Lighting - Zero88 Betapack 3 - SXS Events
Lighting - Zero88 Betapack 3 - SXS Events
Lighting - Zero88 Betapack 3 - SXS Events

Create successful ePaper yourself
Turn your PDF publications into a flip-book with our unique Google optimized e-Paper software.
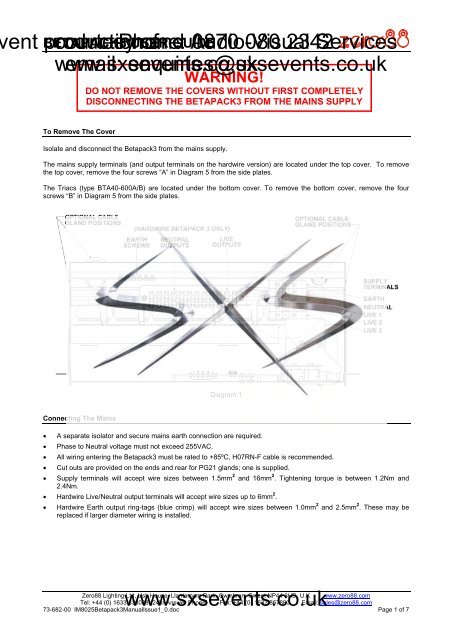
ent BETAPACK3 production courtesy Phone: USER of and GUIDE Audio-Visual 0870 080 2342 Serviceswww.sxsevents.co.ukemail: enquiries@sxsevents.co.ukWARNING!DO NOT REMOVE THE COVERS WITHOUT FIRST COMPLETELYDISCONNECTING THE BETAPACK3 FROM THE MAINS SUPPLYTo Remove The CoverIsolate and disconnect the <strong>Betapack</strong>3 from the mains supply.The mains supply terminals (and output terminals on the hardwire version) are located under the top cover. To removethe top cover, remove the four screws “A” in Diagram 5 from the side plates.The Triacs (type BTA40-600A/B) are located under the bottom cover. To remove the bottom cover, remove the fourscrews “B” in Diagram 5 from the side plates.Diagram 1Connecting The Mains• A separate isolator and secure mains earth connection are required.• Phase to Neutral voltage must not exceed 255VAC.• All wiring entering the <strong>Betapack</strong>3 must be rated to +85ºC, H07RN-F cable is recommended.• Cut outs are provided on the ends and rear for PG21 glands; one is supplied.• Supply terminals will accept wire sizes between 1.5mm 2 and 16mm 2 . Tightening torque is between 1.2Nm and2.4Nm.• Hardwire Live/Neutral output terminals will accept wire sizes up to 6mm 2 .• Hardwire Earth output ring-tags (blue crimp) will accept wire sizes between 1.0mm 2 and 2.5mm 2 . These may bereplaced if larger diameter wiring is installed.www.sxsevents.co.uk<strong>Zero88</strong> <strong>Lighting</strong> Ltd, Usk House, Llantarnam Park, Cwmbran, Gwent NP44 3HD, U.K www.zero88.comTel: +44 (0) 1633 838088 (24hr Answer Phone) Fax: +44 (0) 1633 867880 Email: sales@zero88.com73-682-00 IM8025<strong>Betapack</strong>3ManualIssue1_0.doc Page 1 of 7
ent BETAPACK3 production courtesy Phone: USER of and GUIDE Audio-Visual 0870 080 2342 Serviceswww.sxsevents.co.ukemail: enquiries@sxsevents.co.ukThe <strong>Betapack</strong>3 is supplied configured for three-phase star operation as shown in Diagram 2:Diagram 2For single-phase operation, fit the supplied linking bar between the L1, L2 and L3 terminals as shown in Diagram 3:Diagram 3For three-phase delta operation, the 6 neutral wires must be removed from the terminal block, and the crimped ferrulesmust be cut off. Strip the ends of these 6 wires, and reconnect as shown in Diagram 4:Diagram 4www.sxsevents.co.uk<strong>Zero88</strong> <strong>Lighting</strong> Ltd, Usk House, Llantarnam Park, Cwmbran, Gwent NP44 3HD, U.K www.zero88.comTel: +44 (0) 1633 838088 (24hr Answer Phone) Fax: +44 (0) 1633 867880 Email: sales@zero88.com73-682-00 IM8025<strong>Betapack</strong>3ManualIssue1_0.doc Page 2 of 7
ent BETAPACK3 production courtesy Phone: USER of and GUIDE Audio-Visual 0870 080 2342 Serviceswww.sxsevents.co.ukemail: enquiries@sxsevents.co.ukMounting/InstallationIn a 19" RackThe <strong>Betapack</strong>3 is supplied with side brackets fitted for rack mounting.On a wallUndo the four screws ‘X’ to remove the brackets, replace the screws in the holes for future use. Stand the <strong>Betapack</strong>3 onone end. Remove the two screws ‘Y’ (see Diagram 5), fit the brackets as shown and replace screws ‘Y’. Fit the otherbracket on the other end.The wall drilling positions are shown in Diagram 6. WARNING Completely fit one bracket at a time. Removal of all fourscrews ‘Y’ at the same time can allow the heatsink assembly to fall out! Allow a minimum vertical spacing of 130mmbetween packs, and between packs and other equipment. A spacing of 180mm is recommended for ease of wiring andservicing.For Portable UseAn ‘Easicarry’ Option Kit consisting of a handle and four feet is available (Stock No: 00-540-00). Contact your dealer forfurther details. To fit, remove the brackets. Fit the handle using the screws supplied and holes ‘Z’. Fit the four feet to theother end using the holes ‘X’ and ‘Y’. See Diagram 5.Diagram 5VentilationDiagram 6The <strong>Betapack</strong>3 is convection cooled with air flowing over the rear mounted heatsink.When one or more <strong>Betapack</strong>3s are mounted in an enclosed rack, a fan MUST be fitted to ensure that adequate cool airis circulated. Up to three <strong>Betapack</strong>3s may be stacked in free air.www.sxsevents.co.uk<strong>Zero88</strong> <strong>Lighting</strong> Ltd, Usk House, Llantarnam Park, Cwmbran, Gwent NP44 3HD, U.K www.zero88.comTel: +44 (0) 1633 838088 (24hr Answer Phone) Fax: +44 (0) 1633 867880 Email: sales@zero88.com73-682-00 IM8025<strong>Betapack</strong>3ManualIssue1_0.doc Page 3 of 7
ent BETAPACK3 production courtesy Phone: USER of and GUIDE Audio-Visual 0870 080 2342 Serviceswww.sxsevents.co.ukemail: enquiries@sxsevents.co.ukSpecification OverviewThe <strong>Betapack</strong>3 is a well specified versatile dimmer,offering six channels each capable of driving up to10Amp loads.The <strong>Betapack</strong>3 features breakers as standard, preheat,topset and 3 laws per channel, 12 memories, 3 99-stepsequences, local control and DMX patch per channel.An isolated DMX512-A input and loop-through allow forremote operation. When the loop-through plug is notinserted, the DMX line is automatically terminated.Control InterfaceThe main display consists of four seven-segmentdisplays; the data displayed is dependent on the set-upmode of the <strong>Betapack</strong>3. Around the outside of thesedisplays are eight red LEDs which indicate the currentset-up mode of the <strong>Betapack</strong>3. An additional green LEDis used for DMX indication.The <strong>Betapack</strong>3 has a default mode, for operation. Inthis mode non of the set-up mode LEDs will be lit, andthe main display will show the DMX address(es).Default ModeIf a block patch has been set (see ‘DMX Address’below), then the display will show the DMX startaddress of the block.If individual DMX addresses have been set for eachchannel, then the ‘Up & Down’ Arrows can be used toselect which DMX address to display, or alternatively if‘Auto’ is selected, then the display will cycle through allsix DMX addresses. In either case, the DMX address isprefixed by the channel number.Holding down the ‘Enter’ button in default mode willchange the display to ‘Out’, and the top 6 setup LEDs(numbered) will change to displaying an indication ofthe current output levels. Each LED will be lit if thecurrent output level for that channel is greater than20%.Set-up ModesManual ControlMode ButtonThe Mode button is used to cycle through the differentset-up modes. They are;- Manual control- DMX address- DMX fail- Memory- Sequence- Preheat- Topset- LawEnter ButtonThe Enter button is used to confirm actions.Up & Down ButtonsThese are used to adjust the values shown in the maindisplay. Pressing both buttons together will reset thedisplay to the default values.The Manual Control Mode allows the user to set-up alook on the <strong>Betapack</strong>3 without the need of an externalcontroller.Select ‘Manual’ mode using the ‘Mode’ button. Thedisplay will show C.LLL, where C is the channel numberand LLL is the level. Select the channel you require or‘A’ for all channels, using the ‘Up & Down’ Arrows andpress ‘Enter’. Now set the level you require using the‘Up & Down’ Arrows and press ‘Enter’ again to confirmand move back to the channel selection.The Manual Control levels are reset to zero if power tothe <strong>Betapack</strong>3 is lost.DMX AddressThere are 2 ways that the <strong>Betapack</strong>3 can be patched –a single DMX start address can be set for the block of 6channels (block patch), or each channel can be given adifferent DMX start address.For block patch, the range of DMX start addresses is001 – 507. For individual patch, the range of DMX startaddresses is 001 – 512www.sxsevents.co.uk<strong>Zero88</strong> <strong>Lighting</strong> Ltd, Usk House, Llantarnam Park, Cwmbran, Gwent NP44 3HD, U.K www.zero88.comTel: +44 (0) 1633 838088 (24hr Answer Phone) Fax: +44 (0) 1633 867880 Email: sales@zero88.com73-682-00 IM8025<strong>Betapack</strong>3ManualIssue1_0.doc Page 4 of 7
ent BETAPACK3 production courtesy Phone: USER of and GUIDE Audio-Visual 0870 080 2342 Serviceswww.sxsevents.co.ukemail: enquiries@sxsevents.co.ukSelect ‘DMX ADR’ using the ‘Mode’ button, the displaywill show C.AAA, where C is the channel number andAAA is the current DMX address for that channel.Select the channel you require (1-6), or ‘A’ for allchannels (block patch), using the ‘Up & Down’ Arrowsand press ‘Enter’. Now set the address you requireusing the ‘Up & Down’ Arrows and press ‘Enter’ againto confirm and move back to the channel selection.DMX FailThere are four DMX fail modes available – ‘hold DMX’,‘fade to black’, ‘fade to memory’ and ‘fade to sequence’.Select ‘DMX Fail’ using the ‘Mode’ button. Using the‘Up & Down’ Arrows select your preferred choice fromthe list below;Fail ModeHold Last StateMain DisplayHoldFade to Zero F 00Fade to Memory 1 - 12 F 01 – F 12Fade to Sequence 1 - 3 S 01 – S 03If there is no DMX present, the selectedmemory/sequence will be re-called immediately.1. Program the required looks using the ‘Memories’function (see above).2. Select ‘Sequence’ using the ‘Mode’ button.3. Use the ‘Up & Down’ Arrows to select the requiredsequence (the number of steps alreadyprogrammed in each sequence is shown after thesequence number on the display), and press the‘Enter’ button to confirm.4. The display will now change to show the currentstep number, followed by the memory currentlyprogrammed in that step. Use the ‘Up & Down’Arrows to select the required step number (or Fadetime ‘F’ or dwell time ‘d’), and press the ‘Enter’button to confirm.5.For steps:If there is no DMX present, the selected memorywill be immediately re-called. Use the ‘Up & Down’Arrows to select the memory for that step, andpress the ‘Enter’ button to confirm. Onlyprogrammed memories may be selected. If thestep is at the end of the sequence, then the stepnumber will automatically increment and furthersteps may now be programmed in the same way.Otherwise the display will return to step numberselection mode.MemoriesThe <strong>Betapack</strong>3 will store 12 memories for stand aloneoperation, these can only be re-called if there is noDMX present.1. Set-up the scene using the ‘Manual’ controlfunction or a DMX controller.2. Select ‘Memory’ using the ‘Mode’ button.Using the ‘Up & Down’ Arrows select the requiredmemory number and press the ‘Enter’ button to confirm.A ‘p’ should appear next to the memory to signify that ithas been programmed.Holding both the ‘Up & Down’ Arrows for 1 second willclear the selected memory. If these buttons are held for5 seconds, ALL memories will be cleared.If memories are cleared which are used in sequences,they will be removed automatically from thosesequences.SequencesFor fade and dwell times:If there is no DMX present, the sequence will nowrun. Use the ‘Up & Down’ Arrows to change thetime, and press the ‘Enter’ button to confirm.When done, or to return to sequence selection mode(step 3 above) at any point, press and hold the ‘Enter’button for 1s.At step 3 above, holding both the ‘Up & Down’ Arrowsfor 1 second will clear the selected sequence. If thesebuttons are held for 5 seconds, ALL sequences will becleared.At step 5 above, if the selected step is at the end of thesequence, holding both the ‘Up & Down’ Arrows willclear the selected step.PreheatPreheat can be selected on a per channel or all channelbasis. The preheat level is 5% and cannot be adjusted.Select ‘Preheat’ by cycling through the modes usingthe ‘Mode’ button.The <strong>Betapack</strong>3 will store 3 sequences of up to 99-stepseach. Each step is a link to one of the 12 programmedmemories. Sequences can only be replayed if there isno DMX present.Each sequence can have a fade time (0-60s) and dwelltime (1-60s) programmed. It is only possible to addsteps to or remove steps from the end of a sequence.Select required channel or ‘A’ for all channels, using the‘Up & Down’ Arrows and press ‘Enter’, to confirm.Now select on/off using the ‘Up & Down’ Arrows. Press‘Enter’ to confirm and return to the channel selection.Note that Preheat is only applied if there is a DMX inputpresent, and the law is not set to ‘Switch’.www.sxsevents.co.uk<strong>Zero88</strong> <strong>Lighting</strong> Ltd, Usk House, Llantarnam Park, Cwmbran, Gwent NP44 3HD, U.K www.zero88.comTel: +44 (0) 1633 838088 (24hr Answer Phone) Fax: +44 (0) 1633 867880 Email: sales@zero88.com73-682-00 IM8025<strong>Betapack</strong>3ManualIssue1_0.doc Page 5 of 7
ent BETAPACK3 production courtesy Phone: USER of and GUIDE Audio-Visual 0870 080 2342 Serviceswww.sxsevents.co.ukemail: enquiries@sxsevents.co.ukTopsetTopset can be selected on a per channel or all channelbasis. On the <strong>Betapack</strong>3, Topset is applied as a limiting(not scaling) value.Select ‘Topset’ by cycling through the modes using the‘Mode’ button.Select required channel or ‘A’ for all channels, using the‘Up & Down’ Arrows and press ‘Enter’, to confirm.Now select the topset level you require, again using the‘Up & Down’ Arrows and press ‘Enter’ to confirm andreturn to the channel selection.Note that if the law is set to ‘Switch’, the setting inTopset will instead be used to determine theswitchpoint. The ‘Topset’ LED will flash in this case, toindicate the setting being made.Dimmer LawsThree dimmer laws are available, which can beselected per channel.Select ‘Law’ mode using the ‘Mode’ button. Using the‘Up & Down’ Arrows select the channel required, or ‘A’for all channels. Press ‘Enter’ to confirm. Now selectthe law you require, again using the ‘Up & Down’Arrows and press ‘Enter’ to confirm and return to thechannel selection.Output LawNormalSwitchLinearMain DisplaynNote that if the law is set to Switch, the switchpoint canbe set in the ‘Topset’ menu.SL‘Mode’ button now will only cycle between ManualControl and Default Mode.If Super User is entered when the <strong>Betapack</strong>3 is locked,only the unlock function will be available. The displaywill show “UNL”. To unlock the <strong>Betapack</strong>3, press andhold the ‘Enter’ button for 5 seconds. The <strong>Betapack</strong>3will unlock and exit super user returning to the Defaultmode.Resetting The <strong>Betapack</strong>3Press the ‘Up & Down’ Arrows until the display shows“rset”. Press ‘Enter’ to confirm. The display will flashbriefly to confirm this action. The <strong>Betapack</strong>3 will bereset to its default settings, shown in the table below:Set Up ParameterStateManual Control LevelsAll OffDMX Addresses Block patch at 001DMX Fail ModeHold Last StateMemoryAll Memories ClearedSequence All Sequences ClearedPreheatOff (0%) for all channelsTopset100% for all channelsLawNormal law for all channelsSwitch law switchpoint 50% for all channelsFirmware VersionTo identify which version of firmware is loaded in the<strong>Betapack</strong>3, press the ‘Up & Down’ Arrows until thefirmware version is shown in the display (e.g. 01.00)Press and hold the ‘Enter’ button for 1s, and the<strong>Betapack</strong>3’s CPU serial number will be displayed.Press the ‘Enter’ button again to return to the versiondisplay. Note that the firmware version will also beshown briefly on start up.Internal TemperatureSuper UserThe <strong>Betapack</strong>3 has a number of hidden functions,located in the Super User Menu. The super usermenus can only be accessed from the Default mode(no LEDs lit). To enter Super User press and hold the‘Up & Down’ Arrows together and press and hold the‘Mode’ button for 5 seconds. All the mode LEDs willflash to indicate the <strong>Betapack</strong>3 is in super user mode.Press the ‘Up & Down’ Arrows until the temperature isshown in the display, shown as xxxC, where xxx is thetemperature in Centigrade. The ‘Enter’ button has nofunction in this mode.The ‘Up & Down’ Arrows are used to cycle through thevarious super user functions. Pressing the ‘Mode’button at any point will revert to normal operation. If nobuttons are pressed after 20 seconds the unit willautomatically revert to normal operation.Dimmer Lock/UnlockPress the ‘Up & Down’ Arrows until the display shows“LOC”. Press ‘Enter’ to confirm this action. The<strong>Betapack</strong>3 will revert to the Default mode. Pressing thewww.sxsevents.co.uk<strong>Zero88</strong> <strong>Lighting</strong> Ltd, Usk House, Llantarnam Park, Cwmbran, Gwent NP44 3HD, U.K www.zero88.comTel: +44 (0) 1633 838088 (24hr Answer Phone) Fax: +44 (0) 1633 867880 Email: sales@zero88.com73-682-00 IM8025<strong>Betapack</strong>3ManualIssue1_0.doc Page 6 of 7
ent BETAPACK3 production courtesy Phone: USER of and GUIDE Audio-Visual 0870 080 2342 ServicesTechnical www.sxsevents.co.ukemail: enquiries@sxsevents.co.ukDMX IndicationWARNINGDO NOT REMOVE THE COVERS WITHOUTFIRST COMPLETELY DISCONNECTING THEBETAPACK3 FROM THE MAINS SUPPLYElectricalThe <strong>Betapack</strong>3 is designed to operate on 230VAC+10% -15% at 50-60Hz (auto sensing). The pack maynot operate satisfactorily outside this specification.The packs may be wired:• Single Phase: 60A 1 phase 2-wire 230V(255V max phase to neutral)Earth leakage less than 1mA• Three Phase Star: 20A 4-wire 230/380V(255V max phase to neutral)Earth leakage less than 1mA• Three Phase Delta: 30A 3-wire 230V(255V max phase to phase)Earth leakage less than 4mA- Max total load: 13.9kW @ 230V- Load per channel: 0.1A Min; 10A Max- No load consumption: 10W- Rise Time: 80uS- Triac Type: BTA40-600A/BIf used in conjunction with MCBs, to avoid nuisancetripping use high inrush current (Type K) MCBs.OnFlashFastFlashSlowOffMechanical- Height: 175mm- Width: 440mm- Depth: 195mm- Weight: 8.0kg (17.6lb)CoolingDMX dimmer data (start byte of00) being received OK.DMX data being received, but notdimmer data (start byte of 00)DMX data errors occurring.No DMX data being received.Ambient Temperature: 0 to +40ºC.The <strong>Betapack</strong>3 is convection cooled, and includes atemperature sensor which monitors the internaltemperature. If the temperature rises above the normaloperating level the outputs are first reduced, thenswitched off altogether until the temperature falls backto a safe level.The table below shows how the <strong>Betapack</strong>3 will reactunder these conditions. (Note: The temperature shownon the display will be the actual temperature not therounded figures given below)<strong>Lighting</strong> loads may be resistive or inductive and includetungsten, transformer driven low voltage (e.g. pinspots),and quartz halogen. Electronic transformers must besuitable for leading edge dimming.Portable Appliance TestingWARNING The <strong>Betapack</strong>3 will fail the portableappliance high voltage test as it has capacitorsconnected between Live 1/2/3 and Earth, and betweenNeutral and Earth, to enable it to comply with CEregulations.DMX ConnectionsConforms to USITT DMX512-A (isolated).One male and one female 5 pin XLR connector. DMXline is automatically terminated when the loop-throughplug is not inserted. The pin assignment is:Pin 1Pin 2Pin 3Pin 4Pin 50VDMX- (RS485 B line)DMX+ (RS485 A line)ReservedReservedNotes:TemperatureOutput Levels(% of control)Maindisplay95ºC 0% “hot”sensor fault 100% “err”Zero 88 <strong>Lighting</strong> Ltd reserves the right to make changes to theequipment described in this manual without prior notice.This equipment is designed for professional stage lightingcontrol, and is unsuitable for any other purpose. It should beused by, or under the supervision of, an appropriately qualifiedor trained person.E&OE. <strong>Zero88</strong> <strong>Lighting</strong> Ltd reserves the right to change thespecification without prior notice.Manual Stock Number: 73-682-00 Issue 1.0: July 2006© Zero 88 <strong>Lighting</strong> Ltd 2006www.sxsevents.co.uk<strong>Zero88</strong> <strong>Lighting</strong> Ltd, Usk House, Llantarnam Park, Cwmbran, Gwent NP44 3HD, U.K www.zero88.comTel: +44 (0) 1633 838088 (24hr Answer Phone) Fax: +44 (0) 1633 867880 Email: sales@zero88.com73-682-00 IM8025<strong>Betapack</strong>3ManualIssue1_0.doc Page 7 of 7