

Classic Shaker Side Table - Popular Woodworking Magazine
Classic Shaker Side Table - Popular Woodworking Magazine
Classic Shaker Side Table - Popular Woodworking Magazine
- No tags were found...

Create successful ePaper yourself
Turn your PDF publications into a flip-book with our unique Google optimized e-Paper software.
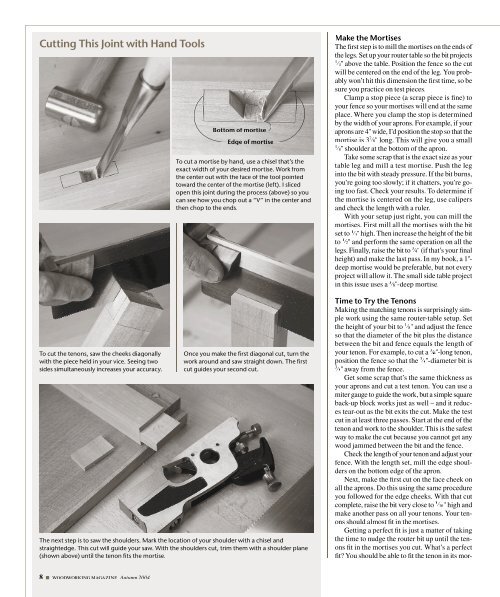
Cutting This Joint with Hand ToolsTo cut the tenons, saw the cheeks diagonallywith the piece held in your vice. Seeing twosides simultaneously increases your accuracy.Bottom of mortiseEdge of mortiseTo cut a mortise by hand, use a chisel that’s theexact width of your desired mortise. Work fromthe center out with the face of the tool pointedtoward the center of the mortise (left). I slicedopen this joint during the process (above) so youcan see how you chop out a “V” in the center andthen chop to the ends.Once you make the first diagonal cut, turn thework around and saw straight down. The firstcut guides your second cut.The next step is to saw the shoulders. Mark the location of your shoulder with a chisel andstraightedge. This cut will guide your saw. With the shoulders cut, trim them with a shoulder plane(shown above) until the tenon fits the mortise.Make the MortisesThe first step is to mill the mortises on the ends ofthe legs. Set up your router table so the bit projects1 ⁄ 4 " above the table. Position the fence so the cutwill be centered on the end of the leg. You probablywon’t hit this dimension the first time, so besure you practice on test pieces.Clamp a stop piece (a scrap piece is fine) toyour fence so your mortises will end at the sameplace. Where you clamp the stop is determinedby the width of your aprons. For example, if youraprons are 4" wide, I’d position the stop so that themortise is 3 7 ⁄ 8 " long. This will give you a small1 ⁄ 8 " shoulder at the bottom of the apron.Take some scrap that is the exact size as yourtable leg and mill a test mortise. Push the leginto the bit with steady pressure. If the bit burns,you’re going too slowly; if it chatters, you’re goingtoo fast. Check your results. To determine ifthe mortise is centered on the leg, use calipersand check the length with a ruler.With your setup just right, you can mill themortises. First mill all the mortises with the bitset to 1 ⁄ 4 " high. Then increase the height of the bitto 1 ⁄ 2 " and perform the same operation on all thelegs. Finally, raise the bit to 3 ⁄ 4 "(if that’s your finalheight) and make the last pass. In my book, a 1"-deep mortise would be preferable, but not everyproject will allow it. The small side table projectin this issue uses a 3 ⁄ 8 "-deep mortise.Time to Try the TenonsMaking the matching tenons is surprisingly simplework using the same router-table setup. Setthe height of your bit to 1 ⁄ 8 " and adjust the fenceso that the diameter of the bit plus the distancebetween the bit and fence equals the length ofyour tenon. For example, to cut a 3 ⁄ 4 "-long tenon,position the fence so that the 3 ⁄ 8 "-diameter bit is3 ⁄ 8 " away from the fence.Get some scrap that’s the same thickness asyour aprons and cut a test tenon. You can use amiter gauge to guide the work, but a simple squareback-up block works just as well – and it reducestear-out as the bit exits the cut. Make the testcut in at least three passes. Start at the end of thetenon and work to the shoulder. This is the safestway to make the cut because you cannot get anywood jammed between the bit and the fence.Check the length of your tenon and adjust yourfence. With the length set, mill the edge shoulderson the bottom edge of the apron.Next, make the first cut on the face cheek onall the aprons. Do this using the same procedureyou followed for the edge cheeks. With that cutcomplete, raise the bit very close to 3 ⁄ 16 " high andmake another pass on all your tenons. Your tenonsshould almost fit in the mortises.Getting a perfect fit is just a matter of takingthe time to nudge the router bit up until the tenonsfit in the mortises you cut. What’s a perfectfit? You should be able to fit the tenon in its mor-8 ■ woodworking magazine Autumn 2004


