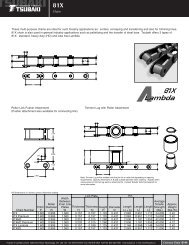
Tsubaki Power Lock Inch Series
Tsubaki Power Lock Inch Series
Tsubaki Power Lock Inch Series
- No tags were found...

Create successful ePaper yourself
Turn your PDF publications into a flip-book with our unique Google optimized e-Paper software.
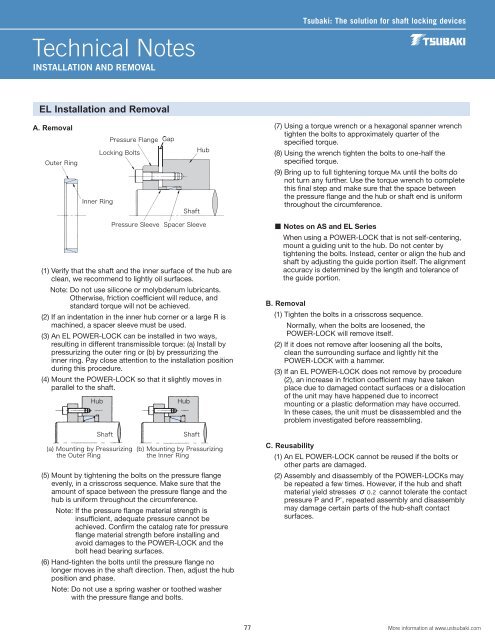
Technical NotesINSTALLATION AND REMOVAL<strong>Tsubaki</strong>: The solution for shaft locking devicesEL Installation and RemovalA. Removal(7) Using a torque wrench or a hexagonal spanner wrenchtighten the bolts to approximately quarter of thespecified torque.(8) Using the wrench tighten the bolts to one-half thespecified torque.(9) Bring up to full tightening torque MA until the bolts donot turn any further. Use the torque wrench to completethis final step and make sure that the space betweenthe pressure flange and the hub or shaft end is uniformthroughout the circumference.(1) Verify that the shaft and the inner surface of the hub areclean, we recommend to lightly oil surfaces.Note: Do not use silicone or molybdenum lubricants.Otherwise, friction coefficient will reduce, andstandard torque will not be achieved.(2) If an indentation in the inner hub corner or a large R ismachined, a spacer sleeve must be used.(3) An EL POWER-LOCK can be installed in two ways,resulting in different transmissible torque: (a) Install bypressurizing the outer ring or (b) by pressurizing theinner ring. Pay close attention to the installation positionduring this procedure.(4) Mount the POWER-LOCK so that it slightly moves inparallel to the shaft.■ Notes on AS and EL <strong>Series</strong>When using a POWER-LOCK that is not self-centering,mount a guiding unit to the hub. Do not center bytightening the bolts. Instead, center or align the hub andshaft by adjusting the guide portion itself. The alignmentaccuracy is determined by the length and tolerance ofthe guide portion.B. Removal(1) Tighten the bolts in a crisscross sequence.Normally, when the bolts are loosened, thePOWER-LOCK will remove itself.(2) If it does not remove after loosening all the bolts,clean the surrounding surface and lightly hit thePOWER-LOCK with a hammer.(3) If an EL POWER-LOCK does not remove by procedure(2), an increase in friction coefficient may have takenplace due to damaged contact surfaces or a dislocationof the unit may have happened due to incorrectmounting or a plastic deformation may have occurred.In these cases, the unit must be disassembled and theproblem investigated before reassembling.(5) Mount by tightening the bolts on the pressure flangeevenly, in a crisscross sequence. Make sure that theamount of space between the pressure flange and thehub is uniform throughout the circumference.Note: If the pressure flange material strength isinsufficient, adequate pressure cannot beachieved. Confirm the catalog rate for pressureflange material strength before installing andavoid damages to the POWER-LOCK and thebolt head bearing surfaces.(6) Hand-tighten the bolts until the pressure flange nolonger moves in the shaft direction. Then, adjust the hubposition and phase.Note: Do not use a spring washer or toothed washerwith the pressure flange and bolts.C. Reusability(1) An EL POWER-LOCK cannot be reused if the bolts orother parts are damaged.(2) Assembly and disassembly of the POWER-LOCKs maybe repeated a few times. However, if the hub and shaftmaterial yield stresses σ0.2 cannot tolerate the contactpressure P and P', repeated assembly and disassemblymay damage certain parts of the hub-shaft contactsurfaces.77More information at www.ustsubaki.com