1955-57 power brake pedal conversion - Eckler's Classic Chevy
1955-57 power brake pedal conversion - Eckler's Classic Chevy
1955-57 power brake pedal conversion - Eckler's Classic Chevy
- No tags were found...

Create successful ePaper yourself
Turn your PDF publications into a flip-book with our unique Google optimized e-Paper software.
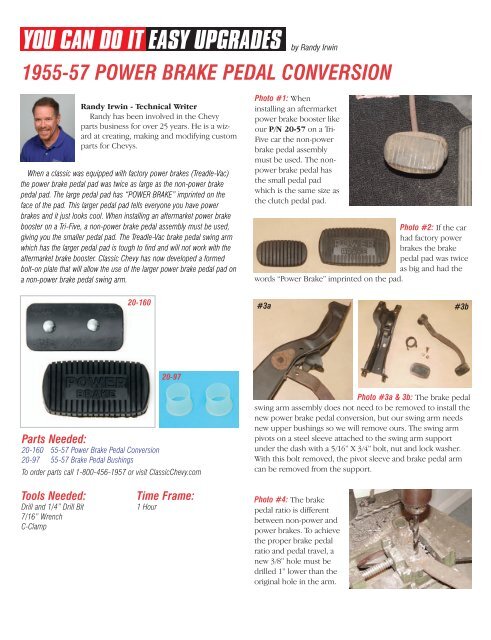
y Randy Irwin<strong>1955</strong>-<strong>57</strong> POWER BRAKE PEDAL CONVERSIONRandy Irwin - Technical WriterRandy has been involved in the <strong>Chevy</strong>parts business for over 25 years. He is a wizardat creating, making and modifying customparts for <strong>Chevy</strong>s.When a classic was equipped with factory <strong>power</strong> <strong>brake</strong>s (Treadle-Vac)the <strong>power</strong> <strong>brake</strong> <strong>pedal</strong> pad was twice as large as the non-<strong>power</strong> <strong>brake</strong><strong>pedal</strong> pad. The large <strong>pedal</strong> pad has “POWER BRAKE” imprinted on theface of the pad. This larger <strong>pedal</strong> pad tells everyone you have <strong>power</strong><strong>brake</strong>s and it just looks cool. When installing an aftermarket <strong>power</strong> <strong>brake</strong>booster on a Tri-Five, a non-<strong>power</strong> <strong>brake</strong> <strong>pedal</strong> assembly must be used,giving you the smaller <strong>pedal</strong> pad. The Treadle-Vac <strong>brake</strong> <strong>pedal</strong> swing armwhich has the larger <strong>pedal</strong> pad is tough to find and will not work with theaftermarket <strong>brake</strong> booster. <strong>Classic</strong> <strong>Chevy</strong> has now developed a formedbolt-on plate that will allow the use of the larger <strong>power</strong> <strong>brake</strong> <strong>pedal</strong> pad ona non-<strong>power</strong> <strong>brake</strong> <strong>pedal</strong> swing arm.Photo #1: Wheninstalling an aftermarket<strong>power</strong> <strong>brake</strong> booster likeour P/N 20-<strong>57</strong> on a Tri-Five car the non-<strong>power</strong><strong>brake</strong> <strong>pedal</strong> assemblymust be used. The non<strong>power</strong><strong>brake</strong> <strong>pedal</strong> hasthe small <strong>pedal</strong> padwhich is the same size asthe clutch <strong>pedal</strong> pad.Photo #2: If the carhad factory <strong>power</strong><strong>brake</strong>s the <strong>brake</strong><strong>pedal</strong> pad was twiceas big and had thewords “Power Brake” imprinted on the pad.20-160#3a #3b20-97Parts Needed:20-160 55-<strong>57</strong> Power Brake Pedal Conversion20-97 55-<strong>57</strong> Brake Pedal BushingsTo order parts call 1-800-456-19<strong>57</strong> or visit <strong>Classic</strong><strong>Chevy</strong>.comPhoto #3a & 3b: The <strong>brake</strong> <strong>pedal</strong>swing arm assembly does not need to be removed to install thenew <strong>power</strong> <strong>brake</strong> <strong>pedal</strong> <strong>conversion</strong>, but our swing arm needsnew upper bushings so we will remove ours. The swing armpivots on a steel sleeve attached to the swing arm supportunder the dash with a 5/16” X 3/4” bolt, nut and lock washer.With this bolt removed, the pivot sleeve and <strong>brake</strong> <strong>pedal</strong> armcan be removed from the support.Tools Needed:Drill and 1/4” Drill Bit7/16” WrenchC-ClampTime Frame:1 HourPhoto #4: The <strong>brake</strong><strong>pedal</strong> ratio is differentbetween non-<strong>power</strong> and<strong>power</strong> <strong>brake</strong>s. To achievethe proper <strong>brake</strong> <strong>pedal</strong>ratio and <strong>pedal</strong> travel, anew 3/8” hole must bedrilled 1” lower than theoriginal hole in the arm.
#5a #5bPhoto #8: The P/N20-97 bushings atthe top of the<strong>brake</strong> <strong>pedal</strong> swingarm simply press inplace.Photo #5a & 5b: The <strong>power</strong> <strong>brake</strong> <strong>pedal</strong> <strong>conversion</strong> kit isdesigned to be bolted in place, but can be welded if you wish.The kit includes the large <strong>power</strong> <strong>brake</strong> rubber pad, the steel<strong>pedal</strong> plate and mounting hardware. The mounting plate iscurved to match the contour of the original <strong>pedal</strong> plate.#6a#6cPhoto #9a & 9b: Now simply install the new rubber pad on thenew large <strong>pedal</strong> plate and reinstall the swing arm. Now the carwill have a factory <strong>power</strong> <strong>brake</strong> <strong>pedal</strong> pad and look super!Good Luck!#6bPhoto #6a & 6b & 6c: Theholes in the new plate areoffset slightly to move the<strong>pedal</strong> to the left of thesteering column allowingfor more <strong>brake</strong> <strong>pedal</strong> to gas<strong>pedal</strong> clearance. Clamp the<strong>pedal</strong> plate in place andusing the holes in the plate,drill two 1/4” holes throughthe original <strong>brake</strong> <strong>pedal</strong>plate.#7a #7bPhoto #7a & 7b: Using the supplied 1/4” carriage bolts, nutsand lock washers, bolt the new plate to the original <strong>pedal</strong> plate.Here you can see the slight offset in the new <strong>pedal</strong> plate.