MIDI Quantizing and Humanizing Functions in Cubase
MIDI Quantizing and Humanizing Functions in Cubase
MIDI Quantizing and Humanizing Functions in Cubase

You also want an ePaper? Increase the reach of your titles
YUMPU automatically turns print PDFs into web optimized ePapers that Google loves.
<strong>MIDI</strong> <strong>Quantiz<strong>in</strong>g</strong> <strong>and</strong> <strong>Humaniz<strong>in</strong>g</strong> <strong>Functions</strong><br />
<strong>in</strong> <strong>Cubase</strong><br />
by Piotr Musiał<br />
Note: This tutorial was made us<strong>in</strong>g <strong>Cubase</strong> 4 Studio<br />
Hi. My name is Piotr Musiał <strong>and</strong> I welcome You to my next tutorial!<br />
Today, we are go<strong>in</strong>g to talk a little bit about some usueful quantiz<strong>in</strong>g functions <strong>in</strong><br />
<strong>Cubase</strong> – what they are, what they do, how to setup custom quantize <strong>and</strong> step by<br />
step, we'll use quantiz<strong>in</strong>g <strong>and</strong> midi edition tools to humanize an example (Storm)drum<br />
track.<br />
This tutorial won't deal with dilema whether to quantize or not. Many composers do<br />
not quantize at all – they record parts by a midi keyboard or midi controler, until it<br />
satisfies them. Yeah, why not? Some do not have keyboard <strong>and</strong> put music <strong>in</strong>to<br />
sequencer <strong>in</strong> note edition or <strong>in</strong> key editor (piano roll). Some are not that good piano<br />
players. So, they have the option to leave their bad performances or straight noteputs<br />
<strong>in</strong> their compositions or to you some cool basic tools to change it <strong>and</strong> make it<br />
sound better.<br />
If you are already familiar with quantization <strong>and</strong> midi edition functions <strong>in</strong> <strong>Cubase</strong> or do<br />
not use this sequencer, keep read<strong>in</strong>g this tutorial, as you may learn some new<br />
techniques or tricks as well.<br />
PART 1<br />
INTRODUCTION<br />
SIMPLE QUANTIZING<br />
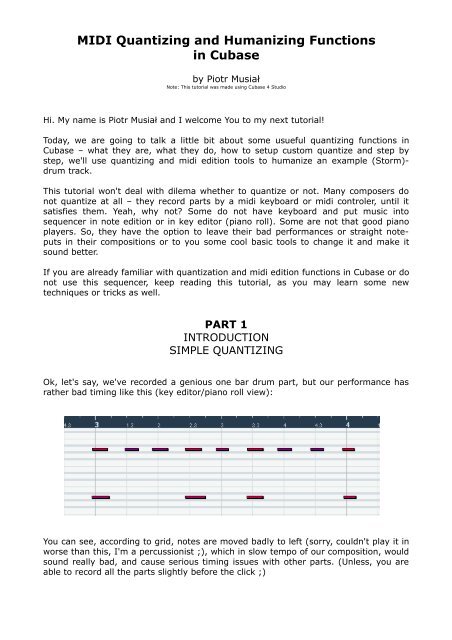
Ok, let's say, we've recorded a genious one bar drum part, but our performance has<br />
rather bad tim<strong>in</strong>g like this (key editor/piano roll view):<br />
You can see, accord<strong>in</strong>g to grid, notes are moved badly to left (sorry, couldn't play it <strong>in</strong><br />
worse than this, I'm a percussionist ;), which <strong>in</strong> slow tempo of our composition, would<br />
sound really bad, <strong>and</strong> cause serious tim<strong>in</strong>g issues with other parts. (Unless, you are<br />
able to record all the parts slightly before the click ;)
Straight quantize (keyboard shortcut – Q) to 8-th notes (1/8) -><br />
performance, should result <strong>in</strong> someth<strong>in</strong>g like this*:<br />
* Note: If you changed Quantize Sett<strong>in</strong>gs (menu-> <strong>MIDI</strong>-> Quantize Sett<strong>in</strong>gs...) before, then for straight quantiz<strong>in</strong>g<br />
make sure you have r<strong>and</strong>om quantize, non quantize <strong>and</strong> sw<strong>in</strong>g set to 0.<br />
And this way, we can have nice, totally straight 8ths. We've just quantized our bad<br />
record<strong>in</strong>g to 8ths. All notes were moved to closest quantize grid position.<br />
If we want, we can quantize to:<br />
– straight: 1/1, 1/2, 1/4, 1/8, 1/16 etc.<br />
– tripplets: 1/2 tripplet, 1/4 tripplet, 1/8 tripplet etc.<br />
– dotted: 1/1, 1/2, 1/4, 1/8, 1/16 etc – to clarify – for example, if you have a 6/8<br />
bar, <strong>and</strong> Q set to dotted 1/8 it will divide it <strong>in</strong>to 4 even 8ths with a dot. Quite useful<br />
<strong>in</strong> 3/4, 6/8 bars <strong>and</strong> so on.<br />
What for?<br />
Straight quantiz<strong>in</strong>g may be very usefull when creat<strong>in</strong>g electronic tracks, requir<strong>in</strong>g<br />
straight notes – pumpy kick drum.<br />
PART 2<br />
ITERATIVE QUANTIZE<br />
Iterative quantize works different than simple quantize. The difference, is that<br />
iterative quantize won't move all notes straight to the closest quantize grid position,<br />
but accord<strong>in</strong>g to sett<strong>in</strong>gs (menu-> <strong>MIDI</strong>-> Quantize Sett<strong>in</strong>gs-> Iterative strenght) will<br />
move an x% of way between it's current position to the closest quantize grid position.<br />
This way, a bad record<strong>in</strong>g, could be straighten up, just a little bit.<br />
This is k<strong>in</strong>d of step by step quantize, so if you don't won't to make your record<strong>in</strong>g<br />
sound too robotish, you can set iterative strenght to, say, 10%, <strong>and</strong> use Iterative<br />
Quantize function couple of times, untill you f<strong>in</strong>d the result satisfy<strong>in</strong>g.<br />
What for?<br />
You are a good keyboard player, but want to improve tim<strong>in</strong>g of your record<strong>in</strong>gs JUST a<br />
little bit? This function is for you.
PART 3<br />
FIXED LENGHTS<br />
GOOD TO KNOW<br />
In Key editor/piano roll we have also option to quantize lenghts (lenght<br />
Q) of notes to a fixed value, that may be <strong>in</strong>dependent of quantize<br />
sett<strong>in</strong>gs, but also l<strong>in</strong>ked to them, so if we want straight 8ths with 8ths<br />
lenght, then we set Q to 1/8 <strong>and</strong> lenght Q to „Quantize L<strong>in</strong>k”, or to 1/8 manually. To<br />
do so automaticaly, we select desired length Q, then select notes <strong>and</strong> go to menu-<br />
><strong>MIDI</strong>-><strong>Functions</strong>->Fixed Lenghts. Voila!<br />
What for?<br />
Fixed lenghts function may be useful to <strong>in</strong>crese notes release time especially <strong>in</strong> slow<br />
tempo. Besides that, it sometimes simply looks better <strong>and</strong> may be easier to edit. I use<br />
it if I create parts <strong>in</strong> key editor/piano roll – for example str<strong>in</strong>gs staccato – for shorter<br />
16th notes sound, I choose 1/32th lenghts, <strong>and</strong> for longer, I fix their lenghts to full<br />
16ths.<br />
PART 4<br />
QUANTIZE SETUP...<br />
Ok. Now, when we are aware of what quantize function does, why don't we take a<br />
look at Quantize Setup? (menu-> <strong>MIDI</strong>-> Quantize Setup...)
All right, guys, what do we have here?<br />
Grid Quantize – this is a base of this whole function, <strong>and</strong> we can here:<br />
– set the Grid to a value of 1/1 to 1/128 notes. Let's take 1/8 for example.<br />
– chose Type of the Grid – if it's straight, tripplet or dotted (see Part 1 for details)<br />
– set sw<strong>in</strong>g strenght <strong>in</strong> % for the grid:<br />
0% is straight grid – for example straight 8ths =<br />
100% is sw<strong>in</strong>g made of tripples =<br />
values between will mean a shuffle – type of sw<strong>in</strong>g,<br />
pretty cool for some type of music.<br />
– set tuplet type – for example you want 5ths tuplets on every beat <strong>in</strong> 4/4 bar – set<br />
grid to 1/4 <strong>and</strong> tuplet to 5. Done!<br />
– Set Magnetic Area – not all notes have to be affected by quantize, you may mark<br />
the area <strong>in</strong> the bar, that will be affected by sett<strong>in</strong>g magnetic area.<br />
Non Quantize option works <strong>in</strong> opposite to Magnetic area – you can mark the area tha<br />
will not be affected by quantize function.<br />
R<strong>and</strong>om Quantize is a funtion, that is very useful, especially when creat<strong>in</strong>g drum<br />
tracks, spiccato str<strong>in</strong>gs, staccato <strong>in</strong>struments with orchestra etc. By putt<strong>in</strong>g a value<br />
here, you can decide, how accurate quantize is, <strong>and</strong> let it move notes a little bit off<br />
the grid, simulat<strong>in</strong>g human performance. Non Quantize <strong>and</strong> R<strong>and</strong>om Quantize value<br />
strenght depends on the tempo of the track, so if you are compos<strong>in</strong>g a down tempo<br />
song, you should use lower values here, <strong>and</strong> for faster music, use higher.<br />
Iterative Strenght – see Part 2 for details.<br />
The rest options will allow you to save your favourite sett<strong>in</strong>gs, apply quantize now,<br />
autoquantize whatever you will record, <strong>and</strong> chose if you can quantize controllers such<br />
as mod wheel, expression (CC's) etc.<br />
Now, let's set use my favourite of these options – R<strong>and</strong>om Quantize, but first, let's<br />
add some more layers to the drum track like so:
This track is now full of different <strong>in</strong>struments (I used some Stormdrums <strong>and</strong> EWQLSO<br />
Tom-toms). Ok, it's straight like hell <strong>and</strong> very robotish, <strong>and</strong> even if there are many<br />
<strong>in</strong>struments, because they are totally sychronized, they sound weak.<br />
Now, let's go to Quantize Setup <strong>and</strong> set value accord<strong>in</strong>g to the tempo (132bpm <strong>in</strong> my<br />
case), say to 20 ticks. Let's click to apply quantize. Notice, that <strong>in</strong> lower parts, <strong>in</strong> the<br />
second bar (it's 4 th <strong>in</strong> this project), we have 16th tripplets, so I had to quantize it<br />
separately (or f<strong>in</strong>d the closest common grid for all parts which is 32 th tripplet, but it<br />
does work only when your all notes are straightly quantized <strong>in</strong> the first place). The<br />
effect is <strong>in</strong>stantly visible, <strong>and</strong> believe or not, sounds much better – even bigger, <strong>and</strong><br />
you can hear, that there are many <strong>in</strong>struments play<strong>in</strong>g.<br />
Experiment with R<strong>and</strong>om Quantize sett<strong>in</strong>gs, to get the sound, that satisfies you.<br />
PART 5<br />
MORE COOL THINGS<br />
Some of you know, some probably don't but <strong>Cubase</strong> has some great feature called<br />
logical edition. It is quite impossible to discover all of the possibilities of this feature.<br />
Logical operations on midi tracks can be pretty useful, like half tempo or double tempo<br />
or r<strong>and</strong>om selected notes with one click. Especially if you do your own presets, or<br />
modify exist<strong>in</strong>g. I will show you one of my favourite – R<strong>and</strong>om Velocity.<br />
Let's say, you are us<strong>in</strong>g multi velocity layered drum library. You've made excelent bigdrums<br />
loop, it is a little bit unquantized (r<strong>and</strong>om quantize) for simulat<strong>in</strong>g human error,<br />
but it still lacks of this... someth<strong>in</strong>g. Still not human enough.<br />
Go to key editor of this track, <strong>and</strong> run Logical Editor (menu-> <strong>MIDI</strong>-> Logical Editor).<br />
At presets menu, f<strong>in</strong>d R<strong>and</strong>om Velocity (60 to 100) – I'm sure it's present <strong>in</strong> <strong>Cubase</strong> 4<br />
Studio, not sure about previous versions. What can this little bug do? If you apply it to<br />
your midi track, I will change velocity of all notes to a r<strong>and</strong>om value between 60 <strong>and</strong><br />
100.<br />
Ok, I hear you say<strong>in</strong>g - „I already have pretty good velocity dynamics here, so if I<br />
apply this, it will change my velocities <strong>in</strong>to some r<strong>and</strong>om crap!”. And you are right! :)
However, we may modify this preset, so it would only make some m<strong>in</strong>or r<strong>and</strong>om<br />
changes to exist<strong>in</strong>g velocities, not modify them regardless your whole work. Try this:<br />
Instead of „Set R<strong>and</strong>om Values to” let's pick „Set relative R<strong>and</strong>om Values between”.<br />
And as Parameter 1 put a negative value (say „-10” is f<strong>in</strong>e) <strong>and</strong> as Parameter 2 let's<br />
say „10”. Done. Now if you apply it to your highly valuable velocity-important midi<br />
track, it will add OR subtract to each note's velocity a r<strong>and</strong>om value of 10.<br />
Complicated, but pretty cool isn't it? ;)<br />
Try brows<strong>in</strong>g through presets <strong>in</strong> Logical Editor, <strong>and</strong> see what th<strong>in</strong>gs it is capable of.<br />
Some won't be much of use to you, but some, like this one, most probably will. Don't<br />
forget to store a preset if you run <strong>in</strong>to someth<strong>in</strong>g useful. Good luck! :)<br />
I'm open to suggestions <strong>and</strong> requests for new tutorials. If you found a mistake or<br />
have a suggestion, feel free to contact me via e-mail: pietro@toya.net.pl<br />
Have fun!<br />
Piotr Musiał<br />
www.piotrmusial.com<br />
pietro@toya.net.pl