
You also want an ePaper? Increase the reach of your titles
YUMPU automatically turns print PDFs into web optimized ePapers that Google loves.
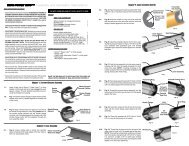
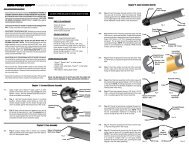
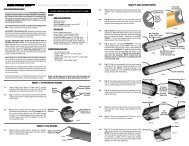
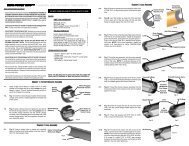
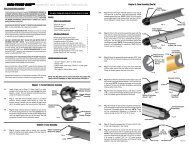
Storage and HandlingStore <strong>AeroTech</strong> rocket motors in a dry place where the temperature will remainbetween 45 0 F and 100 0 F. Do not cut, saw, attempt to alter the size, attempt todisassemble, attempt to modify (except as described in these instructions), or drop an<strong>AeroTech</strong> rocket motor. Do not use an <strong>AeroTech</strong> rocket motor that you believe hasbeen damaged in any way. Do not ignite an <strong>AeroTech</strong> rocket motor indoors. Do notbreathe fumes from the rocket motor exhaust.First AidFor a minor burn, apply a burn ointment. For a severe burn, immerse the burned area inice water at once and see a physician as quickly as possible. In the unlikely event oforal ingestion of the propellant, induce vomiting and see a physician as quickly aspossible. The composite propellant used in <strong>AeroTech</strong> rocket motors consists primarilyof Ammonium Perchlorate and a rubber-like plastic elastomer. Redline propellantalso contains Strontium Nitrate.DisposalPack motor firmly in hole in ground so that only the nozzle is exposed, away frompeople, animals, buildings and flammable materials. Ignite motor electrically from adistance of 30 feet or more. <strong>Pro</strong>pellant, delay and ejection charge (if installed) will burnuntil consumed. Wait 5 minutes and then dispose of the motor casing in inert trash.Fire Safety<strong>AeroTech</strong> composite rocket motors will normally not ignite unless subjected to directflame. Use water to fight any fires in which <strong>AeroTech</strong> rocket motors may becomeinvolved: Direct the water at the <strong>AeroTech</strong> rocket motors to keep them below their 550deg. F autoignition temperature. Foam and carbon dioxide fire extinguishers will NOTextinguish burning propellants of the type used in <strong>AeroTech</strong> rocket motors. Keep rocketmotors away from flames, sources of heat and flammable materials.Disclaimer and WarrantyNOTICE: As we cannot control the storage and use of our products, once sold wecannot assume any responsibility for product storage, transportation or usage. RCSshall not be held responsible for any personal injury or property damage resulting fromthe handling, storage or use of our product. The buyer assumes all risks and liabilitiestherefrom and accepts and uses <strong>AeroTech</strong>/RCS products on these conditions. Nowarranty either expressed or implied is made regarding <strong>AeroTech</strong>/RCS products,except for replacement or repair, at RCS's option, of those products that are proven tobe defective in manufacture within one year from the date of original purchase. In nocase will <strong>AeroTech</strong> warranty a product more than five (5) years after the date ofmanufacture. For repair or replacement under this warranty, please contact RCS. <strong>Pro</strong>ofof purchase will be required. Note: Your state may provide additional rights not coveredby this warranty.<strong>AeroTech</strong> DivisionMade in U.S.A.RCS Rocket Motor Components, Inc. P/N 21049 Rev. 2/12/13Cedar City, UT 84721Certified by the Tripoli Rocketry Associationwww.aerotech-rocketry.com ©2013 RCS Rocket Motor Components, Inc., All rights reserved<strong>Pro</strong>-<strong>SU</strong> Single-Use Adjustable Delay& Ejection Charge Rocket MotorAssembly & Operation <strong>Instructions</strong>DO NOT OPEN ROCKET MOTOR PACKAGING UNTIL READY TO USENote: Motor designation and complete performance specifications (includingsample time-thrust curve) are printed on the <strong>Pro</strong>-<strong>SU</strong> motor label.WARNING-FLAMMABLE: Read <strong>Instructions</strong> Before Use. Use only inaccordance with instructions. Do not smoke near rocket motors andkeep away from open flames and other heat sources. Sale to personsunder 18 years of age prohibited by federal law. For use only bycertified users 18 years of age or older. Ignite by electrical means only.CAUTION: Keep out of reach of children. Motor is hot after firing.Before You Begin:• Do not modify the motor in any way, except as described herein.• If any parts are missing or damaged, please call <strong>AeroTech</strong> at 435-865-7100.Package contents:Other items needed:1. <strong>Pro</strong>-<strong>SU</strong> rocket motor 1. Universal delay drilling tool2. Igniter, ejection charge & thrust ring kit 2. Hobby knife or scissors1. Setting the Time DelayNote: If you want to use the longest (as-supplied) time delay, do not use the delaydrilling tool and instead proceed to step 2.1.1.1 WARNING: Do not smoke and ensure thatthere are no open flames or heat sources nearbywhen setting the time delay. Assemble the<strong>AeroTech</strong> Universal delay drilling tool with thedesired amount of delay time removal (i.e., the - 4or - 8 seconds removal marked on the tool label)facing the exposed drill bit and motor bulkhead.
1.2 Optional: Place the washer between the drillknob and the tool if you want to remove 2 secondsless than the value printed on the tool (i.e., - 2 or - 6seconds removal).2.3 Insert the rounded end of the ejection chargecap into the ejection charge well of the bulkheadand press in completely with the end of the ignitertube or similar object.1.3 Place the open end of the tool over the motorbulkhead, hold the tool and motor firmly againsteach other and turn the drill knob several timesclockwise until the drill knob sits flush against thedrill tool body.2.4 If desired, bond the included thrust ring to thenozzle end of the motor case with cyanoacrylatecement, or use other means to prevent the motorfrom moving in the motor mount tube duringoperation.3. Igniter Installation and Preparation for Flight1.4 Remove the tool and shake out the shavingsfrom the tool and motor bulkhead. Dispose of theshavings by burning with a safe method and in asafe location.CAUTION: Install the igniter in the motor only when the rocket is at the pad and readyfor launch.3.1 Remove the supplied FirstFire igniter from the cardboard tube and straighten theleads.3.2. Strip ½”-1” of insulation from the ends of the leads.3.3 Insert the black-coated end of the igniter into the nozzle opening and push itcompletely into the motor core, until the coated end is touching the time delay elementin the motor bulkhead.2. Installing the Ejection Charge, Ejection Cap & Thrust Ring2.1 Open the supplied igniter, ejection charge and thrust ring kit and remove thecontents.2.2 WARNING: Do not smoke and ensure thatthere are no open flames or heat sources nearbywhen installing the ejection charge. Open theejection charge vial and dispense the desiredamount of black powder ejection charge into theejection charge well of the motor bulkhead. Useabout ½ of the contents of the vial for 2.6” diameterrockets and smaller, and the entire vial for 3” andlarger rockets. Note: additional ejection charge maybe required for rockets exceeding 4” in diameter.3.4 Using a hobby knife or scissors, cut a corneroff the end of the supplied nozzle cap to produce avent hole in the cap about 1/16”-1/8” wide.3.5 Press the open end of the nozzle cap over theexposed nozzle extension to hold the igniter firmlyin place.3.6 Install the motor into the rocket's motor mounttube. Ensure that the motor is securely retained inthe rocket by using positive mechanical means toprevent it from being ejected during recovery system deployment.3.7 Prepare the rocket's recovery system and then launch the rocket in accordance withthe National Association of Rocketry (NAR) and/or Tripoli Rocketry Association (TRA)safety codes. Note: After use, the rocket motor casing may be disposed in inert trash.