PEP9000 - EA1DDO
PEP9000 - EA1DDO
PEP9000 - EA1DDO
- No tags were found...

Create successful ePaper yourself
Turn your PDF publications into a flip-book with our unique Google optimized e-Paper software.
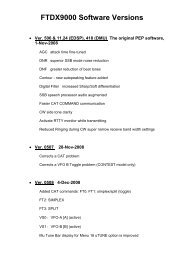
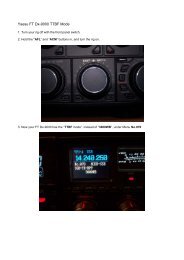
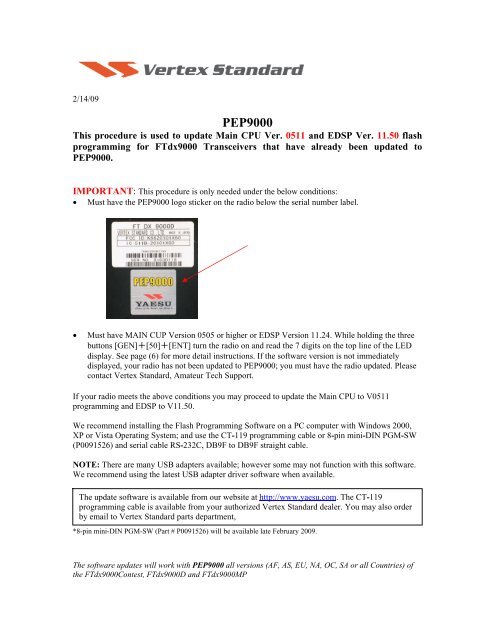
EDSPThis procedure is used for uploading new EDSP Software into the FTdx9000 Amateur Transceivers,from your personal computer, using the RS-232C, DB9F to DB9F straight cable.1. Turn off the main power switch located on the back of the FTdx9000 (or turn off the powersupply for FTdx9000MP and wait until the capacitors discharge) and remove the AC power cord.2. Connect a serial RS-232C, DB9F to DB9F straight cable to the COM1 connector of yourcomputer and the 9-pin CAT connector on the rear of the transceiver. If you use a USB to serialadapter, you might need to change the COM-Port number.Main Power SWCAT3. Reconnect the power cable and turn ON the main power switch located on the back of theFTdx9000 (or turn ON the power supply for FTdx9000MP).4. While holding the [DNR]+[CONT]+[DNF] for the D or [NR]+[CONT]+[D.NOTCH] buttonsfor the Contest and MP, press the front main power switch to turn the radio on. You will see [dSPPrg] on the radio display.5. On your computer desk top open <strong>PEP9000</strong>_EDSP folder and find the EDSP-9000 icon as shownbelow. Double-click the EDSP-9000 icon, displayed on the Program Screen.6. Click the Update button. You will see AH010N_V1150 out file displayed. If you do not seeAH010N_V1150 (as in the screen below), then open the “Look in:” window and go to the desktopand find <strong>PEP9000</strong>_EDSP. Open the folder and AH010N_V1150 will be displayed in the window.Click AH010N_V1150 out file to highlight it. Then click the Open button and wait until theprogram is loaded, and 100% is indicated on the bar graph, [completion!!] will be displayed.
NOTE: If you receive a “communicationserror” message on your screen, click on theCOM Select box arrow and choose a differentCOM port from the drop down menu. Thenclick the Update button and Open button again.7. Turn the front Power Switch and the Main Power Switch in the back OFF (or turn off the powersupply for FTdx9000MP and wait until the capacitors discharge) and remove the AC power cord.This resets the radio and locks in the new software. Remove the DB9F to DB9F cable. Theupdating process is now completeIt is important to reset the FTdx9000. Plug the radio back in. Press and hold in the [FAST] and[LOCK] keys; while holding them in, turn the radio back on (this resets the radio and locks inthe new software).NOTE: We recommend trying the new factory default settings rather than transferring your old ones,because of the changes in the EDSP and the Main CPU, you may wish to make new settings.The software versions can be displayed on the radioWhile holding the three buttons [GEN]+[50]+[ENT] turn the radio on. Confirm the new softwareversions 11.505.11 are displayed in the VFO-A window for 5 seconds, and then the radio will start upin normal operation.EDSP:Softwareversion 11.50Main CPU:Softwareversion 0511We hope this new software will increase your enjoyment of your FTdx9000. Thank you for choosingYaesu radios. If you have any problems or questions please contact Vertex Standard, Amateur TechSupport. amateurtech@vxstdusa.comBest regards,Mikio Maruya, WA6FExecutive Vice PresidentAmateur Radio, Engineering & Customer ServiceVertex Standard USA, Inc.Vertex Standard USA, Inc. | 10900 Walker St. | Cypress, CA 90630 | 714.827-7600 | FAX: 714.827-8100www.vertexstandard.com