Aero Brake Levers - Bontrager
Aero Brake Levers - Bontrager
Aero Brake Levers - Bontrager
- No tags were found...

Create successful ePaper yourself
Turn your PDF publications into a flip-book with our unique Google optimized e-Paper software.
iii
<strong>Aero</strong> <strong>Brake</strong> <strong>Levers</strong> Owner’s ManualTable of contentsRead this manual before you ride ......................... 1Introduction ...................................................... 2Inspect your brake levers regularly ........................ 2Adjusting aero brake levers .................................. 2Lubricating aero brake levers ............................... 3Installation instructions .....................................4-6Check all parts compatibility before installing .... 4To install a brake lever .................................4-5To install a brake cable in the lever .................. 5To attach a cable and adjust the brake ...........5-6<strong>Bontrager</strong> warranty ............................................ 7iv© Copyright Trek Bicycle Corporation 2005All rights reserved
Read This Manual Before You RidePlease read this instruction manual thoroughly before using your new brakelevers; it contains important safety and maintenance information. If you do notunderstand the information in this manual, or you have a question about yourbrake levers that this manual does not cover, consult your <strong>Bontrager</strong> dealer.CAUTIONThe expander wedge which attaches the brake lever to thehandlebar applies force to the inside of the handlebar. Somehandlebars may be damaged by this force. Check with thehandlebar manufacturer for compatibility before installing<strong>Bontrager</strong> Race XXX Lite brake levers.<strong>Bontrager</strong> Race XXX Lite aero brake levers are compatible with all <strong>Bontrager</strong>handlebars when installed according to the directions in this manual.If you have a question or problem that your <strong>Bontrager</strong> dealer can’t handle,contact us at:<strong>Bontrager</strong> Components (800) 369-8735Attn: Customer Servicehttp://www.bontrager.com801 W. Madison StreetWaterloo, Wisconsin 535941
Expander wedgeCarbon fiberlever bladeFigure 1- <strong>Bontrager</strong> Race XXX Liteaero brake leverFigure 2- Expander boltFigure 3- Cable holder set screwIntroductionThe brake system allows you to slow or stop your bike, a function critical toyour safety. These instructions explain how to inspect, adjust, and lubricate aspecific component of a bicycle braking system: <strong>Bontrager</strong> Race XXX Lite aerobrake levers (Figure 1). The brake system is difficult to adjust properly withoutthe proper tools and training. It is strongly recommended that installation andadjustment of brake system components be done by your dealer.WARNINGNever ride a bike if you are not certain the brakes areworking properly, or you if suspect a problem with the brakecables. Malfunctioning brakes can cause you to lose controland fall resulting in injury or death. If your brakes are notworking properly, re-adjust them or take the bike to yourdealer for service.Inspect your brake levers regularlyEvery 3 months tighten the bolts on the brake levers (Figures 2-3) until secure,or to these maximum torque specifications:Expander bolt- 60 Lb•in (6.7 N•m)Cable holder set screw- 9.0 Lb•in (1.0 N•m)Adjusting aero bar brake leversThere is no adjustment offered on aero brake levers.2
Lubricating aero bar brake leversEvery 3 months lubricate the brake lever pivots with Wrench Force ®SynLube or a similar light oil.3
Installation instructionsThe correct installation of new <strong>Bontrager</strong> brake levers is critical to the rider’ssafety, so this work should be performed only by an experienced mechanic. Ifyou are not sure of your ability to correctly install these brake levers, have theminstalled by your <strong>Bontrager</strong> dealer.Use compatible parts<strong>Brake</strong> levers interface with the handlebar, brake cables, and brakes. Only useparts which are compatible with the specifications of this lever:• <strong>Brake</strong> cable pull is for caliper-type brakes only• Handlebar inner diameters (depending on size)between 20.0-21.0mmbetween 21.0-22.0mm• Handlebar outer diameter less than 24.6mm• Cable ends are ATB-type, 6 or 8mm (Figure 5)If you are not sure if these brake levers are compatible with your bicycle, consultyour dealer.To install a brake lever1. Slide the expander wedges (Figure 1) into the end of the handlebar.Use the largest wedge that easily fits into the end of the bar. Do not lubricatethe wedges.4
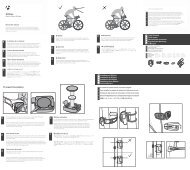
2. Tighten the expander bolt (Figure 2) until the lever is secure, or to amaximum of 60 Lb•in (6.7 N•m).Make sure the lever is easy to reach when in a normal riding position.To install a brake cable in the lever1. Loosen the cable holder set screw (Figure 3) several turns.2. Push the cable holder (Figure 4) forward through the front of the lever.Figure 4- Cable holder3. Slide the cable through the larger, tapered side of the cable holder andthrough the slot (Figure 5).4. Push the cable end into the center of the cable holder.5. Slide the cable through the lever and then through the cable exit hole(Figure 6).6. Tighten the set screw until snug, or to a maximum of 9.0 Lb•in (1.0N•m).The set screw’s sole function is to prevent rattling.To attach the cable and adjust the brake1. Follow normal procedures to cut the housing, attach the cable, and adjustthe brake.Refer to the brake manufacturer’s instructions as needed.5Figure 5- ATB cable in cable holderFigure 6- Cable exit hole
2. Make sure the brake system provides adequate stopping power:• Test ride the bike• Make sure the lever can move at least 25mm (Figure 7), but cannotcontact the handlebar under hard braking.If the brakes fail these tests, do not ride the bicycle. Readjust the brake system orchoose different components.Figure 7- Minimum lever opening6
Limited Warranty<strong>Bontrager</strong> warrants each new <strong>Bontrager</strong> component or wheelset against defects in workmanship and materials:For the lifetime of the original owner-• <strong>Bontrager</strong> forksFor one year-• All <strong>Bontrager</strong> partsThis warranty does not cover-• Normal wear and tear• Improper assembly• Improper follow-up maintenance• Installation of parts or accessories not originally intended for, or compatible with, the <strong>Bontrager</strong> componentsor wheelsets as sold• Damage or failure due to accident, misuse, abuse, or neglect• Labor charges for part replacement or changeoverThis warranty is void in its entirety by any modification of the wheelset, or components.This warranty is expressly limited to the repair or replacement of a defective item and is the sole remedy ofthe warranty. This warranty extends from the date of purchase, applies only to the original owner, and is nottransferable. <strong>Bontrager</strong> is not responsible for incidental or consequential damages. Some states do not allow theexclusion of incidental or consequential damages, so the above exclusion may not apply to you.Claims under this warranty must be made through an authorized <strong>Bontrager</strong> dealer. Proof of purchase is required.This warranty gives the consumer specific legal rights, and those rights may vary from place to place. This warrantydoes not affect the statutory rights of the consumer.7