transtherm studio installation instructions - Vintec and Transtherm
transtherm studio installation instructions - Vintec and Transtherm
transtherm studio installation instructions - Vintec and Transtherm
- No tags were found...

Create successful ePaper yourself
Turn your PDF publications into a flip-book with our unique Google optimized e-Paper software.
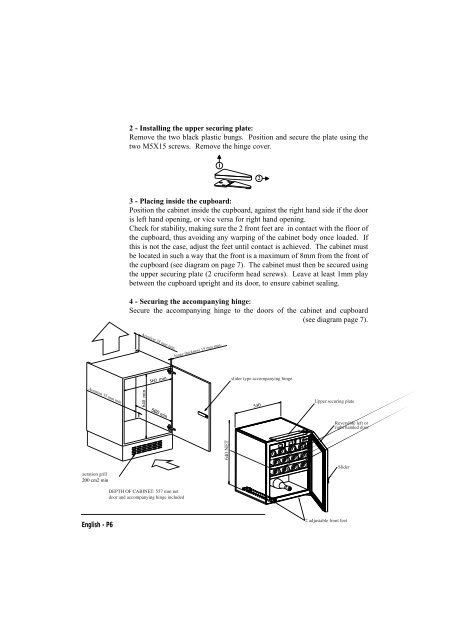
2 - Installing the upper securing plate:Remove the two black plastic bungs. Position <strong>and</strong> secure the plate using thetwo M5X15 screws. Remove the hinge cover.3 - Placing inside the cupboard:Position the cabinet inside the cupboard, against the right h<strong>and</strong> side if the dooris left h<strong>and</strong> opening, or vice versa for right h<strong>and</strong> opening.Check for stability, making sure the 2 front feet are in contact with the floor ofthe cupboard, thus avoiding any warping of the cabinet body once loaded. Ifthis is not the case, adjust the feet until contact is achieved. The cabinet mustbe located in such a way that the front is a maximum of 8mm from the front ofthe cupboard (see diagram on page 7). The cabinet must then be secured usingthe upper securing plate (2 cruciform head screws). Leave at least 1mm playbetween the cupboard upright <strong>and</strong> its door, to ensure cabinet sealing.4 - Securing the accompanying hinge:Secure the accompanying hinge to the doors of the cabinet <strong>and</strong> cupboard(see diagram page 7).English - P6