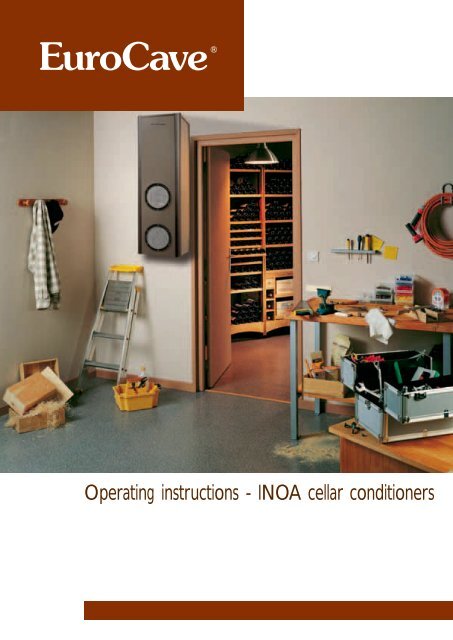
Operating instructions - INOA cellar conditioners
Operating instructions - INOA cellar conditioners
Operating instructions - INOA cellar conditioners

You also want an ePaper? Increase the reach of your titles
YUMPU automatically turns print PDFs into web optimized ePapers that Google loves.
<strong>Operating</strong> <strong>instructions</strong> - <strong>INOA</strong> <strong>cellar</strong> <strong>conditioners</strong>
Des solutions adaptées à tous vos besoins - Solutions to meet all your needs<br />
All Ihren Bedürfnissen angepaßte Lösungen - Soluciones adaptadas a todas sus necesidades<br />
ARMOIRES À VINS - WINE CABINETS<br />
WEINKLIMASCHRÄNKE - ARMARIOS PARA VINOS<br />
Origine Classic Compact<br />
Cuir - Leather - Leder - Cuero Meuble à Vins Sommelier<br />
Elite<br />
SYSTÈMES DE RANGEMENT - STORAGE SYSTEMS<br />
REGALSYSTEME - SISTEMAS DE COLOCACIÓN<br />
2<br />
Modulothèque Modulocube Modulorack<br />
CLIMATISEURS DE CAVE<br />
CELLAR CONDITIONERS<br />
WEINKELLERKLIMAGERÄTE<br />
CLIMATIZADORES PARA BODEGA<br />
Inoa*<br />
SERVICE DU VIN AU VERRE<br />
SYSTEM TO SERVE WINES BY THE GLASS<br />
OFFENAUSSCHANKSYSTEM<br />
DISPENSADOR DE VINO POR COPA<br />
Vin au Verre*<br />
* Produit non disponible dans certains pays. Product not available in certain countries.
WELCOME TO THE WORLD OF EUROCAVE<br />
Our greatest wish is to accompany your enthusiasm for wine throughout the years…<br />
To do so, EuroCave puts all of its know-how into action to bring together the essential factors in optimal wine maturing:<br />
Temperature:<br />
The two worst enemies of your wine are extreme temperatures and sudden fluctuations in temperature.<br />
A constant temperature of 10° to 14°C (50 to 57°F) is considered to be ideal for your wine to reach its full potential.<br />
Owing to its electronic regulation system, your EuroCave <strong>INOA</strong> conditioner is activated as soon as the <strong>cellar</strong><br />
temperature rises one degree above the programmed temperature. Furthermore, the presence of a heater built into the<br />
air distributor protects your wine from any significant fall in temperature.<br />
Humidity:<br />
This is an essential factor, enabling corks to retain their sealing qualities. The level of humidity must be higher than 50%<br />
(ideally between 60 and 75 %).<br />
By maintaining a constant evaporation temperature, above 0°C, your EuroCave <strong>INOA</strong> conditioner ensures minimal drying<br />
out of the air of your <strong>cellar</strong> and an ideal level of humidity.<br />
Protection from light:<br />
Light, and more especially its ultra-violet component, will rapidly prove noxious to your wine by irreversible oxidation of<br />
its tannins. For this reason we strongly advise that wines be stored in the dark, far from U.V. light.<br />
Protection from vibration:<br />
Vibration disturbs the slow process of your wine’s biochemical evolution, and is often fatal for the finest wines.<br />
The housing of your EuroCave conditioner is fully sound-proofed (by 20 mm polyethylene foam) and the compressor and<br />
fans are fitted with silent blocks to absorb any residual vibration.<br />
Natural aeration:<br />
A constant supply of air from the outside is also indispensable.<br />
All of these specific features can be found in the EuroCave <strong>INOA</strong> conditioner you have bought. We thank you for the<br />
confidence you have placed in us.<br />
Usual wine serving temperatures<br />
French wines<br />
Alsace 10°C<br />
Beaujolais 13°C<br />
Bordeaux Sweet White 6°C<br />
Bordeaux Dry White 8°C<br />
Bordeaux Red 17°C<br />
Bourgogne White 11°C<br />
Burgundy Red 18°C<br />
Champagne 6°C<br />
Jura 10°C<br />
Languedoc-Roussillon 13°C<br />
Provence Rosé 12°C<br />
Savoie 9°C<br />
Vins de Loire Dry White 10°C<br />
Vins de Loire Sweet 7°C<br />
Vins de Loire Red 14°C<br />
Vins du Rhône 15°C<br />
Vins du Sud Ouest Sweet 7°C<br />
Vins du Sud Ouest Red 15°C<br />
Australian wines<br />
Cabernet franc 16°C<br />
Cabernet sauvignon 17°C<br />
Chardonnay 10°C<br />
Merlot 17°C<br />
Muscat à petit grain 6°C<br />
Pinot noir 15°C<br />
Sauvignon White 8°C<br />
Semillon 8°C<br />
Shiraz 18°C<br />
Verdhelo 7°C<br />
Other wines<br />
California 16°C<br />
Chile 15°C<br />
Spain 17°C<br />
Italy 16°C<br />
3<br />
GB
CONTENTS<br />
1 • CONDITIONER DESCRIPTION p. 5<br />
2 • IMPORTANT SAFETY RECOMMENDATIONS p. 6<br />
3 • ELECTRICAL POWER SUPPLY p. 6<br />
4 • CARE FOR THE ENVIRONMENT AND ENERGY SAVING p. 6<br />
5 • INSTALLING YOUR CONDITIONER p. 7<br />
6 • CONDITIONER OPERATION p. 8<br />
7 • COMMISSIONING YOUR CONDITIONER<br />
I- Connection p. 9<br />
II- Switching on p. 9<br />
III- Remote control description p. 9<br />
IV- Installing the remote control p. 10<br />
V- Setting the temperature p. 10<br />
VI- Silent function p. 11<br />
VII- “Heating” function p. 11<br />
VIII- Changing the remote control batteries p. 11<br />
IX- Discharging condensate p. 11<br />
8 • EVERYDAY MAINTENANCE p. 12<br />
9 • TECHNICAL SPECIFICATIONS p. 12<br />
4
1 - CONDITIONER DESCRIPTION<br />
COLD AIR<br />
HOT AIR<br />
1 - Distance between ceiling / conditioner:<br />
200 mm min.<br />
2 - Ceiling<br />
3 - Cellar wall<br />
4 - Metal mounting frame<br />
5 - Flexible ducting<br />
6 - Aesthetic front panel<br />
7 - Grid, to be cleaned regularly (see p.11)<br />
8 - Mounting frame / conditioner seal<br />
9 - Evaporator, to be cleaned regularly<br />
10 - Condenser, to be cleaned regularly<br />
11 - Inside of <strong>cellar</strong><br />
12 - Remote control<br />
13 - Grid securing screws (quantity: 24)<br />
14 - Aesthetic front panel securing screws<br />
(quantity: 4)<br />
15 - Screws to fix frame to the wall (quantity: 4)<br />
16 - Screws to fix conditioner to the frame<br />
(quantity: 4)<br />
5<br />
GB
2 - IMPORTANT SAFETY RECOMMENDATIONS<br />
Warning<br />
When using your conditioner, you<br />
should always observe certain<br />
basic precautions, especially:<br />
Never use your conditioner for anything other than its specific purpose as described in this guide.<br />
Never unplug the conditioner by pulling on the supply lead. Take a firm hold on the plug and pull out smoothly in a<br />
straight line from the wall socket.<br />
If the power lead is damaged, it must be replaced by a qualified electrician.<br />
Do not allow children to climb, sit, stand on or hang from the conditioner.They could damage the conditioner, as well<br />
as badly hurting themselves.<br />
Never damage your appliance’s refrigeration unit.<br />
3 - ELECTRICAL POWER SUPPLY<br />
For your personal safety, the conditioner must be correctly earthed.<br />
Your conditioner’s power lead is supplied without a plug. Installation of a power plug or connection of the conditioner to a junction box must be carried<br />
out by a qualified electrician.<br />
In all cases, the connection of your conditioner must be carried out on an earthed socket to prevent any risk of electric shock.<br />
Have an electrician carry out the installation. He will tell you whether or not the socket is correctly earthed and, if necessary, will perform any work required<br />
to bring your installation in line with standards.<br />
IMPORTANT: any electrical work must be carried out by a qualified electrician.<br />
Electric connection must be carried out by means of a device to ensure isolation from the mains system.The isolating device should open all of the contacts<br />
of all the poles ensuring complete disconnection in line with the conditions in over-voltage category III. Installation must be carried out in compliance with<br />
national installation regulations.<br />
Should you move to another country, check that the conditioner’s electrical rating (see grey identification label) complies with the country (voltage,<br />
frequency).<br />
Ensure that the plug (230 V – 13 A*) is correctly earthed and that your installation<br />
is protected by a differential circuit breaker (30 mA*).<br />
*not valid for some countries<br />
4 - CARE FOR THE ENVIRONMENT<br />
AND ENERGY SAVING<br />
Disposal of packaging:<br />
The packaging used by EuroCave is made of recyclable materials.<br />
After unpacking your conditioner, take the packaging to a waste disposal centre. For the most part it will be recycled.<br />
Recycling:A caring gesture<br />
Electrical and electronic equipment have potentially hazardous effects on the environment and public health due to the presence of<br />
noxious substances.<br />
You should therefore never dispose of electrical or electronic equipment with unsorted municipal waste.<br />
When buying a new EuroCave product (wine cabinet, <strong>cellar</strong> conditioner,Vin au Verre), you can take advice about the recycling of your old appliance from<br />
your EuroCave dealer.<br />
In compliance with legal provisions covering respect and care for the environment, your conditioner does not contain CFCs.<br />
Energy saving:<br />
- Install your conditioner in an appropriate place and within the recommended temperature ranges.<br />
- Keep the door open for as short a time as possible.<br />
N.B.: Care for the environment: when replacing your conditioner, consult your local municipal refuse department in order to observe the appropriate<br />
recycling procedure.<br />
For refrigerant gases, substances and some parts contained in the conditioner, EuroCave uses recyclable materials which require a special packaging disposal<br />
procedure to be followed.<br />
Place unusable appliances out of use by unplugging them.<br />
6
5 - INSTALLING YOUR CONDITIONER<br />
- When your appliance is delivered, ensure, after unpacking, that your conditioner shows no apparent damage to exterior appearance (impacts, buckling, etc.).<br />
- In the event of a problem, contact your EuroCave dealer.<br />
- Important: insulation of your <strong>cellar</strong> is crucial for your conditioner to perform at its best.The quality of your insulation will determine the stability of the<br />
programmed temperature. Do not use fibrous insulation, such as glass wool or rock wool.<br />
We recommend that you use extruded polystyrene, at least 80 mm thick.<br />
• Positioning your conditioner:<br />
The conditioner produces cold air inside the <strong>cellar</strong> and expels hot air outside (see diagram A).<br />
- Do not install the conditioner facing the door of the room (risk of condensation on the door joints).<br />
- Do not place the external section of the conditioner above a source of heat.<br />
- For insulation reasons, there must be no windows or bay windows in the room to be conditioned.<br />
- No piped hot water must pass through the room to be conditioned (e.g. under-floor heating).<br />
- The exterior of the conditioner must not be located in an area subject to atmospheric exposure.<br />
- No heat-producing appliance must be located in the area to be conditioned (e.g. refrigerator, radiator, boiler).<br />
- Do not obstruct the air entry and exit points.<br />
- Never place an object or container containing liquid on top of the conditioner.<br />
- The room where the hot air is expelled must, ideally, be approximately twice as large as the wine <strong>cellar</strong> and<br />
well ventilated so that the hot air can be properly expelled.<br />
- Wait 48 hrs before plugging in so that the internal circuit fluids can settle.<br />
- Never connect several <strong>conditioners</strong> to a multi-socket.<br />
Ventilated<br />
room<br />
Temperature:<br />
Max.: 35°C<br />
Min.: -5°C<br />
Diagram A<br />
CELLAR<br />
• Installation: (see B diagrams)<br />
Your conditioner was designed to be completely modular and adapt to any type of <strong>cellar</strong>.<br />
You can, amongst other options, install it either outside or inside your <strong>cellar</strong>, position it close to the floor (fixed to the wall) or at a height (we recommend,<br />
however, installation at a height for improved air convection).<br />
Additionally, hot air can be expelled from different angles (to be specified when ordering): facing forwards, right or left.<br />
You also have the option of expelling hot air outside the room by way of extractor piping (standard piping, 160 mm in diameter, not supplied).<br />
Finally, you can choose to fit the conditioner onto a door. In this case, get your fitter to check that the door is able to support a weight of 46 kg and that it<br />
does not produce vibration.<br />
Cold air<br />
discharged<br />
Cold air<br />
discharged<br />
Hot air<br />
expelled<br />
Hot air<br />
expelled<br />
Conditioner housed outside the<br />
<strong>cellar</strong> with extraction facing<br />
forwards / aesthetic front panel on<br />
the inside<br />
Diagram B<br />
Diagram B<br />
Conditioner housed inside the<br />
<strong>cellar</strong> with extraction facing<br />
forwards / aesthetic front panel on<br />
the outside<br />
Conditioner housed outside the<br />
<strong>cellar</strong> with extraction on the left<br />
side / aesthetic front panel on the<br />
inside.<br />
Schéma B<br />
Schéma B<br />
Conditioner housed inside the <strong>cellar</strong>,<br />
fitted onto an adapted door.<br />
7<br />
GB
5 - INSTALLING YOUR CONDITIONER<br />
• Fitting: (see C diagrams)<br />
Your conditioner comes supplied with a metal mounting<br />
frame which simplifies the process of drilling air entry and<br />
exit holes.<br />
It also has 2 extendable ducts to be cut to length (75 cm<br />
each) in order to install the conditioner whatever the<br />
thickness of the wall.<br />
Finally, your conditioner is supplied with an aesthetic front<br />
panel and 4 grids for an aesthetic appearance.<br />
metallic<br />
mounting<br />
frame<br />
extendable<br />
ducting<br />
wall<br />
drill holes<br />
grid<br />
aesthetic front<br />
panel<br />
grid<br />
aesthetic front<br />
panel<br />
extendable<br />
ducting<br />
wall<br />
drill holes<br />
metallic<br />
mounting<br />
frame<br />
Installation with conditioner housed<br />
Diagram C<br />
outside the <strong>cellar</strong><br />
Installation with conditioner housed<br />
Diagram C<br />
inside the <strong>cellar</strong><br />
• Recommendations:<br />
- Fit your conditioner as close as possible to the ceiling in order to ensure uniform dispersal of<br />
cold air in the <strong>cellar</strong>.<br />
- We recommend that you leave a space of 200 mm between the ceiling and your conditioner to<br />
make it easier to fit the appliance on its base.<br />
- The air outlets (hot and cold) must not be obstructed by any obstacle (minimum distance:<br />
1500 mm). Direct the cold air outlet so it is facing the bottles (see diagram D).<br />
door<br />
bottles<br />
conditioner<br />
CELLAR<br />
The installation (wall drilling and fitting) of your conditioner must be carried out by a EuroCave<br />
approved fitter.<br />
CELLAR<br />
bottles<br />
door<br />
conditioner<br />
conditioner<br />
CELLAR<br />
bottles<br />
Diagram D<br />
door<br />
6 - CONDITIONER OPERATION<br />
The <strong>INOA</strong> conditioner is fitted with a refrigerating<br />
unit:<br />
• an evaporator forces cold air inside the room,<br />
• a condenser expels the hot air outside.<br />
Fan<br />
Cold air<br />
Hot air<br />
(heated if necessary)<br />
The evaporator fan operates continuously to ensure<br />
that air is constantly mixed and that temperatures are<br />
as uniform as possible, in accordance with speeds<br />
automatically adjusted according to requirements.<br />
Heater<br />
Evaporator<br />
Hot air<br />
Turbine<br />
Condenser<br />
8<br />
Compressor
7 - COMMISSIONING YOUR CONDITIONER<br />
I- Connection<br />
Check that the plug is connected to a power supply (presence of correct amp fuses, functioning 30 mA* differential circuit breaker - not applicable to certain<br />
countries).Wait 48 hours before plugging in your conditioner.<br />
II- Switching on<br />
- Place the switch, located under the conditioner, in position 1.<br />
- Press and hold down the key on your remote control for about 8 seconds, until the indicator goes off.<br />
To put your conditioner on standby, press and hold down the<br />
goes off.<br />
key on your remote control for about 5 seconds and release it before the indicator<br />
III- Remote control description<br />
Radio frequency remote control (433.92 Mhz).<br />
Each remote control has a personalised code matched to the conditioner.<br />
On / off indicator<br />
Low battery<br />
indicator<br />
Temperature units<br />
(according to the<br />
country)<br />
Temperature<br />
indicator<br />
Temperature and<br />
setting display<br />
Knob<br />
Adjustment keys<br />
Confirmation and on/off key<br />
9<br />
GB
7 - COMMISSIONING YOUR CONDITIONER<br />
IV- Installing the remote control<br />
You can install the remote control inside your <strong>cellar</strong>.<br />
We recommend that you place it as close as possible to the bottles.<br />
Fix the unit close to your bottles using the supplied pegs and screws (see diagram below)<br />
N.B.: Do not place the remote control in the path of the conditioner’s cold air flow.<br />
It is also possible to place the remote control outside the <strong>cellar</strong>.<br />
In this case, an external sensor (supplied) must be connected to the remote control and then the remote control must be reprogrammed.<br />
For further details, contact your EuroCave retailer.<br />
V- Setting the temperature<br />
Setting the temperature of your conditioner is carried out entirely from the remote control which has the following layout:<br />
Cellar<br />
temperature<br />
display<br />
Temperature<br />
indicator<br />
Temperature<br />
units (according<br />
to the country)<br />
- Temperature display: displays the actual temperature inside<br />
your <strong>cellar</strong>.<br />
- Setting keys: allow you to select the desired temperature<br />
inside the <strong>cellar</strong>.<br />
Cellar temperature<br />
setting keys<br />
Selection and confirmation key<br />
To adjust the temperature:<br />
- Press then immediately release the key.<br />
The setting then appears (the temperature flashes).<br />
- - When the temperature flashes, you have 7 seconds to change the setting by pressing the or keys, otherwise the display automatically returns to<br />
the previous setting.<br />
The recommended setting range for maturing wine: 10 to 14°C.<br />
10
7 - COMMISSIONING YOUR CONDITIONER<br />
- Press the key to confirm the new setting, the display then returns to the new setting.<br />
The setting can be adjusted between 9 and 15°C. Beyond this range, the and keys do not work.<br />
WARNING: to operate correctly, your conditioner must be in a location where the ambient<br />
temperature is between -5°C is 35°C.<br />
When making significant modifications to temperature settings, it can take several hours for the temperature in your <strong>cellar</strong> to stabilise and for the conditioner<br />
to display the desired temperature.<br />
VI- Silent function<br />
Your EuroCave conditioner is fitted with a silent function which allows the sound level to be reduced when you enter the <strong>cellar</strong>.<br />
When the conditioner is on:<br />
- Press and hold down the key for 3 seconds.<br />
The<br />
display then appears. Next the current temperature is displayed.<br />
You will be able to see this function via the<br />
pictogram which flashes for 15 minutes.<br />
The compressor then remains in operation and the fans change to slow speed for 15 minutes.<br />
After this, the conditioner returns to the default operating speed.<br />
VII- Heating function<br />
The EuroCave <strong>INOA</strong> conditioner has a heater (650 W) allowing the internal temperature in your <strong>cellar</strong> to be maintained at an optimal level.<br />
As soon as the temperature drops below the programmed temperature, the heating function is automatically activated.<br />
VIII- Changing the remote control batteries<br />
Remote control power supply: 1 x 3 V (CR 2430 battery) (2 batteries supplied)<br />
Battery life: 2 years approx<br />
The remote control is supplied with 2 batteries. Only one battery is required (pull off the plastic strip to make it<br />
useable).The other battery is a spare.<br />
- When the battery runs out, the pictogram flashes on the remote control’s display.<br />
- Take the remote control off the wall.<br />
- On the back of the remote control, push the used battery down using a screwdriver (see diagram opposite).<br />
- Pull the strip from the spare battery, which will then be ready for use.<br />
- Remember to buy a replacement for the spare battery.<br />
IX- Discharging condensate<br />
Your conditioner was designed to allow condensate to be discharged (discharge pipe located under the conditioner’s<br />
housing) either inside the <strong>cellar</strong>, if the humidity level is too low, or outside the <strong>cellar</strong>.<br />
Simply pass the pipe through the wall to discharge the condensate into the room next to the conditioner housing.<br />
Ensure that the piping is not kinked.<br />
11<br />
GB
8 - EVERYDAY MAINTENANCE<br />
Vacuum the 4 air entry and exit grids at least twice a year, ensuring that you first unplug the conditioner. Please<br />
note that a refrigeration engineer must be employed for a more thorough cleaning of your appliance’s internal<br />
elements (every two years).<br />
9 - TECHNICAL SPECIFICATIONS<br />
Dimensions Power Sample Cooling Weight Electrical Heating Refrigerant External<br />
in mm supply volume m 3 capacity W Kg power W resistance W temperatures<br />
Inoa 25 W385 x D322 230 V up to 600 W** 43 Kg 550 W** 650 W R134a -5°C to 35°C<br />
x H1250 / 50 Hz 25 m 3 * (without CFCs)<br />
Inoa 50 W385 x D322 230 V up to 1200 W** 46 Kg 800 W** 650 W R134a -5°C to 35°C<br />
x H1250 / 50 Hz 50 m 3 * (without CFCs)<br />
* in a very well insulated room - ** for an internal temperature of 12° C and an external temperature of 32° C.<br />
Supplied with 3.50 m power lead without plug.<br />
12
WARNING<br />
The information in this document is subject to modification without prior notice.<br />
EuroCave offers no guarantee on this equipment item if it is used for any specific purpose other than that for which it was designed. EuroCave cannot be<br />
held responsible for any errors in this manual, nor for any damage linked to or following the provision, performance or use of the equipment item.<br />
All photocopying, reproduction, translation, wether partial or total, are strictly prohibited, without prior written consent from EuroCave.
www.eurocave.com - info@eurocave.com<br />
06/2007 - 60