User Guide - Thermo Scientific Home Page
User Guide - Thermo Scientific Home Page
User Guide - Thermo Scientific Home Page

You also want an ePaper? Increase the reach of your titles
YUMPU automatically turns print PDFs into web optimized ePapers that Google loves.
<strong>Thermo</strong> <strong>Scientific</strong><br />
Orion 2118XP Oxygen Scavenger Monitor<br />
<strong>User</strong> <strong>Guide</strong>
ROSS and the COIL trade dress are trademarks of <strong>Thermo</strong> Fisher <strong>Scientific</strong> Inc.<br />
AQUAfast, Cahn, ionplus, KNIpHE, No Cal, ORION, perpHect, PerpHecT, PerpHecTion, pHISA, pHuture, Pure Water, Sage, Sensing the Future, SensorLink,<br />
ROSS, ROSS Ultra, Sure-Flow, Titrator PLUS and TURBO2 are registered trademarks of <strong>Thermo</strong> Fisher .<br />
1-888-pHAX-ION, A+, All in One, Aplus, AQUAsnap, AssuredAccuracy, AUTO-BAR, AUTO-CAL, AUTO DISPENSER, Auto-ID, AUTO-LOG, AUTO-READ,<br />
AUTO-STIR, Auto-Test, BOD AutoEZ, Cable-Free, CERTI-CAL, CISA, DataCOLLECT, DataPLUS, digital LogR, DirectCal, DuraProbe, Environmental Product<br />
Authority, Extra Easy/Extra Value, FAST QC, GAP, GLPcal, GLPcheck, GLPdoc, ISEasy, KAP, LabConnect, LogR, Low Maintenance Triode, Minimum Stir<br />
Requirement, MSR, NISS, One-Touch, One-Touch Calibration, One-Touch Measurement, Optimum Results, Orion Star, Pentrode, pHuture MMS, pHuture<br />
Pentrode, pHuture Quatrode, pHuture Triode, Quatrode, QuiKcheK, rf link, ROSS Resolution, SAOB, SMART AVERAGING, Smart CheK, SMART STABILITY,<br />
Stacked, Star Navigator 21, Stat Face, The Enhanced Lab, ThermaSense, Triode, TRIUMpH, Unbreakable pH, Universal Access are trademarks of<br />
<strong>Thermo</strong> Fisher .<br />
Guaranteed Success and The Technical Edge are service marks of <strong>Thermo</strong> Fisher .<br />
PerpHecT meters are protected by U.S. patent 6,168,707.<br />
PerpHecT ROSS are protected by U.S. patent 6,168,707.<br />
ORION Series A meters and 900A printer are protected by U.S. patents 5,198,093, D334,208 and D346,753.<br />
ionplus electrodes and Optimum Results solutions are protected by US Patent 5,830,338.<br />
ROSS Ultra electrodes are protected by US patents 6,793,787.<br />
Orion ORP Standard is protected by US Patent 6,350,367.<br />
Orion NoCal electrodes with stabilized potential patent pending.<br />
© 2008 <strong>Thermo</strong> Fisher <strong>Scientific</strong> Inc. All rights reserved. All trademarks are the property of <strong>Thermo</strong> Fisher <strong>Scientific</strong> Inc. and its subsidiaries.<br />
The specifications, descriptions, drawings, ordering information and part numbers within this document are subject to change without notice.<br />
This publication supersedes all previous publications on this subject.
<strong>Thermo</strong> <strong>Scientific</strong> Orion 2118XP Oxygen Scavenger Monitor <strong>User</strong> <strong>Guide</strong><br />
Table of Contents<br />
Chapter I<br />
General Information . . . . . . . . . . . . . . . . . . . . . . . . . . . . . . . . . . . . . . . . . . . . I-<br />
Introduction . . . . . . . . . . . . . . . . . . . . . . . . . . . . . . . . . . . . . . . . . . . . . . I-1<br />
Features .and .Benefits . . . . . . . . . . . . . . . . . . . . . . . . . . . . . . . . . . . . . . . I-2<br />
Application .Modes . . . . . . . . . . . . . . . . . . . . . . . . . . . . . . . . . . . . . . . . . I-3<br />
Principles .of .Operation . . . . . . . . . . . . . . . . . . . . . . . . . . . . . . . . . . . . . I-4<br />
Principles .of .Calibration . . . . . . . . . . . . . . . . . . . . . . . . . . . . . . . . . . . . . I-7<br />
Fluidics .Diagram . . . . . . . . . . . . . . . . . . . . . . . . . . . . . . . . . . . . . . . . . . I-8<br />
Glossary . . . . . . . . . . . . . . . . . . . . . . . . . . . . . . . . . . . . . . . . . . . . . . . . . I-9<br />
Chapter II<br />
Instrument Preparation . . . . . . . . . . . . . . . . . . . . . . . . . . . . . . . . . . . . . . . . . II-<br />
Unpacking .the .Instrument . . . . . . . . . . . . . . . . . . . . . . . . . . . . . . . . . . .II-1<br />
Mounting .and .Plumbing .Instructions . . . . . . . . . . . . . . . . . . . . . . . . . .II-2<br />
Electrical .Wiring . . . . . . . . . . . . . . . . . . . . . . . . . . . . . . . . . . . . . . . . . .II-4 .<br />
. Safety .Requirements . . . . . . . . . . . . . . . . . . . . . . . . . . . . . . . . . . . . . . .II-4<br />
. Warning .Labels .and .Locations . . . . . . . . . . . . . . . . . . . . . . . . . . . . . . .II-5<br />
Wiring .the .Instrument . . . . . . . . . . . . . . . . . . . . . . . . . . . . . . . . . . . . . .II-6<br />
Terminal .Assignments . . . . . . . . . . . . . . . . . . . . . . . . . . . . . . . . . . . . . .II-8<br />
Installation .of .Reagent .and .Diffusion .Tubing . . . . . . . . . . . . . . . . . . . . .II-9<br />
Installation .of .New .Iodide .Electrode . . . . . . . . . . . . . . . . . . . . . . . . . .II-10<br />
Installation .of .ATC .Probe . . . . . . . . . . . . . . . . . . . . . . . . . . . . . . . . . . .II-10<br />
Installation .of .New .Reference .Electrode . . . . . . . . . . . . . . . . . . . . . . . .II-11<br />
Chapter III<br />
Instrument Operation . . . . . . . . . . . . . . . . . . . . . . . . . . . . . . . . . . . . . . . . . . III-<br />
Description .of .Basic .Controls . . . . . . . . . . . . . . . . . . . . . . . . . . . . . . . . III-1<br />
Description .of .Keypad .Icons . . . . . . . . . . . . . . . . . . . . . . . . . . . . . . . . III-2<br />
Use .of .Setup .Mode . . . . . . . . . . . . . . . . . . . . . . . . . . . . . . . . . . . . . . . . III-3<br />
Shutdown .and .Start-Up .Procedure . . . . . . . . . . . . . . . . . . . . . . . . . . . III-32
<strong>Thermo</strong> <strong>Scientific</strong> Orion 2118XP Oxygen Scavenger Monitor <strong>User</strong> <strong>Guide</strong><br />
Chapter IV<br />
Calibration . . . . . . . . . . . . . . . . . . . . . . . . . . . . . . . . . . . . . . . . . . . . . . . . . . . IV-<br />
Calibration .Setup . . . . . . . . . . . . . . . . . . . . . . . . . . . . . . . . . . . . . . . . . IV-1<br />
DYN .Calibration .Recommendations . . . . . . . . . . . . . . . . . . . . . . . . . . IV-2<br />
Rinsing .the .Flow .Cell . . . . . . . . . . . . . . . . . . . . . . . . . . . . . . . . . . . . . . IV-3<br />
Dynamic .Calibrator .Operation . . . . . . . . . . . . . . . . . . . . . . . . . . . . . . IV-4<br />
Performing .DYN .Calibration .(Hydrazine .Application) . . . . . . . . . . . . IV-5<br />
Performing .DYN .Calibration .(ELIMIN-OX .Application) . . . . . . . . . . IV-8<br />
Calibration .At .Custom .Concentrations .Using .DYN . . . . . . . . . . . . . IV-13<br />
Dynamic .Calibrator .Check . . . . . . . . . . . . . . . . . . . . . . . . . . . . . . . . IV-14<br />
Offline .Calibration .Procedure . . . . . . . . . . . . . . . . . . . . . . . . . . . . . . IV-15<br />
Chapter V<br />
Instrument Maintenance . . . . . . . . . . . . . . . . . . . . . . . . . . . . . . . . . . . . . . . . V-<br />
Weekly .Maintenance . . . . . . . . . . . . . . . . . . . . . . . . . . . . . . . . . . . . . . .V-1<br />
Bi-Weekly .Maintenance . . . . . . . . . . . . . . . . . . . . . . . . . . . . . . . . . . . . .V-2<br />
Monthly .Maintenance . . . . . . . . . . . . . . . . . . . . . . . . . . . . . . . . . . . . . .V-2<br />
Yearly .Preventative .Maintenance . . . . . . . . . . . . . . . . . . . . . . . . . . . . . .V-5<br />
Chapter VI<br />
Troubleshooting . . . . . . . . . . . . . . . . . . . . . . . . . . . . . . . . . . . . . . . . . . . . . . VI-<br />
Diagnostics .Mode . . . . . . . . . . . . . . . . . . . . . . . . . . . . . . . . . . . . . . . . VI-1<br />
Slope .Problems . . . . . . . . . . . . . . . . . . . . . . . . . . . . . . . . . . . . . . . . . . . VI-9<br />
Troubleshooting .Matrix . . . . . . . . . . . . . . . . . . . . . . . . . . . . . . . . . . . VI-11<br />
Error/Event .Codes . . . . . . . . . . . . . . . . . . . . . . . . . . . . . . . . . . . . . . . VI-14<br />
Resetting .the .Monitor . . . . . . . . . . . . . . . . . . . . . . . . . . . . . . . . . . . . VI-17<br />
Serial .Number .and .Software .Revision . . . . . . . . . . . . . . . . . . . . . . . . . VI-18<br />
Service .and .Repair . . . . . . . . . . . . . . . . . . . . . . . . . . . . . . . . . . . . . . . VI-19<br />
Chapter VII<br />
Customer Service . . . . . . . . . . . . . . . . . . . . . . . . . . . . . . . . . . . . . . . . . . . . .VII-<br />
Notice .of .Compliance . . . . . . . . . . . . . . . . . . . . . . . . . . . . . . . . . . . . . VII-1<br />
Declaration .of .Conformity . . . . . . . . . . . . . . . . . . . . . . . . . . . . . . . . . VII-2<br />
Terms .and .Conditions . . . . . . . . . . . . . . . . . . . . . . . . . . . . . . . . . . . . VII-3<br />
Appendix . . . . . . . . . . . . . . . . . . . . . . . . . . . . . . . . . . . . . . . . . . . . . . . . . . . . .A-<br />
Mounting .Dimensions . . . . . . . . . . . . . . . . . . . . . . . . . . . . . . . . . . . . . .A-1<br />
ISE .Default .Values . . . . . . . . . . . . . . . . . . . . . . . . . . . . . . . . . . . . . . . . .A-2<br />
Specifications . . . . . . . . . . . . . . . . . . . . . . . . . . . . . . . . . . . . . . . . . . . . . .A-3<br />
Ordering .Information . . . . . . . . . . . . . . . . . . . . . . . . . . . . . . . . . . . . . .A-7<br />
Accessory .Options . . . . . . . . . . . . . . . . . . . . . . . . . . . . . . . . . . . . . . . . .A-8<br />
Field .Replaceable .Parts . . . . . . . . . . . . . . . . . . . . . . . . . . . . . . . . . . . . . .A-9<br />
Recommended .Consumables .for .Annual .Operation . . . . . . . . . . . . . . .A-10
Introduction<br />
Markets:<br />
Applications:<br />
<strong>Thermo</strong> <strong>Scientific</strong> Orion 2118XP Oxygen Scavenger Monitor <strong>User</strong> <strong>Guide</strong><br />
Chapter I General Information<br />
This .manual .covers .operation, .maintenance .and .troubleshooting .for .the .<br />
<strong>Thermo</strong> .<strong>Scientific</strong> .Orion .2118XP .oxygen .scavenger .monitor, .which .offers .<br />
unmatched .reliability .in .analyzing .oxygen .scavengers .in .feedwater, .boiler .<br />
water .or .at .the .economizer .inlet .<br />
Monitor .the .oxygen .scavenger .content .at .points .in .the .steam/water .circuit .<br />
where .dissolved .oxygen .control .is .critical . . .Residual .oxygen .scavengers .must .<br />
be .carefully .monitored .to .prevent .costly .overdosing, .yet .allow .enough .of .<br />
the .reductant .in .the .system .for .metal .passivation . . .Excess .levels .of .certain .<br />
oxygen .scavengers .decompose .into .ammonia, .which .increases .system .<br />
alkalinity . . .Efficient .control .of .oxygen .scavengers .depends .on .maintaining .a .<br />
predetermined .safety .zone . . .The .Orion .2118XP .oxygen .scavenger .monitor .<br />
optimizes .the .fluidic .design .with .the .sensing .technology .to .provide .accurate .<br />
and .precise .results .with .an .almost .instantaneous .indication .of .oxygen .<br />
scavenger .concentration .changes . .<br />
The .Orion .2118XP .oxygen .scavenger .monitor .meets .all .of .the .criteria .for .<br />
accurate .and .dependable .oxygen .scavenger .monitoring .and .more . . .The .<br />
2118XP .incorporates .innovative .technologies .that .include:<br />
• . Premium .<strong>Thermo</strong> .Scietific .Orion .electrodes . .<br />
• . Marquee .help .screen .<br />
• . Pump-less .reagent .addition .and .dynamic .calibration .system<br />
Orion 2118XP Oxygen Scavenger Monitor<br />
• . . Power<br />
• . . Pulp .and .paper<br />
• . . Chemical .and .petrochemical<br />
• . . Boiler .water<br />
• . . Feedwater<br />
• . Hydrazine<br />
• . ELIMIN-OX®<br />
• . Carbohydrazide<br />
• . DEHA .and .others<br />
I-
General Information<br />
Features and Benefits<br />
<strong>Thermo</strong> <strong>Scientific</strong> Orion 2118XP Oxygen Scavenger Monitor <strong>User</strong> <strong>Guide</strong><br />
The .<strong>Thermo</strong> .<strong>Scientific</strong> .Orion .2118XP .oxygen .scavenger .monitor .is .ideal .<br />
for .measuring .and .monitoring .the .critical .oxygen .scavenger .levels .in .<br />
feedwater, .boiler .water .or .economizer .inlet . . .With .limited .maintenance .<br />
requirements .and .low .reagent .usage, .the .Orion .2118XP .provides .the .<br />
highest .level .of .performance .with .easy .of .use . . .<br />
• . Measurement .of .oxygen .scavenger .concentrations .in .water .using .<br />
premium .Orion .ion .selective .electrode .(ISE) .technology<br />
• . Accurate .and .precise .measurements .in .the .range .of .0 .ppb .to . .<br />
200 .ppb .for .hydrazine .and .0 .ppb .to .1 .ppm .for .ELIMIN-OX® .and .<br />
carbohydrazide:<br />
. • . .Reliable .measurements .and .a .wide .measurement .range .with .<br />
selectable .resolution .<br />
. • . .Measures .oxygen .scavenger .levels .in .aqueous .solutions .quickly, .<br />
accurately .and .economically .<br />
• . Premium .reference .and .sensing .electrodes: .<br />
. • . .Superior .accuracy .and .stability .over .a .wide .temperature .range .<br />
• . Advanced .flow .cell .design:<br />
. • . .Automatic .sample .handling .and .contamination .control .with .no .<br />
moving .parts .<br />
• . Patented .scrolling .Marquee:<br />
. • . Intuitive .menu-driven .digital .user .interface .<br />
• . Data .log .of .previous .measurements .and .calibration:<br />
. • . View .measurement, .calibration .and .error .history .<br />
• . Self .diagnostics:<br />
. • . Ease .of .maintainability .<br />
• . Password .protection:<br />
. • . Security .and .peace .of .mind .for .your .operation .<br />
• . Auto-ranging .electronics .with .an .easy .to .read .backlit .LCD .display:<br />
. • . Monitor .determines .best .range .<br />
I-
General Information<br />
Application Modes<br />
Hydrazine Application<br />
ELIMIN-OX® Application<br />
<strong>Thermo</strong> <strong>Scientific</strong> Orion 2118XP Oxygen Scavenger Monitor <strong>User</strong> <strong>Guide</strong><br />
The .versatility .of .the .<strong>Thermo</strong> .<strong>Scientific</strong> .Orion .2118XP .oxygen .scavenger .<br />
monitor .allows .the .user .to .set .the .monitor .to .read .hydrazine .or .ELIMIN-<br />
OX®, .depending .on .the .oxygen .scavenger .to .be .measured . . .Refer .to .<br />
Chapter III, Use of Setup Mode .for .instructions .on .how .to .set .the .<br />
monitor .to .read .hydrazine .or .ELIMIN-OX® . .<br />
Hydrazine Measuring Range: 0 ppb to 200 ppb as hydrazine<br />
In .high .pressure .boiler .systems, .hydrazine .is .added .to .react .with .dissolved .<br />
oxygen .present .in .the .system .and .a .small .amount .of .residual .hydrazine .is .<br />
left .behind . . .The .residual .hydrazine .ensures .that .small .amounts .of .dissolved .<br />
oxygen .that .enters .the .system .through .leakage .will .be .removed . . .Residual .<br />
hydrazine .should .be .carefully .monitored .to .prevent .costly .overdosing . . .<br />
Excess .hydrazine .may .also .decompose .into .ammonia, .which .increases .<br />
sample .alkalinity .and .attacks .copper .alloy .components . . .Efficient .control .of .<br />
hydrazine .depends .on .maintaining .a .predetermined .safety .zone .- .typically .<br />
10 .to .50 .ppb .<br />
ELIMIN-OX® Measuring Range: 0 ppb to 1 ppm as ELIMIN-OX®<br />
In .boiler .systems .ELIMIN-OX® .is .very .effective .for .oxygen .scavenging .<br />
and .metal .passivation .at .both .high .and .low .temperatures .and .pressures . . .It .<br />
is .added .to .react .with .the .dissolved .oxygen .in .the .system .and .to .passivate .<br />
metals . . .A .small .amount .of .residual .ELIMIN-OX® .is .left .that .must .be .<br />
carefully .monitored .to .protect .the .system . . .Excess .ELIMIN-OX® .levels .<br />
result .in .high .oxygen .scavenger .chemical .costs . . .Efficient .control .of .<br />
ELIMIN-OX® .depends .on .maintaining .a .predetermined .optimum . .<br />
dosage .range . . .<br />
I-3
General Information<br />
Principles of Operation<br />
Figure I-<br />
Orion 2118XP Schematic<br />
<strong>Thermo</strong> <strong>Scientific</strong> Orion 2118XP Oxygen Scavenger Monitor <strong>User</strong> <strong>Guide</strong><br />
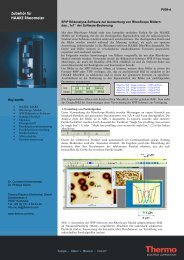
The .sample .enters .the .<strong>Thermo</strong> .<strong>Scientific</strong> .Orion .2118XP .oxygen .scavenger .<br />
monitor .and .passes .through .the .inlet .valve, .bypass/needle .valve, .inlet .filter, .<br />
pressure .regulator, .flow .meter .and .into .the .restrictor .tubing . . .The .sample .<br />
then .passes .through .the .fluid .connector .block .into .a .reagent .bottle .through .<br />
a .diffusion .tubing .assembly .where .pH .adjustment .takes .place .and .iodine .<br />
is .added . . .The .pH-adjusted .sample .then .flows .back .through .the .connector .<br />
block .into .the .reagent .mixing .loop .where .the .oxygen .scavenger .in .the .<br />
sample .mixes .with .iodine .reagent .to .form .iodide . . .The .sample .then .passes .<br />
the .iodide .electrode, .reference .electrode .and .temperature .probe .and .flows .<br />
into .an .atmospheric .drain .via .the .diverter .valve .<br />
ORION 2118XP<br />
Oxygen Scavenger<br />
I-4
General Information<br />
<strong>Thermo</strong> <strong>Scientific</strong> Orion 2118XP Oxygen Scavenger Monitor <strong>User</strong> <strong>Guide</strong><br />
The .oxygen .scavenger .present .in .the .sample .reacts .with .the .iodine .to .form .<br />
iodide .ion:<br />
. OSred + X • I2 → 2X • I¯ + OSox<br />
Where: .<br />
. OSred .= . .oxygen .scavenger .reduced<br />
. OSox . .= . .oxygen .scavenger .oxidized .<br />
The .iodide .sensing .electrode .responds .logarithmically .to .changes .in .the .<br />
resulting .iodide .ion .concentration . . .This .response .is .described .by .the .<br />
Nernst .equation: .<br />
E = Eo + 2.3 (RT/nF) log (C/Ciso)<br />
Where: .<br />
E . = .measured .electrode .potential, .mV .<br />
Eo . . = .potential, .when .C .equals .Ciso, .mV .<br />
R . = .ideal .gas .constant .<br />
T . . = .temperature .of .sample, .degrees .K .<br />
n . . = .valence .of .ionic .species .(-1 .for .iodide .ion) .<br />
F . . = .Faraday’s .constant .<br />
C . = .effective .iodide .concentration .(activity) .<br />
Ciso .= . .concentration .(activity) .of .iodide .ion .where .potential .E .is .<br />
temperature .independent .(isopotential .point) .<br />
The .above .equation .indicates .that .the .measured .potential .varies .with .both .<br />
temperature .and .the .concentration .of .the .ion .of .the .interest . . .In .order .to .<br />
eliminate .error .caused .by .fluctuations .in .sample .temperature, .the .2118XP .<br />
microprocessor .constantly .updates .temperature .corrections .from .data .<br />
supplied .by .the .ATC .probe . .<br />
From .the .Nernst .equation, .the .theoretical .response .of .an .iodide .ion .<br />
selective .electrode .to .a .ten-fold .change .in .concentration .at .25 .˚C .is . .<br />
-59 .16 .mV . . .This .is .referred .to .as .the .electrode .slope .(S) . . .Most .electrodes, .<br />
however, .do .not .exhibit .a .theoretical .slope . . .Therefore, .the .instrument .is .<br />
calibrated .to .determine .its .actual .value . . .Two .standards .are .used .to .provide .<br />
information .necessary .for .the .microprocessor .to .compute .the .actual .slope .<br />
and .E0 .for .use .during .sample .analysis . .<br />
I-5
General Information<br />
<strong>Thermo</strong> <strong>Scientific</strong> Orion 2118XP Oxygen Scavenger Monitor <strong>User</strong> <strong>Guide</strong><br />
Acid .is .added .to .the .sample .to .prevent .a .competing .reaction .from .<br />
occurring:<br />
. 3I2 .+ .H2O . .→ .5I¯ .+ .IO3¯ .+ .6H+<br />
Maintaining .acidic .conditions .prevents .the .release .of .iodide .which .would .<br />
cause .high .apparent .reductant .readings .<br />
The .pH .adjustment .and .iodine .addition .are .accomplished .by .the .patented .<br />
passive-diffusion .process .wherein .the .sample .passes .through .a .length .of .<br />
tubing .in .the .reagent .bottle .that .contains .the .acid .reagent .and .iodine . . .The .<br />
reagent .and .iodine .diffuse .through .the .tube .wall .and .mix .with .the .sample . . .<br />
This .passive .method .eliminates .sample .contamination .problems .due .to .<br />
reagent .contamination .and .makes .the .fluid .handling .apparatus .simple .and .<br />
reliable . .<br />
I-6
General Information<br />
Principles of<br />
Calibration<br />
Dynamic Two Point<br />
Calibration (DYN)<br />
Offline Calibration<br />
<strong>Thermo</strong> <strong>Scientific</strong> Orion 2118XP Oxygen Scavenger Monitor <strong>User</strong> <strong>Guide</strong><br />
Calibration .procedures .for .analytical .instruments .are .important .and .must .<br />
be .performed .carefully . . .The .<strong>Thermo</strong> .<strong>Scientific</strong> .Orion .2118XP .oxygen .<br />
scavenger .monitor .uses .a .dynamic .two .point .calibration .that .utilizes .<br />
advanced .electrode .technology .in .combination .with .a .dynamic .calibrator . . .<br />
The .dynamic .two .point .calibration .procedure .provides .maximum .<br />
calibration .accuracy .and .requires .the .use .of .the .dynamic .calibrator, .Cat . .<br />
No . .21DC00 .(115 ./ .220 .V) . . .In .addition .to .calculating .the .Eo .value .of .<br />
the .electrode, .as .is .done .in .an .offline .calibration .procedure, .this .procedure .<br />
determines .electrode .slope . . .To .perform .a .dynamic .two .point .calibration, .<br />
the .Orion .2118XP .is .first .connected .to .a .reductant-free .sample .stream . . .<br />
An .appropriate .diluted .standard .is .prepared .and .then .a .syringe .is .filled .<br />
with .the .diluted .standard .and .mounted .on .the .calibrator . . .The .calibrator .<br />
is .then .mounted .near .the .monitor .and .the .syringe .tubing .is .connected .to .<br />
the .standard .injection .port . . .By .adjusting .the .calibrator .pump .settings, .<br />
two .different .flow .rates .produce .two .known .standards .that .are .diluted .into .<br />
the .sample .background . . .By .pressing .the .appropriate .keys .on .the .monitor .<br />
when .prompted, .the .monitor’s .microprocessor .completes .the .calibration . . .<br />
After .allowing .approximately .30 .minutes .for .the .calibration .solution .to .be .<br />
flushed .from .the .system, .the .Orion .2118XP .can .begin .sample .measurement .<br />
again . .<br />
In .addition .to .a .dynamic .two .point .calibration, .an .offline .calibration .can .<br />
be .performed .with .some .oxygen .scavengers . . .Since .the .oxygen .scavenger .<br />
concentration .in .feedwater .is .normally .controlled .over .a .rather .narrow .<br />
range, .usually .an .offline .calibration .procedure .is .sufficient .to .provide .<br />
accurate .results . . .The .offline .calibration .procedure .has .the .advantage .of .<br />
being .quick .and .easy .to .perform . . .If .sample .reductant .concentrations .are .<br />
expected .to .vary .widely .from .day .to .day .or .if .online .verification .of .monitor .<br />
readings .is .desired, .a .dynamic .two .point .calibration .should .be .performed . .<br />
The .offline .calibration .feature .of .the .Orion .2118XP .allows .the .user .to .<br />
adjust .the .monitor .to .values .determined .by .alternate .methods .used .in .their .<br />
laboratory .such .as .a .standard .colorimetric .method .<br />
The .offline .calibration .is .essentially .a .one .point .calibration . . .To .perform .an .<br />
offline .calibration, .a .sample .is .taken .from .the .bypass .of .the .instrument; .the .<br />
sample .concentration .value .is .stored .in .memory; .the .sample .is .analyzed .by .<br />
an .alternate .method .of .choice; .the .previously .stored .reading .is .adjusted .to .<br />
the .lab .method .result; .and .the .instrument .is .then .returned .to .the .analysis .<br />
mode . . .The .term .“offline .calibration” .refers .only .to .the .fact .that .a .sample .<br />
from .Orion .2118XP .bypass .is .taken .“offline” .for .laboratory .analysis; .in .<br />
fact, .no .downtime .is .experienced .during .the .procedure .and .the .instrument .<br />
remains .online .throughout . .<br />
I-7
General Information<br />
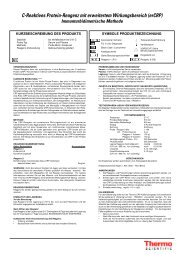
Fluidics Diagram<br />
Mode Indicator<br />
Scrolling Marquee<br />
LCD Display<br />
Warning Icon<br />
Status Indicators<br />
Keypad<br />
Flow Meter<br />
Reference<br />
Electrode<br />
Iodide<br />
Electrode<br />
Flow Cell Block<br />
Fluid Connector<br />
Block<br />
Diffusion Tubing<br />
Assembly<br />
Bottle Clamp<br />
Reagent Bottle<br />
Figure I-<br />
Fluidics Diagram<br />
ORION 2118XP<br />
Oxygen Scavenger<br />
<strong>Thermo</strong> <strong>Scientific</strong> Orion 2118XP Oxygen Scavenger Monitor <strong>User</strong> <strong>Guide</strong><br />
Mounting<br />
Hole<br />
Pressurized<br />
Reference<br />
Filling<br />
Solution<br />
Air Pump<br />
Restructor<br />
Tube<br />
Assembly<br />
Reagent<br />
Mixing<br />
Loop<br />
Pressure<br />
Regulator<br />
Bypass/Needle<br />
Valve<br />
Inlet Filter<br />
Reagent<br />
Bottle<br />
Adapter<br />
Assembly<br />
Inlet Valve<br />
I-8
General Information<br />
Glossary<br />
Refer .to .Figure I-2 .<br />
<strong>Thermo</strong> <strong>Scientific</strong> Orion 2118XP Oxygen Scavenger Monitor <strong>User</strong> <strong>Guide</strong><br />
Inlet Valve – Accepts .the .sample .stream .via .1/4 .inch .NPTF .connector . . .<br />
The .user .must .supply .the .sample .with .a .pressure .between .14 .and .100 .psig . .<br />
Inlet Filter – 60-micron .stainless .steel .filter .that .traps .particulate .matter .in .<br />
the .sample .stream . .<br />
Bypass/Needle Valve – Used .to .redirect .flow .in .bypass .system .<br />
Pressure Regulator – Adjusts .flow .of .incoming .sample .stream .<br />
Flow Valve – .Used .to .turn .off .flow .to .the .flow .cell .<br />
Flow Meter – Measures .the .sample .flow .rate .<br />
Restrictor Tube Assembly – Used .in .conjunction .with .pressure .regulator .<br />
to .maintain .a .steady .sample .flow .rate .<br />
Fluid Connector Block – Connects .the .reagent .bottle .to .the .sample .stream .<br />
and .flow .cell .assembly .<br />
Diffusion Tubing Assembly – Semi-permeable .tubing .through .which .<br />
reagent .and .iodine .diffuse .into .the .sample .<br />
Reagent Bottle – Contains .iodine .solution .and .acid .reagent .that .adjusts .<br />
the .sample .pH . .<br />
Thumbscrew – .Supports .the .reagent .bottle .<br />
Reagent Bottle Clamp – .Holds .the .reagent .bottle .securely .in .place .<br />
Reagent Mixing Loop – .Mixes .the .iodine .reagent .with .the .oxygen .<br />
scavenger .in .the .sample .to .form .iodide, .which .is .measured .by .the .iodide .<br />
sensing .electrode .<br />
Flow Cell – Contains .reference .electrode, .sensing .electrode .and .ATC .probe . .<br />
Iodide Electrode – Senses .iodide .ions .in .the .sample .stream .and .produces .<br />
an .electrical .potential .dependent .on .the .oxygen .scavenger .concentration .<br />
Reference Electrode – Provides .a .constant .reference .potential .and .<br />
completes .the .measurement .circuit .<br />
I-9
General Information<br />
<strong>Thermo</strong> <strong>Scientific</strong> Orion 2118XP Oxygen Scavenger Monitor <strong>User</strong> <strong>Guide</strong><br />
Pressurized Reference Electrode Filling Solution Bottle – Provides .a .<br />
constant .flow .of .electrolyte .solution .through .the .reference .electrode .for .<br />
maximum .stability .<br />
Check Valve – .Prevents .the .backflow .of .electrolyte .from .the .pressurized .<br />
reservoir .<br />
ATC probe – Measures .sample .temperature .and .inputs .data .to .the .<br />
microprocessor .for .automatic .temperature .compensation .(ATC) .<br />
Standard Injection Port – Allows .the .connection .of .the .dynamic .calibrator .<br />
tubing .to .the .fluid .connector .block .during .a .dynamic .two .point .calibration .<br />
Air Pump – Provides .air .to .pressurize .the .filling .solution .bottle . .<br />
LCD Display – Provides .digital .readouts .of .concentration, .temperature, .<br />
millivolts .and .error .codes . .<br />
Keypad – Consists .of .five .mode .keys, .four .prompt .indicator .lights, .two .<br />
scroll .keys .and .one .key .for .entering .data . . .Mode .and .error .indicators .are .<br />
also .incorporated .on .the .keypad . .<br />
Status Indicator – 2 .LED .lights .that .illuminate .according .to .current .status .<br />
of .the .instrument .<br />
Green Light: Indicates .system .is .in .correct .working .condition .<br />
Yellow Light: Indicates .a .warning, .system .in .hold, .or .maintenance .is .<br />
required .<br />
Red Light: Indicates .something .is .seriously .wrong .<br />
Note: When .either .the .yellow .or .red .LED .is .lit, .there .may .be .an .entry .in .<br />
the .diagnostic .menus .indicating .the .error . . . . .<br />
I- 0
Unpacking the<br />
Instrument<br />
Figure II-<br />
Unpacking the Instrument<br />
<strong>Thermo</strong> <strong>Scientific</strong> Orion 2118XP Oxygen Scavenger Monitor <strong>User</strong> <strong>Guide</strong><br />
Chapter II Instrument Preparation<br />
The .<strong>Thermo</strong> .<strong>Scientific</strong> .Orion .2118XP .oxygen .scavenger .monitor .has .been .<br />
assembled, .tested .and .packaged .with .great .care . . .Refer .to .Figure II-1 .<br />
Report .any .obvious .damage .of .shipping .container .to .carrier .and .hold .for .<br />
inspection . . .The .carrier .(not .<strong>Thermo</strong> .Fisher .<strong>Scientific</strong>) .is .responsible .for .<br />
any .damage .incurred .during .shipment .<br />
1 . . Open .outer .box . . .Remove .top .two .foam .corner .support .pieces . .<br />
2 . . Open .inner .box . . .This .box .should .contain .(1) .each .of .the .following .<br />
items:<br />
. • . . .Orion .2118XP .oxygen .scavenger .monitor .and .ATC . .<br />
temperature .probe .<br />
. • . .Iodide .electrode .box .<br />
. • . .Reference .electrode .box .<br />
. • . . .Options .kit: . .cable .glands, .conduit .fitting, .fuse .kit, .green .screw .<br />
terminal .<br />
. • . .<strong>User</strong> .guide .CD . .<br />
3 . . Remove .the .cardboard .retaining .shell .by .sliding .over .the .entire .<br />
mounting .board .and .the .monitor . .<br />
4 . . Carefully .remove .entire .mounting .board .with .monitor .from .inner .box . .<br />
Note: Do .not .lift .or .pull .instrument .by .the .fluidics .or .electronic .<br />
components .<br />
5 . . Unbolt .the .monitor .from .mounting .board .by .removing .the .4 .mounting .<br />
bolts .with .a .9/16 .wrench . . .These .bolts .may .be .discarded .<br />
6 . . Carefully .place .the .monitor .at .a .convenient .location .until .proper .<br />
installation .can .be .completed .<br />
II-
Instrument Preparation<br />
Mounting and<br />
Plumbing Instructions<br />
Recommendations<br />
Instructions<br />
<strong>Thermo</strong> <strong>Scientific</strong> Orion 2118XP Oxygen Scavenger Monitor <strong>User</strong> <strong>Guide</strong><br />
Refer .to .Appendix A1, Mounting Dimensions.<br />
Warning: Do .not .connect .power .prior .to .mounting .and .plumbing .of .the .<br />
instrument . . .<br />
• . Select .a .site .for .the .instrument .that .allows .it .to .be .permanently .bolted .<br />
with .ample .height .for .atmospheric .drain .operation . . .Be .sure .there .is .<br />
ready .access .to .both .electronic .controls .and .flow .cell .calibration .port . .<br />
• . A .clearance .of .15 .inches .(about .40 .cm) .must .be .allowed .above .the .<br />
calibration .port . . .Insert .the .pipette .vertically .(not .angled) .during .the .<br />
calibration . .<br />
• . The .analyzer .location .must .permit .connection .to .a .plumbed .in .sample .<br />
line, .a .drain, .and .AC .power .supply .and .any .connections .for .output .<br />
devices . .<br />
• . The .analyzer .should .be .mounted .as .close .to .the .sampling .point .as .<br />
possible . . .This .ensures .the .fastest .possible .response .to .a .changing .<br />
sample .condition . . .Refer .to .Appendix A-4, Sample Conditions .<br />
• . For .proper .flow .cell .operations, .instrument .must .be .installed .straight .<br />
and .level .upon .its .mounting .location . . .<br />
1 . . Prepare .mounting .holes . . .Carefully .lift .the .analyzer .and .bolt .into .place . . .<br />
Do .not .lift .the .instrument .by .holding .on .to .any .of .the .plumbing .or .<br />
fluid .handling .components .<br />
2 . . Connect .a .waste .line .to .the .outlet .of .the .instrument, .which .is .3⁄4 .NPT .<br />
male . . .The .waste .line .should .be .connected .to .a .drain .of .sufficient .<br />
capacity, .0 .5 .inch .(1 .27 .cm) .OD .is .recommended .<br />
3 . . Connect .a .sample .line .to .the .inlet .of .the .instrument, .which .is .1⁄4 .<br />
NPT .female . . .It .is .recommended .that .a .shutoff .valve .be .installed .at .the .<br />
sampling .point .<br />
4 . . The .system .must .be .mounted .and .leveled, .vertically .for .proper .<br />
operation .<br />
II-
Instrument Preparation<br />
Sample Requirements<br />
<strong>Thermo</strong> <strong>Scientific</strong> Orion 2118XP Oxygen Scavenger Monitor <strong>User</strong> <strong>Guide</strong><br />
Additional .information .is .listed .in .Appendix A-3, Specifications.<br />
Sample inlet connection – 1/4” .NPTF . . .If .particulate .matter .is .present .<br />
in .sample, .pre-filtration .is .necessary . . .The .60-micron .stainless .steel .filter .<br />
located .after .inlet .valve .will .remove .moderate .amounts .of .particulates . .<br />
Flow rate – 40 .mL/min .(nominal) .<br />
Pressure – 8-100 .psig . . .Consult .Technical .Support .for .details .on .sample .<br />
handling .if .pressure .is .outside .range . .<br />
Temperature – Temperature .must .be .between .5-35 .˚C . .<br />
Oxygen scavenger level – Oxygen .scavenger .levels .are .read .directly .in .ppb .<br />
or .ppm, .when .calibrated .with .Orion .standard . .<br />
Sample alkalinity – Sample .alkalinity .should .not .be .more .than .50 .<br />
ppm .CaCO3 .equivalent . . .For .higher .sample .alkalinity, .contact .Technical .<br />
Support . .<br />
Technical Support<br />
. .US .& .Canada: . .800-225-1480 .<br />
Dom . .Fax: .978-232-6015 .<br />
Int’l . .Fax: .978-232-6031<br />
. www .thermo .com/water .<br />
II-3
Instrument Preparation<br />
Electrical Wiring<br />
Safety Requirements<br />
Recommendations<br />
<strong>Thermo</strong> <strong>Scientific</strong> Orion 2118XP Oxygen Scavenger Monitor <strong>User</strong> <strong>Guide</strong><br />
Warning: Be .sure .to .read .and .observe .the .following .safety .<br />
recommendations! . .<br />
Warning .icon .provides .important .information .that .should .be .strictly .<br />
followed .when .using .the .unit .for .your .own .safety . . .Failure .to .follow .these .<br />
instructions .may .result .in .injuries .<br />
• . Prior .to .wiring, .a .switch .or .circuit .breaker .for .disconnecting .the .<br />
instrument .from .power .supply .should .be .installed .<br />
• . .It .should .be .in .close .proximity .to .the .monitor .and .with .easy .reach .of .<br />
the .user .<br />
• . . It .should .be .marked .as .the .disconnecting .device .for .the .monitor .<br />
• . To .reduce .the .risk .of .shock .hazard, .disconnect .power .prior .to .opening .<br />
instrument .<br />
• . Before .connecting .the .instrument .to .the .main, .make .sure .that .the .<br />
voltage .lies .within .either .range: .85-132V; .200 .mA; .or .170-264V; .100 .<br />
mA; .50-60 .Hz .AC .<br />
• . Cutting .off .the .power .by .disconnecting .power .source .will .not .reset .<br />
the .2118XP . . .This .unit .incorporates .a .non-volatile .memory .and .will .<br />
maintain .calibration .and .settings .after .power .failure . . .Battery .power .is .<br />
supplied .to .the .display .for .the .date .and .time .functions .<br />
• . If .a .repair .should .be .required, .or .to .arrange .a .Return .Material .<br />
Authorization, .call .Technical .Support .at .1-800-225-1480 .(domestic .toll .<br />
free) .or .contact .your .authorized .dealer . .<br />
• . Installation .and .wiring .of .the .2118XP .may .only .be .carried .out .in .<br />
accordance .with .applicable .local .and .national .codes .per .this .instruction .<br />
manual . .<br />
• . Be .sure .to .observe .the .technical .specifications .and .input .ratings .<br />
II-4
Instrument Preparation<br />
Warning Labels<br />
and Locations<br />
Figure II-<br />
Faceplate<br />
Figure II-3<br />
Power Supply<br />
<strong>Thermo</strong> <strong>Scientific</strong> Orion 2118XP Oxygen Scavenger Monitor <strong>User</strong> <strong>Guide</strong><br />
Warning: Provides .important .information .that .should .be .strictly .<br />
followed .when .using .the .unit .for .your .own .safety . . .Failure .to .follow .these .<br />
instructions .may .result .in .injuries .<br />
Safety .warning .icons .are .used .in .two .locations .on .the .2118XP . . .<br />
• . Faceplate . . .Refer .to .Figure II-2 .<br />
• . Power .supply . . .Refer .to .Figure II-3 .<br />
Replace .fuse .only .with .fuse .of .same .rating .<br />
ORION 2117XP<br />
Chloride<br />
Fuse Holder<br />
Fuse<br />
II-5
Instrument Preparation<br />
Wiring the Instrument<br />
Figure II-4<br />
Electronics Enclosure<br />
with Cable Glands<br />
Required Tools<br />
4 Compression<br />
Screws<br />
<strong>Thermo</strong> <strong>Scientific</strong> Orion 2118XP Oxygen Scavenger Monitor <strong>User</strong> <strong>Guide</strong><br />
Hinge Pin<br />
Power Cable<br />
Hole Locations<br />
Cable Glands<br />
Electrode Cables<br />
Warning: Be .sure .to .read .and .observe .the .following .requirements! . .If .you .<br />
install .the .wrong .fuse .for .your .system, .you .could .damage .the .instrument . . .<br />
Make .sure .you .select .the .correct .fuse .rating .and .discard .the .additional .fuses .<br />
supplied .in .the .fuse .kit . .<br />
• . Options .kit- .includes .fuses, .cable .glands, .conduit .fitting, .and .green .<br />
screw .terminal .<br />
• . Phillips .head .screwdriver .<br />
• . 2 .mm .blade .flat-head .screwdriver .<br />
1 . . Open .the .faceplate: .Loosen .the .four .screws .using .a .Phillips .head .<br />
screwdriver . . .Electronics .faceplate .will .open .via .the .hinge .pin .<br />
connection .<br />
2 . . Remove .one .or .two .of .the .two .unused .cable .glands .as .required .for .<br />
wiring .power .cable .or .auxiliary .connections . . .Power .cable .optional .hole .<br />
locations .in .Figure II-4 .<br />
3 . . Select .and .install .appropriate .size .cable .gland .or .conduit .fitting .as .<br />
required .<br />
4 . . Feed .power .cable .through .conduit .or .cable .glands .as .appropriate .<br />
II-6
Instrument Preparation<br />
Figure II-5<br />
Terminal Connector Location<br />
<strong>Thermo</strong> <strong>Scientific</strong> Orion 2118XP Oxygen Scavenger Monitor <strong>User</strong> <strong>Guide</strong><br />
5 . . Wire .the .power .cable .to .the .green .screw .terminal .connector .from .the .<br />
options .kit . . .Select .correct .terminal .for .hot .conductor .depending .on .<br />
line .voltage . . .Refer .to .Figure II-5 .for .terminal .connector .location .and .<br />
Figure II-3 .for .terminal .wiring .position.<br />
6 . . Plug .to .terminal .connector .into .power .supply . . .Refer .to .Figure II-3 .<br />
7 . . Select .the .correct .fuse .from .the .fuse .kit . . .Install .by .inserting .fuse . .<br />
in .fuse .holder .and .secure .by .twist .and .lock .method . . .Refer .to . .<br />
Figure II-3 . . .The .fuses .are .clearly .labeled .with .the .appropriate .voltages .<br />
for .your .system . . .Refer .to .Figure II-3 . . .Refer .to .the .table .below .for . .<br />
fuse .selection .<br />
AC Voltage Fuse Rating<br />
115V 200mA, 250V, Fast Acting<br />
230V 100mA, 250V Fast Acting<br />
Terminal Connector<br />
II-7
Instrument Preparation<br />
Terminal<br />
Assignments<br />
Figure II-6<br />
Terminal Assignments<br />
<strong>Thermo</strong> <strong>Scientific</strong> Orion 2118XP Oxygen Scavenger Monitor <strong>User</strong> <strong>Guide</strong><br />
Alarms / Relays Analog Outputs Temperature ISE<br />
Relay 1<br />
(normally open)<br />
Relay 1<br />
(normally open)<br />
3 Relay 2<br />
(normally open)<br />
4 Relay 2<br />
(normally open)<br />
5 Relay 3<br />
(normally closed)<br />
6 Relay 3<br />
(normally closed)<br />
7 Air pump<br />
8 Air pump<br />
9 Sout (mA)<br />
Iodide Signal<br />
0 GND<br />
Common Ground *<br />
-<br />
7<br />
Tout (mA)<br />
Temp. Signal<br />
Key Electrical Notes for the Orion 2118XP:<br />
8 ATC - Not Used<br />
9 ATC 3 Electrode<br />
Shield **<br />
0 Solution<br />
Ground<br />
4 Reference<br />
Electrode<br />
Not Used 5 Not Used<br />
6 Iodide<br />
Electrode<br />
• . Fluid .ground .is .provided .through .the .Orion .ATC .Probe .(30 .kΩ), .<br />
Cat . .No . .2100TP . . .Only .an .Orion .ATC .probe .can .be .used .to .provide .<br />
the .fluid .ground .<br />
• . Do .not .connect .to .any .of .the .unused .terminals: .12-17, .21-22 .and .25 . .<br />
* Terminal 9 & 11 are not isolated from each other. They share terminal 10 as a<br />
common ground.<br />
** Do not attach external ground shield connections to terminal 23<br />
II-8
Instrument Preparation<br />
Installation of Reagent and<br />
Diffusion Tubing<br />
Figure II-7<br />
Reagent Bottle Assembly<br />
<strong>Thermo</strong> <strong>Scientific</strong> Orion 2118XP Oxygen Scavenger Monitor <strong>User</strong> <strong>Guide</strong><br />
Warning: Acid .reagent .is .hazardous . . .Use .protective .glasses .and .gloves .and .<br />
work .in .a .well-ventilated .area . . .Avoid .contact .with .skin .or .clothes . . .In .case .<br />
of .skin .contact, .flush .skin .immediately .with .water .to .prevent .burns . . .Refer .<br />
to .the .bottle .label .for .precautions . .<br />
1 . . Support .the .bottom .of .the .reagent .bottle .and .release .the .holding .clamp .<br />
with .one .hand . . .Turn .the .thumbscrew .counterclockwise .to .release .the .<br />
reagent .bottle . . .Unscrew .the .white .bottle .cap .and .gray .tubing .connector .<br />
assembly . . .The .bottle .that .is .supplied .with .the .instrument .can .be .used .<br />
as .a .spare .<br />
2 . . Take .a .new .bottle .of .the .reagent, .Cat . .No . .181811, .to .a .well .ventilated .<br />
area, .such .as .a .laboratory .fume .hood . . .Unscrew .and .remove .the .white .<br />
cap .on .the .bottle .<br />
3 . . Connect .the .diffusion .tubing, .Cat . .No . .181860, .to .the .tubing .<br />
connector .assembly . . .Place .the .tubing .assembly .and .cap .into .the .bottle .<br />
4 . . Replace .the .gray .cap .and .screw .the .white .cap .on .tightly .<br />
5 . . Insert .the .four .nipples .on .the .top .of .the .reagent .bottle .into .the .fluid .<br />
connector .block .<br />
6 . . Support .the .bottom .of .the .reagent .bottle .with .one .hand .and .tighten .the .<br />
thumbscrew .clockwise .<br />
7 . . Clamp .the .bottle .to .the .fluidics .panel .to .secure .it .<br />
.<br />
II-9
Instrument Preparation<br />
Installation of New<br />
Iodide Electrode<br />
Installation of<br />
ATC Probe<br />
<strong>Thermo</strong> <strong>Scientific</strong> Orion 2118XP Oxygen Scavenger Monitor <strong>User</strong> <strong>Guide</strong><br />
The .Orion .iodide .electrode .(Cat . .No . .100022) .must .be .used .in .<br />
conjunction .with .the .Orion .reference .electrode .(Cat . .No . .100056) .<br />
1 . . Unpack .the .iodide .electrode .(Cat . .No . .100022) .and .carefully .remove .<br />
it .from .the .storage .cap . . .Use .the .electrode .polishing .strip .(Cat . .No . .<br />
948201) .to .gently .polish .the .sensing .surface .for .about .30 .seconds . . .<br />
2 . . Insert .the .iodide .electrode .into .the .holder .in .the .flow .cell . . .Refer .to .<br />
Figure I-2 .for .the .location . .<br />
3 . . Plug .the .electrode .cable .marked .“Sensing” .into .the .top .of .the .electrode . . .<br />
Be .sure .to .push .back .black .cap .to .verify .a .secure .connection .between .<br />
male .and .female .pin .connection .prior .to .tightening .<br />
4 . . Tighten .the .screw .cap .connection .to .cable . .<br />
Note: Do .not .twist .cables .while .tightening .connection . . .Twisting .may .<br />
cause .damage .requiring .premature .replacement .of .the .cables .<br />
5 . . Wait .at .least .one .hour .before .calibrating .analyzer . .<br />
The .automatic .temperature .compensation .(ATC) .probe .(Cat . .No . .2100TP) .<br />
is .already .connected .to .the .correct .terminal .for .temperature .upon .delivery . .<br />
Insert .ATC .into .its .holder .in .the .flow .cell . .<br />
II- 0
Instrument Preparation<br />
Installation of New<br />
Reference Electrode<br />
Figure II-8<br />
Reference Electrode<br />
with Filling Solution<br />
<strong>Thermo</strong> <strong>Scientific</strong> Orion 2118XP Oxygen Scavenger Monitor <strong>User</strong> <strong>Guide</strong><br />
1 . . Unpack .the .reference .electrode .(Cat . .No . .100056) .and .its .instruction .<br />
sheet .from .the .shipping .box . . .<br />
2 . . Carefully .remove .protective .caps .from .bottom .and .sidearm .of .electrode . .<br />
Save .caps .for .future .storage .<br />
3 . . Shake .out .as .much .of .the .fill .solution .as .possible .through .the .sidearm . .<br />
Drain .through .the .sidearm .or .use .a .pipette .or .syringe .if .needed .<br />
4 . . While .passing .1/8 .inch .tubing .into .electrode .sidearm, . .slide .1/4 .inch .<br />
tubing .over .sidearm . . .The .outside .tubing .should .extend .3/8 .to .1/2 .<br />
inches .over .sidearm . . .Refer .to .Figure II-8 .<br />
Reference Electrode<br />
Filling Solution<br />
Gasket<br />
Tubing Bottle Adaptor<br />
Small 1/8” Tubing Inside<br />
Bottle Cap<br />
Large 1/4” Tubing<br />
Electrode Sidearm<br />
Ceramic Frit<br />
5 . . Remove .cap .and .fluid .seal .from .reference .electrode .filling .solution .<br />
bottle .(Cat . .No . .181073) . . .Hold .bottle .in .upright .position . . .Check .<br />
that .rubber .gasket .is .properly .aligned, .then .connect .cap .end .of .tubing .<br />
assembly .to .bottle . . .The .1/8-inch .tubing .should .extend .into .the .bottle .<br />
6 . . Hold .reservoir .bottle .above .electrode .with .bottle .cap .end .down . .<br />
Electrode .should .be .horizontal .with .sidearm .pointing .up . . .Gently .shake .<br />
electrode .to .allow .any .trapped .air .bubbles .to .rise .into .bottle .as .electrode .<br />
fills .with .solution .<br />
7 . . Dry .off .ceramic .frit .on .base .of .the .electrode .with .tissue .paper . . .Squeeze .<br />
bottle .for .a .few .seconds . . .A .small .amount .of .filling .solution .should .<br />
bead .up .on .frit .surface, .indicating .good .fill .solution .flow . . .If .no .<br />
moisture .is .visible .electrode .is .clogged .and .should .be .replaced .<br />
II-
Instrument Preparation<br />
<strong>Thermo</strong> <strong>Scientific</strong> Orion 2118XP Oxygen Scavenger Monitor <strong>User</strong> <strong>Guide</strong><br />
8 . . Invert .the .electrolyte .bottle .and .snap .into .the .clip . . .Locate .the .discharge .<br />
tube .of .the .air .pump .on .the .fluidic .panel . . .The .end .of .the .tubing .has .<br />
a .hollow .push .pin .for .pressurizing .the .reference .reservoir . . .Puncture .<br />
the .base .of .the .bottle .with .the .pin .and .push .the .pin .down .until .its .<br />
PVC .base .abuts .bottle . . .Mark .and .date .the .level .of .filling .solution .in .<br />
reservoir . . .Electrolyte .solution .will .begin .to .flow .into .electrode . . . .<br />
Caution: Failure .to .vent .fill .solution .bottle .will .lead .to .noisy .and .<br />
drifting .output .signals .<br />
9 . . Plug .the .electrode .cable .marked .“Reference” .into .the .top .of .the .<br />
electrode, .and .tighten .the .screw .cap . . .Be .sure .to .push .back .black .cap .<br />
to .verify .a .secure .connection .between .male .and .female .pin .connection .<br />
prior .to .tightening .<br />
10 . .Tighten .screw .cap .connection .to .cable . .<br />
Note: Do .not .twist .cables .while .tightening .connection . . .Twisting .may .<br />
cause .damage .requiring .premature .replacement .of .the .cables .<br />
11 . .Insert .the .reference .electrode .into .its .holder .in .the .flow .cell . . .Refer .<br />
Figure I-2 .for .location . .<br />
II-
Description of<br />
Basic Unit Controls<br />
Figure III-<br />
Faceplate<br />
<strong>Thermo</strong> <strong>Scientific</strong> Orion 2118XP Oxygen Scavenger Monitor <strong>User</strong> <strong>Guide</strong><br />
Chapter III Instrument Operation<br />
B<br />
E<br />
ORION 2118XP<br />
Oxygen Scavenger<br />
Parameter Location on Display Options Default<br />
A Mode Indicator Top right corner Hold, Cal, Setup, Measure, Diagnostic Measure<br />
B Marquee Display Top left corner <strong>User</strong> prompts through scrolling<br />
messaging<br />
D<br />
A<br />
F<br />
No ATC connected 25 ˚C<br />
ATC connected: measured at actual<br />
B Temperature Display Top left corner Celsius Measured at actual<br />
C<br />
Main Data Display<br />
Middle Line:<br />
Lower Line:<br />
Concentration<br />
mV<br />
Concentration in ppb<br />
At initial installation if no electrodes<br />
are connected: Connect electrodes and<br />
calibrate<br />
Lower line will be disabled at<br />
installation. Refer to use of setup mode<br />
to initiate lower line visibility.<br />
D Measurement Units Left & right side of display ISE concentration ppb/ppm Auto ranging: ppb - ppm<br />
E System Status Yellow /Green Indicator Light:<br />
Left side of display above<br />
View icon<br />
F System Error Red Indicator Light:<br />
Right side of display above<br />
Setup icon<br />
Green: System OK<br />
Yellow: System warning<br />
Yellow: Needs calibration<br />
Red: System failure Red: At initial installation, needs<br />
electrodes installed and calibration.<br />
C<br />
III-
Instrument Operation<br />
Description of<br />
Keypad Icons<br />
Figure III-<br />
Keypad Icons<br />
Icon Parameter/Mode Action Operational Selections<br />
Enters calibration mode Calibration mode with user prompts DYN, Off Line<br />
Scroll up numbers<br />
Scroll up in cal & setup mode<br />
Used to edit values<br />
Use to select available modes by using up arrow.<br />
Enters setup mode System setup mode at the last parameter used<br />
by the user.<br />
<strong>Thermo</strong> <strong>Scientific</strong> Orion 2118XP Oxygen Scavenger Monitor <strong>User</strong> <strong>Guide</strong><br />
0-9 selectable by digit, first digit selectable 0-19<br />
DYN, Password, Date, Time, Log, Hold, Reset, Display,<br />
Measure, Temp, Alarm, mAmp, Test, Calibration<br />
Move cursor to the right digit Used to edit values When move to final digit, system will wrap around to<br />
first digit<br />
Enters test mode Use enter key to advance through sequence<br />
of displays<br />
Diagnostics will appear in top right of screen<br />
Scroll down numbers<br />
Scroll down in cal & setup<br />
mode<br />
Used to edit values that can be changed<br />
by the user<br />
Use to select available modes by using down arrow<br />
view Log-changes between date and data that was<br />
logged at that specific time interval<br />
+/- Toggles negative/positive sign when editing<br />
numbers<br />
enter function Accepts value or selection displayed on LCD,<br />
stores in memory<br />
enter (in test mode Only) Used in test mode to display additional<br />
information for selected menus<br />
exit to measure Exits from setup or cal modes and puts the<br />
monitor into sample mode.<br />
ORION 2118XP<br />
Oxygen Scavenger<br />
Last calibration slope & E o, error list, log points by time<br />
& date, error log by time & date, software rev., serial #,<br />
displays measured mV and noise, mAmp output values<br />
(sensor & temp), and display test<br />
0-9 selectable by digit, first digit selectable 0-19<br />
Use to view data in calibration, measurement &<br />
status logs<br />
Instrument automatically enters sample mode when<br />
first turned on and after calibration.<br />
last screen Used in test and setup mode <strong>User</strong> may move back to previous menu.<br />
Can not be used in calibration mode: If exit calibration,<br />
user must re-do calibration<br />
decimal point Sets the decimal point position in some<br />
menus with decimal point numbers between toggles<br />
ppm & ppb.<br />
Used in set decimal position<br />
III-
Instrument Operation<br />
Use of Setup Mode<br />
Navigating tips for the<br />
setup mode<br />
Once in a submenu of the<br />
selected setup menu<br />
<strong>Thermo</strong> <strong>Scientific</strong> Orion 2118XP Oxygen Scavenger Monitor <strong>User</strong> <strong>Guide</strong><br />
Before .first .sample .measurements .on .<strong>Thermo</strong> .<strong>Scientific</strong> .Orion .2118XP .<br />
oxygen .scavenger .monitor .can .be .performed, .a .successful .calibration .must .<br />
be .performed .and .accepted .by .the .user .and .stored .in .the .memory .<br />
• . Press . .to .enter .setup .mode .<br />
• . Setup: .appears .in .mode .indicator .<br />
• . Hold: .displayed .while .in .setup .mode .<br />
• . System .returns .to .the .last .parameter .used .by .the .user .<br />
• . Press . .and . .to .loop .through .16 .menu .selections .<br />
• . Press . .to .select .the .desired .menu .selection .and .enter .submenu .<br />
• . Press . .and . .to:<br />
• . Toggle .between .on .and .off .in .selected .submenus . .<br />
• . Scroll .and .set .first .digit .value .to .0-19<br />
• . Scroll .and .set .values .to .0-9 .of .selected .digit<br />
• . Press . .to .scroll .right .to .set .each .digit .(4 .digits .total) .<br />
• . Press . .to .exit .current .screen .and .return .to .previous .screen . .<br />
• . Press . .to .exit .setup .menu .and .return .to .measurement .mode . . .If . .<br />
.is .pressed, . .will .not .return .the .user .to .the .setup .mode . . .<strong>User</strong> .<br />
must .enter .into .setup .mode .by .pressing . .<br />
III-3
Instrument Operation<br />
Password protection<br />
<strong>Thermo</strong> <strong>Scientific</strong> Orion 2118XP Oxygen Scavenger Monitor <strong>User</strong> <strong>Guide</strong><br />
Default password: .0000 .– .indicates .password .protection .has .not .been .<br />
activated .<br />
System password: .Management .secured .password .protection .of .setup .and .<br />
calibration .process .<br />
Calibration password: .<strong>User</strong> .secured .password .for .protection .of .calibration .<br />
process .only .<br />
If password(s) are activated:<br />
• . System .prompts .user .to .enter .system .password .<br />
• . Marquee: .ENTER .PASSWORD<br />
• . Main .display .top: .PASS<br />
• . Main .display .bottom: .0000 .– .flashing<br />
• . Correct .password: .allows .user .to .enter .setup .mode .for .custom .<br />
programming .options .<br />
• . Incorrect .password: .Password .incorrect .or .not .entered .correctly .<br />
• . System .password<br />
• . Marquee: .SYSTEM .PASS .INCORRECT<br />
• . Main .display: .E035 .<br />
• . Calibration .password<br />
• . Marquee: .CAL .PASS .INCORRECT<br />
• . Main .display: .E034 . .<br />
• . Verify .password .and .re-enter .password .<br />
If password(s) are de-activated:<br />
• . System .enters .the .last .setup .menu .screen .used .by .the .user . .<br />
• . Marquee: .Flashes .current .menu .selection .<br />
• . Main .display: .SEL .SCrn<br />
III-4
Instrument Operation<br />
Setup Mode<br />
Password<br />
Date<br />
Time<br />
Log<br />
Hold<br />
<strong>Thermo</strong> <strong>Scientific</strong> Orion 2118XP Oxygen Scavenger Monitor <strong>User</strong> <strong>Guide</strong><br />
Features 16 programmable menus: Order .of .menu .selection .is .dependent .<br />
upon .the .direction .the .user .scrolls .when .pressing . .or . . . .Listed .<br />
below .by .pressing . .<br />
Set .either .of .2 .password .options .<br />
• . .System .password .– .Setup .settings .protected . . .Accessed .by .authorized .<br />
users .only<br />
• . .Calibration .password .– .Calibration .menu .data .is .protected . . .Accessed .<br />
by .authorized .users .only<br />
• . .Default .password: .0000 .– .Disables .both .passwords<br />
• . Forgot .your .password? . .Contact .Technical .Support .at .800-225-1480<br />
Set .date .in .US .or .Europe .format .<br />
• . .Enter .month, .day .and .year<br />
• . .Default .date: .System .will .continue .to .keep .date .and .time .due .to .battery .<br />
back .up . . .<strong>User</strong> .must .set .in .accordance .to .local .time .zone .<br />
• . If .the .battery .is .removed .the .system .will .show .01/01/2000<br />
Set .instrument .time .<br />
• . .Enter .hour .and .minutes .in .24 .hour .format<br />
• . .Default .time: .System .will .continue .to .keep .date .and .time .due .to .battery .<br />
back .up . . .<strong>User</strong> .must .set .in .accordance .to .local .time .zone<br />
• . If .the .battery .is .removed .the .system .will .show .00:01<br />
Set .data .logging .interval .for .measure .log . . .Calibration .and .error .logs .are .<br />
accessed .in .Test Mode .section .<br />
• . .Set .log .interval .– .Hour: .Minutes<br />
• . .Measure .log .(Sens)<br />
• . .System .log .(Stat)<br />
• . .Default .log .interval: . .00:00 .– .logging .disabled<br />
• . Minimum .log .interval .is .5 .minutes<br />
Set .time .system .remains .in .hold .before .system .will .display .actual .<br />
measurements .after .calibration .<br />
• . .Once .hold .time .expires, .system .implements .any .custom .programmable .<br />
changes .to .the .setup .parameters .from .the .defaults<br />
• . .After .calibration, .hold .allows .rinse .down .of .flow .cell .prior .to .recording .<br />
actual .oxygen .scavenger .values<br />
• . .Default .hold .time: .30 .minutes<br />
III-5
Instrument Operation<br />
Reset<br />
Display<br />
Model<br />
Measure<br />
Temp<br />
<strong>Thermo</strong> <strong>Scientific</strong> Orion 2118XP Oxygen Scavenger Monitor <strong>User</strong> <strong>Guide</strong><br />
Reset .the .instrument .to .factory .defaults .for .setup .parameters .<br />
• . .Used .to .troubleshoot .system<br />
. .(A .hard .reset .can .be .used .if .the .keypad .and .software .is .not .responding .to .<br />
touch . .Refer .to .Chapter VI, Resetting the Computer .)<br />
Warning: . .Resetting .the .computer .will .lose .all .stored .information .including .<br />
relay, .logs .and .calibration .settings . .<br />
Controls .the .automatic .lighting .options .for .backlit .display .<br />
• . .Auto .– .system .will .toggle .brightness .in .response .to .ambient .light .source<br />
• . .On .– .backlit .display .always .on<br />
• . .Off .– .backlit .display .always .off<br />
• . .Default: .Auto<br />
Sets .the .monitor .to .the .hydrazine .or .ELIMIN-OX® .application .mode . . .<br />
Note: .Changing .the .application .mode .will .reset .the .monitor, .restore .the .<br />
default .parameters .and .clear .any .saved .calibration .information .<br />
Sets .significant .digits, .mV, .and .concentration .units .displayed .when .in .<br />
measure .mode . .<br />
Set number of significant digits displayed.<br />
• . .Toggle .between .2, .3 .and .4 .significant .digits<br />
• . .Default .significant .digits: .3<br />
Enables second LCD line (mV) values to display.<br />
• . .Toggle .between .mV: .On .or .Off<br />
• . .Default .mV: .Off<br />
Select concentration unit for oxygen scavenger values.<br />
• . .Auto .– .auto-ranges .from .ppb .to .ppm<br />
• . .ppb .– .part .per .billion .of .oxygen .scavenger<br />
• . .pp .– .parts .per .million .of .oxygen .scavenger .(pp .= .ppm)<br />
• . .Default: .Auto<br />
Allows .user .to .adjust .the .temperature .reading .from .ATC .probe .by .± .1 .˚C<br />
• . .Default: .0 .0 .degrees .C<br />
III-6
Instrument Operation<br />
Alarm<br />
mAmp<br />
mADJ<br />
<strong>Thermo</strong> <strong>Scientific</strong> Orion 2118XP Oxygen Scavenger Monitor <strong>User</strong> <strong>Guide</strong><br />
Set .up .to .3 .alarms: .high, .low, .and .an .error .signaling .contact .<br />
• . .Relays .1 .and .2 .(RLY1, .RLY2) .are .normally .open .dry .contacts .used .to .set .<br />
high .and .low .alarms .for .measurement .values<br />
• . .RLY .1 .options: .Off, .High, .Low<br />
• . .RLY .2 .options: .Off, .High, .Low<br />
• . .Relay .3 .(RLY3) .is .a .normally .closed .contact .that .can .be .dedicated .to .<br />
errors . . .This .will .close .if .power .to .monitor .is .lost . . .This .alarm .is .effected .<br />
by .calibration, .errors .and .offline .or .hold .status<br />
• . .RLY .3 .options: .Off, .Cal, .Hold, .Err<br />
• . .Default: .All .alarms .(1, .2, .& .3) .are .set .to .off<br />
Set .either .of .2 .analog .current .outputs .(Sout .& .Tout), .set .scale .values .as .<br />
linear .or .logarithmic .curves .for .concentration .<br />
Analog outputs:<br />
• . .Toggle .between .4-20 .mA .or .0-20 .mA .current .signals .<br />
• . .The .outputs .share .a .common .return, .but .are .isolated .from .the .main .<br />
circuitry .of .the .monitor .<br />
• . .Default .output .current: .4-20 .mA<br />
• . .Sout: .dedicated .oxygen .scavenger .output .<br />
• . .Tout: .dedicated .temperature .output .<br />
• . .Toggle .between .logarithmic .(LOG) .and .linear .(LIn) .scale .for .each .<br />
• . .Set .Low .(LO) .and .high .(HI) .limits .for .Sout .and .Tout .<br />
• . .Default .scale .values: .for .both .log .and .lin .<br />
Default Concentration:<br />
• . .Low .limit: .1 .0 .ppb<br />
• . .High .limit: .100 .ppb<br />
Default Temperature:<br />
• . .Low .limit: .5 .0 .degrees .C<br />
• . .High .limit: .45 .0 .degrees .C<br />
Set .the .mAmp .offset .adjustment .value .<br />
• . .Select .the .Sout .or .Tout .output .<br />
• . .Toggle .the .numeric .offset .value .and .positive .or .negative .offset .value .<br />
• . .Default: .00 .00 .mAmp .<br />
III-7
Instrument Operation<br />
Test<br />
Cal<br />
DYN<br />
<strong>Thermo</strong> <strong>Scientific</strong> Orion 2118XP Oxygen Scavenger Monitor <strong>User</strong> <strong>Guide</strong><br />
Allows .user .to .test .relays .and .analog .output .lines .<br />
• . .<strong>User</strong> .selectable .method .to .activate/deactivate .relays .and .outputs .to . .<br />
be .tested<br />
• . .Verify .the .accuracy .of .the .analog .outputs .lines .if .used .with .an .external .<br />
loop .calibrator<br />
Diagnostics: Indicated .in .mode .window . . .Will .provide .the .following .test .<br />
values/settings .for: .mAmp .output, .relays, .and .the .air .pump . .<br />
mAmp output:<br />
• . 4-20 .or .0-20<br />
• . Sout .= .LO .and .HI .values<br />
• . Tout .= .LO .and .HI .values<br />
Relays:<br />
• . RLY .1 .= .Toggle .On/Off<br />
• . RLY .2 .= .Toggle .On/Off<br />
• . RLY .3 .= .Toggle .On/Off<br />
Air pump:<br />
• . AIR .= .Toggle .On/Off<br />
Set .calibration .frequency .in .hours .(h) .<br />
• . High .limit: .19999 .h .<br />
• . Low .limit: . .00000 .h<br />
• . Default: .720 .hours<br />
<strong>User</strong> .selectable .values .for .customized .dynamic .two .point .calibration .(DYN)<br />
• . Monitor .Flow .Rate: . .40 .mL/min<br />
• . Standard .Concentration: . .2 .ppm<br />
• . Standard .1 .Percent .Flow .(Hydrazine): . .99 .9% .<br />
• . Standard .1 .Percent .Flow .(ELIMIN-OX®): . .93 .5% .<br />
• . Standard .1 .Range: . .x/100<br />
• . Standard .2 .Percent .Flow .(Hydrazine): . .52 .5% .<br />
• . Standard .2 .Percent .Flow .(ELIMIN-OX®): . .48 .6% .<br />
• . Standard .2 .Range: . .x/10<br />
III-8
Instrument Operation<br />
Default <strong>User</strong> Action Marquee<br />
Scrolling<br />
SETUP<br />
Press to enter setup mode<br />
• Setup: appears as mode indicator<br />
mode window<br />
• Hold: displayed while in Setup mode<br />
• System will enter setup mode at last<br />
used menu<br />
Use the to loop through 16 menu<br />
selections.<br />
Press to select the desired menu<br />
selection and enter submenu to customize<br />
setup parameters<br />
<strong>Thermo</strong> <strong>Scientific</strong> Orion 2118XP Oxygen Scavenger Monitor <strong>User</strong> <strong>Guide</strong><br />
PASS<br />
DATE<br />
TIME<br />
LOG<br />
HOLD<br />
RSET<br />
DISP<br />
MDL<br />
MEAS<br />
TEMP<br />
ALRM<br />
mAMP<br />
mADJ<br />
TEST<br />
CAL<br />
DYN<br />
Main Display<br />
top line<br />
bottom line<br />
SEL<br />
SCrn<br />
Notes<br />
III-9
Instrument Operation<br />
Default <strong>User</strong> Action Marquee<br />
Scrolling<br />
PASS<br />
Press to set new system<br />
and calibration passwords<br />
<strong>Thermo</strong> <strong>Scientific</strong> Orion 2118XP Oxygen Scavenger Monitor <strong>User</strong> <strong>Guide</strong><br />
PASS<br />
(Flashing)<br />
0 0 0 0 SET-UP NEW SYSTEM<br />
PASSWORD<br />
Use / to set first digit<br />
Use to move to set each digit<br />
Use / to set the values of remaining<br />
digits for system password<br />
Press to accept system password and<br />
advance to next screen to set calibration password<br />
SET-UP NEW SYSTEM<br />
PASSWORD<br />
SET-UP NEW SYSTEM<br />
PASSWORD<br />
SET-UP NEW SYSTEM<br />
PASSWORD<br />
0 0 0 0 SET-UP NEW CALIBRATION<br />
PASSWORD<br />
Use / to set first digit<br />
Use to move to set each digit<br />
Use / to set the values of<br />
remaining digits for calibration password<br />
Press to return user to main setup menu<br />
for PASS submenu<br />
Use the to scroll to next menu<br />
SET-UP NEW CALIBRATION<br />
PASSWORD<br />
SET-UP NEW CALIBRATION<br />
PASSWORD<br />
SET-UP NEW CALIBRATION<br />
PASSWORD<br />
PASS<br />
(Flashing)<br />
Main Display<br />
top line<br />
bottom line<br />
SEL<br />
SCrn<br />
PASS<br />
# # # #<br />
(All digits flashing)<br />
PASS<br />
# # # #<br />
(Flashing digit will change)<br />
PASS<br />
# # # #<br />
(Flashing digit will change)<br />
PASS<br />
# # # #<br />
(Flashing digit will change)<br />
PASS<br />
# # # #<br />
(All digits flashing)<br />
PASS<br />
# # # #<br />
(Flashing digit will change)<br />
PASS<br />
# # # #<br />
(Flashing digit will change)<br />
PASS<br />
# # # #<br />
(Flashing digit will change)<br />
SEL<br />
SCrn<br />
Notes<br />
Do not<br />
scroll<br />
value for<br />
first digit<br />
above 9<br />
III- 0
Instrument Operation<br />
Default <strong>User</strong> Action Marquee<br />
Scrolling<br />
DATE<br />
Press to set date<br />
<strong>Thermo</strong> <strong>Scientific</strong> Orion 2118XP Oxygen Scavenger Monitor <strong>User</strong> <strong>Guide</strong><br />
DATE<br />
(Flashing)<br />
US SET USA OR EUROPEAN US<br />
Use / to toggle between US<br />
and EUrO<br />
Press to select and advance to next<br />
screen to set date<br />
0 /0 / 000 ENTER DATE<br />
MM/DD/YYYY (US)<br />
Use / to set first digit<br />
Use to move to set each digit<br />
Use / to set values of<br />
remaining digits. Set values of last two<br />
digits in the year 2 0 # #<br />
Press to return user to main setup menu<br />
for DATE submenu<br />
Use to scroll to next menu<br />
Main Display<br />
top line<br />
bottom line<br />
SEL<br />
SCrn<br />
(Flashing)<br />
SET USA OR EUROPEAN US or EUrO<br />
ENTER DATE<br />
DD/MM/YYYY (EUrO)<br />
ENTER DATE<br />
MM/DD/YYYY (US)<br />
ENTER DATE<br />
DD/MM/YYYY (EUrO)<br />
ENTER DATE<br />
MM/DD/YYYY (US)<br />
ENTER DATE<br />
DD/MM/YYYY (EUrO)<br />
ENTER DATE<br />
MM/DD/YYYY (US)<br />
ENTER DATE<br />
DD/MM/YYYY (EUrO)<br />
DATE<br />
(Flashing)<br />
(Flashing)<br />
# # . # # (Month. Day) US /<br />
(Day.Month) EUrO<br />
2 0 # # (Year)<br />
(All digits flashing)<br />
# # . # # (Month. Day) US /<br />
(Day.Month) EUrO<br />
2 0 # # (Year)<br />
(Flashing digit will change)<br />
# # . # # (Month. Day) US /<br />
(Day.Month) EUrO<br />
2 0 # # (Year)<br />
(Flashing digit will change)<br />
# # . # # (Month. Day) US /<br />
(Day.Month) EUrO<br />
2 0 # # (Year)<br />
(Flashing digit will change)<br />
SEL<br />
SCrn<br />
Notes<br />
III-
Instrument Operation<br />
Default <strong>User</strong> Action Marquee<br />
Scrolling<br />
TIME<br />
Press to set time<br />
<strong>Thermo</strong> <strong>Scientific</strong> Orion 2118XP Oxygen Scavenger Monitor <strong>User</strong> <strong>Guide</strong><br />
TIME<br />
(Flashing)<br />
00:0 ENTER TIME HOUR MINUTE # # : # #<br />
Use / to set first digit for hour<br />
Use to move to set each digit<br />
Use / to set values of remaining<br />
digits for hour and minutes<br />
Press to return user to main setup menu for<br />
TIME submenu<br />
Use to scroll to next menu<br />
Main Display<br />
top line<br />
bottom line<br />
SEL<br />
SCrn<br />
(Hour: Minute)<br />
ENTER TIME HOUR MINUTE # # : # #<br />
(All digits flashing)<br />
(Hour: Minute)<br />
(Flashing digit will change)<br />
ENTER TIME HOUR MINUTE # # : # #<br />
(Hour: Minute)<br />
(Flashing digit will change)<br />
ENTER TIME HOUR MINUTE # # : # #<br />
(Hour: Minute)<br />
(Flashing digit will change)<br />
TIME<br />
(Flashing)<br />
SEL<br />
SCrn<br />
Notes<br />
Set in<br />
4 hour<br />
time<br />
format<br />
III-
Instrument Operation<br />
Default <strong>User</strong> Action Marquee<br />
Scrolling<br />
LOG<br />
Press to set log interval<br />
LOG<br />
(Flashing)<br />
0 0 : 0 0 SET LOG TIME IN HOUR<br />
MINUTES<br />
Use / to set first digit<br />
Use to move to set each digit<br />
Use / to set values<br />
of remaining digits for log interval<br />
Press to return user to main setup<br />
menu for LOG submenu<br />
Use to scroll to next menu<br />
<strong>Thermo</strong> <strong>Scientific</strong> Orion 2118XP Oxygen Scavenger Monitor <strong>User</strong> <strong>Guide</strong><br />
SET LOG TIME IN HOUR<br />
MINUTES<br />
SET LOG TIME IN HOUR<br />
MINUTES<br />
SET LOG TIME IN HOUR<br />
MINUTES<br />
LOG<br />
(Flashing)<br />
Main Display<br />
top line<br />
bottom line<br />
SEL<br />
SCrn<br />
# #: ##<br />
LOg<br />
(All digits flashing)<br />
# # : # #<br />
LOg<br />
(Flashing digit will<br />
change)<br />
# # : # #<br />
LOg<br />
(Flashing digit will<br />
change)<br />
# # : # #<br />
LOg<br />
(Flashing digit will<br />
change)<br />
SEL<br />
SCrn<br />
Notes<br />
To disable the log<br />
enter 0000 for log<br />
interval<br />
The minimum log<br />
interval is 5 minutes<br />
The maximum log<br />
interval is 99 hours<br />
and 59 minutes<br />
III- 3
Instrument Operation<br />
Default <strong>User</strong> Action Marquee<br />
Scrolling<br />
HOLD<br />
Press to set hold time<br />
<strong>Thermo</strong> <strong>Scientific</strong> Orion 2118XP Oxygen Scavenger Monitor <strong>User</strong> <strong>Guide</strong><br />
HOLD<br />
(Flashing)<br />
0 0 : 3 0 ENTER HOLD TIME HOUR<br />
MINUTE<br />
Use / to set first digit<br />
Use to move to set each digit<br />
Use / to set values of remaining<br />
digits for hold time<br />
Press to return user to main setup menu<br />
for HOLD submenu<br />
Use to scroll to next menu<br />
ENTER HOLD TIME HOUR<br />
MINUTE<br />
ENTER HOLD TIME HOUR<br />
MINUTE<br />
ENTER HOLD TIME HOUR<br />
MINUTE<br />
HOLD<br />
(Flashing)<br />
Main Display<br />
top line<br />
bottom line<br />
SEL<br />
SCrn<br />
# # : # #<br />
HOLd<br />
(All digits flashing)<br />
# # : # #<br />
HOLd<br />
(Flashing digit will change)<br />
# # : # #<br />
HOLd<br />
(Flashing digit will change)<br />
# # : # #<br />
HOLd<br />
(Flashing digit will change)<br />
SEL<br />
SCrn<br />
Notes<br />
III- 4
Instrument Operation<br />
Warning: The .reset .command .will .erase .all .user .settings, .logs, .and .calibration .data! . .The .instrument .<br />
needs .to .be .setup .and .calibrated .before .it .can .resume .operation . . .<br />
Default <strong>User</strong> Action Marquee<br />
Scrolling<br />
RSET<br />
Press to reset<br />
To Reset:<br />
Press , then<br />
Press , then<br />
Press<br />
When reset is complete system returns to<br />
measure mode<br />
<strong>User</strong> will need to re-enter the setup menu to<br />
continue to program setup parameters-<br />
Press to return to the setup menu..<br />
To Abort Reset:<br />
Press to return user to main setup<br />
menu for RSET submenu<br />
Use to scroll to next menu<br />
RSET<br />
<strong>Thermo</strong> <strong>Scientific</strong> Orion 2118XP Oxygen Scavenger Monitor <strong>User</strong> <strong>Guide</strong><br />
(Flashing)<br />
PRESS TEST VIEW ENTER<br />
TO RESET<br />
PRESS TEST VIEW ENTER<br />
TO RESET<br />
PRESS TEST VIEW ENTER<br />
TO RESET<br />
RSET<br />
(Flashing)<br />
Main Display<br />
top line<br />
bottom line<br />
SEL<br />
SCrn<br />
rSEt<br />
?<br />
rSEt<br />
?<br />
rSEt<br />
?<br />
SEL<br />
SCrn<br />
Notes<br />
This command<br />
resets all<br />
previously set<br />
parameters to<br />
factory default<br />
values . Use this<br />
command only to<br />
set the device to<br />
original factory<br />
setup values<br />
Warning: Resetting .the .monitor .will .cause .the .computer .to .lose .all .stored .information .including .relay, .<br />
logs .and .calibration .settings . .<br />
Note: Resetting .the .computer .will .not .reset .the .hydrazine .or .ELIMIN-OX® .application .mode . . . .<br />
To .change .the .application .mode, .refer .to .the .MDL .setting .in .this .section .<br />
III- 5
Instrument Operation<br />
Default <strong>User</strong> Action Marquee<br />
Scrolling<br />
DISP<br />
Press to control the automatic lighting<br />
options for backlit display<br />
<strong>Thermo</strong> <strong>Scientific</strong> Orion 2118XP Oxygen Scavenger Monitor <strong>User</strong> <strong>Guide</strong><br />
DISP<br />
(Flashing)<br />
AUtO BACKLIGHT LItE<br />
Use / to scroll through AUtO, On,<br />
or OFF settings<br />
Press to return user to main setup menu<br />
for DISP submenu<br />
Use to scroll to next menu<br />
Main Display<br />
top line<br />
bottom line<br />
SEL<br />
SCrn<br />
AUtO<br />
BACKLIGHT LItE<br />
DISP<br />
(Flashing)<br />
AUtO, On or OFF<br />
(Flashing)<br />
SEL<br />
SCrn<br />
Notes<br />
III- 6
Instrument Operation<br />
Default <strong>User</strong> Action Marquee<br />
Scrolling<br />
MDL<br />
Press to set the monitor to the<br />
hydrazine or ELIMIN-OX ® application mode<br />
<strong>Thermo</strong> <strong>Scientific</strong> Orion 2118XP Oxygen Scavenger Monitor <strong>User</strong> <strong>Guide</strong><br />
MDL<br />
(Flashing)<br />
HYdr SELECT HYDRAZINE OR<br />
ELIMINOX HYdr<br />
Use / to scroll through HYdr or<br />
ELI settings<br />
Press to return user to main setup menu<br />
for MDL submenu<br />
Use to scroll to next menu<br />
Main Display<br />
top line<br />
bottom line<br />
SEL<br />
SCrn<br />
(Flashing)<br />
SELECT HYDRAZINE OR<br />
ELIMINOX HYdr or ELI<br />
MDL<br />
(Flashing)<br />
(Flashing)<br />
Note: Changing .the .application .mode .will .reset .the .monitor, .restore .the .default .parameters .and .clear .any .saved .<br />
calibration .information .<br />
SEL<br />
SCrn<br />
Notes<br />
III- 7
Instrument Operation<br />
Default <strong>User</strong> Action Marquee<br />
Scrolling<br />
MEAS<br />
Press to set significant digits<br />
<strong>Thermo</strong> <strong>Scientific</strong> Orion 2118XP Oxygen Scavenger Monitor <strong>User</strong> <strong>Guide</strong><br />
MEAS<br />
(Flashing)<br />
3 SET NUMBERS OF<br />
SIGNIFICANT DIGITS<br />
Use / to scroll through 2, 3 and<br />
4 significant digit options<br />
Press to select and advance to next<br />
screen to enable second LCD line (mV) value<br />
on measurement screen<br />
SET NUMBERS OF<br />
SIGNIFICANT DIGITS<br />
OFF SHOW mV ON LINE 2 OFF<br />
Use / to toggle between OFF<br />
and On options<br />
Press to select and return to next<br />
screen to set concentration units for oxygen<br />
scavenger (ISE) measurements<br />
Main Display<br />
top line<br />
bottom line<br />
SEL<br />
SCrn<br />
SIg<br />
(2, 3 or 4)<br />
SIg<br />
(2, 3 or 4)<br />
(Flashing)<br />
SHOW mV ON LINE 2 On or OFF<br />
AUtO SELECT ISE UNIT UnIt<br />
Use / to scroll through AUtO,<br />
ppb, and pp (ppm)* options<br />
Press to return user to main setup<br />
menu for MEAS submenu<br />
Use to scroll to next menu<br />
(Flashing)<br />
AUtO<br />
SELECT ISE UNIT UnIt<br />
MEAS<br />
(Flashing)<br />
(Flashing)<br />
AUtO, ppb or pp (ppm)*<br />
(Flashing)<br />
SEL<br />
SCrn<br />
Notes<br />
*pp<br />
indicates<br />
ppm<br />
III- 8
Instrument Operation<br />
Default <strong>User</strong> Action Marquee<br />
Scrolling<br />
TEMP<br />
Press to set<br />
temperature adjustment<br />
TEMP<br />
(Flashing)<br />
0 . 0 C ADJUST TEMPERATURE AdJ<br />
Use / to set first digit to<br />
adjust temperature<br />
Use to move to set next digit<br />
Use / to set next digit<br />
Press to set a positive or negative<br />
temperature adjustment<br />
Press to return user to main setup<br />
menu for TEMP submenu<br />
Use to scroll to next menu<br />
<strong>Thermo</strong> <strong>Scientific</strong> Orion 2118XP Oxygen Scavenger Monitor <strong>User</strong> <strong>Guide</strong><br />
Main Display<br />
top line<br />
bottom line<br />
SEL<br />
SCrn<br />
# .# C<br />
ADJUST TEMPERATURE AdJ<br />
(Flashing)<br />
# .# C<br />
(Flashing digit will change)<br />
ADJUST TEMPERATURE AdJ<br />
# .# C<br />
(Flashing digit will change)<br />
ADJUST TEMPERATURE AdJ<br />
- # .# C<br />
TEMP<br />
(Flashing)<br />
SEL<br />
SCrn<br />
Notes<br />
The maximum<br />
temperature<br />
adjustment is<br />
± ˚C<br />
III- 9
Instrument Operation<br />
Default <strong>User</strong> Action Marquee<br />
Scrolling<br />
ALARM<br />
Press to set up to 3 alarms: high, low, and<br />
an error signaling contact (rLY 1, rLY 2, & rLY3)<br />
<strong>Thermo</strong> <strong>Scientific</strong> Orion 2118XP Oxygen Scavenger Monitor <strong>User</strong> <strong>Guide</strong><br />
ALRM<br />
(Flashing)<br />
OFF SELECT ALARM 1 HIGH<br />
LOW OR OFF<br />
Use / to select HI, LO or OFF for rLY1<br />
SELECT ALARM 1 HIGH<br />
LOW OR OFF<br />
Main Display<br />
top line<br />
bottom line<br />
SEL<br />
SCrn<br />
rLY1<br />
OFF<br />
(Flashing)<br />
rLY1<br />
HI, LO or OFF<br />
(Flashing)<br />
Notes<br />
Press to set rLY1 alarm value If OFF option is<br />
selected the system<br />
will proceed to rLY<br />
00 ppb To set HI or LO values for rLY1:<br />
Use to move decimal and ppm/ppb<br />
Use / to set digit values<br />
Use to move to set next digit<br />
Press to accept value and advance to next<br />
screen for rLY2<br />
OFF SELECT ALARM 2 HIGH<br />
LOW OR OFF<br />
Use / to set HI, LO or OFF for rLY2<br />
ENTER VALUE rLY1<br />
### [concentration]<br />
SELECT ALARM 2<br />
HIGH LOW OR OFF<br />
rLY2<br />
OFF<br />
(Flashing)<br />
rLY2<br />
HI, LO or OFF<br />
(Flashing)<br />
Press to set rLY2 alarm value If OFF option is<br />
selected the system<br />
will proceed to rLY3<br />
ppm To set HI or LO values for rLY2:<br />
Use to move decimal and ppm/ppb<br />
Use / to set digit values<br />
Use to move to set next digit<br />
Press to accept value and advance to next<br />
screen for rLY3<br />
ENTER VALUE rLY2<br />
### [concentration]<br />
III- 0
Instrument Operation<br />
Default <strong>User</strong> Action Marquee<br />
Scrolling<br />
ALARM (cont’d)<br />
OFF SELECT CALIBRATION<br />
HOLD ERROR OR OFF<br />
Use / to set CAL, HOLD, Err<br />
OFF for rLY3<br />
Press to return user to main setup menu<br />
for ALRM submenu<br />
Use to scroll to next menu<br />
<strong>Thermo</strong> <strong>Scientific</strong> Orion 2118XP Oxygen Scavenger Monitor <strong>User</strong> <strong>Guide</strong><br />
SELECT CALIBRATION,<br />
HOLD, ERROR OR OFF<br />
ALRM<br />
(Flashing)<br />
Main Display<br />
top line<br />
bottom line<br />
rLY3<br />
OFF<br />
(Flashing)<br />
rLY3<br />
CAL, HOLD, Err or OFF<br />
(Flashing)<br />
SEL<br />
SCrn<br />
Notes<br />
III-
Instrument Operation<br />
Default <strong>User</strong> Action Marquee<br />
Scrolling<br />
mAMP<br />
Press to set analog output parameters<br />
<strong>Thermo</strong> <strong>Scientific</strong> Orion 2118XP Oxygen Scavenger Monitor <strong>User</strong> <strong>Guide</strong><br />
mAMP<br />
(Flashing)<br />
4- 0 Select 0-20 or 4-20 4-20<br />
LOG<br />
Use / to toggle between 4-20 or<br />
0-20 output values<br />
Press to set analog output and advance to<br />
next screen for sensing output (SOUt) for oxygen<br />
scavenger<br />
Use / to toggle<br />
between LOG and LIn output<br />
Press to set SOUt low (LO) limit<br />
Main Display<br />
top line<br />
bottom line<br />
SEL<br />
SCrn<br />
(Flashing)<br />
Select 0-20 or 4-20 4-20 or 0-20<br />
SELECT LOG OR LINEAR<br />
OUTPUT<br />
.0 ppb mA SENSOR OUTPUT LOW<br />
VALUE<br />
Use to move decimal and ppm / ppb<br />
Use / to set digit values<br />
Use to move to set each digit<br />
Use / to set values of remaining<br />
digits for SOUt low value<br />
Press to accept value and advance to next<br />
screen to set SOUt high (HI) limit<br />
mA SENSOR OUTPUT LOW<br />
VALUE<br />
mA SENSOR OUTPUT LOW<br />
VALUE<br />
00 ppb mA SENSOR OUTPUT HIGH<br />
VALUE<br />
Use to move decimal and ppm / ppb<br />
Use / to set digit values<br />
Use to move to set each digit<br />
Use / to set values of remaining<br />
digits for SOUt high value<br />
mA SENSOR OUTPUT HIGH<br />
VALUE<br />
mA SENSOR OUTPUT HIGH<br />
VALUE<br />
(Flashing)<br />
SOUt<br />
LOG or LIn<br />
(Flashing)<br />
LO<br />
#.# ppb<br />
(Flashing)<br />
LO<br />
# # #. #<br />
(Flashing digit will change)<br />
LO<br />
# # #. #<br />
(Flashing digit will change)<br />
HI<br />
#.# ppb<br />
(Flashing)<br />
HI<br />
# # #. #<br />
(Flashing digit will change)<br />
HI<br />
###. #<br />
(Flashing digits will<br />
change)<br />
Notes<br />
The default<br />
scale values<br />
the same for<br />
both LOG and<br />
LIn<br />
III-
Instrument Operation<br />
Default <strong>User</strong> Action Marquee<br />
Scrolling<br />
mAMP (cont’d)<br />
Press to accept value and advance to next<br />
screen for temperature output (tOUt)<br />
Press to set tOUt low (LO) limit<br />
<strong>Thermo</strong> <strong>Scientific</strong> Orion 2118XP Oxygen Scavenger Monitor <strong>User</strong> <strong>Guide</strong><br />
SET TEMP OUTPUT VALUE tOUt<br />
5 .0 C mA TEMP OUTPUT LOW<br />
VALUE<br />
To set tOUt low (LO) limit value:<br />
Use / to set digit values<br />
Use arrow to move to set next digit<br />
Use to set a positive or negative<br />
temperature value<br />
Press to accept values and advance to next<br />
screen to set tOUt high value<br />
mA TEMP OUTPUT LOW<br />
VALUE<br />
45 C mA TEMP OUTPUT HIGH<br />
VALUE<br />
To set tOUt high (HI) limit value:<br />
Use / to set digit values<br />
Use arrow to move to set next digit<br />
Press to return user to main setup menu for<br />
mAMP submenu<br />
Use to scroll to next menu<br />
mA TEMP OUTPUT HIGH<br />
VALUE<br />
mAMP<br />
(Flashing)<br />
Main Display<br />
top line<br />
bottom line<br />
(Flashing)<br />
LO<br />
#.# C<br />
(Flashing)<br />
LO<br />
# #.# C<br />
(Flashing digit will change)<br />
HI<br />
# #.# C<br />
(Flashing)<br />
HI<br />
# ##. # C<br />
(Flashing digit will change)<br />
SEL<br />
SCrn<br />
Notes<br />
III- 3
Instrument Operation<br />
Default <strong>User</strong> Action Marquee<br />
Scrolling<br />
mADJ<br />
Press to set SOUt and tOUt offset values<br />
<strong>Thermo</strong> <strong>Scientific</strong> Orion 2118XP Oxygen Scavenger Monitor <strong>User</strong> <strong>Guide</strong><br />
mADJ<br />
(Flashing)<br />
SOUt SELECT TEMP OR SENSOR<br />
OUTPUT<br />
00 .00<br />
Use / to toggle between SOUt or<br />
tOUt mA value. Select SOUt.<br />
Press to set the SOUt mA offset value<br />
Use / to set the numeric value for<br />
the SOUt mA offset value<br />
Use to set a positive or negative SOUt mA<br />
offset value.<br />
Press to return user to main setup menu<br />
for mADJ submenu<br />
Press to set the mA offset value<br />
SELECT TEMP OR SENSOR<br />
OUTPUT<br />
SENSOR 4-20mA OUTPUT<br />
ADJUSTMENT<br />
mAMP<br />
(Flashing)<br />
SOUt SELECT TEMP OR SENSOR<br />
OUTPUT<br />
00 .00<br />
Use / to toggle between SOUt or<br />
tOUt mA value. Select tOUt.<br />
Press to set the tOUt mA offset value<br />
Use / to set the numeric value for<br />
the tOUt mA offset value<br />
Use to set a positive or negative tOUt mA<br />
offset value.<br />
Press to return user to main setup menu<br />
for mADJ submenu<br />
Use to scroll to next menu<br />
SELECT TEMP OR SENSOR<br />
OUTPUT<br />
TEMP 4-20mA OUTPUT<br />
ADJUSTMENT<br />
mAMP<br />
(Flashing)<br />
Main Display<br />
top line<br />
bottom line<br />
SEL<br />
SCrn<br />
SOUt<br />
(Flashing)<br />
SOUt or tOUt<br />
(Flashing)<br />
AdJ<br />
00.0#<br />
(Flashing digit will change)<br />
SEL<br />
SCrn<br />
SOUt<br />
(Flashing)<br />
SOUt or tOUt<br />
(Flashing)<br />
AdJ<br />
00.0#<br />
(Flashing digit will change)<br />
SEL<br />
SCrn<br />
Notes<br />
III- 4
Instrument Operation<br />
Default <strong>User</strong> Action Marquee<br />
Scrolling<br />
4- 0<br />
Actual<br />
LO Value<br />
Displayed<br />
Actual<br />
HI Value<br />
Displayed<br />
TEST<br />
Press to test mAmp outputs (4-<br />
20), relays (rLY), and the air pump (AIr)<br />
To Select: tOUt<br />
Use / to scroll through<br />
4-20, rLY, and AIr setting. Select 4-20<br />
Press to test 4-20 outputs<br />
Use / to toggle between<br />
SOUt and tOUt. Select tOUt<br />
Press for tOUt; low value (LO)<br />
Press for tOUt; high value (HI)<br />
Press to return user to main<br />
setup menu for TEST submenu<br />
Press to test mAmp outputs<br />
(4-20), relays (rLY), and the air pump<br />
(AIr)<br />
TEST<br />
(Flashing)<br />
<strong>Thermo</strong> <strong>Scientific</strong> Orion 2118XP Oxygen Scavenger Monitor <strong>User</strong> <strong>Guide</strong><br />
Main Display<br />
top line<br />
bottom line<br />
SEL<br />
SCrn<br />
SELECT mA OR RELAY tESt<br />
4-20<br />
(Flashing)<br />
SELECT TEMP OR SENSOR OUTPUT tOUt or SOUt<br />
SELECT TEMP OR SENSOR OUTPUT tOUt<br />
mA TEMP OUTPUT LOW VALUE LO<br />
(Flashing)<br />
(Flashing)<br />
#. # C<br />
mA TEMP OUTPUT HIGH VALUE HI<br />
#. # C<br />
TEST<br />
(Flashing)<br />
SEL<br />
SCrn<br />
Notes<br />
DIAGNOSTICS<br />
appears above<br />
SETUP in mode<br />
window<br />
4 .0 mA are<br />
sourced at output<br />
terminal<br />
0 mA are<br />
sourced at output<br />
terminal<br />
III- 5
Instrument Operation<br />
Default <strong>User</strong> Action Marquee<br />
Scrolling<br />
4- 0<br />
Actual<br />
LO Value<br />
Displayed<br />
Actual<br />
HI Value<br />
Displayed<br />
rLY<br />
TEST (cont’d)<br />
To Select: SOUt<br />
Use / to select 4-20<br />
Press to test 4-20 outputs<br />
Use / to toggle between SOUt<br />
and tOUt. Select SOUt<br />
Press for SOUt; low value (LO)<br />
Press for SOUt; high value (HI)<br />
Press to return user to main setup<br />
menu for TEST submenu<br />
Press to test mAmp outputs (4-20),<br />
relays (rLY), and the air pump (AIr)<br />
To Select: rLY<br />
Use / to select rLY<br />
Press to test rLY outputs<br />
<strong>Thermo</strong> <strong>Scientific</strong> Orion 2118XP Oxygen Scavenger Monitor <strong>User</strong> <strong>Guide</strong><br />
SELECT mA OR RELAY tESt<br />
Main Display<br />
top line<br />
bottom line<br />
4-20<br />
(Flashing)<br />
SELECT TEMP OR SENSOR OUTPUT tOUt or SOUt<br />
(Flashing)<br />
SELECT TEMP OR SENSOR OUTPUT SOUt<br />
mA SENSOR OUTPUT LOW VALUE LO<br />
mA SENSOR OUTPUT HIGH VALUE HI<br />
TEST<br />
(Flashing)<br />
(Flashing)<br />
#. # C<br />
#. # C<br />
SEL<br />
SCrn<br />
SELECT mA OR RELAY tESt<br />
rLY<br />
(Flashing)<br />
Notes<br />
4 .0 mA are<br />
sourced<br />
at output<br />
terminal 9<br />
0 .0 mA are<br />
sourced<br />
at output<br />
terminal 9<br />
III- 6
Instrument Operation<br />
Default <strong>User</strong> Action Marquee<br />
Scrolling<br />
Actual rLY<br />
Status<br />
Actual rLY<br />
Status<br />
Actual rLY 3<br />
Status<br />
Actual AIr<br />
Status<br />
TEST (cont’d)<br />
Use / to toggle rLY1 setting<br />
On or OFF<br />
Press to accept rLY1 and move to<br />
rLY 2 status<br />
Use / to toggle rLY2 setting On<br />
or OFF<br />
Press to accept rLY2 and move to<br />
rLY 3 status<br />
Use / to toggle rLY3 setting On<br />
or OFF<br />
Press to accept rLY3 and advance to air<br />
pump setting (AIr)<br />
Use / to toggle air pump On or<br />
OFF<br />
Press to return user to main setup menu<br />
for TEST submenu<br />
Press to test mAMP outputs (4-20),<br />
relays (rLY), and the air pump (AIr)<br />
To select AIr:<br />
<strong>Thermo</strong> <strong>Scientific</strong> Orion 2118XP Oxygen Scavenger Monitor <strong>User</strong> <strong>Guide</strong><br />
USE ARROWS TO TOGGLE RELAY 1 rLY 1<br />
Main Display<br />
top line<br />
bottom line<br />
On or OFF<br />
USE ARROWS TO TOGGLE RELAY 2 rLY 2<br />
On or OFF<br />
USE ARROWS TO TOGGLE RELAY 3 rLY 3<br />
USE ARROWS TO TOGGLE AIR<br />
PUMP STATE<br />
TEST<br />
(Flashing)<br />
On or OFF<br />
AIr<br />
On or OFF<br />
SEL<br />
SCrn<br />
Notes<br />
Relay<br />
contact<br />
according<br />
to screen<br />
indication<br />
Relay<br />
contact<br />
according<br />
to screen<br />
indication<br />
Relay<br />
contact<br />
according<br />
to screen<br />
indication<br />
Relay<br />
contact<br />
according<br />
to screen<br />
indication<br />
III- 7
Instrument Operation<br />
Default <strong>User</strong> Action Marquee<br />
Scrolling<br />
Actual AIr<br />
Status<br />
TEST (cont’d)<br />
Use / to scroll through 4-20,<br />
rLY, and AIr setting. Select AIr<br />
Press to test air pump<br />
Use / to toggle AIr setting On<br />
or OFF<br />
Press to return user to main setup<br />
menu for TEST submenu<br />
Use to scroll to next menu<br />
<strong>Thermo</strong> <strong>Scientific</strong> Orion 2118XP Oxygen Scavenger Monitor <strong>User</strong> <strong>Guide</strong><br />
SELECT mA OR RELAY tESt<br />
USE ARROWS TO TOGGLE AIR<br />
PUMP STATE<br />
USE ARROWS TO TOGGLE AIR<br />
PUMP STATE<br />
TEST<br />
(Flashing)<br />
Main Display<br />
top line<br />
bottom line<br />
AIr<br />
(Flashing)<br />
AIr<br />
Actual Status<br />
AIr<br />
On or OFF<br />
SEL<br />
SCrn<br />
Notes<br />
Relay<br />
contact<br />
according<br />
to screen<br />
indicator<br />
III- 8
Instrument Operation<br />
Default <strong>User</strong> Action Marquee<br />
Scrolling<br />
CAL<br />
Press to set calibration frequency in<br />
hours (h)<br />
<strong>Thermo</strong> <strong>Scientific</strong> Orion 2118XP Oxygen Scavenger Monitor <strong>User</strong> <strong>Guide</strong><br />
CAL<br />
(Flashing)<br />
7 0 ENTER CALIBRATION FREQUENCY<br />
IN HOURS<br />
Use / to set calibration<br />
frequency value<br />
Use to move to set each digit<br />
Use / to set values of<br />
remaining digits for calibration frequency<br />
value<br />
Press to return user to main setup<br />
menu for CAL submenu<br />
Use to scroll to next menu<br />
ENTER CALIBRATION FREQUENCY<br />
IN HOURS<br />
ENTER CALIBRATION FREQUENCY<br />
IN HOURS<br />
CAL<br />
(Flashing)<br />
Main Display<br />
top line<br />
bottom line<br />
SEL<br />
SCrn<br />
CAL<br />
###<br />
(Flashing)<br />
CAL<br />
# # #<br />
(Flashing digit will<br />
change)<br />
CAL<br />
# # #<br />
(Flashing digit will<br />
change)<br />
SEL<br />
SCrn<br />
Notes<br />
To disable<br />
alarm set<br />
value to 000<br />
III- 9
Instrument Operation<br />
Default <strong>User</strong> Action Marquee<br />
Scrolling<br />
DYN<br />
Press to program user customized<br />
two point dynamic calibration values<br />
DYN<br />
<strong>Thermo</strong> <strong>Scientific</strong> Orion 2118XP Oxygen Scavenger Monitor <strong>User</strong> <strong>Guide</strong><br />
(Flashing)<br />
40 SET SAMP FLOW RATE IN mL/M FLO<br />
Use / to set the sample<br />
flow rate (mL/minute)<br />
Use to move to set each digit<br />
Use / to set values of<br />
remaining digits for sample flow rate<br />
Press to accept value and advance<br />
to next screen to set concentration for<br />
custom standards<br />
Main Display<br />
top line<br />
bottom line<br />
SEL<br />
SCrn<br />
SET SAMP FLOW RATE IN mL/M FLO<br />
.0 ppm SET STD CONCENTRATION COnC<br />
99 .9 (hydrazine)<br />
93 .5 (ELIMIN-OX ®)<br />
To set value for standard concentration<br />
(ppm or ppb):<br />
Use to set decimal and ppm / ppb<br />
Use / to set values of digits<br />
Use to move to set each digit<br />
Press to accept value and advance<br />
to next screen to set dynamic calibrator<br />
percent flow rate for standard 1<br />
To set percent flow rate value for<br />
standard 1:<br />
Use / to set values of digits<br />
Use to move to set each digit<br />
# #<br />
(Flashing)<br />
# #<br />
(Flashing digit will<br />
change)<br />
# # #. #<br />
(Flashing)<br />
SET STD CONCENTRATION COnC<br />
SET PUMP PERCENT FLOW FOR<br />
STD 1<br />
SET PUMP PERCENT FLOW FOR<br />
STD 1<br />
# # . #<br />
(Flashing digit will<br />
change)<br />
FLO<br />
# #. #<br />
(Flashing)<br />
FLO<br />
# #. #<br />
(Flashing digit will<br />
change)<br />
Notes<br />
III-30
Instrument Operation<br />
Default <strong>User</strong> Action Marquee<br />
Scrolling<br />
DYN (cont’d)<br />
Press to accept value and advance to<br />
next screen to set dynamic calibrator range<br />
for standard 1<br />
00 SET PUMP RANGE FOR STD 1 rAn<br />
5 .5 (hydrazine)<br />
48 .6 (ELIMIN-OX ®)<br />
To set range value for standard 1:<br />
Use / to select value<br />
Press to accept value and advance<br />
to next screen to set dynamic calibrator<br />
percent flow rate for standard 2.<br />
To set percent flow rate value for<br />
standard 2:<br />
Use / to set values of digits<br />
Use to move to set each digit<br />
Press to accept value and advance to<br />
next screen to set dynamic calibrator range<br />
for standard 2.<br />
<strong>Thermo</strong> <strong>Scientific</strong> Orion 2118XP Oxygen Scavenger Monitor <strong>User</strong> <strong>Guide</strong><br />
Main Display<br />
top line<br />
bottom line<br />
# # #<br />
SET PUMP RANGE FOR STD 1 rAn<br />
SET PUMP PERCENT FLOW FOR<br />
STD 2<br />
SET PUMP PERCENT FLOW FOR<br />
STD 2<br />
(Flashing)<br />
1, 10, 100 or 1000<br />
FLO<br />
# #. #<br />
(Flashing)<br />
0 SET PUMP RANGE FOR STD 2 rAn<br />
# # #<br />
(Flashing)<br />
To set range value for standard 2:<br />
Use / to select value<br />
Press to return user to main setup<br />
menu for DYN submenu<br />
Use to scroll to next menu<br />
FLO<br />
# #. #<br />
(Flashing digit will change)<br />
SET PUMP RANGE FOR STD 2 rAn<br />
1, 10, 100 or 1000<br />
DYN<br />
(Flashing)<br />
SEL<br />
SCrn<br />
Notes<br />
III-3
Instrument Operation<br />
Shutdown and<br />
Start-Up Procedure<br />
Shutdown<br />
<strong>Thermo</strong> <strong>Scientific</strong> Orion 2118XP Oxygen Scavenger Monitor <strong>User</strong> <strong>Guide</strong><br />
The .following .steps .should .be .taken .if .a .loss .of .sample .flow .is .expected .for .<br />
more .than .one .day . . .These .procedures .will .prevent .possible .build-up .of .<br />
caustic .reagent .vapors .in .the .monitor . .<br />
Warning: Be .sure .to .read .and .observe .the .following .requirements! .<br />
Danger: Turn .off .air .pump .prior .to .removing .reagent .bottle . . .The .air .<br />
pump .will .spatter .caustic .reagent .outward .as .bottle .is .removed . . .Wear .<br />
rubber .gloves .and .safety .goggles .to .avoid .possible .injury .from .reagent .<br />
residues .in .the .system . .<br />
To .access .air .pump, .press . . . .Press . ./ . .to .scroll .though .<br />
parameters .until .TEST .appears .in .marquee .window .<br />
Press . .to .access .TEST .menu . . .Use . ./ . .to .scroll .through .<br />
submenu .until .AIr .appears .in .main .display .<br />
Press . . . .Press . ./ . .to .toggle .between .On/OFF .setting .for .air .<br />
pump .power .<br />
Note: Changing .air .pump .On .or .OFF .will .be .indicated .by .a .click .sound . .<br />
Press . .to .accept .the .setting .and .returns .user .to .TEST .sub .menu .<br />
Press . .to .return .to .measure .mode .<br />
1 . . Shut .off .the .sample .flow .prior .to .the .analyzer .inlet . . .Refer .to .Chapter<br />
IV, .Flow Regulation .<br />
2 . . Disconnect .the .power . . .Refer .to .Chapter II, Wiring the Instrument .<br />
3 . . Remove .the .reagent .bottle .and .store .it .in .a .well-ventilated .area, .such .as .<br />
a .laboratory .fume .hood .<br />
4 . . Carefully .pull .the .iodide .and .reference .electrodes .out .of .the .top .of .the .<br />
flow .cell .and .let .them .hang .by .their .connectors . .<br />
5 . . Locate .the .protective .end .cap .from .reference .electrode .kit .and .place .on .<br />
base .of .reference .electrode . . .This .will .prevent .the .reference .electrode .<br />
from .drying .out . .<br />
III-3
Instrument Operation<br />
Start-up 1 . . Replace .the .diffusion .tubing .if .sample .flow .has .been .off .for .more .than .<br />
a .few .days . . .Tubing .becomes .brittle .with .long-term .exposure .to .reagent . .<br />
If .age .of .reagent .is .not .known, .replace .it .and .note .in .maintenance .<br />
records . . .Re-install .bottle .on .monitor . .<br />
<strong>Thermo</strong> <strong>Scientific</strong> Orion 2118XP Oxygen Scavenger Monitor <strong>User</strong> <strong>Guide</strong><br />
2 . . Restore .sample .flow .to .analyzer . . .If .necessary, .adjust .pressure .and .flow .<br />
rate .through .monitor .to .40 .mL/min .<br />
3 . . Remove .protective .end .cap .from .reference .electrode . . .Re-install .the .<br />
electrode .on .the .monitor . . .Be .careful .not .to .disconnect .the .reservoir .<br />
tubing .from .the .sidearm . .<br />
4 . . Allow .monitor .to .stabilize .for .approximately .1 .hour .and .recalibrate . .<br />
Refer .to .Chapter IV, Performing DYN Calibration .<br />
III-33
Calibration<br />
Setup<br />
<strong>Thermo</strong> <strong>Scientific</strong> Orion 2118XP Oxygen Scavenger Monitor <strong>User</strong> <strong>Guide</strong><br />
Chapter IV Calibration<br />
The .<strong>Thermo</strong> .<strong>Scientific</strong> .Orion .2118XP .oxygen .scavenger .monitor .provides .<br />
simple .and .fast .calibration .cycles .using .a .dynamic .two .point .calibration .<br />
procedure, .which .requires .the .use .of .the .dynamic .calibrator, .Cat . .No . .<br />
21DC00 .(115 .V ./ .220 .V) . . .<br />
To .perform .a .dynamic .two .point .calibration, .the .Orion .2118XP .is .first .<br />
connected .to .a .reductant-free .sample .stream . . .An .appropriate .diluted .<br />
standard .is .prepared .and .then .a .syringe .is .filled .with .the .diluted .standard .<br />
and .mounted .on .the .calibrator . . .The .calibrator .is .then .mounted .near .the .<br />
monitor .and .the .syringe .tubing .is .connected .to .the .standard .injection .port . . .<br />
By .adjusting .the .calibrator .pump .settings, .two .different .flow .rates .produce .<br />
two .known .standards .that .are .diluted .into .the .sample .background . . .<br />
Prior .to .performing .a .calibration, .refer .to .Chapter III, Use of Setup Mode .<br />
for .instructions .on .how .to .properly .configure .the .Orion .2118XP .and .set .<br />
the .monitor .to .the .hydrazine .or .ELIMIN-OX® .application .mode .<br />
IV-
Calibration<br />
DYN Calibration<br />
Recommendations<br />
<strong>Thermo</strong> <strong>Scientific</strong> Orion 2118XP Oxygen Scavenger Monitor <strong>User</strong> <strong>Guide</strong><br />
When .the .<strong>Thermo</strong> .<strong>Scientific</strong> .Orion .2118XP .oxygen .scavenger .monitor .<br />
is .first .commissioned, .it .is .advisable .to .flush .out .fluidics .system .overnight .<br />
prior .to .initial .calibration .and .use . . .The .electronics .need .not .be .turned .on .<br />
at .this .time . . .Refer .to .Chapter IV, Rinsing the Flow Cell .<br />
• . .Install .the .ATC, .sensing, .and .reference .electrodes .in .respective .flow .cell .<br />
holders . . .Refer .to Chapter II, Installation of New Iodide Electrode,<br />
Reference Electrode, and ATC Probe .<br />
• . .To .ensure .the .instrument .achieves .stability .and .minimize .interference .<br />
during .calibration, .the .user .should .minimize .activity .on .system .during .<br />
calibration . .<br />
• . Maximum .system .accuracy .is .ensured .through .a .fast, .easy, .and .accurate .<br />
calibration .performed .in .the .expected .sample .range . . .This .calibration .<br />
procedure .uses .equipment .supplied .in .the .calibration .kit .(Cat . .No . .<br />
2118XPCAL) .including .the .dynamic .calibrator . .<br />
• . .Wait .at .least .one .hour .to .calibrate .after .changing .reagent . .<br />
• . .Use .an .oxygen .scavenger-free .sample .during .calibration .<br />
• . .Fill .and .empty .the .syringe .with .standard .at .least .three .times .before .<br />
connecting .the .syringe .to .the .dynamic .calibrator .<br />
• . .Always .use .a .new .syringe .for .each .calibration .<br />
.<br />
IV-
Calibration<br />
Rinsing the Flow Cell<br />
D<br />
C<br />
B<br />
A<br />
<strong>Thermo</strong> <strong>Scientific</strong> Orion 2118XP Oxygen Scavenger Monitor <strong>User</strong> <strong>Guide</strong><br />
50<br />
40<br />
30<br />
20<br />
10<br />
Figure IV-<br />
1 . . Open .the .sample .inlet .valve, .see . A . .<br />
. • . .Positioning .valve .with .pointed .end .facing .up .for .open .position .<br />
2 . . Open .the .bypass/needle .valve .by .turning .counterclockwise, .see . B .<br />
. • . Check .for .appropriate .sample .flow . .<br />
. • . Adjust .pressure .regulator .if .required . . .See .step .3 .<br />
3 . . .Adjust .the .knob .on .the .pressure .regulator, .see . C , .so .the .ball .in .<br />
the .flow .meter .indicates .the .correct .flow .rate .reading, .see . D . .<br />
The .flow .rate .should .be .adjusted .to .40 .mL/min .<br />
. • . .Pull .out .the .knob .to .unlock .the .setting .and .allow .adjustment .of .the .<br />
flow .rate .<br />
. • . Turn .the .knob .clockwise .to .increase .the .flow .rate . . .<br />
. • . Turn .the .knob .counterclockwise .to .decrease .the .flow .rate .<br />
. • . Push .in .the .knob .to .lock .the .setting . .<br />
IV-3
Calibration<br />
Dynamic Calibrator<br />
Operation<br />
Figure IV-<br />
Dynamic Calibrator<br />
and Syringe Setup<br />
<strong>Thermo</strong> <strong>Scientific</strong> Orion 2118XP Oxygen Scavenger Monitor <strong>User</strong> <strong>Guide</strong><br />
The .dynamic .calibrator .is .used .to .deliver .a .standard .solution .to .the .2118XP .<br />
monitor .during .calibration . . .Place .the .dynamic .calibrator .on .a .support .near .<br />
the .monitor . . .The .calibrator .location .should .be .close .enough .to .allow .easy .<br />
connection .of .the .syringe .tubing .to .the .injection .port .on .monitor . . .<br />
% Flow Rate<br />
% flow<br />
x/1000<br />
x/100<br />
x/10<br />
x/1<br />
Sage syringe pump<br />
on<br />
off<br />
Power<br />
green/ power<br />
red/endpoint<br />
Range Selector Power LED<br />
1 . . Connect .the .calibration .tubing .to .the .syringe .using .the .luer .adapter .and .<br />
the .1/4” .female .connector . . .Only .hand-tighten .the .components, .do .not .<br />
overtighten . .<br />
2 . . Loosen .the .blue .knob .on .the .dynamic .calibrator .by .turning .it .<br />
approximately .1/4 .of .a .turn .clockwise .and .pressing .up .on .the .bottom, .<br />
inside .part .of .the .blue .knob . . .Lift .the .blue .syringe .holder .and .turn .<br />
it .away .from .the .syringe .cradle . . .Set .the .filled .syringe .in .the .center .<br />
syringe .cradle . . .Rotate .the .syringe .holder .back .in .place .across .the .<br />
syringe . . .Gently .tighten .the .blue .knob .by .turning .it .1/4 .of .a .turn .<br />
counterclockwise . .<br />
3 . . Lift .the .black .drive .carriage .straight .up . . .Move .the .carriage .back .and .<br />
re-engage .it .with .the .gears, .leaving .room .for .the .syringe . . .Check .the .<br />
alignment .of .the .drive .carriage .to .ensure .it .is .perfectly .straight . .<br />
4 . . Replace .the .drive .carriage .on .the .gears . . .Advance .the .carriage .to .meet .<br />
the .syringe .by .momentarily .turning .the .pump .on .high .speed . .<br />
Note: Do .no .attempt .to .push .the .carriage .manually . . .This .may .result .in .<br />
damage .to .the .pump .mechanism . .<br />
5 . . Set .the .blue .endpoint .limiter .midway .between .the .white .indicator .<br />
marks .<br />
IV-4
Calibration<br />
.<br />
Performing DYN<br />
Calibration<br />
(Hydrazine<br />
Application)<br />
<strong>Thermo</strong> <strong>Scientific</strong> Orion 2118XP Oxygen Scavenger Monitor <strong>User</strong> <strong>Guide</strong><br />
• . .To .begin .a .DYN .calibration, .the .system .starts .from .the .measurement .<br />
mode . .<br />
• . .The .monitor .must .be .set .to .the .hydrazine .application .in .the .setup .<br />
menu .prior .to .performing .a .calibration . . .Refer .to .Chapter III, Use of<br />
Setup Mode .<br />
Note: A .three-way .valve .can .be .installed .upstream .of .the .monitor .<br />
inlet .to .allow .easy .switching .to .a .oxygen .scavenger-free .sample .such .as .<br />
demineralizer .output .or .condensate .pump .discharge . . .<br />
Stage <strong>User</strong> Action Marquee Main Display<br />
top line<br />
bottom line<br />
* Press to start calibration.<br />
* If calibration password is activated<br />
- user must scroll in digits 0-9 using<br />
or to set digits and<br />
Press<br />
to move selected digit.<br />
to accept<br />
password.<br />
3 DYN or OFFL<br />
(Flashing)<br />
4<br />
Press / to select DYN.<br />
5 Press .<br />
6 Polish the iodide sensing electrode.<br />
Connect the 2118XP monitor to a<br />
oxygen scavenger-free sample.<br />
Run the monitor at 40 mL/min for 30<br />
minutes.<br />
7 Press .<br />
8 Verify that the sample flow rate<br />
is actually 40 mL/min. Adjust the<br />
sample flow rate if required.<br />
Be sure that the sample bypass valve<br />
is off during this step.<br />
9 Press .<br />
Actual temperature reading Actual readings in<br />
concentration and mV<br />
ENTER PASSWORD PASS<br />
0000<br />
DYN<br />
(Flashing)<br />
POLISH IODIDE ELECTRODE<br />
CONNECT TO OX--SCAV FREE SAMPLE<br />
WAIT 30 MINUTES<br />
ADJUST SAMPLE FLOW TO 40 mL/<br />
MINUTE<br />
PRESS ENTER<br />
CAL<br />
tYPE<br />
CAL<br />
tYPE<br />
Actual readings in<br />
concentration and mV<br />
Notes<br />
CAL appears as mode.<br />
Minutes will be counted<br />
down on Marquee. Once<br />
30 minutes have elapsed,<br />
the Marquee will display<br />
PRESS ENTER.<br />
FLO For the best accuracy,<br />
measure the flow at the<br />
drain, weigh the timed<br />
discharge repeatedly and<br />
average the results.<br />
IV-5
Calibration<br />
Stage <strong>User</strong> Action Marquee Main Display<br />
top line<br />
bottom line<br />
0 Prepare a 2 ppm hydrazine standard<br />
using the 100 ppm hydrazine<br />
standard, Cat. No. 151810.<br />
Fill a 20 cc syringe with the 2 ppm<br />
standard solution. Expel any air<br />
bubbles in the syringe.<br />
Refer to Chapter IV, Dynamic<br />
Calibrator Operation for<br />
instructions on how to install the<br />
syringe and set up the dynamic<br />
calibrator.<br />
Connect the syringe tubing to the<br />
standard injection port.<br />
Open the port by turning the<br />
thumbscrew 1/4 of a turn to the<br />
right, so the dot is aligned with the<br />
direction of the flow.<br />
Press .<br />
Turn on the dynamic calibrator.<br />
Turn the flow rate dial until the flow<br />
rate reads 999 (99.9% flow).<br />
Turn the range switch to x/100.<br />
3 Press .<br />
SETUP PUMP<br />
PURGE AIR AND CONNECT SYRINGE<br />
TO INJECTION PORT<br />
OPEN VALVE<br />
DOT TO LEFT<br />
PRESS ENTER<br />
SET PUMP TO 999 PERCENT-FLOW<br />
AND X1/100 RANGE<br />
TURN PUMP ON<br />
PRESS ENTER<br />
4 Wait 4 minutes. MEASURING STD1<br />
5 Turn the flow rate dial until the flow<br />
rate reads 525 (52.5% flow).<br />
Turn the range switch to x/10.<br />
6 Press .<br />
WAIT 4 MINUTES<br />
SET PUMP TO 525 PERCENT-FLOW<br />
AND X1/10 RANGE<br />
PRESS ENTER<br />
7 Wait 3 minutes. MEASURING STD2<br />
WAIT 3 MINUTES<br />
<strong>Thermo</strong> <strong>Scientific</strong> Orion 2118XP Oxygen Scavenger Monitor <strong>User</strong> <strong>Guide</strong><br />
SEt<br />
dYn<br />
Notes<br />
To prepare a 2 ppm<br />
hydrazine standard, add<br />
20 mL of the 100 ppm<br />
hydrazine standard to a<br />
one liter volumetric flask<br />
and dilute to the mark with<br />
distilled water. Mix the<br />
solution well.<br />
The 2 ppm standard will<br />
produce a 20 ppb and 100<br />
ppb N 2H 4 readings on the<br />
monitor during calibration.<br />
Std 1 The 2 ppm standard is<br />
diluted to 20 ppb N 2H 4 by<br />
the sample stream.<br />
Actual readings<br />
flashing<br />
System circulates sample.<br />
Minutes will be counted<br />
down on Marquee. Once<br />
4 minutes have elapsed,<br />
the Marquee will display<br />
PRESS ENTER.<br />
Std 2 The 2 ppm standard is<br />
diluted to 100 ppb N 2H 4 by<br />
the sample stream.<br />
Actual readings<br />
flashing<br />
System circulates sample.<br />
Minutes will be counted<br />
down on Marquee. Once<br />
3 minutes have elapsed,<br />
the Marquee will display<br />
PRESS ENTER.<br />
IV-6
Calibration<br />
Stage <strong>User</strong> Action<br />
8 Press to accept the<br />
new slope and Eo values<br />
or<br />
Press to abort the<br />
calibration. The new slope<br />
and Eo values will not be<br />
stored. The values for the<br />
last saved calibration prior<br />
to the aborted calibration<br />
will be used in the<br />
measurement mode.<br />
9 Turn off the dynamic<br />
calibrator.<br />
Close the standard<br />
injection port by turning<br />
the thumbscrew 1/4 of a<br />
turn to the left, so the dot<br />
is perpendicular with the<br />
direction of the flow.<br />
0 Press .<br />
System will proceed to<br />
measurement mode.<br />
Marquee<br />
NEW CALIBRATION SLOPE AND E 0<br />
PRESS ENTER TO ACCEPT OR PRESS<br />
EXIT TO ABORT<br />
TURN PUMP OFF<br />
CLOSE INJECTION VALVE<br />
DOT DOWN<br />
PRESS ENTER<br />
<strong>Thermo</strong> <strong>Scientific</strong> Orion 2118XP Oxygen Scavenger Monitor <strong>User</strong> <strong>Guide</strong><br />
Main Display<br />
top line<br />
bottom line<br />
Calculated Slope<br />
and E 0<br />
Actual temperature reading Actual readings in<br />
concentration and mV<br />
Notes<br />
System presents the new slope and<br />
E 0 values.<br />
If is pressed, continue to<br />
stage 9.<br />
If is pressed, refer to<br />
Exit 4.<br />
System enters measurement mode,<br />
but will remain on hold until the<br />
hold timer expires.<br />
(Default 30 minutes)<br />
IV-7
Calibration<br />
<strong>Thermo</strong> <strong>Scientific</strong> Orion 2118XP Oxygen Scavenger Monitor <strong>User</strong> <strong>Guide</strong><br />
• . .To .begin .a .DYN .calibration, .the .system .starts .from .the .measurement .<br />
mode . .<br />
• . .The .monitor .must .be .set .to .the .ELIMIN-OX® .application .in .the .setup .<br />
menu .prior .to .performing .a .calibration . . .Refer .to .Chapter III, Use of<br />
Setup Mode .<br />
Note: A .three-way .valve .can .be .installed .upstream .of .the .monitor .<br />
inlet .to .allow .easy .switching .to .a .oxygen .scavenger-free .sample .such .as .<br />
demineralizer .output .or .condensate .pump .discharge . .<br />
Stage <strong>User</strong> Action Marquee Main Display<br />
top line<br />
bottom line<br />
* Press to start calibration.<br />
* If calibration password is activated<br />
- user must scroll in digits 0-9 using<br />
or to set digits and<br />
Press<br />
to move selected digit.<br />
to accept<br />
password.<br />
3 DYN or OFFL<br />
(Flashing)<br />
4<br />
Performing DYN<br />
Calibration<br />
(ELIMIN-OX ®<br />
Application)<br />
Press / to select DYN.<br />
5 Press .<br />
6 Polish the iodide sensing electrode.<br />
Connect the 2118XP monitor to a<br />
oxygen scavenger-free sample.<br />
Run the monitor at 40 mL/min for<br />
30 minutes.<br />
7 Press .<br />
8 Verify that the sample flow rate<br />
is actually 40 mL/min. Adjust the<br />
sample flow rate if required.<br />
Be sure that the sample bypass valve<br />
is off during this step.<br />
9 Press .<br />
Actual temperature reading Actual readings in<br />
concentration and mV<br />
ENTER PASSWORD PASS<br />
0000<br />
DYN<br />
(Flashing)<br />
POLISH IODIDE ELECTRODE<br />
CONNECT TO OX--SCAV FREE SAMPLE<br />
WAIT 30 MINUTES<br />
ADJUST SAMPLE FLOW TO 40 mL/<br />
MINUTE<br />
PRESS ENTER<br />
CAL<br />
tYPE<br />
CAL<br />
tYPE<br />
Actual readings in<br />
concentration and mV<br />
Notes<br />
CAL appears as mode.<br />
Minutes will be counted<br />
down on Marquee. Once<br />
30 minutes have elapsed,<br />
the Marquee will display<br />
PRESS ENTER.<br />
FLO For the best accuracy,<br />
measure the flow at the<br />
drain, weigh the timed<br />
discharge repeatedly and<br />
average the results.<br />
IV-8
Calibration<br />
Stage <strong>User</strong> Action Marquee Main Display<br />
top line<br />
bottom line<br />
0 Prepare a 2 ppm hydrazine standard<br />
using the 100 ppm hydrazine<br />
standard, Cat. No. 151810.<br />
Fill a 20 cc syringe with the 2 ppm<br />
standard solution. Expel any air<br />
bubbles in the syringe.<br />
Refer to Chapter IV, Dynamic<br />
Calibrator Operation for<br />
instructions on how to install the<br />
syringe and setup the dynamic<br />
calibrator.<br />
Connect the syringe tubing to the<br />
standard injection port.<br />
Open the port by turning the<br />
thumbscrew 1/4 of a turn to the<br />
right, so the dot is aligned with the<br />
direction of the flow.<br />
Press .<br />
Turn on the dynamic calibrator.<br />
Turn the flow rate dial until the flow<br />
rate reads 935 (93.5% flow).<br />
Turn the range switch to x/100.<br />
3 Press .<br />
SETUP PUMP<br />
PURGE AIR AND CONNECT SYRINGE<br />
TO INJECTION PORT<br />
OPEN VALVE<br />
DOT TO LEFT<br />
PRESS ENTER<br />
SET PUMP TO 935 PERCENT-FLOW<br />
AND X1/100 RANGE<br />
TURN PUMP ON<br />
PRESS ENTER<br />
4 Wait 4 minutes. MEASURING STD1<br />
5 Turn the flow rate dial until the flow<br />
rate reads 486 (48.6% flow).<br />
Turn the range switch to x/10.<br />
6 Press .<br />
WAIT 4 MINUTES<br />
SET PUMP TO 486 PERCENT-FLOW<br />
AND X1/10 RANGE<br />
PRESS ENTER<br />
7 Wait 3 minutes. MEASURING STD2<br />
WAIT 3 MINUTES<br />
<strong>Thermo</strong> <strong>Scientific</strong> Orion 2118XP Oxygen Scavenger Monitor <strong>User</strong> <strong>Guide</strong><br />
SEt<br />
dYn<br />
Notes<br />
To prepare a 2 ppm<br />
hydrazine standard, add<br />
20 mL of the 100 ppm<br />
hydrazine standard to a<br />
one liter volumetric flask<br />
and dilute to the mark with<br />
distilled water. Mix the<br />
solution well.<br />
The 2 ppm standard will<br />
produce a 400 ppb and<br />
2000 ppb as ELIMIN-OX ®<br />
readings on the monitor<br />
during calibration.<br />
Std 1 The 2 ppm standard is<br />
diluted to 400 ppb as<br />
ELIMIN-OX ® by the sample<br />
stream.<br />
Actual readings<br />
flashing<br />
System circulates sample.<br />
Minutes will be counted<br />
down on Marquee. Once<br />
4 minutes have elapsed,<br />
the Marquee will display<br />
PRESS ENTER.<br />
Std 2 The 2 ppm standard is<br />
diluted to 2000 ppb as<br />
ELIMIN-OX ® by the sample<br />
stream.<br />
Actual readings<br />
flashing<br />
System circulates sample.<br />
Minutes will be counted<br />
down on Marquee. Once<br />
3 minutes have elapsed,<br />
the Marquee will display<br />
PRESS ENTER.<br />
IV-9
Calibration<br />
Stage <strong>User</strong> Action<br />
8 Press to accept the<br />
new slope and Eo values<br />
or<br />
Press to abort the<br />
calibration. The new slope<br />
and Eo values will not be<br />
stored. The values for the<br />
last saved calibration prior<br />
to the aborted calibration<br />
will be used in the<br />
measurement mode.<br />
9 Turn off the dynamic<br />
calibrator.<br />
Close the standard<br />
injection port by turning<br />
the thumbscrew 1/4 of a<br />
turn to the left, so the dot<br />
is perpendicular with the<br />
direction of the flow.<br />
0 Press .<br />
System will proceed to<br />
measurement mode.<br />
Marquee<br />
NEW CALIBRATION SLOPE AND E 0<br />
PRESS ENTER TO ACCEPT OR PRESS<br />
EXIT TO ABORT<br />
TURN PUMP OFF<br />
CLOSE INJECTION VALVE<br />
DOT DOWN<br />
PRESS ENTER<br />
<strong>Thermo</strong> <strong>Scientific</strong> Orion 2118XP Oxygen Scavenger Monitor <strong>User</strong> <strong>Guide</strong><br />
Main Display<br />
top line<br />
bottom line<br />
Calculated Slope<br />
and E 0<br />
Actual temperature reading Actual readings in<br />
concentration and mV<br />
Notes<br />
System presents the new slope and<br />
E 0 values.<br />
If is pressed, continue to<br />
stage 9.<br />
If is pressed, refer to<br />
Exit 4.<br />
System enters measurement mode,<br />
but will remain on hold until the<br />
hold timer expires.<br />
(Default 30 minutes)<br />
IV- 0
Calibration<br />
Stage <strong>User</strong> Action Marquee Main Display<br />
top line<br />
bottom line<br />
Calibration Abort- Exit Steps<br />
Exit ARE YOU SURE? PRESS<br />
ENTER TO ABORT OR<br />
PRESS LAST SCREEN TO<br />
BACKUP<br />
Exit Decide whether or not you really want to exit<br />
the calibration process and lose the new slope<br />
and E 0:<br />
To Abort Calibration:<br />
Follow step Exit 3.<br />
To Continue Calibration:<br />
If is pressed, system will go back to last<br />
screen used in calibration sequence prior to<br />
pressing .<br />
Continue to follow calibration according to<br />
Marquee and main display directions.<br />
Exit 3 Press .<br />
Exit 4 CALIBRATION ABORTED<br />
PRESS ENTER<br />
<strong>Thermo</strong> <strong>Scientific</strong> Orion 2118XP Oxygen Scavenger Monitor <strong>User</strong> <strong>Guide</strong><br />
Notes<br />
SUrE? Abort calibration vs. Last Screen<br />
option:<br />
The system allows the user two<br />
options when is pressed at<br />
any step during the calibration.<br />
Go to Exit<br />
CAL Abrt Turn off the dynamic calibrator.<br />
Close the standard injection port<br />
by turning the thumbscrew 1/4<br />
of a turn to the left, so the dot is<br />
perpendicular with the direction of<br />
the flow.<br />
Exit 5 Press . Begin with stage to retry<br />
calibration sequence<br />
IV-
Calibration<br />
Stage <strong>User</strong> Action Marquee Main Display<br />
top line<br />
bottom line<br />
Stability Timeout<br />
Error 4 Decide to continue calibration<br />
despite instability or abort<br />
Calibration Error<br />
Error 4 Review Marquee text to understand<br />
the failure that occurred<br />
Error 09 Review Marquee text to understand<br />
the failure that occurred<br />
Error 5 Review Marquee text to understand<br />
the failure that occurred<br />
READINGS WERE<br />
UNSTABLE<br />
PRESS ENTER TO<br />
CONTINUE CALIBRATION<br />
OR PRESS EXIT TO ABORT<br />
INVALID SLOPE<br />
PRESS ENTER TO ABORT<br />
CALIBRATION<br />
BAD SLOPE<br />
PRESS ENTER<br />
BAD E 0<br />
PRESS ENTER<br />
<strong>Thermo</strong> <strong>Scientific</strong> Orion 2118XP Oxygen Scavenger Monitor <strong>User</strong> <strong>Guide</strong><br />
Notes<br />
E041 Stability was not reached before<br />
timeout<br />
If is pressed system will<br />
continue from step where stability<br />
timed out.<br />
If is pressed refer to Exit 4<br />
E042 Invalid slope continue at Exit 3<br />
E109 Bad Slope<br />
Press to continue at stage<br />
E125 Bad E 0<br />
Press to continue at stage<br />
IV-
Calibration<br />
Calibration At Custom<br />
Concentrations Using DYN<br />
Hydrazine Default Values<br />
ELIMIN-OX ® Default<br />
Values<br />
Dynamic Calibrator<br />
Settings<br />
<strong>Thermo</strong> <strong>Scientific</strong> Orion 2118XP Oxygen Scavenger Monitor <strong>User</strong> <strong>Guide</strong><br />
The .<strong>Thermo</strong> .<strong>Scientific</strong> .Orion .2118XP .oxygen .scavenger .monitor .software .<br />
has .default .values .to .accommodate .standards .added .using .the .dynamic .<br />
calibrator . . .The .user .has .the .option .to .use .alternate .standards .by .changing, .<br />
in .the .setup .mode, .the .default .values .<br />
Monitor .Flow .Rate . . = . 40 .mL/min<br />
Standard .Concentration . = . 2 .ppm<br />
Standard .1 .Percent .Flow . = . 99 .9% .<br />
Standard .1 .Range . . = . x/100<br />
Standard .2 .Percent .Flow . = . 52 .5% .<br />
Standard .2 .Range . . = . x/10<br />
Monitor .Flow .Rate . . = . 40 .mL/min<br />
Standard .Concentration . = . 2 .ppm<br />
Standard .1 .Percent .Flow . = . 93 .5% .<br />
Standard .1 .Range . . = . x/100<br />
Standard .2 .Percent .Flow . = . 48 .6% .<br />
Standard .2 .Range . . = . x/10<br />
Settings .on .the .dynamic .calibrator .are .based .on .a .20 .cc .syringe .at .100% .<br />
(39 .7 .mL/min) . . .The .flow .rate .of .the .standard .(F std) .is .the .39 .7 .mL/min .<br />
multiplied .by .the .percent .setting, .divided .by .the .range . . .Refer .to .the .<br />
dynamic .calibrator .user .guide .for .additional .information . .<br />
C .= .[(Cb .• .Fb) .+ .(Cstd .• .Fstd)] ./ .(Fb .+ .Fstd)<br />
Where: .<br />
. C .= .Measured .concentration .during .calibration .<br />
. Cb .= .Background .concentration .(assumed .to .be .zero) .<br />
. Cstd .= .Concentration .of .standard .in .the .syringe .<br />
. Fb .= .Background .flow .rate .of .monitor .(approximately .40 .mL/min) .<br />
. Fstd .= .Flow .rate .of .standard .<br />
IV- 3
Calibration<br />
Dynamic Calibrator<br />
Check<br />
<strong>Thermo</strong> <strong>Scientific</strong> Orion 2118XP Oxygen Scavenger Monitor <strong>User</strong> <strong>Guide</strong><br />
1 . . The .normal .flow .rate .from .the .20 .cc .syringe .when .the .dynamic .<br />
calibrator .percent .flow .dial .is .set .to .500 .(equals .50% .flow) .and .when .<br />
the .range .switch .is .set .at .x/1 .is .20 .mL/min . . .Therefore, .the .flow .rate .at .<br />
x/10 .is .2 .mL/min .and .at .x/100 .is .0 .2 .mL/min . .<br />
2 . . Place .a .10 .mL .graduated .cylinder .so .that .the .calibration .tubing .will .<br />
reach .the .top .of .the .cylinder . .<br />
3 . . Turn .the .pump .range .switch .to .x/100 .and .allow .the .flow .to .begin .and .<br />
to .fill .the .tubing .completely, .purging .all .air .bubbles . .<br />
4 . . Simultaneously, .insert .the .calibration .tubing .into .the .mouth .of .the .<br />
graduated .cylinder .and .start .a .stopwatch . .<br />
5 . . Allow .the .flow .to .continue .into .cylinder .for .exactly .ten .minutes . . .<br />
Remove .the .tubing .from .the .cylinder .and .the .pump .off .<br />
. The .total .volume .of .the .graduated .cylinder .should .be .2 .0 .± .0 .1 .mL . .<br />
. If .the .total .volume .is .not .2 .0 .± .0 .1 .mL, .the .flow .rate .dial .may .be .<br />
adjusted .using .the .following .formula: .<br />
. adjusted .flow .rate .setting . .= . .present .setting . .• . .expected .total .volume . .<br />
. . . . . . . . . . . . . . . .actual .total .value .<br />
. For .example, .if .the .actual .total .flow .was .1 .8 .mL, .the .new .flow .rate .<br />
setting .will .equal . .= . .(500) . .• . .(2 .0/1 .8) . .= . .555 .<br />
6 . . Perform .the .same .flow .rate .check .with .the .range .switch .on .x/10 .using .<br />
a .50 .mL .graduated .cylinder . . .Set .the .percent .flow .dial .to .read .500 .<br />
(50 .0%) . .<br />
7 . . Allow .the .flow .to .continue .into .cylinder .for .exactly .five .minutes . . .<br />
Remove .the .tubing .from .the .cylinder .and .turn .the .pump .off . .<br />
. The .total .volume .of .the .graduated .cylinder .should .be .10 .0 .± .1 .0 .mL . .<br />
. Fine .adjustment .of .the .flow .rate .dial .may .be .made .if .the .total .flow .is .<br />
different .from .the .specified .amount . .<br />
. For .example, .if .the .actual .total .volume .was .11 .0 .mL, .the .new .flow .rate .<br />
setting .will .equal . .= . .(500) .(10 .0/11 .0) . .= . .455 .<br />
Note: For .the .best .possible .accuracy .for .the .dynamic .calibrator .check, .<br />
weigh .volumes .delivered .for .use .in .calculations . .<br />
IV- 4
Calibration<br />
Offline Calibration<br />
Procedure<br />
Stage <strong>User</strong> Action Marquee Main Display<br />
top line<br />
bottom line<br />
Open the bypass/needle valve to<br />
redirect flow.<br />
Take QC sample from bypass of<br />
2118XP.<br />
* Press to start calibration<br />
* If calibration password is<br />
activated - user must scroll in<br />
digits 0-9 using . ./ . .<br />
to set digits and to move<br />
selected digit.<br />
Press to accept<br />
password.<br />
Actual temperature<br />
reading<br />
3 DYN or OFFL<br />
4<br />
Press . ./ . .arrows<br />
to select OFFL<br />
5 Press .<br />
ENTER PASSWORD PASS<br />
(Flashing)<br />
OFFL<br />
(Flashing)<br />
6 Wait 1 to 10 minutes MEASURING SAMPLE<br />
7 Take a sample from the bypass<br />
drain for laboratory analysis<br />
8 Press .<br />
9 Perform laboratory analysis on QC<br />
sample and return with results<br />
<strong>Thermo</strong> <strong>Scientific</strong> Orion 2118XP Oxygen Scavenger Monitor <strong>User</strong> <strong>Guide</strong><br />
The .offline .calibration .feature .is .simply .a .one-point .calibration .without .<br />
slope .change . . .The .term .“offline .calibration” .refers .only .to .the .fact .that .<br />
a .sample .from .2118XP .bypass .is .taken .“offline” .for .laboratory .analysis; .<br />
in .fact, .no .downtime .is .experienced .and .the .instrument .remains .online .<br />
throughout .the .procedure .<br />
WAIT 1 MINUTE<br />
AWAITING DATA<br />
STABILITY<br />
TAKE SAMPLE FROM<br />
BYPASS DRAIN<br />
PRESS ENTER TO USE<br />
METER<br />
THEN PRESS CAL TO<br />
ENTER LAB RESULTS<br />
Actual temperature<br />
reading<br />
Actual readings in<br />
concentration & mV<br />
0000<br />
CAL<br />
tYPE<br />
CAL<br />
tYPE<br />
Actual readings<br />
flashing<br />
LAb<br />
Actual readings in<br />
concentration & mV<br />
Notes<br />
CAL appears as mode.<br />
HOLD CAL appears as mode.<br />
System continuously evaluates data by applying<br />
stability criteria until a “stable/pass” condition<br />
is met.<br />
System remains in measurement mode and<br />
operates as normal. The CAL and MEASURE<br />
mode icons will both be displayed.<br />
IV- 5
Calibration<br />
Stage <strong>User</strong> Action Marquee Main Display<br />
top line<br />
bottom line<br />
0* Press . .<br />
* If calibration password is<br />
activated - user must scroll in<br />
digits 0-9 using . ./ . .<br />
to set digits and to move<br />
selected digit.<br />
Press to accept<br />
password.<br />
Press . ./ . to select<br />
OFFL.<br />
3 Press .<br />
4 Adjust the displayed value to the<br />
QC value obtained from laboratory<br />
analysis.<br />
Press to set decimal and<br />
ppm / ppb.<br />
Press . ./ . to set the<br />
first digit.<br />
Press to move to set each<br />
digit.<br />
Press . ./ . to set the<br />
values of remaining digits.<br />
5 Press .<br />
ENTER PASSWORD PASS<br />
0000<br />
DYN or OFFL<br />
(Flashing)<br />
OFFL<br />
(Flashing)<br />
LAB ANALYSIS<br />
READY<br />
INPUT CONC VALUE<br />
FROM LAB<br />
PRESS ENTER TO<br />
CONTINUE OR PRESS<br />
EXIT TO MEASURE TO<br />
ABORT<br />
6 NEW CALIBRATION<br />
Eo<br />
PRESS ENTER TO<br />
ACCEPT OR PRESS<br />
EXIT TO ABORT<br />
<strong>Thermo</strong> <strong>Scientific</strong> Orion 2118XP Oxygen Scavenger Monitor <strong>User</strong> <strong>Guide</strong><br />
CAL<br />
tYPE<br />
CAL<br />
tYPE<br />
COnC<br />
# #.#<br />
(Flashing digit will<br />
change)<br />
Notes<br />
CAL appears as mode<br />
HOLD CAL appears as mode<br />
Actual Eo The system displays recalculates the E 0<br />
7 Press . The system will return to the measurement<br />
mode.<br />
Only MEASURE should appear as mode.<br />
IV- 6
Maintenance Schedule<br />
Recommendation<br />
Weekly Maintenance<br />
<strong>Thermo</strong> <strong>Scientific</strong> Orion 2118XP Oxygen Scavenger Monitor <strong>User</strong> <strong>Guide</strong><br />
Chapter V Instrument Maintenance<br />
The .<strong>Thermo</strong> .<strong>Scientific</strong> .Orion .2118XP .oxygen .scavenger .monitor .is .<br />
designed .for .simple .maintenance . . .Follow .the .instructions .in .this .section .to .<br />
ensure .proper .operation .of .your .instrument .<br />
To .ensure .proper .maintenance .and .good .monitor .performance, .a .service .<br />
logbook .should .be .kept .<br />
• . Record .maintenance .date .and .type .service .work .completed . .<br />
• . Mark .date .and .fluid .levels .of .reagent .and .date .when .replaced . .<br />
• . Tag .each .electrode .cable .with .installation .date .of .electrode .<br />
1 . . . Check .that .sample .flow .rate .is .35 .to .45 .mL/min . . .To .alter .flow .rate, .<br />
pull .out .locking .knob .of .pressure .regulator, .then .rotate .black .knob .to .<br />
increase .(clockwise) .or .decrease .(counterclockwise) .sample .flow . . .Push .<br />
in .to .lock .rate, .if .desired . .<br />
2 . . . Inspect .unit .for .leakage . . .Diffusion .tubing .leakage .is .indicated .by .a .rise .<br />
in .level .of .reagent . .<br />
3 . . . Check .that .there .are .no .error .indications .and .current .concentration .<br />
level .is .reasonable . .<br />
4 . . . Check .that .reference .fill .solution .is .adequate . .<br />
5 . . . If .required .wipe .instrument .with .damp .cloth .to .remove .dirt .and . .<br />
dust .particles . .<br />
V-
Instrument Maintenance<br />
Bi-Weekly<br />
Maintenance<br />
Reference Electrode Fill<br />
Solution Replacement<br />
Monthly Maintenance<br />
Calibration<br />
<strong>Thermo</strong> <strong>Scientific</strong> Orion 2118XP Oxygen Scavenger Monitor <strong>User</strong> <strong>Guide</strong><br />
Refer .to .Chapter II, Installation of New Reference Electrode .<br />
The .reference .electrode .filling .solution .needs .to .be .replaced .approximately .<br />
every .two .weeks . . .If .the .reservoir .is .less .than .one .quarter .full, .replace .the .<br />
solution . . .This .should .be .checked .every .two .weeks .to .ensure .that .the .<br />
electrode .does .not .run .dry .<br />
1 . . . Remove .the .spent .electrolyte .bottle .from .the .clip . . .Unscrew .the .cap .and .<br />
discard .the .bottle . .<br />
2 . . . Remove .the .cap .and .seal .from .the .new .electrolyte .fill .solution . . .Check .<br />
that .the .rubber .gasket .is .properly .aligned, .and .then .connect .the .cap .<br />
and .tubing .assembly .to .bottle . . .The .1/8” .tubing .should .extend .into .the .<br />
bottle . .<br />
3 . . . Invert .the .electrolyte .bottle .and .snap .it .into .the .clip . .<br />
4 . . Use .the .special .pushpin .attached .to .the .pressurized .reference .assembly .<br />
on .the .monitor .to .pierce .a .hole .in .the .bottom .of .the .bottle .and . .<br />
re-pressure .the .reservoir .by .the .air .pump . .<br />
5 . . Dry .the .frit .at .the .base .of .the .reference .electrode . . .Check .the .frit .to .see .<br />
if .a .bead .of .fill .solution .forms, .which .indicates .good .electrolyte .flow .<br />
Calibration .frequency .is .user .dependent .for .the .most .accurate .and .precise .<br />
measurements . . .<br />
• . Replacement .of .the .reagent .requires .calibration . . .Refer .to . .<br />
Chapter IV, Performing DYN Calibration .<br />
• . Calibration .intervals .can .be .programmed .using .the .setup .mode . . .This .<br />
will .prompt .the .user .to .recalibrate .after .a .specific .amount .of .time .has .<br />
passed . . .Refer .to .Chapter III, Use of Setup Mode .<br />
V-
Instrument Maintenance<br />
Replacement of<br />
Sample Inlet Filter<br />
Polish Iodide Electrode<br />
Air Pump Check<br />
<strong>Thermo</strong> <strong>Scientific</strong> Orion 2118XP Oxygen Scavenger Monitor <strong>User</strong> <strong>Guide</strong><br />
1 . . . If .sample .flow .can .be .adjusted .with .the .pressure .regulator .to . .<br />
50 .mL/minute .or .more, .skip .this .procedure . .<br />
2 . . . Turn .off .sample .flow .by .turning .the .inlet .valve .to .the .right . .<br />
3 . . . Remove .filter .hex .cap .using .1-inch .open-ended .wrench . .<br />
4 . . . Separate .filter .cap .with .bypass/needle .valve .assembly .from .filter .body, . .<br />
retaining .ring .<br />
5 . . . Remove .filter .element .and .soft .gasket .(if .necessary) .<br />
6 . . . Replace .gasket .and .press .new .sintered .element .into .filter .body . .<br />
7 . . . Replace .hex .cap .and .bypass/needle .valve .assembly .and .reposition .bypass .<br />
drain .line .into .drain .assembly .<br />
8 . . . Retighten .hex .cap .to .approximately .75 .pound-inch .in .torque . .<br />
9 . . . Turn .on .sample .flow .by .turning .the .inlet .valve .left . .<br />
10 . .Check .for .leaks . . .<br />
Refer .to .Chapter II, Installation of New Iodide Electrode .<br />
Polish .the .iodide .electrode .according .to .the .instructions .that .are .included .<br />
with .the .polishing .strips, .Cat . .No . .948201 . . .<br />
Rinse .the .electrode .thoroughly .with .distilled .water, .insert .the .iodide .<br />
electrode .into .its .holder .in .the .flow .cell .and .then .plug .the .electrode .cable .<br />
marked .“Sensing” .into .the .top .of .the .electrode .<br />
The .reference .electrode .fill .solution .level .should .drop .at .least .1/8” .per .<br />
month, .which .indicates .good .flow .through .the .electrode .frit . . .If .the .flow .<br />
rate .is .low, .the .air .pump .should .be .tested .for .proper .operation .<br />
To .test .the .air .pump, .remove .the .pushpin .and .tubing .from .the .reference .<br />
reservoir . . .Place .the .tip .of .the .pushpin .in .a .beaker .of .water . . .Vigorous .<br />
bubbling .should .be .observed . . .Normally, .the .air .pump .delivers .at .least . .<br />
500 .cc/min .of .air . . .Replace .the .air .pump .if .weak .bubbling .or .no .bubbling .<br />
is .observed . . .To .ensure .a .tight .seal .on .the .reservoir, .replace .it .with .a .fresh .<br />
bottle .of .fill .solution, .Cat . .No . .181073 .<br />
V-3
Instrument Maintenance<br />
Replacement of Reagent<br />
and Diffusion Tubing<br />
Assembly<br />
Figure V-<br />
Reagent Bottle Assembly<br />
<strong>Thermo</strong> <strong>Scientific</strong> Orion 2118XP Oxygen Scavenger Monitor <strong>User</strong> <strong>Guide</strong><br />
Warning: Acid .reagent .is .hazardous . . .Use .protective .glasses .and .gloves .and .<br />
work .in .a .well-ventilated .area . . .Avoid .contact .with .skin .or .clothes . . .In .case .<br />
of .skin .contact, .flush .skin .immediately .with .water .to .prevent .burns . . .Refer .<br />
to .the .bottle .label .for .precautions . .<br />
1 . . Support .the .bottom .of .the .reagent .bottle .and .release .the .holding .clamp .<br />
with .one .hand . . .Turn .the .thumbscrew .counterclockwise .to .release .the .<br />
reagent .bottle . . .Unscrew .the .white .bottle .cap .and .gray .tubing .connector .<br />
assembly . . . .<br />
Since .the .reagent .contains .concentrated .acid, .which .is .very .corrosive .<br />
to .skin .and .eyes, .take .the .reagent .to .a .well .ventilated .area, .such .as .a .<br />
laboratory .fume .hood . . .Wear .rubber .gloves .and .eye .goggles . . .Unscrew .<br />
the .cap .and .pour .the .old .reagent .into .a .suitable .waste .container .<br />
2 . . Take .a .new .bottle .of .the .reagent, .Cat . .No . .181811, .to .a .well .ventilated .<br />
area, .such .as .a .laboratory .fume .hood . . .Unscrew .and .remove .the .white .<br />
cap .on .the .bottle .<br />
3 . . Connect .the .diffusion .tubing, .Cat . .No . .181860, .to .the .tubing .<br />
connector .assembly . . .Place .the .tubing .assembly .and .cap .into .the .bottle .<br />
4 . . Replace .the .gray .cap .and .screw .the .white .cap .on .tightly .<br />
5 . . Insert .the .five .nipples .on .the .top .of .the .reagent .bottle .into .the .fluid .<br />
connector .block .<br />
6 . . Support .the .bottom .of .the .reagent .bottle .with .one .hand .and .tighten .the .<br />
thumbscrew .clockwise .<br />
7 . . Clamp .the .bottle .to .the .fluidics .panel .to .secure .it .<br />
V-4
Instrument Maintenance<br />
Yearly Preventive<br />
Maintenance<br />
Electrodes<br />
O-ring Replacement<br />
<strong>Thermo</strong> <strong>Scientific</strong> Orion 2118XP Oxygen Scavenger Monitor <strong>User</strong> <strong>Guide</strong><br />
Note: Dispose .of .all .old .solutions .according .to .MSDS .instructions . . . .<br />
MSDS .sheets .can .be .downloaded .at .www .thermo .com/water .<br />
1 . . Replace .the .Orion .reference .electrode .(Cat . .No . .100056) . . .Refer .to .<br />
Chapter II, Installation of New Reference Electrode for .step-by-step .<br />
instructions .<br />
2 . . Replace .the .Orion .sensing .electrode .(Cat . .No . .100022) . . .Refer .to .<br />
Chapter II, Installation of New Iodide Electrode .for .step-by-step .<br />
instructions .<br />
3 . . Replace .the .hydrazine .standard .solution .(Cat . .No . .151810)<br />
Replace .the .electrode .holder .and .micro-valve .O-rings .every .year .in .addition .<br />
to .changing .the .reagent .and .tubing .connector .assembly .barb .O-rings .every .<br />
month . . .Both .O-rings .are .included .in .the .O-ring .kit, .Cat . .No . .2118OK .<br />
V-5
Instrument Maintenance<br />
Replacement of Restrictor<br />
Tubing<br />
Figure V-<br />
Restrictor Tubing<br />
<strong>Thermo</strong> <strong>Scientific</strong> Orion 2118XP Oxygen Scavenger Monitor <strong>User</strong> <strong>Guide</strong><br />
Use .the .restrictor .tube .assembly .(Cat . .No . .2100RT) . . .Refer .to .Figure V-2 .<br />
for .restrictor .tubing .connections .<br />
1 . . Close .the .inlet .valve .to .stop .sample .flow .through .monitor .<br />
2 . . Loosen .the .restrictor .tube .fitting .connection .from .the .top .of .the .flow .<br />
meter .<br />
3 . . Loosen .the .restrictor .tube .fitting .from .the .left .side .of .the .flow .cell .<br />
block .<br />
4 . . Pull .out .the .restrictor .tube .assembly .at .each .end . .<br />
5 . . Unscrew .the .clip .behind .flow .cell .that .holds .the .restrictor .tube .to .panel .<br />
6 . . Replace .with .new .restrictor .tubing .assembly . .<br />
7 . . Be .sure .all .fittings .are .secure, .to .prevent .leaks .<br />
8 . . Open .the .inlet .valve .to .start .sample .flow .through .monitor .<br />
.<br />
restrictor<br />
adapter<br />
fitting<br />
restrictor<br />
tube assembly<br />
flow<br />
meter<br />
clamp<br />
O-ring<br />
to check valve on<br />
flow cell manifold<br />
V-6
Diagnostics Mode<br />
<strong>Thermo</strong> <strong>Scientific</strong> Orion 2118XP Oxygen Scavenger Monitor <strong>User</strong> <strong>Guide</strong><br />
Chapter VI Troubleshooting<br />
• . Press . .to .enter .the .diagnostics .mode .<br />
• . The . .key .allows .access .to .menus .used .for .system .diagnostics . .<br />
• . Each .menu .is .sequential . . .Press . .to .scroll .through .the .menu .<br />
selections . . .<br />
• . .can .be .pressed .at .any .time .to .return .to .the .measurement .mode .<br />
Menu <strong>User</strong> Action Marquee Scrolling Main Display<br />
top line<br />
bottom line<br />
Diagnostics<br />
Press . to enter<br />
diagnostics mode.<br />
System will enter<br />
diagnostics mode at<br />
calibration log menu.<br />
Press . to step<br />
through the menu<br />
items.<br />
CALIBRATION SLOPE AND E 0<br />
ERROR LIST PRESS VIEW<br />
SELECT TIME/DATE TO VIEW MEASUREMENT LOG<br />
SELECT TIME/ DATE TO VIEW STATUS LOG<br />
SOFTWARE REV NUMBER<br />
SERIAL NUMBER<br />
MODEL NUMBER<br />
MEASURE mV AND NOISE<br />
mA OUTPUT VALUES SENSOR/TEMP<br />
KEYPAD TEST<br />
DISPLAY TEST<br />
The display will<br />
change with each<br />
menu<br />
Notes<br />
DIAGNOSTICS<br />
appears in mode<br />
window<br />
Keypad test<br />
menu shown<br />
immediately after<br />
display test menu<br />
VI-
Calibration Log<br />
<strong>Thermo</strong> <strong>Scientific</strong> Orion 2118XP Oxygen Scavenger Monitor <strong>User</strong> <strong>Guide</strong><br />
• . Displays .up .to .the .last .twelve .calibrations .using .three .information .<br />
screens:<br />
1 . . Slope .and .E0<br />
2 . . Date .and .Time<br />
3 . . Temperature .and .Electrode .Response .Time<br />
• . Press . .to .scroll .between .the .three .information .screens .for .one .<br />
calibration<br />
• . Press . ./ . .to .view .the .last .twelve .calibrations<br />
Menu <strong>User</strong> Action Marquee Scrolling Main Display<br />
top line<br />
bottom line<br />
Press . .<br />
Calibration Log CALIBRATION SLOPE AND E0 ##.# (Slope)<br />
##.# (E0) Press . to display the calibration<br />
time and date.<br />
Press . .to display the calibration<br />
temperature and electrode response.<br />
Press . .<br />
LAST CALIBRATION TIME/DATE HH:MM<br />
MM/DD or<br />
DD/MM<br />
CALIBRATION TEMP + ELECTRODE<br />
RESPONSE TIME<br />
##.# C (Temp)<br />
### (Response)<br />
Notes<br />
DIAGNOSTICS<br />
appears as mode<br />
Press ./ .<br />
to scroll<br />
through the last<br />
12 calibrations<br />
Press ./ .<br />
to scroll<br />
through the last<br />
12 calibrations<br />
VI-
Error List<br />
<strong>Thermo</strong> <strong>Scientific</strong> Orion 2118XP Oxygen Scavenger Monitor <strong>User</strong> <strong>Guide</strong><br />
• . Displays .a .list .of .system .events, .warnings, .and .error .codes .that .cause .the .<br />
yellow .or .red .LED .to .light . .<br />
• . The .top .line .of .the .main .display .shows .the .error .code .and .the .bottom .<br />
line .shows .the .number .of .error .codes .(1-5 .indicates .that .one .of .five .<br />
error .codes .is .being .displayed) .<br />
• . Press . ./ . .to .scroll .through .the .error .list .<br />
• . Press . .to .display .a .description .of .each .error .code .on .the .Marquee .<br />
Menu <strong>User</strong> Action Marquee Scrolling Main Display<br />
top line<br />
bottom line<br />
Error List ERROR LIST PRESS VIEW E###<br />
# - #<br />
Press . to display description of<br />
error code on Marquee.<br />
Press . ./ . to scroll through<br />
the error list.<br />
Press . .<br />
ACTUAL DESCRIPTION OF ERROR CODE E###<br />
# - #<br />
ACTUAL DESCRIPTION OF ERROR CODE E###<br />
# - #<br />
Notes<br />
VI-3
Measurement Log<br />
<strong>Thermo</strong> <strong>Scientific</strong> Orion 2118XP Oxygen Scavenger Monitor <strong>User</strong> <strong>Guide</strong><br />
• . Displays .logged .measurements .according .to .log .interval .entered .in .<br />
setup .menu .<br />
• . Press . .to .toggle .between .the .measurement .value .and .the .data .and .<br />
time .<br />
• . Press . ./ . .to .scroll .through .the .log .entries . .<br />
Menu <strong>User</strong> Action Marquee Scrolling Main Display<br />
top line<br />
bottom line<br />
Measurement Log SELECT TIME/DATE TO<br />
VIEW MEASUREMENT<br />
LOG<br />
Press . ./ . to scroll through<br />
the log entries<br />
Press . to toggle between the<br />
measurement log and the data and time<br />
display<br />
Press . .<br />
SELECT TIME/DATE TO<br />
VIEW MEASUREMENT<br />
LOG<br />
Temperature for logged<br />
measurement<br />
HH:MM<br />
MM/DD or DD/MM<br />
HH:MM<br />
MM/DD or DD/MM<br />
Concentration and<br />
mV values for logged<br />
measurement<br />
Notes<br />
VI-4
Status Log<br />
Software Revision<br />
<strong>Thermo</strong> <strong>Scientific</strong> Orion 2118XP Oxygen Scavenger Monitor <strong>User</strong> <strong>Guide</strong><br />
• . Displays .a .list .of .system .events .<br />
• . Press . ./ . .to .scroll .through .the .log .entries .<br />
• . Press . .to .toggle .between .the .log .code .and .the .data .and .time .<br />
• . Displays .the .software .revision .numbers .of .the .two .processors .<br />
Menu <strong>User</strong> Action Marquee Scrolling Main Display<br />
top line<br />
bottom line<br />
Status Log SELECT TIME/DATE TO<br />
VIEW STATUS LOG<br />
Software<br />
Revision<br />
Press . ./ . to scroll through<br />
the log entries<br />
Press . to toggle between the log<br />
code and the data and time<br />
Press . .<br />
Press . .<br />
SELECT TIME/DATE TO<br />
VIEW STATUS LOG<br />
PRESS UP/DOWN KEY TO<br />
VIEW STATUS LOG<br />
HH:MM<br />
MM/DD or DD/MM<br />
HH:MM<br />
MM/DD or DD/MM<br />
Event code<br />
SOFTWARE REV NUMBER r # . # #<br />
r # . # #<br />
Notes<br />
VI-5
Electronics Serial Number<br />
Model Number<br />
mV and Noise Measurements<br />
mA Output Values<br />
<strong>Thermo</strong> <strong>Scientific</strong> Orion 2118XP Oxygen Scavenger Monitor <strong>User</strong> <strong>Guide</strong><br />
• . Displays .the .serial .number .of .the .electronics .assembly .<br />
• . Displays .the .model .number .of .the .system . . .An .E .will .be .displayed .if .the .<br />
monitor .is .set .to .the .ELIMIN-OX® .application .mode .and .an .H .will .be .<br />
displayed .if .the .monitor .is .set .to .the .hydrazine .application .mode .<br />
• . Displays .the .current .mV .measurement .value .and .the .noise .associated .<br />
with .the .measurement .<br />
• . Displays .current .mA .values .for .sensor .and .temperature .outputs .<br />
Menu <strong>User</strong> Action Marquee Scrolling Main Display<br />
top line<br />
bottom line<br />
Electronics Serial Number SERIAL NUMBER # # #<br />
# # #<br />
Press . .<br />
Model Number MODEL NUMBER 2118<br />
# E or H displayed<br />
Press . .<br />
mV and Noise Measurements MEASURE mV AND NOISE Current mV measurement<br />
and noise<br />
Press . .<br />
mA Output Values mA OUTPUT VALUES<br />
SENSOR/ TEMP<br />
Press . .<br />
Current mA output values<br />
for sensor and temperature<br />
Notes<br />
VI-6
Display Test<br />
<strong>Thermo</strong> <strong>Scientific</strong> Orion 2118XP Oxygen Scavenger Monitor <strong>User</strong> <strong>Guide</strong><br />
• . Press . .to .start .display .test .<br />
1 . . All .the .display .segments .will .light .up .and .the .system .will .cycle .<br />
through .the .LED .colors . .<br />
2 . . Verify .that .all .the .display .segments .are .on .and .that .the .LED .colors .<br />
are .functional .and .press . .<br />
3 . . All .the .display .segments .will .turn .off .except .for .the .Marquee .display, .<br />
which .should .show .PRESS ENTER TO CONTINUE .<br />
4 . . Verify .that .all .the .display .segments .are .off .and .press . .<br />
5 . . The .system .will .show .a .counting .number .pattern .on .both .lines .of .<br />
the .main .display .<br />
6 . . Verify .that .the .display .segments .are .functional .and .press . .to .<br />
proceed .to .the .keypad .test .<br />
Menu <strong>User</strong> Action Marquee Scrolling Main Display<br />
top line<br />
bottom line<br />
Display Test PRESS ENTER FOR<br />
DISPLAY TEST<br />
Press . .<br />
Verify that all the display segments<br />
are on and that the LED colors are<br />
functional.<br />
Press . .<br />
Verify that all the display segments<br />
are off.<br />
Press . .<br />
Verify that the display segments are<br />
functional.<br />
Press . .<br />
dISP<br />
tESt<br />
Notes<br />
All segments on All segments on System will cycle through<br />
the LED colors<br />
PRESS ENTER TO<br />
CONTINUE<br />
PRESS ENTER TO<br />
CONTINUE<br />
All segments off<br />
Count pattern<br />
Count pattern<br />
VI-7
Keypad Test<br />
<strong>Thermo</strong> <strong>Scientific</strong> Orion 2118XP Oxygen Scavenger Monitor <strong>User</strong> <strong>Guide</strong><br />
• . The .main .display .will .show .0 .and .the .Marquee .will .display .KEYPAD<br />
TEST PRESS ALL KEYS ONE AT A TIME .<br />
• . Press .all .eight .keys .one .at .a .time .in .any .order .<br />
Menu <strong>User</strong> Action Marquee Scrolling Main Display<br />
top line<br />
bottom line<br />
Keypad Test KEYPAD TEST PRESS ALL<br />
KEYS ONE AT A TIME<br />
Press all keys one at a<br />
time in any order<br />
* . . After .the .first .key .is .pressed .Error .E033 .will .be .displayed .if .a .new .<br />
key .is .not .pressed .within .10 .seconds .<br />
KEYPAD TEST PRESS ALL<br />
KEYS ONE AT A TIME<br />
0<br />
Display will show numbers<br />
1 through 8 as keys are<br />
pressed<br />
Notes<br />
After the first key is pressed Error<br />
E033 will be displayed if a new key<br />
is not pressed within 10 seconds<br />
VI-8
Troubleshooting<br />
Slope Problems<br />
Low Slope<br />
Slope .less .than .-40 .mV<br />
<strong>Thermo</strong> <strong>Scientific</strong> Orion 2118XP Oxygen Scavenger Monitor <strong>User</strong> <strong>Guide</strong><br />
• . Check .electrode .function, .clean .electrode, .recalibrate, .and .if .instrument .<br />
continues .to .read .low, .replace .electrode . .<br />
• . Check .electronics .to .read .mV .input .correctly . . .Use .electronic .test .kit .<br />
(Cat . .No . .180029) .procedure .for .checking .electronics .function . .<br />
• . Oxygen .scavenger-free .sample .must .be .used .for .calibration .<br />
. Ion-selective .electrodes .(ISEs) .can .be .shown .as .DC-voltage .sources .with .<br />
50 .to .1000 .Mohm; .a .very .high .output .impedance . . .ISEs .respond .to .ion .<br />
concentration .changes .with .a .voltage .change .of .approximately .-60 .mV/<br />
decade .for .monovalent .ions .such .as .iodide . . .Knowing .electrode .and .<br />
instrument .parameters .like .offset .potential, .slope, .etc . .allows .testing .of .<br />
various .instruments .by .applying .a .known .mV-voltage .<br />
Input Signal Expected Reading: ± (0 .5 mV + 0 . %)<br />
0 mV - 0.5 mV to + 0.5 mV<br />
- 1000 mV -1001.5 mV to – 998.5 mV<br />
+ 1000 mV + 998.5 mV to + 1001.5 mV<br />
• . Standard .contaminated .or .incorrectly .made . . .Verify .with .fresh .standard . .<br />
• . Standard .1 .and .standard .2 .values .not .set .correctly .– .Check .percent .flow .<br />
rate .setting .and .range .setting .on .dynamic .calibrator .and .in .the .setup .<br />
menu .of .the .monitor . .<br />
• . If .using .custom .standard, .verify .values .for .dynamic .calibrator .<br />
• . pH .adjustment .is .not .correct . . .Check .level .and .flow .for .reagent . . .<br />
Replace .reagent .if .contaminated .or .level .is .less .than .50 .mL . . .Refer .to .<br />
Chapter II, Installation of Reagent and Diffusion Tubing .<br />
• . Standard .1 .and .standard .2 .added .in .wrong .sequence . . .Refer .to . .<br />
Chapter IV, Performing DYN Calibration .<br />
VI-9
Troubleshooting<br />
High Slope<br />
Slope .greater .than .-75 .mV<br />
<strong>Thermo</strong> <strong>Scientific</strong> Orion 2118XP Oxygen Scavenger Monitor <strong>User</strong> <strong>Guide</strong><br />
• . Improper .calibration .technique .– .Refer .to .Chapter IV, Performing<br />
DYN Calibration .<br />
• . Calibration .standard .contaminated .– .Replace .with .new .standard . .<br />
• . Electronics .failure .– .Try .to .reset .monitor . . .Refer .to .Chapter VI,<br />
Resetting the Monitor .<br />
• . Improper .dynamic .calibrator .settings .– .Refer .to .Chapter IV,<br />
Performing DYN Calibration .<br />
• . Oxygen .scavenger-free .sample .must .be .used .for .calibration .<br />
• . Reference .and .sensing .cables .interchanged .– .Verify .wiring .of .cable .<br />
connections .to .terminal .strip . . .Refer .to .Chapter II, Wiring the<br />
Instrument .<br />
• . Check .the .connection .of .the .cable .markers .for .the .corresponding .<br />
electrode . . .(Cable .markers .are .the .white .tape .at .the .cap .connector .on .<br />
the .cable):<br />
• . “Ref” .for .reference .electrode . .<br />
• . “Sensing” .for .the .iodide .electrode .<br />
• . .Sensing .electrode .coated .– .Polish .or .replace .sensing .electrode .<br />
VI- 0
Troubleshooting<br />
Troubleshooting<br />
Matrix<br />
<strong>Thermo</strong> <strong>Scientific</strong> Orion 2118XP Oxygen Scavenger Monitor <strong>User</strong> <strong>Guide</strong><br />
Malfunction Possible Cause Remedy<br />
Noisy Blocked reference<br />
junction<br />
Excessive Drift Blocked reference<br />
junction<br />
Make sure electrolyte bottle is flowing<br />
properly. Check bottle has been vented<br />
and air pump is working properly. Refer to<br />
Chapter II and Chapter V .<br />
Iodide electrode failure Check electrode cable connection and<br />
location of wiring to terminal strip.<br />
Refer to Chapter II .<br />
Temperature probe Disconnect ATC. Temperature should read<br />
25 ˚C (E101). Replace if necessary.<br />
Faulty electrode cables Replace electrode cables.<br />
Make sure electrolyte bottle is flowing<br />
properly. Check tubing to electrode for<br />
obstruction. Check bottle has been vented<br />
and air pump is working properly. Refer to<br />
Chapter II and Chapter V .<br />
Reference electrode Missing or not using correct filling solution<br />
(Cat. No. 181073).<br />
Iodide electrode<br />
response<br />
Polish iodide electrode.<br />
Install new iodide electrode.<br />
Refer to Chapter II .<br />
Temperature probe Disconnect ATC. Temperature should read<br />
25 ˚C (E101). Replace if necessary.<br />
Burst diffusion tubing Observe liquid level in reagent bottle.<br />
If liquid level rises, replace reagent and<br />
diffusion tubing. Tubing connector may need<br />
replacement. Refer to Chapter II .<br />
Low Flow Rate Sample pressure below<br />
8 psi<br />
Pressure regulator set<br />
too low<br />
Check sample pressure. If less than<br />
8 psi, increase pressure. Refer to Chapter II .<br />
Increase pressure by pulling on red locking<br />
ring and turning black knob clockwise.<br />
Refer to Chapter II .<br />
Inlet filter clogged Replace or clean filter.<br />
Restrictor tubing<br />
crimped or clogged<br />
Replace restrictor tubing.<br />
Refer to Chapter II .<br />
VI-
Troubleshooting<br />
<strong>Thermo</strong> <strong>Scientific</strong> Orion 2118XP Oxygen Scavenger Monitor <strong>User</strong> <strong>Guide</strong><br />
Malfunction Possible Cause Remedy<br />
Does Not<br />
Calibrate<br />
Properly<br />
Contaminated standard or<br />
syringe<br />
Flow rate and range not set<br />
properly for standards on<br />
dynamic calibrator<br />
Sample used for calibration<br />
contains oxygen scavenger.<br />
Reagent diluted or<br />
contaminated<br />
Use new standard solution. Replace<br />
syringe.<br />
Verify dynamic calibrator settings and<br />
repeat calibration. Refer to Chapter IV .<br />
Oxygen scavenger-free sample must be<br />
used for calibration. Refer to Chapter IV<br />
Replace reagent. Refer to Chapter II .<br />
Temperature probe failure Disconnect ATC. Temperature should<br />
read 25 ˚C (E101). Replace if necessary.<br />
Electronics failure /<br />
Bad setup<br />
Try resetting the monitor. Refer to<br />
Chapter VI .<br />
High Readings Monitor out of calibration Recalibrate. Refer to Chapter IV .<br />
Inlet filter just replaced Flush for one hour. If offline calibration<br />
was performed, verify accuracy of<br />
alternate method value. Refer to<br />
Chapter IV .<br />
Reagent spent or diluted Replace reagent. Refer to Chapter II .<br />
VI-
Troubleshooting<br />
<strong>Thermo</strong> <strong>Scientific</strong> Orion 2118XP Oxygen Scavenger Monitor <strong>User</strong> <strong>Guide</strong><br />
Malfunction Possible Cause Remedy<br />
Over-Range<br />
Readings<br />
Electrode connections Verify electrode connections to electrode<br />
cables. Slide electrode cable back to expose<br />
male connector. Be sure to secure female<br />
connector on electrode to male connector<br />
before twisting to tighten. Refer to<br />
Chapter II .<br />
Electrode wiring Electrodes not properly wired to terminal<br />
strip. Refer to Chapter II .<br />
Reference electrode Missing or blocked filling solution.<br />
Refer to Chapter II .<br />
Electrode failure Electrodes are shorted, cracked, damaged.<br />
Install new probes. Refer to Chapter II .<br />
Electronics failure /<br />
Bad setup /<br />
Needs calibration<br />
Try resetting the monitor.<br />
Refer to Chapter VI .<br />
Default Battery failure Consult Technical Support.<br />
Electronics failure Try resetting the monitor. Refer to<br />
Chapter VI or consult Technical Support.<br />
Low Readings Electronics failure Try resetting the monitor. Refer to<br />
Chapter VI or consult Technical Support.<br />
If offline calibration was performed, verify<br />
accuracy of alternate method value.<br />
Refer to Chapter IV .<br />
VI- 3
Troubleshooting<br />
Error/Event Codes<br />
Displayed<br />
Event Code<br />
System Status Codes<br />
<strong>Thermo</strong> <strong>Scientific</strong> Orion 2118XP Oxygen Scavenger Monitor <strong>User</strong> <strong>Guide</strong><br />
Error/Event .codes .will .be .in .the .format .“E###” . . .Some .of .these .are .errors, .<br />
some .are .warnings, .and .some .are .purely .informational . . .The .first .digits .<br />
identify .the .type .of .error .or .event .as .identified .in .the .table .below .<br />
Description Cause Troubleshooting<br />
A7 ALARM1 CH1 ON Alarm 1 Channel 1 engaged (closed)<br />
A7 ALARM2 CH1 ON Alarm 2 Channel 1 engaged (closed)<br />
A7 3 ALARM3 CH1 ON Alarm 3 Channel 1 engaged (open)<br />
A7 4 AIR PUMP ON Air pump engaged<br />
A8 ALARM1 CH1 OFF Alarm 1 Channel 1 disengaged (open)<br />
A8 ALARM2 CH1 OFF Alarm 2 Channel 1 disengaged (open)<br />
A8 3 ALARM3 CH1 OFF Alarm 3 Channel 1 disengaged (closed)<br />
A8 4 AIR PUMP OFF Air pump disengaged<br />
C500 CAL MODE Calibration mode entered<br />
C509 CAL ISE DYN DYN calibration complete<br />
C50B CAL ISE OFFLINE Offline calibration complete<br />
R400 MEAS MODE Measurement mode entered<br />
S600 SETUP MODE Setup mode entered<br />
E0 8 POWER FAIL Brown out or power failure and system has<br />
stopped processing.<br />
E033 KEYPAD FAILURE <strong>User</strong> did not press the keys during a<br />
diagnostic mode keypad test, or keypad<br />
broken<br />
Verify custom settings<br />
E034 CAL PASS INCORRECT <strong>User</strong> entered incorrect calibration password Verify password<br />
E035 SYSTEM PASS INCORRECT <strong>User</strong> entered incorrect system password Verify password<br />
Repeat diagnostic mode keypad test<br />
E036 USER VALUE INCORRECT <strong>User</strong> entered a value that is out of range Verify value and re-enter<br />
E037 POWER RETURN System started processing after brown out<br />
or power failure<br />
E04 CALIBRATION TIMEOUT The electrode has not reach stability within<br />
the specified time<br />
Verify custom settings<br />
The user can press enter to force stability. The system<br />
code may be due to out of range measurements or an<br />
invalid previous calibration.<br />
E04 INVALID SLOPE Invalid slope obtained during calibration Check electrodes, electrode cables and connectors for<br />
defects or shorts. Replace if necessary. Calibrate using<br />
correct dynamic calibrator settings for standard 1 and 2.<br />
VI- 4
Troubleshooting<br />
Displayed<br />
Event Code<br />
Description Cause Troubleshooting<br />
System Event/Error Codes - Yellow LED<br />
E004 DEFAULT VALUES Instrument has been reset or is new<br />
out of box<br />
<strong>Thermo</strong> <strong>Scientific</strong> Orion 2118XP Oxygen Scavenger Monitor <strong>User</strong> <strong>Guide</strong><br />
Calibrate the instrument<br />
E0 HARDWARE FAULT System Error Contact Technical Support 1-800-225-1480<br />
E 0 TEMP OUT OF RANGE Temperature sensor on channel 1 out<br />
of range (5.1 ˚C to 45 ˚C)<br />
E CAL DUE <strong>User</strong> calibration required. No<br />
calibration has been performed in<br />
user specified time interval.<br />
E 7 SOUT mA OVER RANGE Measured oxygen scavenger value<br />
above Sout high limit value<br />
E 8 SOUT mA UNDER RANGE Measured oxygen scavenger value<br />
below Sout low limit value<br />
E 9 TOUT mA OVER RANGE Measured temperature value above<br />
Tout high limit value<br />
E 30 TOUT mA UNDER RANGE Measured temperature value below<br />
Tout low limit value<br />
System Error Codes - Red LED<br />
Check ATC cable and probe connections. Replace if needed.<br />
Recalibrate the instrument.<br />
Verify user selectable Sout high limit value in setup menu<br />
Verify user selectable Sout low limit value in setup menu<br />
Verify user selectable Tout high limit value in setup menu<br />
Verify user selectable Tout low limit value in setup menu<br />
E001 HARDWARE FAULT System Error Contact Technical Support 1-800-225-1480<br />
E002 HARDWARE FAULT System Error Contact Technical Support 1-800-225-1480<br />
E005 HARDWARE FAULT System Error Contact Technical Support 1-800-225-1480<br />
E006 HARDWARE FAULT System Error Contact Technical Support 1-800-225-1480<br />
E018 HARDWARE FAULT System Error Contact Technical Support 1-800-225-1480<br />
E019 HARDWARE FAULT System Error Contact Technical Support 1-800-225-1480<br />
E020 HARDWARE FAULT System Error Contact Technical Support 1-800-225-1480<br />
E022 HARDWARE FAULT System Error Contact Technical Support 1-800-225-1480<br />
E024 HARDWARE FAULT System Error Contact Technical Support 1-800-225-1480<br />
E026 HARDWARE FAULT System Error Contact Technical Support 1-800-225-1480<br />
E027 HARDWARE FAULT System Error Contact Technical Support 1-800-225-1480<br />
E029 HARDWARE FAULT System Error Contact Technical Support 1-800-225-1480<br />
E030 HARDWARE FAULT System Error Contact Technical Support 1-800-225-1480<br />
E038 HARDWARE FAULT System Error Contact Technical Support 1-800-225-1480<br />
VI- 5
Troubleshooting<br />
Displayed<br />
Event Code<br />
Description Cause Troubleshooting<br />
System Error Codes - Red LED (cont’d)<br />
E 03 MEAS OVER RANGE Oxygen scavenger measurement is<br />
over range, the display should also be<br />
flashing ‘9999’<br />
E 09 BAD SLOPE Last calibration produced a bad slope.<br />
Slope is less than -45 mV/decade<br />
or more than -62 mV/decade, or the<br />
calibration standards may have been<br />
interchanged.<br />
E 3 CAL OVERDUE Calibration is overdue by more than<br />
50% of the user specified time<br />
interval.<br />
E TEMP BROKEN Temperature sensor on channel 1<br />
broken or out of range.<br />
E 5 BAD OFFSET Last calibration produced a bad Eo<br />
offset.<br />
<strong>Thermo</strong> <strong>Scientific</strong> Orion 2118XP Oxygen Scavenger Monitor <strong>User</strong> <strong>Guide</strong><br />
Check if electrode is not connected, electrode cables are faulty, or<br />
reference junction is fouled.<br />
Recalibrate the instrument using fresh standard. Recalibrate using<br />
correct dynamic calibrator settings for standard 1 and 2.<br />
Recalibrate the instrument<br />
Check ATC cable connections and probe for damage. Replace if<br />
needed.<br />
Recalibrate the instrument using fresh standards. Check reference<br />
electrode and sensing electrode connections. Polish the sensing<br />
electrode. Replace electrodes if needed.<br />
VI- 6
Troubleshooting<br />
Resetting the<br />
Monitor<br />
<strong>Thermo</strong> <strong>Scientific</strong> Orion 2118XP Oxygen Scavenger Monitor <strong>User</strong> <strong>Guide</strong><br />
The .<strong>Thermo</strong> .<strong>Scientific</strong> .Orion .2118XP .oxygen .scavenger .monitor .allows .<br />
the .user .to .reset .the .monitor .through .the .setup .mode .or .by .a .hard .reset . . .<br />
Resetting .the .monitor .will .restore .all .settings .in .the .setup .menu .to .factory .<br />
default .values . .(See .Appendix A-2, ISE Default Values)<br />
Warning: Resetting .the .monitor .will .erase .all .data .logs .including .<br />
calibration, .and .password .protection .settings .for .setup .and .calibration . . . .<br />
The .instrument .will .reset .setup .parameters .to .factory .default .settings .<br />
Note: Resetting .the .computer .will .not .reset .the .hydrazine .or .ELIMIN-OX® .<br />
application .mode . . .<br />
<strong>User</strong> Action Marquee<br />
Scrolling<br />
Press . to enter setup mode.<br />
Press . ./ . until RSET<br />
appears in the Marquee.<br />
Press . .<br />
Press in the following sequence:<br />
1.<br />
2. .<br />
3. .<br />
System resets to default values<br />
and returns to the measurement<br />
mode. Actual values for<br />
concentration and temperature<br />
will be displayed if the electrodes<br />
are operational.<br />
Last menu used<br />
in setup mode<br />
RSET<br />
(Flashing)<br />
PRESS TEST<br />
VIEW ENTER TO<br />
RESET<br />
PRESS TEST<br />
VIEW ENTER TO<br />
RESET<br />
Main Display<br />
top line<br />
bottom line<br />
SEL<br />
SCrn<br />
SEL<br />
SCrn<br />
rSEt<br />
?<br />
rSEt<br />
?<br />
Notes<br />
SETUP appears<br />
as mode<br />
VI- 7
Troubleshooting<br />
Hard Reset<br />
Serial Number and<br />
Software Revision<br />
<strong>Thermo</strong> <strong>Scientific</strong> Orion 2118XP Oxygen Scavenger Monitor <strong>User</strong> <strong>Guide</strong><br />
A .hard .reset .should .be .performed .if .the .unit .becomes .unresponsive .or .the .<br />
status .indicators .are .flashing . . .Perform .the .following .sequence: .<br />
• . Carefully .open .front .cover .of .electronics .case .(loosen .4 .corner .screws) .<br />
• . Press .small .button .located .on .raised .portion .of .PCB .to .reset .electronics . .<br />
• . Close .front .cover .of .electronics .case .and .tighten .the .screws .<br />
System .settings .and .calibrations .are .preserved .and .instrument .returns .to .the .<br />
measure .mode . . .The .actual .value .for .concentration .and .temperature .will .<br />
be .displayed .if .the .electrodes .are .properly .installed . . .If .the .system .does .not .<br />
reset, .contact .Technical .Support .at .1-800-225-1480 .for .assistance .<br />
In .the .event .you .require .technical .assistance, .please .have .the .serial .number .<br />
available .when .calling .for .assistance .along .with .the .software .version .<br />
• . The .monitor .serial .number .is .located .on .the .underside .of .the .<br />
electronics .enclosure .or .if .panel .mounted .then .on .the .backside .of .the .<br />
electronics .enclosure . .<br />
• . The .software .revision .is .accessed .through .the .test .mode .<br />
VI- 8
Troubleshooting<br />
Service and Repair<br />
Extended Warranty<br />
Service Kit to Expand<br />
Standard Warranty<br />
<strong>Thermo</strong> <strong>Scientific</strong> Orion 2118XP Oxygen Scavenger Monitor <strong>User</strong> <strong>Guide</strong><br />
The .<strong>Thermo</strong> .<strong>Scientific</strong> .Orion .2118XP .oxygen .scavenger .monitor .provides .<br />
measurements .of .oxygen .scavenger .through .a .combination .of .our .premium .<br />
electrode .technology, .accurate .and .precise .flow .cell .design .and .user .friendly .<br />
scrolling .Marquee .to .set .a .new .industry .standard .for .reliability . . .Similarly, .<br />
<strong>Thermo</strong> .Fisher .<strong>Scientific</strong> .now .offers .multiple .levels .of .service .programs .to .<br />
meet .your .needs .beyond .the .One-Year .Product .Warranty .period .<br />
A .cost .effective .way .to .blend .your .in-house .expertise .with .our .service .<br />
and .support .experts, .to .get .the .support .you .need .at .a .specified .annual .<br />
contracted .price . . .This .warranty .plan .must .be .purchased .within .ninety .days .<br />
of .the .initial .product .purchase .date .<br />
• . Extends .the .features .of .the .standard .One-Year .Product .Warranty .for .a .<br />
second .or .third .year . .<br />
• . Provides .access .to .the .manufacturer’s .technical .experts .at .<strong>Thermo</strong> .<br />
<strong>Scientific</strong> .Orion .Support .Call .Center, .1-800-225-1480, . .<br />
Monday .– .Friday, .8:00 .AM .– .5:00 .PM .EST . .<br />
• . After .telephone .consultation, .we .will .send .you .required .parts .for .<br />
installation .by .your .on-site .technician .<br />
With .in-house .resources .at .a .premium, .many .organizations .require .<br />
immediate .access .to .manufacturer .expertise . . .Purchase .this .service .kit .<br />
within .ninety .days .of .the .initial .product .purchase .date .to .eliminate .the .<br />
costly .effects .of .down .time . .<br />
• . Provides .a .contracted, .cost-effective .means .to .enhance .level .of .support .<br />
offered .during .the .product .warranty .period . .<br />
• . Provides .priority .access .to .the .manufacturer’s .technical .experts .at .<br />
<strong>Thermo</strong> .<strong>Scientific</strong> .Orion .Support .Call .Center .<br />
• . Provides .a .service .kit .to .expedite .on-site .repairs .in .conjunction .with .<br />
telephone .consultation .with .<strong>Thermo</strong> .<strong>Scientific</strong> .Orion .product .experts . .<br />
. The .service .kit .includes:<br />
• . . Power .supply<br />
• . . Front .panel .display<br />
• . . Air .pump<br />
• . . Sensing .and .reference .electrode .cables<br />
VI- 9
Troubleshooting<br />
Advanced Replacement<br />
Not sure which plan is<br />
best for you?<br />
Installation and Start-Up<br />
Remedial Service<br />
Preventive Maintenance<br />
Programs<br />
<strong>Thermo</strong> <strong>Scientific</strong> Orion 2118XP Oxygen Scavenger Monitor <strong>User</strong> <strong>Guide</strong><br />
When .down-time .is .a .cost .factor .to .be .strictly .controlled, .the .advanced .<br />
replacement .service .plan .is .often .times .the .best .choice . . .<br />
• . Enhances .level .of .support .offered .during .the .standard .One-Year .<br />
Product .Warranty .<br />
• . Provides .access .to .the .manufacturer’s .technical .experts .at .<strong>Thermo</strong> .<br />
<strong>Scientific</strong> .Orion .Support .Call .Center .and .repair .facilities .<br />
• . If, .after .reasonable .remote .diagnostics .and .trouble-shooting .attempts, .<br />
we .determine .the .instrument .to .be .non-functioning, .we .will .make .all .<br />
reasonable .effort .to .get .required .parts .or .equipment .out .to .your .facility .<br />
by .the .following .day .for .installation .by .your .on-site .technician . .<br />
• . Offers .predictable .expenditure .through .fixed .annual .contract .price .<br />
Ask .your .<strong>Thermo</strong> .<strong>Scientific</strong> .Orion .products .Sales .Representative .to .put .you .<br />
in .touch .with .the .service .plan .manager . . .We .have .additional .service .options .<br />
that .are .sure .to .address .your .concerns . . .<br />
To .help .you .achieve .optimum .performance, .rely .on .us .to .provide .you .with .<br />
an .efficient .and .quality .installation .and .the .start-up .support .you .need .to .<br />
be .up .and .running .quickly . . .Our .service .representatives .are .highly .trained, .<br />
experienced, .and .certified .for .your .product .and .will .be .there .to .make .sure .<br />
that .your .instrumentation .delivers .to .specifications .<br />
This .is .a .one-day .service .engineer .on-site .visit .to .your .facility .for .remedial .<br />
service .events .at .standard .response .time . . .Consider .this .plan .an .excellent .<br />
uplift .to .one .of .the .aforementioned .programs .<br />
All .precision-made .scientific .equipment .requires .preventive .maintenance .<br />
and .calibration .checks .to .perform .at .their .maximum .effectiveness . . .<br />
Consider .a .fixed-fee .preventive .maintenance .contract .to .have .one .of .our .<br />
experts .perform .the .following .tasks:<br />
• . Sampling .check<br />
• . Full .validation .test<br />
• . Visual .check .for .worn, .loose, .or .damaged .parts<br />
• . Replacement .of .consumables .(additional .charge .for .consumables)<br />
• . Diagnostic .check .to .verify .all .operating .parameters .are .within .the .<br />
factory .specifications<br />
• . Check .instrument .electrodes, .flow .and .pressures<br />
• . Clean .and .replace .any .wearable .items .such .as .tubing, .O-rings, .reagents .<br />
VI- 0
Notice of Compliance<br />
Chapter VII Customer Service<br />
This .equipment .generates, .uses, .and .can .radiate .radio .frequency .energy .<br />
and .if .not .installed .and .used .in .accordance .with .the .instruction .manual, .<br />
may .cause .interference .to .radio .communications . . .It .has .been .tested .<br />
and .found .to .comply .with .the .limits .for .a .Class .A .computing .device .<br />
pursuant .to .Subpart .J .of .Part .15 .of .FCC .Rules, .which .are .designed .to .<br />
provide .reasonable .protection .against .such .interference .when .operated .in .a .<br />
commercial .environment . . .Operation .of .this .equipment .in .a .residential .area .<br />
is .likely .to .cause .interference .in .which .case .the .user, .at .his .own .expense, .<br />
will .be .required .to .take .whatever .measure .may .be .required .to .correct .the .<br />
interference .<br />
“This .digital .apparatus .does .not .exceed .the .(Class .A) .limits .for .radio .<br />
noise .emissions .from .digital .apparatus .set .out .in .the .Radio .Interference .<br />
Regulations .of .the .Canadian .Department .of .Communications .”<br />
“Le .présent .appareil .numérique .n’émet .pas .de .bruits .radioélectriques .<br />
dépassant .les .limites .applicables .aux .appareils .numériques .(de .la .class .A) .<br />
prescrites .dans .le .Régiement .sur .le .brouillage .radioélectrique .édicté .par .le .<br />
ministère .des .Communications .du .Canada .”<br />
<strong>Thermo</strong> <strong>Scientific</strong> Orion 2118XP Oxygen Scavenger Monitor <strong>User</strong> <strong>Guide</strong> VII-
Customer Service<br />
Declaration of<br />
Conformity<br />
<strong>Thermo</strong> <strong>Scientific</strong> Orion 2118XP Oxygen Scavenger Monitor <strong>User</strong> <strong>Guide</strong><br />
Manufacturer: . <strong>Thermo</strong> .Fisher .<strong>Scientific</strong> .Inc .<br />
Address: . .166 .Cummings .Center .<br />
Beverly, .Ma .01915 .<br />
USA<br />
We .declare .that .the .following .products<br />
Model . Electrical .Rating .<br />
. 2118XP . .85-132 .VAC; .0 .1 .A .or . .<br />
170-250 .VAC; .0 .05 .A, .50 .- .60 .Hz<br />
Equipment Class: . Measurement, .Control .and .Laboratory .Equipment<br />
Conform .to .the .following .Directives .and .Standards<br />
Safety: . Low .Voltage .Directive .(LVD), .73/23/EEC<br />
. . .EN61010-1:2001, .Safety .requirements .for .electrical .<br />
equipment .for .measurement, .control .and .laboratory .<br />
use .– .general .requirements<br />
EMC: . Electromagnetic .Compatibility .(EMC), .89/336/EEC<br />
. . .EN .61326:1997 .+ .A1:1998 .+ .A2:2001 .– .Electrical .<br />
equipment .for .measurement, .control, .and .laboratory .<br />
use . .EMC .requirements .<br />
Environmental: . IP66<br />
These .products .have .been .manufactured .in .compliance .with .the .provisions .<br />
of .the .relevant .<strong>Thermo</strong> .Fisher .<strong>Scientific</strong> .manufacturing .and .test .documents .<br />
and .processes . .Further, .these .documents .and .processes .are .recognized .as .<br />
complying .with .ISO .9001 .by .QMI, .listed .as .File .#001911 .<br />
Place .and .date .of .issues:<br />
Beverly, .MA<br />
January .21, .2008<br />
. . .Glenn .Benvie .<br />
Senior .QA .Engineer<br />
VII-
Customer Service<br />
Terms and Conditions<br />
Contact Information<br />
Minimum Order<br />
Rush Orders<br />
Returning Goods<br />
<strong>Thermo</strong> <strong>Scientific</strong> Orion 2118XP Oxygen Scavenger Monitor <strong>User</strong> <strong>Guide</strong><br />
For .products .not .listed .in .this .warranty .statement, .please .visit .our .website .<br />
at .www .thermo .com/water .<br />
For .updated .contact .information, .visit .www .thermo .com/water .<br />
<strong>Thermo</strong> .Fisher .<strong>Scientific</strong> .Inc . .<br />
Environmental .Instruments .Division .<br />
Water .Analysis .Instruments .<br />
166 .Cummings .Center . .<br />
Beverly, .MA .01915 .<br />
Toll .Free: . .800-225-1480 .<br />
Tel: . .978-232-6000 .<br />
Dom . .Fax: . .978-232-6015 .<br />
Int’l .Fax: . .978-232-6031<br />
The .minimum .order .requirement .is .$100 .for .Orion .online .products . . .An .<br />
order .is .considered .to .be .a .purchase .order .for .products .to .be .shipped .to .<br />
a .single .location . . .International .minimum .order .requirements .may .vary . .<br />
Contact .your .international .coordinator .for .details . .<br />
For .customers .in .the .U .S ., .rush .orders .received .before .12 .pm .Eastern .Time .<br />
will .be .shipped .the .same .day . . .Rush .orders .received .after .12 .Noon .Eastern .<br />
Time .will .be .shipped .the .next .business .day .<br />
For .customers .and .dealers .in .Canada, .rush .orders .will .be .shipped .within .<br />
2 .business .days . . .For .customers .and .dealers .outside .the .U .S . .and .Canada, .<br />
contact .your .international .coordinator .for .rush .order .scheduling . . .All .rush .<br />
orders .carry .a .$50 .incremental .charge .per .order . . .FOB: .Beverly . .Freight .<br />
charges .are .prepaid .and .added .or .freight .collect . . .All .rush .order .processing .<br />
is .subject .to .stock .availability .<br />
Permission .to .return .<strong>Thermo</strong> .<strong>Scientific</strong> .Orion .merchandise .must .be .<br />
obtained .prior .to .return . . .Contact .within .30 .days .of .receipt .of .goods .for .a .<br />
return .authorization .number .<br />
VII-3
Customer Service<br />
Hazardous Materials<br />
Restocking Charge<br />
Short Shipments<br />
Force Majeure<br />
<strong>Thermo</strong> <strong>Scientific</strong> Orion 2118XP Oxygen Scavenger Monitor <strong>User</strong> <strong>Guide</strong><br />
Some .materials .are .designated .corrosive/oxidizer .by .DOT .and .IATA . .<br />
Some .materials .may .require .special .labeling .and .handling . . .Carriers .may .<br />
add .additional .freight .charges .for .handling/transporting .these .materials . .<br />
Consolidating .such .material .with .other .products .may .be .prohibited . .<br />
Additional .freight .charges .are .billed .to .you .per .FOB .terms . . .Advise .<br />
manufacturer .of .shipping .instructions .for .these .hazardous .materials .to .<br />
reduce .your .freight .costs .<br />
Permission .to .return .new, .excess .inventory .must .be .obtained .prior .to .<br />
return . . .If .any .item .is .authorized .to .be .returned .for .credit .as .a .result .of .an .<br />
incorrect .purchase .without .a .reorder, .a .25% .restocking .charge .of .the .price .<br />
paid .for .the .product .will .be .made . . .International .customer’s .restocking .fee .<br />
of .25% .will .be .off .the .international .price .<br />
Only .new .(in-the-box) .goods .may .be .returned .within .30 .days .of .shipment .<br />
from .manufacturer . . .Older .items, .9-digit .parts, .and .discontinued .items .<br />
cannot .be .returned .for .credit .<br />
Manufacturer .must .be .notified .within .30 .days .of .receipt .of .invoice .of .any .<br />
item .or .billing .discrepancies . . .All .substantiated .claims .will .be .remedied .by .<br />
a .credit .memo .and .a .new .order .placed .for .short .shipment . .Any .shipment .<br />
discrepancy .claimed .after .30 .days .of .invoice .date .will .not .be .honored .and .<br />
credit .will .not .be .issued .by .manufacturer .<br />
Manufacturer .shall .not .be .liable .for .failure .to .perform .or .for .delay .in .<br />
performance .due .to .fire, .flood, .strike, .or .other .labor .difficulty, .act .of .God, .<br />
act .of .any .governmental .authority .or .of .the .purchaser, .riot, .embargo, .fuel .<br />
or .energy .shortage, .wrecks .or .delays .in .transportation, .inability .to .obtain .<br />
necessary .labor, .materials, .or .manufacturing .facilities .from .usual .sources, .<br />
or .due .to .any .cause .beyond .its .reasonable .control . .In .the .event .of .a .delay .<br />
in .performance .due .to .any .such .cause, .the .date .of .delivery .or .time .for .<br />
completion .of .performance .will .be .extended .by .a .period .of .time .reasonably .<br />
necessary .to .overcome .the .effect .of .such .delay .<br />
VII-4
Customer Service<br />
Warranty<br />
<strong>Thermo</strong> <strong>Scientific</strong> Orion 2118XP Oxygen Scavenger Monitor <strong>User</strong> <strong>Guide</strong><br />
Orion .online .monitoring .products .are .warranted .to .be .free .from .defects .<br />
in .material .and .workmanship .for .a .period .of .12 .months .from .date .of .<br />
installation .or .18 .months .from .date .of .shipment, .whichever .is .earlier, .<br />
when .used .under .normal .operating .conditions .and .in .accordance .with .the .<br />
operating .limitations .and .maintenance .procedures .given .in .the .instruction .<br />
manual, .and .when .not .having .been .subjected .to .accident, .alteration, .<br />
misuse, .or .abuse . . .This .warranty .is .also .conditioned .upon .expendable .and .<br />
consumable .items .(diffusion .tubing, .electrodes, .and .all .solutions) .being .<br />
stored .at .temperatures .between .5°C .and .45°C .(40°F .and .110°F) .in .a .noncorrosive<br />
.atmosphere .and .within .the .shelf .life .printed .on .the .product .<br />
In .the .event .of .failure .within .the .warranty .period, .manufacturer, .or .its .<br />
authorized .dealer, .will, .at .the .option .of .manufacturer, .repair .or .replace .the .<br />
product .nonconforming .to .the .above .warranty, .or .will .refund .the .purchase .<br />
price .of .the .unit .<br />
The .warranty .described .is .exclusive .and .in .lieu .of .all .other .warranties .<br />
whether .statutory, .express, .or .implied .including, .but .not .limited .to, .any .<br />
implied .warranty .of .merchantability .or .fitness .for .a .particular .purpose .and .<br />
all .warranties .arising .from .the .course .of .dealing .or .usage .of .trade . . .The .<br />
buyer’s .sole .and .exclusive .remedy .is .for .repair .or .replacement .of .the .nonconforming<br />
.part .thereof, .or .refund .of .the .purchase .price, .but .in .no .event .<br />
shall .manufacturer .(its .contractors .and .suppliers .of .any .tier) .be .liable .to .the .<br />
buyer .or .any .person .for .any .special .indirect, .incidental, .or .consequential .<br />
damages .whether .the .claims .are .used .in .contract, .in .tort .(including .<br />
negligence), .or .otherwise .with .respect .to .or .arising .out .of .the .product .<br />
furnished .hereunder .<br />
Online .products .used .at .overseas .nuclear .facilities .are .also .subject .to .<br />
manufacturer’s .nuclear .terms .and .conditions . . .Contact .manufacturer .if .you .<br />
do .not .have .a .copy .<br />
Representations .and .warranties .made .by .any .person, .including .its .<br />
authorized .dealers, .distributors, .representatives, .and .employees .of .<br />
manufacturer, .which .are .inconsistent .or .in .addition .to .the .terms .of .this .<br />
warranty .shall .not .be .binding .upon .manufacturer .unless .in .writing .and .<br />
signed .by .one .of .its .officers .<br />
VII-5
Mounting Dimensions<br />
Appendix<br />
ORION 2118XP<br />
Oxygen Scavenger<br />
<strong>Thermo</strong> <strong>Scientific</strong> Orion 2118XP Oxygen Scavenger Monitor <strong>User</strong> <strong>Guide</strong> A-<br />
17”<br />
26”<br />
8.5”
ISE Default Values<br />
Hydrazine Default Values<br />
ELIMIN-OX ® Default<br />
Values<br />
Slope .default: . .- .64 .0 .mV/dec<br />
<strong>Thermo</strong> <strong>Scientific</strong> Orion 2118XP Oxygen Scavenger Monitor <strong>User</strong> <strong>Guide</strong><br />
Slope .range: . .- .75 .0 .mV/dec .to .- .40 .0 .mV/dec<br />
E0 .default: . .44 .mV<br />
Low .limit .of .E 0: . .- .50 .mV<br />
High .limit .of .E 0: . .+ .150 .mV<br />
Monitor .Flow .Rate: . .40 .mL/min<br />
Standard .Concentration: . .2 .ppm<br />
Standard .1 .Percent .Flow: . .99 .9% .<br />
Standard .1 .Range: . .x/100<br />
Standard .2 .Percent .Flow: . .52 .5% .<br />
Standard .2 .Range: . .x/10<br />
E 0 .default: . .130 .mV<br />
Low .limit .of .E 0: . .+ .30 .mV<br />
High .limit .of .E 0: . .+ .230 .mV .<br />
Monitor .Flow .Rate: . .40 .mL/min<br />
Standard .Concentration: . .2 .ppm<br />
Standard .1 .Percent .Flow: . .93 .5% .<br />
Standard .1 .Range: . .x/100<br />
Standard .2 .Percent .Flow: . .48 .6% .<br />
Standard .2 .Range: . .x/10<br />
Appendix<br />
A-
Specifications<br />
Oxygen Scavenger<br />
Measurement<br />
<strong>Thermo</strong> <strong>Scientific</strong> Orion 2118XP Oxygen Scavenger Monitor <strong>User</strong> <strong>Guide</strong><br />
Range Hydrazine: 0 ppb to 200 ppb<br />
ELIMIN-OX ® : 0 ppb to 1000 ppb<br />
Appendix<br />
Accuracy (with DYN calibration) Hydrazine: ± 5% or 2 ppb, whichever is greater<br />
ELIMIN-OX ® : ± 5% or 30 ppb, whichever is greater<br />
Resolution 2, 3 or 4 significant digits<br />
Response time 90% of final reading within 1 minute of injecting a<br />
standard solution<br />
Units displayed ppb, ppm (auto ranging)<br />
Temperature compensation Automatic<br />
mV Measurement<br />
Range ± 1999.9 mV<br />
Resolution 0.1 mV<br />
Relative accuracy ± (0.5 mV + 0.1%)<br />
Temperature Measurement<br />
Range -10 to 120 ˚C<br />
Resolution 0.1 ˚C<br />
Relative accuracy ± 0.5 ˚C<br />
Failure detection Manual compensation<br />
ATC probe 30 K thermistor<br />
LED Status Indicator<br />
Green OK<br />
Yellow Warning<br />
Red Failure<br />
A-3
Sample Conditions<br />
<strong>Thermo</strong> <strong>Scientific</strong> Orion 2118XP Oxygen Scavenger Monitor <strong>User</strong> <strong>Guide</strong><br />
Temperature 5 to 45 ˚C<br />
Total alkalinity Less than 50 ppm CaCO 3<br />
Inlet pressure 8 to 100 psig<br />
Flow rate 40 mL/min nominal set by pressure regulator<br />
Sample inlet 1/4” NPTF tube fitting<br />
Sample drain 3/4” NPT male<br />
Grab sampler Optional<br />
Reagent Iodide reagent<br />
Display Features<br />
Type Custom backlit LCD<br />
Size 54 x 76 mm (2 1/8 in x 3 in)<br />
Marquee Temperature, user prompts<br />
Middle line Concentration, error codes<br />
Lower line mV (selectable)<br />
Appendix<br />
Text display Scrolling Marquee for English language instructions<br />
on setup, calibration and diagnostics<br />
Calibration<br />
Dynamic dilution calibration Yes<br />
Dynamic dilution calibration points 2 points<br />
Offline calibration Yes<br />
Offline calibration points 1 point<br />
Pre-programmed standard values Yes<br />
Custom calibration <strong>User</strong> programmable values<br />
<strong>User</strong> input dynamic dilution calibration, user programmable,<br />
offline<br />
Inputs (potentiometric)<br />
Ion input Iodide<br />
Reference input Reference<br />
A-4
Outputs<br />
<strong>Thermo</strong> <strong>Scientific</strong> Orion 2118XP Oxygen Scavenger Monitor <strong>User</strong> <strong>Guide</strong><br />
Number of analog outputs 2, one dedicated to iodide, one dedicated to<br />
temperature and shared ground<br />
Analog outputs Galvanically isolated<br />
Output selections 0 to 20 mA or 4 to 20 mA<br />
Programmable range Yes<br />
Channel assignments Iodide and temperature<br />
Relative accuracy ± (0.05 mA + 0.5%)<br />
Maximum load 500 ohm or 10 V<br />
Log and linear output options Yes, user selectable<br />
Alarm Outputs<br />
Number of relay outputs 3<br />
Maximum relay load 250 VAC/5A, 30 VDC/5A, resistive load only<br />
Minimum value alarm Yes<br />
Maximum value alarm Yes<br />
Error alarm Yes<br />
Calibration/offline alarm Yes<br />
Programmable min. and max. values Yes<br />
Meter Features<br />
Non-volatile memory Yes<br />
Battery backup (replaceable) Yes<br />
Data logging Yes<br />
Keypad 8 electromechanical keys with graphic overlay<br />
Software Features<br />
Self-test & diagnostics Yes<br />
Real time clock Yes<br />
Password protection Yes<br />
Reset function Yes<br />
Programmable alarms High, low, error, calibration/offline<br />
Measurement, active Signal noise, temperature<br />
Calibration Sensor response, drift, E 0, slope, temperature<br />
Appendix<br />
A-5
Miscellaneous<br />
<strong>Thermo</strong> <strong>Scientific</strong> Orion 2118XP Oxygen Scavenger Monitor <strong>User</strong> <strong>Guide</strong><br />
Graphics Custom chemical resistant<br />
Cleaning instructions Wipe with damp cloth<br />
Case color Grey<br />
Case material Valox 364<br />
Appendix<br />
Warranty 12 months from date of installation or<br />
18 months from date of shipment, whichever<br />
is earlier<br />
Service policy Field service and factory<br />
Manual CD/printed/web<br />
Regulatory and safety CE, CSA, FCC class A limits<br />
Physical size of monitor 65 x 45 x 27 cm (26 x 17 x 11 inch)<br />
Fits on 1818A0 panel mounting footprint<br />
Weight: 22.7 kg (50 lbs)<br />
Physical size of electronics module 144 x 144 x 187 mm (5.67 x 5.67 x 7.36 inch)<br />
Weight: 1.7 kg (3.75 lbs)<br />
Power input 85 - 132 VAC; 200 mA or 170-264 VAC; 100 mA<br />
Environmental Operating Conditions<br />
50 - 60 Hz<br />
Waterproof enclosure IP66 & NEMA 4X<br />
Overvoltage category II<br />
Ambient temperature 5 to 45 ˚C<br />
Relative humidity Up to 95% non-condensing<br />
Pollution degree 2<br />
Storage temperature -20 to 60 ˚C<br />
Storage humidity Up to 95%, non-condensing<br />
Altitude Sea level to 2000 M<br />
Shock and Vibration<br />
Vibration, shipping/handling 0 - 60 Hz @ 1 G Load<br />
Shock, drop test in packaging 36” on all sides and corners<br />
A-6
Ordering Information<br />
Cat . No . Description<br />
<strong>Thermo</strong> <strong>Scientific</strong> Orion 2118XP Oxygen Scavenger Monitor <strong>User</strong> <strong>Guide</strong><br />
Appendix<br />
8XP Oxygen Scavenger Monitor Instrument Only Package- Oxygen scavenger<br />
monitor with iodide sensing electrode (100022), reference electrode (100056),<br />
ATC (2100TP), CD user guide and options kit<br />
8XPEN Oxygen Scavenger Monitor with Protective Enclosure - Oxygen scavenger<br />
monitor with protective enclosure, iodide sensing electrode (100022),<br />
reference electrode (100056), ATC (2100TP), CD user guide and options kit<br />
850XP Oxygen Scavenger Consumables Kit- for one year operation, includes (6) x<br />
1 L bottles iodide reagent and (6) x 6 ft long diffusion tubing with O-rings<br />
(181811), reagent bottle adapter (2118RBA), 100 ppm hydrazine standard<br />
solution, pint (151810), iodide sensing electrode (100022), reference<br />
electrode (100056), (5) x 2 oz bottle reference electrode filling solution<br />
(181073), O-ring kit (2118OK), restriction tube assembly (2100RT), (2) inlet<br />
filters and (1) filter gasket (181127)<br />
850XPF<br />
For International<br />
Use Only<br />
Reagent-less Oxygen Scavenger Consumables Kit- for one year operation,<br />
includes (6) x 1 L empty bottles for use with iodide reagent (181811), (6) x<br />
6 ft long diffusion tubing with O-rings, reagent bottle adapter (2118RBA),<br />
100 ppm hydrazine standard solution, pint (151810), iodide sensing electrode<br />
(100022), reference electrode (100056), (5) x 2 oz bottle reference electrode<br />
filling solution (181073), O-ring kit (2118OK), restriction tube assembly<br />
(2100RT), (2) inlet filters and (1) filter gasket (181127)<br />
8 8 Iodide Reagent, 6 month supply- includes (3) x 1 L bottles of iodide reagent<br />
and (3) x 6 ft long diffusion tubing with O-rings<br />
8 860 Diffusion Tubing Kit- 3 x 6 ft long diffusion tubing with O-rings<br />
8XPCAL Calibration Kit- includes carrying case, dynamic calibrator (21DC00), (1) x<br />
100 ppm hyrdazine standard (1 pint), and syringe kit for use with dynamic<br />
calibrator (180096)<br />
5 8 0 Hydrazine Standard Solution- 100 ppm hydrazine standard, pint bottle<br />
8XPEK Electrode Kit- includes iodide sensing electrode (100022), reference electrode<br />
(100056), and reference electrode filling solution (181073)<br />
000 Iodide Sensing Electrode with screw cap<br />
00056 Reference Electrode with screw cap<br />
8 073 Reference Electrode Filling Solution, (5) x 2 oz bottles<br />
00TP 2100 Series Automatic Temperature Compensation (ATC) Probe with ground<br />
(30 kΩ)<br />
00 XT 2100 Series Automatic Temperature Compensation (ATC) Probe with ground<br />
(30 kΩ) and 10 meter extension cable<br />
003M (2) x 3 Meter Extension Cables for 100022 and 100056 electrodes<br />
A-7
Accessory Options<br />
Cat . No . Description<br />
<strong>Thermo</strong> <strong>Scientific</strong> Orion 2118XP Oxygen Scavenger Monitor <strong>User</strong> <strong>Guide</strong><br />
00EN Protective Enclosure, for use with 2118XP oxygen scavenger monitor<br />
800 9 Electronic Test Kit for troubleshooting 1500/1700/1800/2100 series<br />
analyzers<br />
Appendix<br />
8GRAB 1800/2100 Series QC Sampler, includes (1) 1 liter polypropylene sample<br />
bottle, tubing, fittings, power supplies and instruction sheet.<br />
8GBTL (4) 1 Liter Polypropylene Bottles with Covers, for use with 18GRAB<br />
8GTBK QC Sampler Replacement Tubing Kit, for use with 18GRAB<br />
43 9-A0 Wall Adapter, 115 V for use with 18GRAB<br />
4330-A0 Wall Adapter, 230 V for use with 18GRAB<br />
A-8
Field Replaceable Parts<br />
Cat . No . Description<br />
<strong>Thermo</strong> <strong>Scientific</strong> Orion 2118XP Oxygen Scavenger Monitor <strong>User</strong> <strong>Guide</strong><br />
8FP Fluidics Panel Assembly<br />
00NV Inlet Valve Assembly<br />
00BV Bypass/Needle Valve Assembly<br />
00RG Regulator Assembly<br />
00FM Flow Meter Assembly<br />
00RT Restrictor Tube Assembly<br />
8RBA Reagent Bottle Adapter Assembly, includes diffusion tube assembly<br />
00PA Air Pump Assembly<br />
00AF Air Filter Assembly<br />
00TG Tygon Tubing (4 ft)<br />
8 70 (2) Inlet Filters<br />
00EC (2) 1 Meter Electrode Cables for 100022 and 100056 electrodes<br />
00FK 5 Fuse Kit Assembly, 115 V<br />
00FK 30 Fuse Kit Assembly, 230 V<br />
00PS Power Supply Assembly<br />
8XPEP 2118XP Electronics Faceplate<br />
8PN Pressurizing Needle Assembly<br />
8MC Mixing Coil-Tubing Spool Assembly<br />
8MV Micro-Valve Assembly, for calibration standard injection port<br />
8CV Calibration Valve Assembly<br />
8CB Fluid Connector Block Assembly, with thumb screw and injection port<br />
Appendix<br />
8FC Flow Cell Assembly, with electrode holder, mounting bracket and O-rings<br />
8OK O-ring Kit, includes O-rings for reagent bottle and cap, micro-valve and<br />
electrode holder<br />
8XPSK Service Kit, includes (1) electronics faceplate (2118XPEP), (1) air pump<br />
assembly (2100PA), (1) regulator assembly (2100RG), (2) electrode cable<br />
with gland assemblies for sensing and reference electrodes, (1) power<br />
supply assembly (2100PS) and (1) fuse kit assembly (2100FK115 and<br />
2100FK230)<br />
A-9
Recommended<br />
Consumables for<br />
Annual Operation<br />
<strong>Thermo</strong> <strong>Scientific</strong> Orion 2118XP Oxygen Scavenger Monitor <strong>User</strong> <strong>Guide</strong><br />
Cat . No . Description Quantity<br />
or<br />
850XP Oxygen Scavenger Consumables Kit- for one year<br />
operation, includes (6) x 1 L bottles iodide reagent and (6)<br />
x 6 ft long diffusion tubing with O-rings (181811), reagent<br />
bottle adapter (2118RBA), 100 ppm hydrazine standard<br />
solution, pint (151810), iodide sensing electrode (100022),<br />
reference electrode (100056), (5) x 2 oz bottle reference<br />
electrode filling solution (181073), O-ring kit (2118OK),<br />
restriction tube assembly (2100RT), (2) inlet filters and (1)<br />
filter gasket (181127)<br />
850XPF<br />
For International<br />
use only<br />
Reagent-less Oxygen Scavenger Consumables Kit- for one<br />
year operation, includes (6) x 1 L empty bottles for use<br />
with iodide reagent (181811), (6) x<br />
6 ft long diffusion tubing with O-rings, reagent bottle<br />
adapter (2118RBA), 100 ppm hydrazine standard solution,<br />
pint (151810), iodide sensing electrode (100022),<br />
reference electrode (100056), (5) x 2 oz bottle reference<br />
electrode filling solution (181073), O-ring kit (2118OK),<br />
restriction tube assembly (2100RT), (2) inlet filters and (1)<br />
filter gasket (181127)<br />
1<br />
1<br />
Appendix<br />
A- 0
Environmental Instruments<br />
Water Analysis Instruments<br />
North America<br />
166 Cummings Center<br />
Beverly, MA 01915 USA<br />
Toll Free: 1-800-225-1480<br />
Tel: 1-978-232-6000<br />
Dom. Fax: 1-978-232-6015<br />
Int’l Fax: 978-232-6031<br />
www.thermo.com/water<br />
Europe<br />
12-16 Sedgeway Business Park<br />
Witchford, Cambridgeshire<br />
England, CB6 2HY<br />
Tel: 44-1353-666111<br />
Fax: 44-1353-666001<br />
Asia<br />
Blk 55, Ayer Rajah Crescent<br />
#04-16/24, Singapore 139949<br />
Tel: 65-6778-6876<br />
Fax: 65-6773-0836<br />
© 2007 <strong>Thermo</strong> Fisher <strong>Scientific</strong> Inc.<br />
All rights reserved.<br />
250596-007 RevA