
Create successful ePaper yourself
Turn your PDF publications into a flip-book with our unique Google optimized e-Paper software.
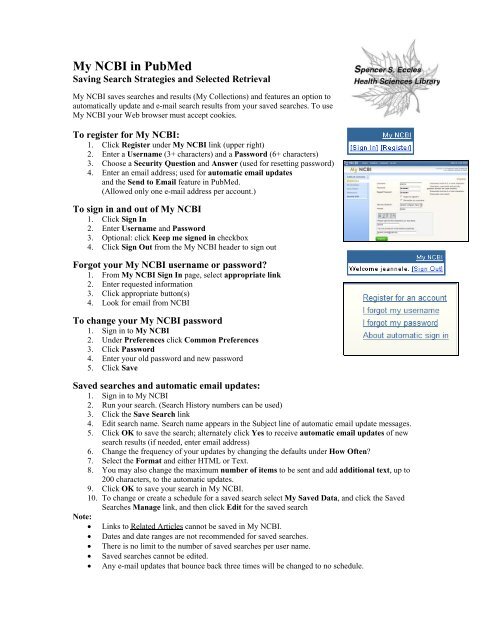
<strong>My</strong> <strong>NCBI</strong> <strong>in</strong> <strong>PubMed</strong>Sav<strong>in</strong>g Search Strategies and Selected Retrieval<strong>My</strong> <strong>NCBI</strong> saves searches and results (<strong>My</strong> Collections) and features an option toautomatically update and e-mail search results from your saved searches. To use<strong>My</strong> <strong>NCBI</strong> your Web browser must accept cookies.To register for <strong>My</strong> <strong>NCBI</strong>:1. Click Register under <strong>My</strong> <strong>NCBI</strong> l<strong>in</strong>k (upper right)2. Enter a Username (3+ characters) and a Password (6+ characters)3. Choose a Security Question and Answer (used for resett<strong>in</strong>g password)4. Enter an email address; used for automatic email updatesand the Send to Email feature <strong>in</strong> <strong>PubMed</strong>.(Allowed only one e-mail address per account.)To sign <strong>in</strong> and out of <strong>My</strong> <strong>NCBI</strong>1. Click Sign In2. Enter Username and Password3. Optional: click Keep me signed <strong>in</strong> checkbox4. Click Sign Out from the <strong>My</strong> <strong>NCBI</strong> header to sign outForgot your <strong>My</strong> <strong>NCBI</strong> username or password?1. From <strong>My</strong> <strong>NCBI</strong> Sign In page, select appropriate l<strong>in</strong>k2. Enter requested <strong>in</strong>formation3. Click appropriate button(s)4. Look for email from <strong>NCBI</strong>To change your <strong>My</strong> <strong>NCBI</strong> password1. Sign <strong>in</strong> to <strong>My</strong> <strong>NCBI</strong>2. Under Preferences click Common Preferences3. Click Password4. Enter your old password and new password5. Click SaveSaved searches and automatic email updates:1. Sign <strong>in</strong> to <strong>My</strong> <strong>NCBI</strong>2. Run your search. (Search History numbers can be used)3. Click the Save Search l<strong>in</strong>k4. Edit search name. Search name appears <strong>in</strong> the Subject l<strong>in</strong>e of automatic email update messages.5. Click OK to save the search; alternately click Yes to receive automatic email updates of newsearch results (if needed, enter email address)6. Change the frequency of your updates by chang<strong>in</strong>g the defaults under How Often?7. Select the Format and either HTML or Text.8. You may also change the maximum number of items to be sent and add additional text, up to200 characters, to the automatic updates.9. Click OK to save your search <strong>in</strong> <strong>My</strong> <strong>NCBI</strong>.10. To change or create a schedule for a saved search select <strong>My</strong> Saved Data, and click the SavedSearches Manage l<strong>in</strong>k, and then click Edit for the saved searchNote:• L<strong>in</strong>ks to Related Articles cannot be saved <strong>in</strong> <strong>My</strong> <strong>NCBI</strong>.• Dates and date ranges are not recommended for saved searches.• There is no limit to the number of saved searches per user name.• Saved searches cannot be edited.• Any e-mail updates that bounce back three times will be changed to no schedule.
Confirmation Email for Automatic Email UpdatesAn <strong>in</strong>itial email message will be sent to confirm email addresses used for <strong>My</strong> <strong>NCBI</strong>.Recipients must confirm their e-mail account before <strong>My</strong> <strong>NCBI</strong> will automatically send updatesRunn<strong>in</strong>g a Saved Search without Update Limits1. Sign <strong>in</strong> to <strong>My</strong> <strong>NCBI</strong>.2. Under <strong>My</strong> Saved Data, click the saved search you want to runCheck<strong>in</strong>g for New Citations S<strong>in</strong>ce You Last Updated a Saved Search1. Sign <strong>in</strong> to <strong>My</strong> <strong>NCBI</strong>.2. Under <strong>My</strong> Saved Data, click the Saved Searches Manage l<strong>in</strong>k3. Click the check box next to the search4. Click Show What’s New5. To display the new items, click the # new items l<strong>in</strong>kDelet<strong>in</strong>g a Search1. Sign <strong>in</strong> to <strong>My</strong> <strong>NCBI</strong>.2. Under <strong>My</strong> Saved Data, click the Saved Searches Manage l<strong>in</strong>k and then click the check box for asearch to select it3. Click Delete SearchesSav<strong>in</strong>g results <strong>in</strong> Collections1. Sign <strong>in</strong> to <strong>My</strong> <strong>NCBI</strong> and run your <strong>PubMed</strong> search.2. Select citations of <strong>in</strong>terest and send to Collections3. In the Save Collection w<strong>in</strong>dow create a new collectionor append to an exist<strong>in</strong>g collection4. Enter a name for your collection and click Save5. There is no limit to the number of collections or saved items6. To view items <strong>in</strong> the collection click <strong>My</strong> Saved Data;under Collections (Manage) click on the name to viewitems <strong>in</strong> that collection. Or click on Manage to Merge orDelete CollectionsSav<strong>in</strong>g Results <strong>in</strong> <strong>My</strong> Bibliography<strong>My</strong> Bibliography is a place for you to collect your <strong>PubMed</strong> citations for your publications1. Under <strong>My</strong> Saved Data click <strong>My</strong> Bibliography2. Click add items and create one to set up a bibliography3. Fill <strong>in</strong> the template4. Review the list of citations and use the check boxesto select your papers, click Add to <strong>My</strong> Bibliography5. To add additional citations, click the plus symbol on theActions bar6. Use the Other Citations l<strong>in</strong>k under <strong>My</strong> Saved Data tocreate an additional bibliography us<strong>in</strong>g a saved search formJml-12/2008