CT125 Manual - Busy Bee Tools
CT125 Manual - Busy Bee Tools
CT125 Manual - Busy Bee Tools
- No tags were found...
You also want an ePaper? Increase the reach of your titles
YUMPU automatically turns print PDFs into web optimized ePapers that Google loves.
<strong>CT125</strong> – BABY DRUM SANDER 13”
INDEXGeneral Safety Instructions Page 3Specific Safety Instructions Page 4Specifications Page 5Features Page 6Unpacking and AssemblyUnpacking Page 7Mounting Page 7Dust Collection Page 8Test Run Page 9OperationsSanding Depth Page 9Variable Speed Page 10Sandpaper Replacement Page 11Tension & Tracking Page 12-13Maintenance Page 14Thickness Scale Calibration Page 15Trouble Shooting Page 16-18Parts List & Diagrams Page 19-24Warranty Information Page 252
GENERAL SAFETY INSTRUCTIONSEXTREME CAUTION SHOULD BE USED IN OPERATING ALL POWER TOOLS. KNOWYOUR POWER TOOL, BE FAMILIAR WITH ITS OPERATION. READ THE OWNER’SMANUAL AND PRACTICE SAFE USAGE PROCEDURES AT ALL TIMES.CONNECT your machine ONLY to the matched and specified powersource.WEAR SAFETY GLASSES, RESPIRATORS, HEARING PROTECTIONand SAFETY SHOES when operating heavy machinery. Always wearsafety glasses.DO NOT wear loose clothing or jewellery when operating machinery.A Safe Environment is important. Keep the area free of dust, dirt andother debris in the immediate vicinity of the machine.BE ALERT! Do Not Use prescription or other drugs that may affect yourability or judgement to safely use this machine.DISCONNECT the power source when sandpaper or making anyadjustmentsNEVER leave an operating tool unattended.NEVER reach over the table when the tool is in operation.ALWAYS keep all safety guards in place and ensure their proper function.ALWAYS use push sticks and feather boards to safely feed your workthrough the machine.ALWAYS make sure that any tools used for adjustments are removedbefore operating the machine.ALWAYS secure your work with the appropriate clamps or vises.ALWAYS keep bystanders safely away while operating machinery.THINK SAFETY. WORK SAFELY. Never attempt a procedure if it doesnot feel safe or comfortable.3
SPECIFIC SAFETY INSTRUCTIONSLike all power tools and machinery, proper safety and attention must be adheredto. There is danger associated with using any tool or machine so pay carefulattention each and every time you use your tool.• DO NOT jam or try and over push the work piece into the machine duringoperation. This may cause damage to the machine. Feed the work pieceinto the conveyor with a firm grasp, slowly and easily.• Keep you hand clear of the conveyor and sand paper when feeding yourwork piece. Make sure your fingers do not get pinched between your workpiece board and the conveyor. If you hand gets caught and pulled into theconveyor this could lead to serious injury and or death.• DO NOT wear jewelry or loose clothing while operating this machine.• DO NOT feed any stock into this machine that is less than 1/8” thick andmore than 4” in thickness. Do not sand thinner pieces than allowed byusing a “dummy” board underneath your work piece. This can bedangerous.• DO NOT sand more than one piece of stock at anytime. This machine isdesigned to feed stock one piece at a time only. DO NOT let anyone standin front of the machine while sanding.• INSPECT your work pieces. Make sure that they are free of nails, staples,tacks, knots and other objects that may be harmful to your machine.• NEVER use this machine without the proper dust collection in place.• TECHINCAL DIFFICULTIES. Any problems you may run into should becarefully looked at with the power OFF and the machine unplugged fromthe power source.• SAFETY GLASSESS and RESPIRATOR is highly recommended whenworking with this machine. Some saw dust can be harmful to your lungs,please take caution when using this machine.4
<strong>CT125</strong> – BABY DRUM SANDER 13”SPECIFICATIONSAs part of the growing line of Craftex woodworking equipment, we areproud to offer the <strong>CT125</strong> Baby Drum Sander. The Craftex name guaranteesCraft Excellence. By following the instructions and procedures laid out in thisowner’s manual, you will receive years of excellent service and satisfaction.The <strong>CT125</strong> is a professional tool and like all power tools, proper care andsafety procedures should be adhered to.Main Motor - 1HP, 110V, 1PHConveyor Motor - DC 90W, 110VMax. Sanding Width - 13"Max. Material Thickness - 4"Min. Material Thickness - 1/8"Minimum Stock Length - 7"Conveyor Belt Speeds - 0 -22 FPMSanding Drum Speed - 1720RPM (2258 FPM)Sanding Belt Size – 3” rollSanding Drum Size – 5” DiameterMin. Dust Collection Req. - 750 CFM.Dust Collection Port - 2 1/2"All sealed ball bearingsThickness scaleAdjustable RollersSpring Loaded Quick Release Abrasive MechanismSolid steel welded constructionGeared chrome crank handleIndustrial conveyor belt.Approx. Weight - 83 kg (185 Lbs.)5
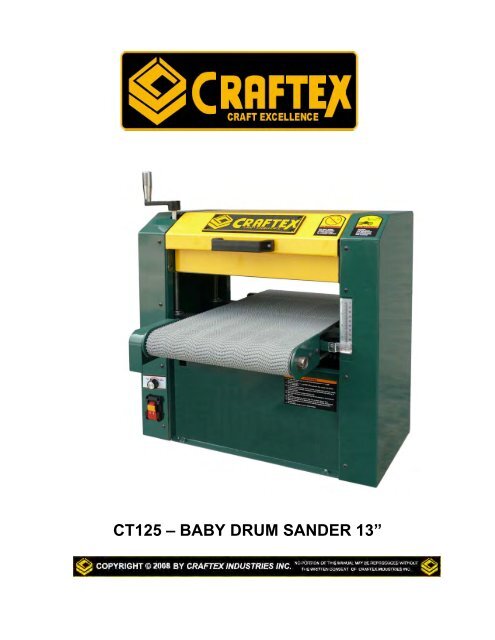
<strong>CT125</strong> – BABY DRUM SANDER 13”FEATURESA – CHROME CRANK HANDLEB – TOP COVERC – CONVEYOR BELTD – VARIABLE SPEED KNOB FOR CONVEYORE – SIDE PANELF – THICKNESS SCALEG – ON/OFF SWITCH6
<strong>CT125</strong> – BABY DRUM SANDER 13”UNPACKING AND ASSEMBLYCarefully unpack the <strong>CT125</strong> from its crate and unsure that everything is in tact.When setting your machine in the desired location, make sure that you haveenough machine clearance in order to use this machine to the full capacity.See the figure below for the minimum working clearance.NOTE – When moving this machine into its desired location please make sure that you doit with the help of another person. The machine is fairly heavy (185 lbs) and it is necessaryto lift and or move this machine with the help of another person.MOUNTINGWhen you have found the proper work bench or surface for your sander (makesure that the surface is flat, stable and can support up to 185lbs) you can mountyour sander to the surface of your final resting place.There are 2 mounting holes located on the front of the machine and 2 mountingplates at the back of the machine. Drill pilot holes into the bench using themounting holes as guides. Using a wrench, bolt the base to the bench top with3/8” lag bolts and flat washers.7
<strong>CT125</strong> – BABY DRUM SANDER 13”CRANK HANDLENow the crank handle that came with the machine needs to be installed. Thehandle should be installed on the top left side of the unit. Make sure that the setscrews and handle are firmly in place before moving on.DUST COLLECTIONIt is highly recommended that you use a dust collector when using this machine.The minimum CFM requirement for this machine is 750CFM which means youshould be using a 1HP or 2HP dust collector at minimum.The machine comes with a 2 ½” dust port located at the back of the machine.(See picture below) You can use a dust collection adaptor which will take you upto 4” in order to use a normal sized dust collector. A fine layer of dust will bepresent on your stock as it comes out from the sander. This is normal. It is notrecommended to use 2 ½” piping from the machine to your collector.8
<strong>CT125</strong> – BABY DRUM SANDER 13”TEST RUNConnect your machine to the correct power source. Once it is connected you areready to perform the first test run. Take a careful look in and around yourmachine before turning it on to ensure everything is in place, all screws andknobs are securely fastened and that all controls are working properly.Before turning the machine on, make sure you are wearing your safety glassesand that any one around you is also wearing safety glasses and not standing inthe front or back of the machine.Turn the power switch to ON.The drum sander should run smoothly and create very little noise or vibration. Ifany loud or strange noises occur turn the machine OFF right away and inspectthe problem. DO NOT make any adjustments while the machine is running.SANDING DEPTHThe optimum sanding depth will depend on what type of project you are working,what type of wood you are using and the sand paper grit. Under most conditions,the depth should not exceed 0.006”, or approx. ¼ turn of the crank wheel. If youattempt to remove too much wood while sanding this may cause the machine tojam, your wood to burn, rapid paper wear or tear and or motor damage.When setting your depth, rotate the crank handle until the table is well below thesanding drum. Then raise the table to ensure a proper and safe gap between thework piece and the drum.Turn the machine ON, start the conveyor and feed your work piece. Slowly raisethe table until the work piece makes slight contact with the drum. This would beyour ideal sanding height.9
<strong>CT125</strong> – BABY DRUM SANDER 13”VARIABLE SPEEDThe variable speed knob will allow you to increase the feed rate of your workpiece from 0 – 22 FPM. The correct speed will vary from work piece to workpiece and will depend of what type of wood you are using.A general rule of thumb is that the slower the feed rate the smoother the sandingjob you will get. However, this also runs the risk of burning your wood. After youare familiar with the machine and how it handles, this will not be an issue,however in the beginning the use of trial and error with scrap wood will be helpfulto get a feel for the machine.Start the Conveyor. Rotate the variable speed knob clockwise to increase thespeed and counterclockwise to decrease the speed.10
<strong>CT125</strong> – BABY DRUM SANDER 13”SANDPAPER REPLACEMENTThe <strong>CT125</strong> is designed with 3” sandpaper rolls. The grit of paper you chosedepends on what job you a doing.An extra coarse, low grit paper is generally used for sanding of rough material,removing glue or thickness sanding.A medium grit paper is used for removing planer marks and initial finish sanding.A fine grit paper is used for finish sanding.1) Before changing the sandpaper on your <strong>CT125</strong>, ensure that the powerswitch is OFF and disconnect the machine from the power source.2) Open the top cover of the sander to expose the sanding drum.3) Remove the old paper by unlocking the quick release spring tensionpaper mechanism and unwinding the paper. (See diagram below)Pay careful attention to the direction is comes off.4) The old sandpaper can be used as a pattern to cut out the newsandpaper or use the pattern shown below to cut the new sandpaperbeing installed.5) When wrapping the new sandpaper on the drum make sure that itwrapped tightly and with minimal gaps. This is important for propersanding after installation.6) Use the spring loaded quick release mechanism to secure thesandpaper to the drum.Spring Loaded Quick ReleasePaper Mechanism11
<strong>CT125</strong> – BABY DRUM SANDER 13”TENSION AND TRACKINGAfter reasonable usage of the drum sander, the conveyor may slightly stretchand will require to be tensioned. When tensioning the conveyor belt, it isimportant to do so from both sides and not to tension one side more than theother as this may lead to more tracking problems.On the side of the conveyor you will find tensioning controls. (see below) Turnthe conveyor adjustment knobs one full turn at a time until the conveyor belt nolonger slips or is off during operation. If you notice that the conveyor is tracking toone side, turn the machine OFF, and follow the next few steps for propertracking.12
<strong>CT125</strong> – BABY DRUM SANDER 13”TRACKINGThe conveyor must track straight for proper sanding. If the conveyor tracks toeither side and not straight, you must fix the tracking. When tracking yourconveyor, remember that this process can take some time and that properbalance and patience is required. To make the conveyor move in the middle ofthe rollers, it is recommended that you first over tighten the loose side (the sidethe belt is tracking towards) and then loosen that same side in order to make theconveyor stay in position. You can try this for both sides but must ensure that theconveyor tracks in the middle by trail and error.1) Turn the conveyor belt ON. Watch the conveyor track and noticewhich way it is tracking.2) Once you have determined which way it is tracking, turn themachine OFF, tension the tracking bolt on the loose side (thedirection the belt is tracking to). Turn the machine ON to see if it istracking the opposite way. (This may take some time to notice adifference but be patient)3) When the conveyor is near the middle of the table, loosen theadjustment knobs until the conveyor itself stops moving sidewaysand tracks straight.4) Repeat steps 2 & 3 if you do not get results right away. Thisprocess may take several minutes.13
<strong>CT125</strong> – BABY DRUM SANDER 13”MAINTENANCECleaning and maintaining this machine is relatively easy. It is imperative tovacuum or use an air blower to clean off wood dust from internal componentsfrom time to time to keep the machine clean. To clean your sandpaper from timeto time to preserve the life, you can use a rubber abrasive cleaner and run it onthe drum as it spins.LUBRICATIONLubrication of the chain mechanism is important and should be done periodicallyfor proper maintenance.Use a light machine oil. Do not use too much lubrication only a fair amount as toomuch will attract dirt and could cause the chain to malfunction as it may clog.Refer to the diagram below and take note of the arrows designated forlubrication. Table Lift ScrewEvery six months, the table lift screws will also need lubrication. (Shown indiagram ablove) It is best to clean the screws first before lubricating. Wipe offwith a cleaning towel and then run on the lubrication in an even manner14
<strong>CT125</strong> – BABY DRUM SANDER 13”THICKNESS SCALE CALIBRATIONAfter some time you may notice that the thickness scale can be a little off. Inorder to sand accurately you must make sure that the thickness scale iscalibrated properly and this is an easy process to do every once in a while.1) Sand a scrap work piece with the sander and measure the thickness ofthe finished piece.2) Loosen the screw that secures the thickness scale pointer and adjust thisto the measured work piece15
TROUBLE SHOOTINGSYMPTOM POSSIBLE CAUSE POSSIBLE SOLUTIONMachine is vibratingtoo much or is toonoisyMotor Overheats or istoo hot1. V Belts are worn orloose2. Motor or other integralcomponent is loose3. Pulley is loose4. Motor bearings areworn1. Poor circulation of airthrough motor2. Motor overload3. Motor is on too long1. Inspect the belts andreplace with samesize or re-tension2. Inspect the nuts andbolts that secure themotor and replace ifnecessary. Alsoreplace worn orstripped bolts.3. Remove pulley,replace shaft, pulley& setscrew and realign.4. Check and replace ifnecessary1. Clean motor toprovide normal aircirculation2. Reduce load onmotor3. Allow motor to cooloff.16
TROUBLE SHOOTINGSYMPTOM POSSIBLE CAUSE POSSIBLE SOLUTIONMachine doesn’t turnon or trips breakerwhen turned on1. Capacitor is faulty2. Centrifugal switch isfaulty3. Motor ON/OFF switch isfaulty4. Motor is faulty5. Motor connection wiredincorrectly1. Test and replacecapacitor if needed2. Adjust or replacecentrifugal switch3. Replace ON/OFFswitch if faulty4. Test, replace orrepair motor5. Make sure motor iswired correctlyConveyor Slips whensanding under load1. Conveyor is too loose2. Excessive Load1. Tension theconveyor properly2. Reduce the loadConveyor tracks toone side only1. Conveyor not trackingproperly1. Track the conveyorproperly(see page 13)Machine stalls orseems under powered1. Low power supplyvoltage2. Belt is slipping3. Poor Dust Collection4. Machine overload5. Overheated Motor1. Ensure that all linesand grounds areoperations and havecorrect voltage2. Replace belt and recheck3. Check for air leaksseal leaks, eliminatebends in piping andensure machine isgetting propersuction from port4. Use new sandpaperand ensure you arefollowing max.guidelines5. Allow motor to cool17
TROUBLE SHOOTINGSYMPTOM PROSSIBLE CAUSE POSSIBLE SOLUTIONSandpaper tears offdrum or wearsexcessivelyPoor Dust Collection1. Sand paper is notsecurely fastened todrum2. Nail or metal piece inwood being sanded3. Too much use withoutcleaning of paper1. Dust collection line outsare undersized or notproperly sized for thismachine2. Dust collector too smallfor this machine3. Dust collector is too faraway1. Re-check to ensurepaper is fastened todrum using springloaded release2. Sand only cleanpieces, or severedamage can becaused to machine1. Branch from 2 ½” (atsource) out to aminimum of 4” toyour collector. 6” or8” is OK as well. Donot stay at a 2 ½”pipe size2. Dust collectorshould be at least750CFM capacity. Ifnot, upgrade to alarger collector3. Bring your collectorcloser as the fartheraway it is, the lessair pressure there is.Should be at 10 feetmax distance18
<strong>CT125</strong> – PARTS LIST19
<strong>CT125</strong> – PARTS DIAGRAM20
<strong>CT125</strong> – PARTS LIST21
<strong>CT125</strong> – PARTS DIAGRAM22
<strong>CT125</strong> – PARTS LIST23
<strong>CT125</strong> – PARTS DIAGRAM24
WARRANTYCRAFTEX 2 YEAR LIMITED WARRANTYCraftex warrants every product to be free from defects in materials and agrees to correct such defects whereapplicable. This warranty covers two years for parts and 90 days for labour (unless specified otherwise), tothe original purchaser from the date of purchase but does not apply to malfunctions arising directly orindirectly from misuse, abuse, improper installation or assembly, negligence, accidents, repairs or alterationsor lack of maintenance.Proof of purchase is necessary.All warranty claims are subject to inspection of such products or part thereof and Craftex reservesthe right to inspect any returned item before a refund or replacement may be issued.This warranty shall not apply to consumable products such as blades, bits, belts, cutters, chisels, punchesetceteras.Craftex shall in no event be liable for injuries, accidental or otherwise, death to persons ordamage to property or for incidental contingent, special or consequential damages arising fromthe use of our products.RETURNS, REPAIRS AND REPLACEMENTSTo return, repair, or replace a Craftex product, you must visit the appropriate <strong>Busy</strong> <strong>Bee</strong> <strong>Tools</strong> showroom orcall 1-800-461-BUSY. Craftex is a brand of equipment that is exclusive to <strong>Busy</strong> <strong>Bee</strong> <strong>Tools</strong>.For replacement parts directly from <strong>Busy</strong> <strong>Bee</strong> <strong>Tools</strong>, for this machine, please call 1-800-461-BUSY (2879),and have your credit card and part number handy.• All returned merchandise will be subject to a minimum charge of 15% for re-stocking and handling withthe following qualifications.• Returns must be pre-authorized by us in writing.• We do not accept collect shipments.• Items returned for warranty purposes must be insured and shipped pre-paid to the nearest warehouse• Returns must be accompanied with a copy of your original invoice as proof of purchase. Returns must bein an un-used condition and shipped in their original packaging a letter explaining your reason for thereturn. Incurred shipping and handling charges are not refundable.• <strong>Busy</strong> <strong>Bee</strong> will repair or replace the item at our discretion and subject to our inspection.• Repaired or replaced items will be returned to you pre-paid by our choice of carriers.• <strong>Busy</strong> <strong>Bee</strong> reserves the right to refuse reimbursement or repairs or replacement if a third party without ourprior authorization has carried out repairs to the item.• Repairs made by <strong>Busy</strong> <strong>Bee</strong> are warranted for 30 days on parts and labour.• Any unforeseen repair charges will be reported to you for acceptance prior to making the repairs.• The <strong>Busy</strong> <strong>Bee</strong> Parts & Service Departments are fully equipped to do repairs on all products purchasedfrom us with the exception of some products that require the return to their authorized repair depots. A<strong>Busy</strong> <strong>Bee</strong> representative will provide you with the necessary information to have this done.• For faster service it is advisable to contact the nearest <strong>Busy</strong> <strong>Bee</strong> location for parts availability prior tobringing your product in for repairs.25


