Flexident Instructions
Flexident Instructions
Flexident Instructions

Create successful ePaper yourself
Turn your PDF publications into a flip-book with our unique Google optimized e-Paper software.
<strong>Flexident</strong> partials and dentures are unbreakable and can be made thinner than traditional acrylic<br />
partials, providing more comfort and confidence for the patient. <strong>Flexident</strong> flexible partials have<br />
just the right degree of flexibility and will not warp or become brittle.<br />
System Requirements<br />
The <strong>Flexident</strong> Complete System includes a press and a mini oven that should have a separate<br />
line for an even current flow to provide uniform heating of the <strong>Flexident</strong> resin materials.<br />
Impression and Case Planning<br />
A mucostatic impression is required for <strong>Flexident</strong> partial dentures. With flexible partials, extra<br />
attention should be paid to tissue retention because the resin material is in a constant relaxed<br />
position.<br />
Carefully study the cast model to plan the design of the prosthesis. The ideal flexibility of<br />
<strong>Flexident</strong> resin materials allows designs that use tissue undercuts as well as a portion of the<br />
abutment teeth for retention. Planning which clasp type to use depends on the position. With<br />
anterior position esthetics is important; therefore, consider minimal coverage of the teeth. With<br />
posterior position clasps should provide utmost support and stability of the partial.<br />
BASIC TYPE OF CLASPS<br />
Include:<br />
WRAP AROUND SPUR ANCHOR<br />
I. DESIGNING THE MASTER MODEL<br />
As always, make full use of tissue undercuts for retention.<br />
It is recommended that red pencil is used during designing on the master model.<br />
II. PREPARING THE MASTER MODEL FOR DUPLICATION<br />
Do not over-relieve nor over-block. The only time surveying may be required is to create<br />
parallelism for a clear path of insertion for interproximal saddles, removing mesial and<br />
distal undercuts. However, when left and right interproximal saddles are to be replaced,
there won’t be any need to create parallelism because the degree of flexibility of the<br />
TALLADIUM material allows the partial to be twisted slightly during insertion.<br />
All undercuts that will affect the path of insertion should be blocked. However, undercuts,<br />
often on buccal and distal, should not be blocked, as these will be utilized for retention.<br />
It is important to remember that there is no need to relieve with wax the necklines of the<br />
tissue except when there is indication of some abnormal recession or some pocket<br />
formation. If necklines are healthy, no relief with wax is necessary.<br />
For free-end cases, be it upper or lower, it is not necessary to remove the distal undercut<br />
of the last natural tooth. For free-end saddle cases with anterior teeth replacements,<br />
undercuts in the front section should be blocked with wax. Always leave distal undercuts<br />
for retention.<br />
III. DUPLICATING THE MASTER MODEL<br />
IV. SET-UP<br />
The normal method of set-up is followed except when a tooth is to be replaced beside a<br />
tooth that will have a spur clasp. Here, one must allow a little more space at the neckline<br />
so that the resin material will have some reinforcement from the lingual to the spur.<br />
Mechanical retention of pontics ( acrylic type is preferred as this follows the principle of<br />
non-breakage ) is achieved using retention burs.
V. WAXING<br />
With TALLADIUM flexible partials cases, there is thinner wax-up compared to<br />
conventional acrylic partials. Thickness needed should just be enough to provide support<br />
especially at critical junctions and connectors. TALLADIUM flexible partials are<br />
unbreakable with proper design and with proper processing. There should not be any<br />
bulky flanges.<br />
Recommended thickness of the wax pattern:<br />
1. Palatal thickness: 1.25 - 1.5 mm<br />
2. Buccal & Labial Flange: 1.25 - 2.0 mm<br />
3. Clasps: 1.0 - 1.5 mm ( Always uniform with flange and junction )<br />
4. Lingual Flange: 1.25 - 2.00 mm<br />
5. Lingual Major Connector [Mandibular] : 1.75 - 2 mm<br />
Wax pattern should rest Wax pattern should include<br />
on the cingulum of anterior the lower 2/3 of the 3 posterior<br />
Teeth / Pontics. Teeth / Pontics.<br />
VI. INVESTING THE TOP HALF OF THE FLASK
VII. SPRUING<br />
Sprue the case after investment has set; two sprues are normally required from<br />
the center sprue opening found at the rear of the flask to the most posterior portion of the<br />
wax-up on either side.<br />
Apply thin layers of tinfoil substitute on the entire stone surface<br />
VIII. INVESTING THE TOP HALF OF THE FLASK<br />
It is necessary to point out that one should use the proper tinfoil substitute to cover the<br />
surface of the stone in the bottom half of the flask. And always let the tinfoil substitute dry<br />
completely. DO NOT OVER TIGHTEN THE SCREWS.
IX. BOIL OUT<br />
Follow standard boil out procedures for making removable partial dentures.<br />
• After the stone has set, the flask is placed in a hot water bath for 6 to 10 minutes<br />
• When the two halves of the flask have been opened, wash out the wax to make sure all<br />
residues are eliminated.<br />
• Let the two halves cool, making sure all the steam has evaporated from the flask<br />
• Apply thin layers of tinfoil substitute or Magic Sep on the entire stone surface.<br />
• Allow to dry completely. (Do not apply the release agent on inner surfaces of the teeth as<br />
this will create a gap between the teeth and resin material.)<br />
Close the two halves of the flask that have cooled down. Tighten the bolts securely in<br />
preparation for injecting.<br />
X. INJECTING THE FLEXIDENT<br />
Pre-injection: Tubes containing resin materials should be dried for at least 2 to 4 hours, at<br />
approximately 40 degrees Centigrade.<br />
Set the furnace to 550ºF (288ºC)<br />
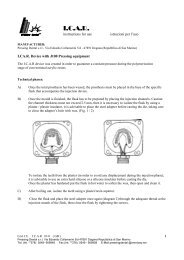
Position the flask into the slot of the presser.
Spray with the provided <strong>Flexident</strong> mold release the inside and outside of the cylinder provided. It<br />
is important to take note that cylinder should always be allowed to warm up in between cycles,<br />
for at least 10 minutes before resin materials in tubes are placed inside the cylinder for melting.<br />
550 F<br />
(approximate<br />
288 C temp)
Then spray a brass disc with the FLEXIDENT mold release spray provided, before inserting the<br />
disc into the cylinder against the end of the tube containing the resin materials. Let the resin<br />
material melt (plasticize) in the furnace, for approximately:<br />
9 minutes for 8 to 9 grams (small-sized tubes),<br />
11 minutes for 16 to 18 grams (medium-sized tubes),<br />
15-16 minutes for 24 to 27 grams (large-sized tubes)<br />
Then push lever forward to inject. After 1 to 2 minutes,<br />
pull lever back and remove the flask and cylinder from<br />
the presser.
Use the Knock-out Punch to release the Tube<br />
from the Cylinder<br />
Open the Flask<br />
Finishing<br />
• Cut off the sprue with a cut-off disc<br />
• Complete as much pre-finishing and over-all<br />
reduction of the palatal area and lingual<br />
connector while the case is still on the duplicate<br />
model<br />
• Lift the case with a flat hand instrument<br />
• Trim the edges of the case with a grinding<br />
wheel.<br />
• Avoid overheating the resin material of the case<br />
during finishing<br />
• Smooth case prior to polishing with the Smooth<br />
Gray or Red-flex (brown rubber) wheels<br />
Once the sprue junction on the lingual and palatal surfaces is reduced, lift the case off the model<br />
with a knife or other flat instrument. Clean the tissue surface with a small stiff bristle brush.<br />
Polishing<br />
• Apply Tripoli compound with a dry rag wheel to produce a smooth but dull-looking finish<br />
• Constantly wet the case with water to avoid excessive build-up of heat<br />
• Remove the oil residue from the Tripoli compound with the B-20 brush<br />
• Use the B-20 brush to remove accumulated debris in the interproximal areas<br />
• Rinse the case before applying a polishing compound such as Kenda ® with a dry rag<br />
wheel to produce a higher luster.<br />
• Use a low speed lathe machine with a light touch and always move the case against the<br />
rag wheel, in only one direction.<br />
Packaging the <strong>Flexident</strong> Case for the Patient<br />
• Follow standard disinfecting procedures<br />
• Place the case in the <strong>Flexident</strong> bag with water and seal<br />
Special <strong>Instructions</strong> for Flexicryl<br />
• Keep tube dry at 122-140ºF / 50-60ºC at all times, or at least 1-2 hour prior to injection<br />
• Place tube in the cylinder for 15-16 minutes at 550ºF (288ºC) to melt the materials<br />
• Inject when flasks are still hot (gloves are needed)<br />
• If necessary, the six anterior pontics may need a cold cure acrylic mask if too transparent<br />
• Proceed with finishing and polishing, same as that of conventional acrylic. No special<br />
burs or instruments are needed.