Rabbit 2000™ Microprocessor - UTN
Rabbit 2000™ Microprocessor - UTN
Rabbit 2000™ Microprocessor - UTN

Create successful ePaper yourself
Turn your PDF publications into a flip-book with our unique Google optimized e-Paper software.
<strong>Rabbit</strong> 2000 <strong>Microprocessor</strong>Designer’s Handbook019-0070 • 020207 - J
<strong>Rabbit</strong> 2000 <strong>Microprocessor</strong> Designer’s HandbookPart Number 019-0070 • 020207 - J • Printed in U.S.A.Copyright© 2000 <strong>Rabbit</strong> Semiconductor • All rights reserved.<strong>Rabbit</strong> Semiconductor reserves the right to make changes and improvements to its products withoutproviding notice.Trademarks• Dynamic C ® is a registered trademark of Z-World• Z80/Z180 is a trademark of Zilog, Inc.Company Address<strong>Rabbit</strong> Semiconductor2932 Spafford StreetDavis, California 95616-6800USATelephone: (530) 757-8400Facsimile: (530) 757-8402Web site: http://www.rabbitsemiconductor.comii
Table of Contents1 Introduction ................................................................................................................11.1 Summary of Design Conventions ...............................................................................................12 <strong>Rabbit</strong> Hardware Design Overview ...........................................................................32.1 Design Conventions ....................................................................................................................3<strong>Rabbit</strong> Programming Connector ..........................................................................................3Memory Chips .....................................................................................................................4Oscillator Crystals................................................................................................................42.2 Operating Voltages ......................................................................................................................42.3 Power Consumption ....................................................................................................................52.4 Through-hole Technology ...........................................................................................................53 Core Design and Components....................................................................................73.1 Clocks..........................................................................................................................................7Low-Power Design ..............................................................................................................8Conformal Coating of 32.768 kHz Oscillator Circuit..........................................................83.2 Basic Memory Design.................................................................................................................9Memory Access Time ..........................................................................................................9Precautions for Unprogrammed Flash Memory ..................................................................93.3 PC Board Layout and Memory Line Permutation ....................................................................113.4 PC Board Layout and Electromagnetic Interference.................................................................12EMI Regulations ................................................................................................................12EMI Measuring Devices .....................................................................................12Classes For EMI Testing ....................................................................................12Layout and Decoupling for Low EMI ...............................................................................13EMI Sources .......................................................................................................13Clock Signal Pin 1 ..............................................................................................14High Frequency Oscillator Circuit .....................................................................15Processor Decoupling .........................................................................................17Elimination of Power Plane ................................................................................184 How Dynamic C Cold Boots the Target System......................................................194.1 How the Cold Boot Mode Works In Detail...............................................................................204.2 Program Loading Process Overview.........................................................................................21Program Loading Process Details......................................................................................215 <strong>Rabbit</strong> Memory Organization..................................................................................235.1 Physical Memory.......................................................................................................................23Flash Memory ....................................................................................................................23SRAM ................................................................................................................................23Basic Memory Configuration ............................................................................................245.2 Memory Segments.....................................................................................................................24Definitions .........................................................................................................................25The Root Memory Segment...............................................................................................25Types of Code Best-Suited for the Root Memory Segment ...............................25The Data Segment..............................................................................................................26The Stack Segment ............................................................................................................26The Extended Memory Segment .......................................................................................265.3 How The Compiler Compiles to Memory.................................................................................26Placement of Code in Memory ..........................................................................................26Paged Access in Extended Memory ..................................................................................27Designer’s Handbook
6 The <strong>Rabbit</strong> BIOS......................................................................................................296.1 Startup Conditions Set Up By the BIOS................................................................................... 296.2 BIOS Flowchart........................................................................................................................ 316.3 Internally Defined Macros........................................................................................................ 326.4 Modifying the BIOS ................................................................................................................. 326.5 Origin Statements to the Compiler ........................................................................................... 34Origin Statement Syntax ................................................................................................... 34Origin Statement Semantics .............................................................................................. 34Origin Statement Examples............................................................................................... 36Origin Directives in Program Code................................................................................... 367 The System ID Block ...............................................................................................377.1 Definition of SysIDBlock......................................................................................................... 387.2 Access....................................................................................................................................... 39Reading the SystemID Block ............................................................................................ 39Writing the SystemID Block ............................................................................................. 397.3 Determining the Existence of the SystemID Block.................................................................. 408 BIOS Support for Program Cloning.........................................................................438.1 Overview of Cloning ................................................................................................................ 43Evolution of Cloning Support ........................................................................................... 448.2 Creating a Clone ....................................................................................................................... 44Steps to Enable and Set Up Cloning ................................................................................. 44Steps to Perform Cloning .................................................................................................. 44LED Patterns .....................................................................................................................458.3 Cloning Questions .................................................................................................................... 45MAC Address.................................................................................................................... 45Different Flash Sizes ......................................................................................................... 45Design Restrictions ........................................................................................................... 469 Low-Power Design and Support ..............................................................................479.1 Software Support for Low-Power Sleepy Modes..................................................................... 499.2 Baud Rates in Sleepy Mode...................................................................................................... 4910 Memory Planning.....................................................................................................5110.1 Making a RAM-only board. ................................................................................................... 51Hardware Changes ............................................................................................................ 52Software Changes.............................................................................................................. 5211 Flash Memories........................................................................................................5311.1 Supporting Other Flash Devices............................................................................................. 5611.2 Writing Your Own Flash Driver ............................................................................................. 5612 Troubleshooting Tips for New <strong>Rabbit</strong>-Based Systems ...........................................5912.1 Initial Checks.......................................................................................................................... 5912.2 Diagnostic Test #2 .................................................................................................................. 5912.3 Diagnostic Test #3 .................................................................................................................. 60A Supported <strong>Rabbit</strong> 2000 Baud Rates .........................................................................63B Wait State Bug..........................................................................................................65Overview of the Bug....................................................................................................................... 65Wait States In Data Memory .......................................................................................................... 65Wait States in Code Memory.......................................................................................................... 66<strong>Rabbit</strong> 2000 <strong>Microprocessor</strong>
Instructions Affected by the Wait State Bug ...............................................................................66Dynamic C version 7.05........................................................................................................67Prior versions of Dynamic C .................................................................................................67Output Enable Signal and Conditional Jumps .............................................................................67Workaround for Wait State Bug with Conditional Jumps .....................................................68Output Enable Signal and Mul Instruction ..................................................................................68Alternatives to Wait States in Code Memory ..............................................................................68Enabling Wait States ....................................................................................................................... 69Summary ......................................................................................................................................... 69Legal Notice .............................................................................................................71Designer’s Handbook
<strong>Rabbit</strong> 2000 <strong>Microprocessor</strong>
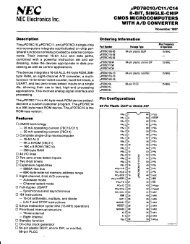
1. IntroductionThis manual is intended for the engineer designing a system using the <strong>Rabbit</strong> microprocessor andZ-World’s Dynamic C development environment. It explains how to develop a <strong>Rabbit</strong> microprocessor-basedsystem that can be programmed with Z-World’s Dynamic C.With the <strong>Rabbit</strong> and Dynamic C, many traditional tools and concepts are obsolete. Complicatedand fragile in-circuit emulators are unnecessary. EPROM burners are not needed. The <strong>Rabbit</strong>microprocessor and Dynamic C work together without elaborate hardware aids, provided that thedesigner observes certain design conventions.1.1 Summary of Design Conventions• Include a programming connector.• Connect a static RAM having at least 32K bytes to the <strong>Rabbit</strong> 2000 using /CS1, /OE1 and/WE1.• Connect a flash memory that is on the approved list and has at least 128K bytes of storage to the<strong>Rabbit</strong> 2000 using /CS0, /OE0 and /WE0.• Install a crystal or oscillator with a frequency of 32.768 kHz to drive the battery-backable clock.(Battery-backing is optional, but the clock is used in the cold boot sequence to generate aknown baud rate.)• Install a crystal or oscillator for the main processor clock that is a multiple of 614.4 kHz, or better,a multiple of 1.8432 MHz.As shown in Figure 1, the <strong>Rabbit</strong> programming cable connects a PC serial port to the programmingconnector of the target system. Dynamic C runs as an application on the PC, and can coldboot the <strong>Rabbit</strong>-based target system with no pre-existing program installed in the target.PC Hosts Dynamic C<strong>Rabbit</strong> ProgrammingCable<strong>Rabbit</strong><strong>Microprocessor</strong>PC SerialPortLevelConversionProgrammingConnectorTargetSystemFigure 1. The <strong>Rabbit</strong> <strong>Microprocessor</strong> and Dynamic CDynamic C programming uses the <strong>Rabbit</strong>’s serial port A for software development. However, it ispossible with some restrictions for the user’s application to also use port A.Designer’s Handbook 1
2 <strong>Rabbit</strong> 2000 <strong>Microprocessor</strong>
2. <strong>Rabbit</strong> Hardware DesignOverviewBecause of the glueless nature of the external interfaces, especially the memory interface, it is easyto design hardware in a <strong>Rabbit</strong>-based system. More details on hardware design are given in the<strong>Rabbit</strong> 2000 <strong>Microprocessor</strong> User’s Manual.2.1 Design Conventions• Include a standard <strong>Rabbit</strong> programming cable. The standard 10-pin programming connectorprovides a connection to serial port A and allows the PC to reset and cold boot the target system.• Connect a static RAM having at least 32K bytes to the processor using /CS1, /OE1 and /WE1. Itis useful if the PC board footprint can also accommodate a RAM large enough to hold all thecode anticipated. If a large RAM can be accommodated, software development will go faster.Although code residing in some flash memory can be debugged, debugging and program downloadis faster to RAM. There are also types of flash memory that can be used, but they cannotsupport debugging.• Connect a flash memory that is on the approved list and has at least 128K bytes of storage tothe processor using /CS0, /OE0 and /WE0. Non-approved memories can be used, but it may benecessary to modify the BIOS. Some systems designed to have their program reloaded by anexternal agent on each powerup may not need any flash memory.• Install a crystal or oscillator with a frequency of 32.768 kHz to drive the battery-backable clock.(Battery-backing is optional, but the clock is used in the cold boot sequence to generate aknown baud rate.)• Install a crystal or oscillator for the main processor clock that is a multiple of 614.4 kHz, or better,a multiple of 1.8432 MHz. These preferred clock frequencies make possible the generationof sensible baud rates. If the crystal frequency is a multiple of 614.4 kHz, then the same multiplesof the 19,200 bps baud rate are achievable. Common crystal frequencies to use are 3.6864,7.3728, 11.0592 or 14.7456 MHz, or double these frequencies.• Digital I/O line PB1 should not be used in the design if cloning is to be be used. (See “BIOSSupport for Program Cloning” on page 43 for more information on cloning.)2.1.1 <strong>Rabbit</strong> Programming ConnectorThe user may be concerned that the requirement for a programming connector places added costoverhead on the design. The overhead is very small—less than $0.25 for components and boardspace that could be eliminated if the programming connector were not made a part of the system.The programming connector can also be used for a variety of other purposes, including user applications.A device attached to the programming connector has complete control over the systembecause it can perform a hardware reset and load new software. If this degree of control is notdesired for a particular situation, then certain pins can be left unconnected in the connecting cable,Designer’s Handbook 3
limiting the functionality of the connector to serial communications. Z-World will be developingproducts and software that assume the presence of the programming connector.2.1.2 Memory ChipsMost systems have one static RAM chip and one or two flash memory chips, but more memorychips can be used when appropriate. Static RAM chips are available in 32K x 8, 64K x 8, 128K x8, 256K x 8 and 512K x 8 sizes. The 256K x 8 is mainly available in 3 V versions. The other chipsare available in 5 V or 3 V versions. Suggested flash memory chips between 128K x 8 and512K x 8 are given in Chapter 10, Flash Memories.Dynamic C and a PC are not necessary for the production programming of flash memory since theflash memory can be copied from one controller to another by cloning. This is done by connectingthe system to be programmed to the same type of system that is already programmed. This connectionis made with a cloning cable. The cloning cable connects to both programming ports andhas a button to start the transfer of program and an LED to display the progress of the transfer.2.1.3 Oscillator CrystalsGenerally a system will have two oscillator crystals, a 32.768 kHz crystal to drive the batterybackabletimer, and another crystal that has a frequency that is a multiple of 1.8432 MHz or a multipleof 3.6864 MHz. Typical values are 1.8432, 3.6864, 7.3728, 11.0592, 14.7456, 18.432,25.8048, and 29.4912 MHz. These crystal frequencies (except 1.8432 MHz) allow generation ofstandard baud rates up to at least 115,200 bps. The clock frequency can be doubled by an on-chipclock doubler, but the doubler should not be used to achieve frequencies higher than about22.1184 MHz on a 5 V system and 14.7456 MHz on a 3.3 V system. A quartz crystal should beused for the 32.768 kHz oscillator. For the main oscillator a ceramic resonator, accurate to 0.5%,will usually be adequate and less expensive than a quartz crystal.2.2 Operating VoltagesThe operating voltage in <strong>Rabbit</strong>-based systems will usually be 5 V or 3.3 V, but 2.7 V is also apossibility. The maximum computation per watt is obtained in the range of 3.0 V to 3.6 V. Thehighest clock speeds require 5 V. The maximum clock speed with a 3.3 V supply is 18.9 MHz, butit will usually be convenient to use a 7.3728 MHz crystal, doubling the frequency to 14.7456MHz. Good computational performance, but not the absolute maximum, can be implemented for 5V systems by using an 11.0592 MHz crystal and doubling the frequency to 22.1184 MHz. Such asystem will operate with 70 ns memories. If the maximum performance is required, then a 29.4912MHz crystal or resonator (for a crystal this must be the first overtone, and may need to be specialordered) or a 29.4912 MHz external oscillator can be used. A 29.4912 MHz system will require 55ns memory access time. A table of timing specification is contained in the <strong>Rabbit</strong> 2000 <strong>Microprocessor</strong>User’s Manual.4 <strong>Rabbit</strong> 2000 <strong>Microprocessor</strong>
2.3 Power ConsumptionWhen minimum power consumption is required, a 3.3 V power supply and a 3.6864 MHz or a1.8432 MHz crystal will usually be good choices. Such a system can operate at the main 3.6864MHz or 1.8432 MHz frequency either doubled or divided by 8 (or both). A further reduction inpower consumption at the expense of computing speed can be obtained by adding memory waitstates. Operating at 3.6864 MHz, such a system will draw approximately 11 mA at 3.3 V, notincluding the power required by the memory. Approximately 2 mA is used for the oscillator and 9mA is used for the processor. Reducing the processor frequency will reduce current proportionally.At 1/4th the frequency or (0.92 MHz) the current consumption will be approximately 4 mA.At 1/8th the frequency, (0.46 MHz) the total power consumption will be approximately 3 mA, notincluding the memories. Doubling the frequency to 7.37 MHz will increase the current to approximately20 mA.If the main oscillator is turned off and the microprocessor is operated at 32.768 kHz from theclock oscillator, the current will drop to about 200 µA exclusive of the current required by thememory. The level of power consumption can be fine-tuned by adding memory wait states, whichhave the effect of reducing power consumption. In order to obtain microampere level power consumption,it is necessary to use auto powerdown flash memories to hold the executing code.Standby power while the system is waiting for an event can be reduced by executing long stringsof multiply zero by zero instructions. Keep in mind that a <strong>Rabbit</strong> operating at 3.68 MHz has thecompute power of a Z180 microprocessor operating at approximately triple the clock frequency(11 MHz).2.4 Through-hole TechnologyMost design advice given for the <strong>Rabbit</strong> assumes the use of surface-mount technology. However,it is possible to use the older through hole technology and develop a <strong>Rabbit</strong> system. One can useZ-World’s <strong>Rabbit</strong>-based Core Module, a small circuit board with a complete <strong>Rabbit</strong> core thatincludes memory and oscillators. Another possibility is to solder the <strong>Rabbit</strong> processors by hand tothe circuit board. This is not difficult and is satisfactory for low production volumes if the righttechnique is used.Designer’s Handbook 5
6 <strong>Rabbit</strong> 2000 <strong>Microprocessor</strong>
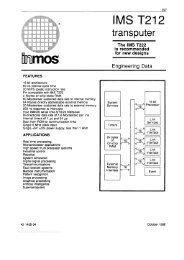
3. Core Design and ComponentsCore designs can be developed around the <strong>Rabbit</strong> 2000 microprocessor. A core design includesmemory, the microprocessor, oscillator crystals, the <strong>Rabbit</strong> standard programming port, and insome cases a power controller and power supply. Although modern designs usually use at leastfour-layer printed circuit boards, two-sided boards are a viable option with the <strong>Rabbit</strong>, especially ifthe clock speed is not high and the design is intended to operate at 2.5 V or 3.3 V—factors whichreduce edge speed and electromagnetic radiation.Schematics illustrating the use of the <strong>Rabbit</strong> microprocessor are available at www.rabbitsemiconductor.com.3.1 ClocksThe <strong>Rabbit</strong> has two built-in oscillators. The 32.768 kHz clock oscillator is needed for the batterybackableclock (aka, the real-time clock), the watchdog timer, and the cold boot function. The highfrequency main oscillator is generally used to provide the main CPU clock.XTALA2330 kW15 pFXTALB22 kW33 pF10 MWCL = 12.5 pF32.768 kHz1 MWCL = 20 pF11.0592 MHzXTALA115 pFXTALB133 pF(a) 32.768 kHz Oscillator(b) Main OscillatorFigure 2. <strong>Rabbit</strong> 2000 Oscillator CircuitsThe 32.768 kHz oscillator is slow to start oscillating after power-on. For this reason a wait loop inthe BIOS waits until this oscillator is oscillating regularly before continuing the startup procedure.The startup delay may be as much as 5 seconds. Crystals with low series resistance (R < 35 kW)will start faster. If the clock is battery-backed, there will be no startup delay since the oscillator isalready oscillating.Designer’s Handbook 7
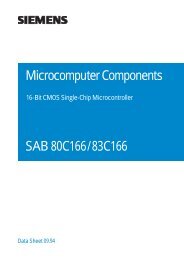
3.1.1 Low-Power DesignThe power consumption is proportional to the clock frequency and to the square of the operatingvoltage. Thus, operating at 3.3 V instead of 5 V will reduce the power consumption by a factor of10.9/25 or 43% of the power required at 5 V. The clock speed is reduced proportionally to the voltageat the lower operating voltage. Thus the clock speed at 3.3 V will be about 2/3 of the clockspeed at 5 V. The operating current is reduced in proportion to operating voltage.The <strong>Rabbit</strong> does not have a "standby" mode that some microprocessors have. Instead, the <strong>Rabbit</strong>has the ability to switch its clock to the 32.768 kHz oscillator. This is called the sleepy mode.When this is done, the power consumption is dramatically decreased. The current consumption isoften reduced to the region of 100 µA at this clock speed. The <strong>Rabbit</strong> executes about 6 instructionsper millisecond at this low clock speed. Generally, when the speed is reduced to this extent, the<strong>Rabbit</strong> will be in a tight polling loop looking for an event that will wake it up. The clock speed isincreased to wake up the <strong>Rabbit</strong>.If current consumption by the real-time clock (RTC) is important, the regulator circuit shown inthe figure below will reduce the current consumption by a substantial amount when a 3 V lithiumbattery is used. Using this circuit, the battery-backed clock requires less than 25 µA. If the full 3 Vis used, the current consumption will be approximately 70 µA.BAT 3 V1 KWSafety resistor requiredby regulatory agencies220 KWbattery backuppower2 MW 0.1 µF4.3 MWFigure 3. Clock Oscillator Regulator Circuit3.1.2 Conformal Coating of 32.768 kHz Oscillator CircuitThis circuit has low microampere level circuits. To avoid leakage due to moisture and ionic contaminationit is recommended that the oscillator circuit be conformally coated. This is simplified ifall components are kept on the same side of the board as the processor. Feedthroughs that passthrough the board and are connected to the oscillator circuit should be covered with solder maskwhich will serve as a conformal coating for the back side of the board from the processor. Anapplication note on conformal coating is available from <strong>Rabbit</strong> Semiconductor.8 <strong>Rabbit</strong> 2000 <strong>Microprocessor</strong>
3.2 Basic Memory DesignNormally /CS0 and /OE0 and /WE0 should be connected to a flash memory that holds the startupcode that executes at address zero. When the processor exits reset with (SMODE1, SMODE0) setto (0,0), it will attempt to start executing instructions at the start of the memory connected to /CS0,/OE0, and /WE0.By convention, the basic RAM memory should be connected to /CS1, /OE1, and /WE1. /CS1 has aspecial property that makes it the preferred chip select for battery-backed RAM. A bit may be setin the MMIDR register to force /CS1 to stay enabled (low). This capability can be used to countera problem encountered when the chip select line is passed through a device that is used to placethe chip in standby by raising /CS1 when the power is switched over to battery backup. The batteryswitchover device typically has a propagation delay that may be 20 ns or more. This is enoughto require the insertion of wait states for RAM access in some cases. By forcing /CS1 low, thepropagation delay is not a factor because the RAM will be always selected and will be controlledby /OE1 and /WE1. If this is done, the RAM will consume more power while not battery-backedthan it would if it were run with dynamic chip select and a wait state. If this special feature is usedto speed up access time for battery backed RAM then no other memory chips should be connectedto OE1 and WE1.3.2.1 Memory Access TimeThe memory access time required depends on the clock speed and the capacitive loading of theaddress and data lines. Wait states can be specified by programming to accommodate slow memoriesfor a given clock speed. Wait states should be avoided with memory that holds programsbecause there is a significant slowing of the execution speed. Wait states are far more important inthe instruction memory than in the data memory since the great majority of accesses are instructionfetches. Going from 0 to 1 wait states is about the same as reducing the clock speed by 30%.Going from 0 to 2 wait states is worth approximately a 45% reduction in clock speed. A table ofmemory access times required for various clock speeds is given in the <strong>Rabbit</strong> 2000 <strong>Microprocessor</strong>User’s Manual.3.2.2 Precautions for Unprogrammed Flash MemoryIf a <strong>Rabbit</strong>-based system is powered up and released from reset when not in one of the cold bootmodes, the processor attempts to begin execution by reading from address zero of the memoryattached to /CS0, /OE0, and /WE0. If this memory is an unprogrammed or improperly programmedflash memory, there is a danger that the memory could be destroyed if the write securityfeature of the flash memory is disabled. Flash memories have a write security feature that inhibitsstarting write cycles unless a special code is first stored to the memory. For example, Atmel flashmemories use the bytes AAh, 55h, and A0h stored to addresses AAAAh or 5555h in a particularsequence. Any write executed that is not prefixed by this sequence will be ignored. If the memoryhas write protection disabled, and execution starts, it is possible that an endless loop that includesa write to memory will establish itself. Since the flash memory wears out after a few hundredthousand writes, the memory could be damaged in a short period of time by such a loop. Unfortunately,flash memory is shipped from the factory with the protection feature disabled to accommodateobsolete memory programmers.The solution to this problem is to order the memory with the write protection enabled, or to enableit with a flash programming system. Then the memory will be safe if it is soldered into the <strong>Rabbit</strong>Designer’s Handbook 9
system. If an unsafe memory is soldered into a system, then the memory can be powered up withthe programming cable connected, and a sequence can be sent using the cold boot procedure toenable the write protection. Compiling any Dynamic C program to the flash will make the memorysafe. If this is not convenient, tester software can make the memory safe by sending a bytesequence over the programming connection serial link.The following example shows a program that can be downloaded via the cold boot protocol tomake a Atmel AT29C010A 128K x 8 flash memory safe. In this case, the RAM connected to /CS1is used to hold a program starting at address zero. The flash memory is mapped into the data segmentstarting at address 1000h for access to the start of the flash memory.; Before storing this program, the RAM is mapped to the first quadrant.; The program resides at address zero in RAM.; NOTE: this program has not been testedld a,0e1h; 3e e1 segsize regioi ld (13h),a ; d3 32 13 00 data seg starts at 1000hld a,3fh; 3e 3f dataseg regioi ld(12h),a ; d3 32 12 00 set data seg base of flash to 1000hld a,0; 3e 00 for MB1CR memory bank reg for flash on CS0ld (15h),a; 32 15 00 bank 1 reads flash starting at 256kld a,0aah; 3e aald (5555h+1000h),a ; 32 55 65 first byte of unlock codeld a,55h ; 3e 55ld (2AAAh+1000h),a ; 32 aa 3a 2nd byte of unlock codeld a,0a0h; 3e a0ld (5555h+1000h),a ; 32 55 65 3rd byte of unlock codeld hl,1000h; 21 00 10 point to start of flash memoryld (hl),0c3h; 36 c3 jump op codeinc hl ; 23ld (hl),00h; 36 00 zeroinc hl ; 23ld (hl),00h; 36 00 zerojr *; 18 fe end with endless loopThis code can be sent by means of a sequence of triplets via the serial port.80 14 01 ; I/O write 01 to 0000 MB0CR select cs1- map RAM to Q100 00 3e ; writetomemoryaddress000 01 e100 02 d300 03 3200 04 1200 05 00; continue code above here00 2b 18 ; last instruction00 2c fe ; last byte80 24 80 ; start execution of program at zeroThe program will execute within about 10 ms.10 <strong>Rabbit</strong> 2000 <strong>Microprocessor</strong>
3.3 PC Board Layout and Memory Line PermutationIn order to use the PC board real estate efficiently, it is recommended that the address and datalines to memory be permuted to minimize the use of PC board resources. By permuting the lines,the need to have lines cross over each other on the PC board is reduced, saving feed-through’s andspace.For static RAM, address and data lines can be permuted freely, meaning that the address linesfrom the processor can be connected in any order to the address lines of the RAM, and the sameapplies for the data lines. For example, if the RAM has 15 address lines and 8 data lines, it makesno difference if A15 from the processor connects to A8 on the RAM and vice versa. Similarly D8on the processor could connect to D3 on the RAM. The only restriction is that all 8 processor datalines must connect to the 8 RAM data lines. If several different types of RAM can be accommodatedin the same PC board footprint, then the upper address lines that are unused if a smallerRAM is installed must be kept in order. For example, if the same footprint can accept either a128K x 8 RAM with 17 address lines or a 512K x 8 RAM with 19 address lines, then address linesA18 and A19 can be interchanged with each other, but not exchanged with A0–A17.Permuting lines does make a difference with flash memory. If the memory is socketed and it isintended to program the memory off the board, then it is probably best to keep the address anddata lines in their natural order. However, since the flash can be programmed in the circuit usingthe <strong>Rabbit</strong> programming port, it is expected that most designers will solder the flash memorydirectly to the board in an unprogrammed state. In this case, the permeation of data and addresslines must still be taken into account because flash memory requires the use of a special unlockcode that removes write protection. The unlock operation involves a special sequence of reads andwrites accessing special addresses and writing the unlock codes.Another consideration is that the flash memory may be divided into sectors. In order to modify thememory, an entire sector must be written. In the small-sector memories the memory is divided into1024 sectors. If the largest flash memory that is usable in a particular design is 512K, the largestsector size is 512 bytes. If the smallest memory used is 128K, then the smallest sector is 128 bytes.In order that the sector can be contiguous for all possible types of memory, the lower 7 addresslines (A0…A6) should be permuted as a group. Address lines A7 and A8 should not be permutedat all if it is desirable to keep the larger sectors contiguous. The upper 10 address lines can be permutedas a separate group. The special memory chip addresses 05555h and 0AAAAh must beaccessed as part of the unlock sequence. These addresses use only the first 16 address lines andhave the odd and even numbered bits the same. The unlock codes use the numbers 55h, AAh orA0h.Permuting data or address lines with flash memory should probably be avoided in practical systems.Designer’s Handbook 11
3.4 PC Board Layout and Electromagnetic InterferenceMost design failures are related to the layout of the printed circuit board (PCB). A good layoutresults when the effects of electromagnetic interference (EMI) are considered. EMI refers to unintentionalradiation from the circuit board that might cause interference with other devices, mainlytelevision sets. If the PCB layout meets EMI regulations, it will probably be otherwise electricallysound.3.4.1 EMI RegulationsThe Federal Communications Commission (FCC) regulates EMI standards in the United States.Their jurisdiction is all 50 states, the District of Columbia, and U.S. possessions. The EuropeanUnion (EU) regulates EMI standards in Europe by means of a CE Marking that acts as a product’spassport in the European market. The actual CE Marking is the letters "CE," an abbreviation of aFrench phrase "Conformite Europeene."These regulations specify the maximum radiation measured in units of field strength (microvolts /meter) at a standard distance, usually 3 meters. The field strength must be measured using a particulartype of filter (120 kHz wide) and a particular type of peak detection (quasi-peak). With <strong>Rabbit</strong>-basedsystems, the radiation will generally be pure tones at harmonics of the clock speed. Thismakes it unnecessary to use a special filter or quasi peak detection except for final verificationmeasurements.3.4.1.1 EMI Measuring DevicesThe measurements are performed using a spectrum analyzer coupled to a calibrated antenna. Theequipment needed to perform these tests may cost $25,000 or more. Many designers will use outsidelaboratories to perform the tests. There is not necessarily a legal requirement to perform thetests. It depends on the type of equipment and its intended use. For example, FCC regulations inthe USA exempt industrial equipment.3.4.1.2 Classes For EMI TestingFCC computer regulations divide equipment into two classes.CLASS AComputer equipment meant for office use: businessmachines, office computersLess restrictive emissions requirement: less than 50dB/uV/M at 3 meters (50 dB relative to 1 microvoltper meter or 300 microvolts / meter).CLASS BComputer equipment meant for home use, where atelevision is likely to be nearby.More restrictive emissions requirement: 40 dBuV/Mor 100 uV/M.Note that for field strength, 20 dB is a factor of 10 and 6 dB is a factor of 2. Field strength declinesinversely with distance, so at 10 meters the field strength for the same device will be about 3/10thsas large as at 3 meters which is approximately 10 dB less. (20 dB is a factor of 10, 10 dB is a factorof the square root of 10 or 1/3.16 = 3.16/10.) These limits apply in the range of 30-230 MHzfor the more restrictive CE test. Above 230 MHz the limit is 7 dB higher. Although the test rangegoes to 1 GHz, with <strong>Rabbit</strong>-based systems there will rarely be any concern above 300 MHz.12 <strong>Rabbit</strong> 2000 <strong>Microprocessor</strong>
With a <strong>Rabbit</strong>-based system it is easy to meet the Class B limits if proper PCB layout precautionsare observed. At Z-World, our target is to beat the Class B limit by 10 dB.3.4.2 Layout and Decoupling for Low EMIGenerally you should design with a 4 (or more) layer printed circuit board. The cost of a 4-layerboard as compared to a 2-layer board is about 30% more per square inch and generally well worthit. Although we have not attempted it, a 2-layer design would probably work for lower clock frequenciesif the ground and power nets are well gridded for power distribution (see Section 3.4.2.5on page 18).Usually a 4-layer printed circuit board has a ground plane and a power plane located as the twoinner layers and connect layers on the top and bottom layers. Components may be mounted ononly one side or on both sides. A 6-layer board places the ground and power layers as the middletwo layers and then has two routing layers both above and below. Adjacent routing layers runtraces at right angles to minimize coupling between signal traces. Sometimes the ground andpower layers are placed on the outside of the boards, but this makes debugging more difficult andcompromises the layers more since they have to be cut up for the component footprints.3.4.2.1 EMI SourcesMost EMI comes from signals that are strictly regular. The main sources are the crystal oscillator,the lines emanating from the <strong>Rabbit</strong> chip that are affected by the internal clocking of the chip, andthe actual clock or clock/2 if it is run around the printed circuit board. Address and data lines generateless EMI because there is no regular frequency on these lines since the bus cycles vary inlength, shifting the signal phase constantly. A0 is the hottest address line since it is varying mostrapidly and also has a stronger drive than the other address lines.A square wave has harmonics at odd frequencies that decline in amplitude proportional to 1/f. Asmall wire that acts as an antenna radiates more the higher the frequency of excitation. The effectivenessas an antenna increases proportional to frequency. These two effects approximately cancel,resulting in an approximately flat spectrum for a typical printed circuit board. For example,without taking precautions, it would not be unusual to have a problem with the 7th harmonic, or154.7 MHz when the <strong>Rabbit</strong> clock is 22.1 MHz. Above approximately 300 MHz, the edges are notfast enough to generate strong harmonics for typical <strong>Rabbit</strong> systems.Designer’s Handbook 13
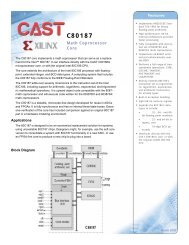
3.4.2.2 Clock Signal Pin 1Pin 1 of the <strong>Rabbit</strong> can be programmed to output the internal clock or the internal clock divided by2. The Z-World BIOS automatically disables this pin, starting with Dynamic C, revision 7.01. Tominimize EMI, avoid using this pin as a clock output. Most <strong>Rabbit</strong> designs don’t need to explicitlyuse the clock output pin. However, in cases that require a clock, use clock/2 if possible. Also, aseriesresistorcan(andshould)beplacedintheclocklinetoslowdowntheriseandfalltimes,which will reduce radiation at higher harmonics of the frequency. Place the resistor, which mightbe around 1 K ohms, as close to pin 1 as possible. The capacitive load of whatever the clock line isconnected to, along with the resistor, creates an RC time constant that slows the edge. If the capacitiveload is larger, a smaller resistor is needed and vice versa.The clock line should be kept as short as possible, and run over a ground plane—or even betterbetween 2 ground planes. It should be positioned well away from other traces, especially tracesrunning parallel to it for any distance. Coupling to a parallel trace is greater the faster the edges. Ifyou run parallel ground traces or a ground trace above the clock line then the parallel groundtraces should be connected with very low inductance connections to the ground plane. This is doneby using many feedthroughs.Pin1Clk1 kWFeedthroughs toGround PlaneParallelGround TracesFigure 4. Many feedthroughs provide very low inductance connections between parallelground traces and a ground plane14 <strong>Rabbit</strong> 2000 <strong>Microprocessor</strong>
3.4.2.3 High Frequency Oscillator CircuitThe <strong>Rabbit</strong>’s oscillator circuit typically runs at 11.05 MHz for a 22.1 MHz internal clock. Theinternal clock doubler is used to double the clock frequency. If the clock doubler is not used thenthe external oscillator circuit runs at the full internal clock frequency, resulting in more radiationfrom the external circuit due to its higher frequency. In either case there should not be excessiveradiation from this circuit if layout guidelines are followed.The main objective is to keep the loop area of the circuit small so as to avoid coupling the clock toother lines and because current circulating in a loop acts as an antenna. The part of the circuit mostsusceptible to radiation is the trace from pin 91 to the 2 kΩ resistor (see Figure below). Theremainder of the circuit has the edges slowed by the 2 kΩ resistor.The low frequency of the 32.768 kHz clock causes no radiation.XTALB2(91)2 kW33 pF1 MWCurrentLoopCrystal (typ. 11.05 MHz)20 pFXTALB1(90)33 pFFigure 5. Loop area of the circuit should be kept small.Designer’s Handbook 15
Y1CL1<strong>Rabbit</strong> 2000Copper pour connected to ground planeCL2 Rs RpV SSXTALB1XTALB2V DDFigure 6. Avoid coupling the clock to other lines.ComponentNameComponent DescriptionValueCL1 Input Cap 33 pFCL2 Output Cap 33 pFRp Bias Resistor 1 MΩRs Current Limiting Series Resistor 2 KΩY1 High speed oscillator CL=20 pFTable 1: High Speed Crystal Oscillator16 <strong>Rabbit</strong> 2000 <strong>Microprocessor</strong>
3.4.2.4 Processor DecouplingThe internal clock of the processor is routed throughout the silicon die. On the rising edge of theclock all the flip flops on the die are clocked within a nanosecond or so of each other, resulting inlarge current flows through the ground and power pins. The current surge is mainly due to thecapacitance driven by the clock and by flip flops changing their state on the clock. The connectionsfrom the ground and power pins to the die have inductance, as do the connections within thedie. The ground and power on the die will bounce up and down at the clock frequency and thiswill be coupled to all the other I/O lines that are clamped to power or ground by transistors. Tominimize this bouncing a low impedance path from the pairs of ground and power pins to decouplingcapacitors should be provided.The <strong>Rabbit</strong> has 6 power and 6 ground pins. Of the six power pins, five reside on the main powergrid and are used to power the CPU, peripherals and the I/O. The other one, pin 42, resides on aseparate power net to supply the battery-backed clock. The ground pins are all tied to the commonground network.To minimize EMI, connect all power pins as directly as possible to a ground plane running underthe processor without large slots or non-metal areas in the plane. A low inductance connection isobtained by a short and wide trace leading to the feedthrough to the ground plane. A pair offeedthroughs has less inductance than a single feedthrough. The power pins should be connectedby a low inductance path to the power plane, or if there is no power plane, to a decoupling capacitor.For capacitors immediately adjacent to the processor, use 10 nF decoupling capacitors (.01 µF).Larger capacitors have too much inductance, resulting in excessive harmonics above 100 MHz.<strong>Rabbit</strong> 2000V SSV DDFigure 7. Decoupling capacitor placement and layout.Decoupling of pin 42 (V bat ) is not critical since relatively small currents flow through this pin.Designer’s Handbook 17
3.4.2.5 Elimination of Power PlaneIf the power plane is eliminated or extensively slotted to accommodate routed traces, decouplingand power distribution becomes more critical. The key is to maintain a low inductance connectionfrom “hot” package power pins to a decoupling capacitor. Also, keep the inductance betweenwidely separated parts of the power net as low as possible. Gridding the net in a cross connect patternwill lower inductance between points, as will wider traces. The procedure is to use a grid andthen use wide traces from grid intersections to the decoupling capacitors or packages.WideTraceDecouplingCapacitorV DDto V SS(GND)Figure 8. Power Distribution Grid18 <strong>Rabbit</strong> 2000 <strong>Microprocessor</strong>
4. How Dynamic C Cold Boots theTarget SystemDynamic C assumes that target controller boards using the <strong>Rabbit</strong> CPU have no pre-installed firmware.It takes advantage of the <strong>Rabbit</strong>’s bootstrap (cold boot) mode that allows memory and I/Owrites to take place over the programming port.Circuit Board with <strong>Rabbit</strong> 2000 Processor1 23 45 67 8109ProgrammingHeader PinoutProgrammingHeaderRXAGNDCLKAVcc/RESETTXAn.c.STATUSSMODE0SMODE112345678910Vcc~50 kW~50 kW~50 kW~50 kW ~5 kW51GND94+5 V3754383635RABBIT 2000RXAVSSCLKAVDD/RESETTXASTATUSSMODE0SMODE1Figure 9. <strong>Rabbit</strong> Programming PortThe <strong>Rabbit</strong> programming cable is a smart cable with an active circuit board in its middle. The circuitboard converts RS-232 voltage levels used by the PC serial port to CMOS voltage levels usedby the <strong>Rabbit</strong>.When the programming cable connects a PC serial port to the target controller board, the PC runningDynamic C is connected to the <strong>Rabbit</strong> as shown in Table 1.Table 2. Programming Port ConnectionsPC Serial Port SignalDTR (output)DSR (input)<strong>Rabbit</strong> Signal/RESET (input, reset system)STATUS (gen purpose output)TX (serial output) RXA (serial input, chan A)RX (serial input) TXA (serial output, chan A)Designer’s Handbook 19
The programming cable includes an RS-232 to CMOS signal level converter circuit. The levelconverter is powered from the +5 V or +3.3 V power supply voltage present on the <strong>Rabbit</strong> programmingconnector (see Figure 7 on page 31). Plugging the programming cable into the <strong>Rabbit</strong>programming connector results in pulling the <strong>Rabbit</strong> SMODE0, SMODE1 (startup mode) lineshigh. This causes the <strong>Rabbit</strong> to enter the cold boot mode after reset.Dynamic C can cold boot the <strong>Rabbit</strong>-based target system with no pre-existing program installed inthe target. The flash memory on the target system can be blank or it may contain any data. Thecold boot capability permits the use of soldered-in flash memory on the target. Soldered-in memoryeliminates sockets, boot blocks and prom programming devices. However, it is important thatthe flash memory have its software data protection enabled before it is soldered in.4.1 How the Cold Boot Mode Works In DetailThe microprocessor starts executing a 12-byte program contained in an internal ROM. The programcontains the following code.; origin zero00 ld l,n ; n=0c0h for serial port A; n=020h for parallel (slave port)02 ioi ld d,(hl) ; get address most sig byte04 ioi ld e,(hl) ; get least sig byte06 ioi ld a,(hl) ; get data (h is ignored)08 ioi or nop ; if D(7)==1 ioi, else nop09 ld (de),A ; store in memory or I/O10 jr 0 ; jump back to zero; note wait states inserted at bytes 3, 5 and 7 waiting; for serial port or parallel port readyThe contents of the boot ROM vary depending on the settings of the pins SMODE0 and SMODE1and on the contents of register D bit 7 which determines if the store is to be an I/O store or a datastore. If the boot is terminated by storing 80h to I/O register 24h then when the boot programreaches address zero the boot mode is disabled and instruction fetching resumes at address zero.Wait states are automatically inserted during the fetching of bytes 3, 5 and 7 to wait for the serialor parallel port ready. The wait states continue indefinitely until the serial port is ready. This willcause the processor to be in the middle of an instruction fetch until the next character is ready.While the processor is in this state the chip select, but not the output enable, will be enabled if thememory mapping registers are such as to normally enable the chip select for the boot ROMaddress. The chip select will stay low for extended periods while the processor is waiting for theserial or parallel port data to be ready. Additionally, the chip select will go low when a write is performedto an I/O address if the address is such as to enable that chip select if it were a write to amemory address.20 <strong>Rabbit</strong> 2000 <strong>Microprocessor</strong>
4.2 Program Loading Process OverviewThe program loading process described here is current through Dynamic C version 7.06.On start up, Dynamic C first uses the PC’s DTR line on the serial port to assert the <strong>Rabbit</strong> RESETline and put the processor in cold boot mode. Next, Dynamic C uses a four stage process to load auser program:1. Load an initial loader (cold loader) via triplets sent at 2400 baud from the PC to a target in coldboot mode.2. Run the initial loader and load a secondary loader (pilot BIOS) at 19200 or 57000 baud,depending on the version of Dynamic C.3. Run the secondary loader and load the BIOS (as Dynamic C compiles it).4. Run the BIOS and load the user program at 115200 baud (after Dynamic C compiles it to afile).4.2.1 Program Loading Process DetailsWhen Dynamic C starts, the following sequence of events takes place:1. The serial port is opened with the DTR line high, closed, then reopened with the DTR line lowat 2400 baud. This pulses the reset line on the target low (the programming cable inverts theDTR line) and prepares the PC to send triplets.2. A group of triplets defined in the file COLDLOAD.BIN consisting of 2 address bytes and a databyte are sent to the target. The first few bytes sent are sent to I/O addresses to set up the MMUand MIU and do system initialization. The MMU is set up so that RAM is mapped to 0x00000,and flash is mapped to 0x80000.3. The remaining triplets place a small initial loader program at memory location 0x00000. Thelast triplet sent is 0x80, 0x24, 0x80, which tells the CPU to ignore the SMODE pins and startrunning code at address 0x00000.4. The PC now bumps the baud rate on the serial port being used to 19200 or 57000 baud,depending on the version of Dynamic C.5. The primary loader measures the crystal speed to determine what divisor is needed to set abaud rate of 19200 (or 57600). The divisor is stored at address 0x4002 for later use by theBIOS, and the programming port is set up to be a 19200 (or 57600) baud serial port.6. The program enters a loop where it receives a fixed number of bytes which compose a secondaryloader program (pilot.bin sent by the PC) and writes those bytes to memory location0x4100. After all of the bytes are received, program execution jumps to 0x4100.7. The secondary loader does a wrap-around test to determine how much RAM is available, andreads the flash ID. This information is made available for transmittal to Dynamic C whenrequested.8. The secondary loader now enters a finite state machine (FSM) that is used to implement theDynamic C/Target Communications protocol. Dynamic C compiles the core of the regularBIOS and sends it to the target at address 0x00000 which is still mapped to RAM. Note thatthis requires that the BIOS core be 0x4000 or less in size.9. The FSM checks the memory location 0x4001 (previously set to zero) after receiving eachbyte. When the compilation and loading to RAM of the BIOS is complete, Dynamic C signalsthe target that it is time to run the BIOS by sending a one to 0x4001.Designer’s Handbook 21
10.The BIOS runs some initialization code including setting up the serial port for 115200 baud,setting up serial interrupts and starting a new FSM.11.The BIOS code modifies a jump instruction at the beginning of the program so that the nexttime it runs, it will skip step 12. It also modifies a byte near the beginning of the programwhere it stores the baud rate divider to achieve 19200 baud. This constant is used by the serialcommunications initialization library functions to compute baud rate dividers.12.The BIOS copies itself to flash at 0x80000, and switches the mapping of flash and RAM so thatRAM is at 0x80000 and flash is at 0x00000. As soon as this remapping is done, the BIOS’ executionof instructions begins happening in flash.13.Dynamic C is now ready to compile a user program. When the user compiles his program tothe target, it is first written to a file, then the file is loaded to the target using the BIOS’ FSM.The file is used as an intermediate step because fix-ups are done after the compilation is completeand all unknown addresses are resolved. The fix-ups would cause extra wear on the flashif done straight to the flash.14.When the program is fully loaded, Dynamic C sets a breakpoint at the beginning of main andruns the program up to the breakpoint. The board has been programmed, and Dynamic C isnow in debug mode.15.If the programming cable is removed and the target board is reset, the user’s program will startrunning automatically because the BIOS will check the SMODE pins to determine whether torun the user application or enter the debug kernel.22 <strong>Rabbit</strong> 2000 <strong>Microprocessor</strong>
5. <strong>Rabbit</strong> Memory OrganizationThe <strong>Rabbit</strong> architecture is derived from the original Z80 microprocessor. The original Z80 instructionset used 16-bit addresses to address a 64K memory space. All code and data had to fit in this64K space. The <strong>Rabbit</strong> adopts a scheme similar to that used by the Z180 to expand the availablememory space. The 64K space is divided into zones and a memory mapping unit or MMU mapseach zone to a block in a larger memory; the larger memory is 1 megabyte in the case of the Z180or the <strong>Rabbit</strong> 2000. The zones are effectively windows to the larger memory. The view from thewindow can be adjusted so that the window looks at different blocks in the larger memory.Figure 10 on page 24 shows the memory mapping schematically.5.1 Physical MemoryThe <strong>Rabbit</strong> has a 1-megabyte physical memory space. In special circumstances more than 1-megabyteof memory can be installed and accessed using auxiliary memory mapping schemes. Typical<strong>Rabbit</strong> systems have two types of physical memory: flash memory and static RAM memory. Flashmemory follows a write-once-in-a-while and read-frequently model. Depending on the particulartype of flash used, the flash memory will wear out after it has been written approximately 10,000to 100,000 times.5.1.1 Flash MemoryFlash memory in a <strong>Rabbit</strong>-based system may be small-sector type or large-sector type. Small-sectormemory typically has sectors of 128 to 1024 bytes. Individual sectors may be separately erasedand written. In large-sector memory the sectors are often 16K or 64K or more. Small-sector memoryprovides better support for program development and debugging, and large-sector memory isless expensive and has faster access time. The best solution will usually be to lay out a design toaccept several different types of flash memory, including the flexible small-sector memories andthe fast large-sector memories.At the present time development support for programs tested in flash memory is confined to flashmemories with small sectors. If larger sectors are used, the code must be debugged in RAM andthen loaded to flash. Large-sector flash is desirable for the better access time and power consumptionspecifications that are available. Dynamic C is being modified to handle large sector flash atthe time of this writing.5.1.2 SRAMStatic RAM memory may or may not be battery-backed. If it is battery-backed it retains its datawhen power is off. Static RAM chips typically used for <strong>Rabbit</strong> systems are 32K, 64K, 128K,256K, or 512K. When the memory is battery-backed, power is supplied at 2 V to 3 V from abackup battery. The shutdown circuitry must keep the chip select line high while preserving memorycontents with battery power.Designer’s Handbook 23
5.1.3 Basic Memory ConfigurationA basic <strong>Rabbit</strong> system has two static memory chips: one flash memory chip and one RAM memorychip. Additional static memory chips may be added. If an application requires storing a lot ofdata in flash memory, another flash memory chip can be added, creating a system with three memorychips—two flash memory chips and one RAM chip.Trying to use a single flash memory chip to store both the user’s program and live data that mustbe frequently changed can create software problems. When data are written to a small-sector flashmemory, the memory becomes inoperative during the 5 ms or so that it takes to write a sector. Ifthe same memory chip is used to hold data and the program, then the execution of code must ceaseduring this write time. The 5 ms is timed out by a small routine executing from root RAM whilesystem interrupts are disabled, effectively freezing the system for 5 ms. The 5 ms lockup periodcan seriously affect real-time operation.5.2 Memory SegmentsFrom the point of view of a Dynamic C programmer, there are a number of different uses of memory.Each memory use occupies a different segment in the logical 16-bit address space. The foursegments are shown here:Extended MemorySegment64K56k52K1 megabyteQuadrant 3Stack SegmentRAMQuadrant 2Data SegmentRoot MemorySegment0kTypical mapping16-bit to 20-bit address spaceQuadrant 1Flash Quadrant 0Figure 10. Memory Map of 16-bit Addressing SpaceThis figure shows that the <strong>Rabbit</strong> does not have a “flat” memory space. The advantage of the <strong>Rabbit</strong>’smemory organization is that the use of 16-bit addresses and pointers is retained, ensuring thatthe code is compact and executes quickly.Note: The relative size of the root memory and data segments can be adjusted in 4K steps.24 <strong>Rabbit</strong> 2000 <strong>Microprocessor</strong>
5.2.1 DefinitionsExtended Code: Instructions addressed in the extended memory segment.Extended Constants: C constants addressed in the extended memory segment. They are mixedtogether with the extended code.Extended Memory: Logical addresses above 0xDFFF.Extended RAM: RAM not used for root variables or stack. Extended memory in RAM may beused for large buffers to save root RAM space. The function xalloc() allocates space inextended RAM memory.Root Code: Instructions addressed in the root memory segment.Root Constants: C constants, such as quoted strings or data tables, addressed in the root memorysegment.Root Memory: Logical addresses below 0xE000.Root Variables: C variables, including structures and arrays that are not initialized to a fixedvalue, are addressed in the data segment.5.2.2 The Root Memory SegmentThe root memory segment has a typical size of 24K. The larger the root memory segment, thesmaller the data segment and vice-versa. Root memory segment address zero is always mapped to20-bit address zero. Usually the root memory segment is mapped to flash memory since root codeand root constants do not change except when the system is reprogrammed. It may be mapped toRAM for debugging, or to take advantage of the faster access time offered by RAM.The root memory segment holds a mixture of code and constants. C functions or assembly languageprograms that are compiled to the root memory segment are interspersed with data constants.Data constants are inserted between blocks of code. Data constants defined inside a Cfunction are put before the end of the code belonging to the function. Data constants defined outsideof C functions are stored as encountered in the source code.Except in small programs, the bulk of the code is executed using the extended memory segment.But code in the root memory segment operates slightly faster, also the root memory segment hasspecial properties that make it better for some types of code.5.2.2.1 Types of Code Best-Suited for the Root Memory Segment• Short subroutines of about 20 instructions or less that are called frequently will use significantlyless execution time if placed in root memory because of the faster calling linkage for 16-bit versus 20-bit addresses. For a call and return, 20 clocks are used compared to 32 clocks.• Interrupt routines. Interrupts use 16-bit addressing so the entry to an interrupt routine must bein root.• The BIOS core. The initialization code of the BIOS must be at the start of the root memorysegment.Designer’s Handbook 25
5.2.3 The Data SegmentThe data segment is mapped to RAM and contains C variables. Typically it starts at 8K or aboveand ends at 52K (0xCFFF). Data allocation starts at or near the top and proceeds in a downwarddirection. It is also possible to place executable code in the data segment if it is copied from flashto the data segment. This can be desirable for code that is self modifying, code to implementdebugging aids or code that controls write to the flash memory and cannot execute from flash. Insome cases RAM may require fewer wait states so code executes faster if copied to RAM.5.2.4 The Stack SegmentThe stack segment normally is from 52K to 56K (0xD000-0xDFFF). It is always mapped to RAMand holds the system stack. Multiple stacks may be implemented by defining several stacks in the4k space or by remapping the 4K space to different locations in physical RAM memory, or byusing both approaches.For example, if 16 stacks of 1k length are needed then 4 stacks can be placed in each 4k mappingand 4 different mappings for the window can be used.5.2.5 The Extended Memory SegmentThis 8K segment from 56K to 64K (0xE000-0xFFFF) is used to execute extended code and it isalso used by routines that manipulate data located in extended memory. While executing code themapping is shifted by 4K each time the code passes the 60K point. Up to a megabyte of code canbe efficiently executed by moving the mapping of the 8K window using special instructions (longcall, long jump and long return) that are designed for this purpose. This uses up only 8K of the 16-bit addressing space.5.3 How The Compiler Compiles to MemoryThe compiler generates code for root code, root constants, extended code and extended constants.It allocates space for data variables, but, except for constants, does not generate data to be storedin memory. Any initialization of variables must be accomplished by code since the compiler is notpresent when the program starts in the field.5.3.1 Placement of Code in MemoryCode may be placed in either extended memory or root memory. Functions execute at the samespeed, but calls to functions in root memory are slightly more efficient than calls to functions inextended memory.In all but the smallest programs, most of the code is compiled to extended memory. Since rootconstants share the memory space needed for root code, as the memory needed for root constantsincreases, the amount of code that can be stored in root memory decreases, and code must bemoved to extended memory.26 <strong>Rabbit</strong> 2000 <strong>Microprocessor</strong>
5.3.2 Paged Access in Extended MemoryThe code in extended memory executes in the 8K window from E000 to FFFF. This 8K windowuses paged access. Instructions that use 16-bit addressing can jump within the page and also outsideof the page to the remainder of the 64K logical space. Special instructions, particularlylcall, ljp, andlret, are used to access code outside of the 8K window. When one of thesetransfer-of-control instructions is executed, both the address and the view through the 8K windowchange, allowing transfer to any instruction in the 1M physical memory space. The 8-bit XPC registercontrols which of two consecutive 4K pages the 8K window aligns with (there are 256pages). The 16-bit PC controls the address of the instruction, usually in the region E000 to FFFF.The advantage of paged access is that most instructions continue to use 16-bit addressing. Onlywhen a page change is needed does a 20-bit transfer of control need to be made.As the compiler compiles code in the extended code window, it checks at opportune times to see ifthe code has passed the midpoint of the window or F000. When the code passes F000, the compilerslides the window down by 4K so that the code at F000+x becomes resident at E000+x. Thisautomatic paging results in the code being divided into segments that are typically 4K long, butwhich can be very short or as long as 8K. Transfer of control within each segment can be accomplishedby 16-bit addressing. Between segments, 20-bit addressing is required.Designer’s Handbook 27
28 <strong>Rabbit</strong> 2000 <strong>Microprocessor</strong>
6. The <strong>Rabbit</strong> BIOSWhen Dynamic C compiles a user’s program to a target board, the BIOS (Basic Input-Output System)is compiled first, as an integral part of the user’s program. The BIOS is a separate programfile that contains the code needed to interface with Dynamic C. It also normally contains a softwareinterface to the user’s particular hardware. Certain drivers in the Dynamic C libraries requireBIOS routines to perform tasks that are hardware-dependent.The BIOS also:•Provides a variety of low-level services for the user’s program.•Takes care of microprocessor system initialization.•Provides the communications services required by Dynamic C for downloading code andperforming debugging services such as setting breakpoints or examining data variables.•Defines the setup of memory.A single, general-purpose BIOS is supplied with Dynamic C for the <strong>Rabbit</strong>. This BIOS will allowyou to boot Dynamic C on any <strong>Rabbit</strong>-based system that follows the basic design rules needed tosupport Dynamic C. The BIOS requires both a flash memory and a 32K or larger RAM or just a128K RAM for it to be possible to compile and run Dynamic C programs. If the user uses a flashmemory from the list of flash memories that are already supported by the BIOS, the task will besimplified. If the flash memory chip is not already supported, the user will have to write a driver toperform the write operation on the flash memory. This is not difficult provided that a system with128K of RAM and the flash memory to be used is available for testing.An existing BIOS can be used as a skeleton BIOS to create a new BIOS. Frequently it will only benecessary to change #define statements at the beginning of the BIOS. In this case it is unnecessaryfor the user to understand or work out the details of the memory setup and other processor initialization.6.1 Startup Conditions Set Up By the BIOSThe BIOS sets up initial values for the following registers by means of code and declarations.• The four memory bank control registers —MB0CR, MB1CR, MB2CR, andMB3CR—are 8-bitregisters, each associated with one quadrant of the 1M memory space. Each register determineswhich memory chip will be mapped into its quadrant, how many wait states will be used foraccessing that memory chip, and whether the memory chip will be write protected.• The STACKSEG register is an 8-bit register that determines the location of the stack segment inthe 1M memory.• The DATASEG register is an 8-bit register that determines the location of the data segment inthe 1M memory, normally the location of the data variable space.• The SEGSIZE register is an 8-bit register holding two 4-bit registers. Together the registersdetermine the relative size of the base segment, data segment and stack segment in the 64K rootspace.• The MMIDR register is an 8-bit register used to force /CS1 to be always enabled or not. HavingCS1 always enabled reduces power consumption.Designer’s Handbook 29
• The XPC register is used to address extended memory. Normally the user’s code frequentlychanges this register. The BIOS sets the initial value.• The SP register is the system stack pointer. It is frequently changed by the user’s code. TheBIOS sets up an initial value.All together there are 11 MMU, MIU registers that are set up by the BIOS. These registers determineall aspects of the hardware setup of the memory.In addition, a number of origin declarations are made in the BIOS to tell the Dynamic C compilerwhere to place different types of code and data. The compiler maintains a number of assemblycounters that it uses to place or allocate root code, extended code, data constants, data variables,and extended data variables. Each of these counters has a starting location and a block size.30 <strong>Rabbit</strong> 2000 <strong>Microprocessor</strong>
6.2 BIOS FlowchartThe following flowchart summarizes the functionality of the BIOS:Start ataddress 0ApplicationProgramInitializingBIOS flag?YesCopy BIOS toflash. Clear flagin source code.BIOS servicesforuserapplicationprogram.NoSetup memorycontrol andbasic BIOS services.Is the programmingcable connected?YesStart Dynamic Ccommunicationsand statemachine.NoDivert to BIOSservice?YesNoCall user applicationprogram(main).Act as masterfor cloning.Service diagnosticport.(not yetavailable)Figure 11. BIOS FlowchartDesigner’s Handbook 31
6.3 Internally Defined MacrosSome macros used in the BIOS are defined internally by Dynamic C before the BIOS is compiled.They are defined using tests done in the bootstrap loading, or by reading variables set in the GUI.These are:_FLASH_, _RAM_ - Used for conditional compilation of the BIOS to distinguish betweencompiling to RAM and compiling to flash. These are set in the Options | Compiler dialog box._RAM_SIZE_, _FLASH_SIZE_ - Used to set the MMU registers and code and data sizesavailable to the compiler. The values given by these macros represent the number of 0x1000blocks of memory available._BOARD_TYPE_ - This is read from the System ID block or defaulted to 0x100 (the BL1810Jack<strong>Rabbit</strong> board) if no System ID block is present. This can be used for conditional compilationbasedonboardtype.6.4 Modifying the BIOSThe BIOS can be modified to be more specific concerning the user’s configuration. This can bedone one step at a time, making it easy to detect any problems. The source code for the UniversalBIOS is in BIOS\RABBITBIOS.C. Dynamic C uses this source code for the BIOS by default,but the user can specify another BIOS for Dynamic C to use in the Options | Compiler dialogbox.There are several macros at the top of RABBITBIOS.C that users may want to modify for boardsthey design or for special situations involving off-the-shelf <strong>Rabbit</strong>-based boards. Not all of themacros at the top of the BIOS are described here.USE115KBAUDThe default value of 1 specifies that Dynamic C will communicate at 115,200 baud with the target.If this macro is set to zero, Dynamic C will communicate at 57,600 baud. The lower baud ratemight be needed on some PCs that can not handle 115,200 baud. If USE115KBAUD is changed tozero, the baud rate should be changed to 57,600 in the Dynamic C Options | Communicationsdialog box. Starting with Dynamic C 7.05, USE115KBAUD is not available to change the baudrate, simply choose the baud rate in Options | Communications.CLOCK_DOUBLEDThe default value of 1 causes the clock speed to be doubled if the crystal speed is less than orequal to 12.9 MHz. Setting this to zero means the clock speed will not be doubled.ENABLE_CLONINGThe default value of 0 disables cloning. Setting this to 1 enables cloning and slightly increases thecode size of the BIOS. If cloning is used, PB1 should be pulled up with 50K or so pull up resistor.Various cloning options are available when ENABLE_CLONING is set to one. For more informationon cloning, please see Chapter 8, “BIOS Support for Program Cloning,”in this manual and/orTechnical Note 207, <strong>Rabbit</strong> 2000 Cloning Board, which is available at rabbitsemiconductor.com.32 <strong>Rabbit</strong> 2000 <strong>Microprocessor</strong>
DATAORGBeginning logical address for the data segment. The default is 0x6000. This should only bechanged to multiples of 0x1000. Increasing it increases the root code space available, anddecreases root data space; decreasing it has the opposite effect. It can be changed to as low as0x3000 or as high as 0xB000.RAM_SIZEThis macro sets the amount of RAM available. The default value is the internally defined_RAM_SIZE_ The units are the number of 4k pages of RAM. In special situations, such as splittingRAM between two coresident programs, this may be modified to a smaller value than theactual available RAM.FLASH_SIZEThis macro sets the amount of flash available. The default value is the internally defined_FLASH_SIZE_ The units are the number of 4k pages of flash. In special situations, such assplitting flash between two coresident programs, this may be modified to a smaller value than theactual available flash.CS1_ALWAYS_ONKeeping CS1 active is useful if your system is pushing the limits of RAM access time. It willincrease power consumption a little. Set to 0 to disable, 1 to enableWATCHCODESIZEThese define the number of bytes available to the debugger for compiling watch expression. Thedefault values are 0x200/0x060. Decreasing these increases the amount of RAM available for rootdata.NUM_RAM_WAITST, NUM_FLASH_WAITSTThese define the number of wait states to be used for RAM and flash. The default value for both is0. The only valid values are 4, 2, 1 and 0.MB0CR_INVRT_A18, MB1CR_INVRT_A18, MB2CR_INVRT_A18, MB3CR_INVRT_A18MB0CR_INVRT_A19, MB1CR_INVRT_A19, MB2CR_INVRT_A19, MB3CR_INVRT_A19These determine whether the MIU registers for each quadrant are set up to invert address lines A18and A19 after the logical to physical address conversion. This allows each 256K quadrant of physicalmemory access up to four 256k pages on the actual memory device. These would be used forspecial compilations of programs to be coresident on flashes between 512k and 1M in size. Seeapplication note 202, <strong>Rabbit</strong> Memory Management In a Nutshell, and application note 210, RunningTwo Application on a TCP/IP Development Board for more details.See the top of the BIOS source code (\BIOS\<strong>Rabbit</strong>BIOS.c) for more options.Designer’s Handbook 33
6.5 OriginStatementstotheCompilerThe Dynamic C compiler uses the information provided by origin statements to decide where toplace code and data in both logical and physical memory. The origin statements are normallydefined in the BIOS; however, they may also be useful in an application program for certain taskssuch as compiling a pilot BIOS or cold loader, or special situations where a user wants two applicationcoresident within a single 256K quadrant of flash.6.5.1 Origin Statement SyntaxPrior to Dynamic C 7.05, origin statement syntax is:# applyAll arguments are required.Starting with Dynamic C 7.05, origin statement syntax (in BNF) is:origin-directive : #origin-type identifier origin-designatororigin-designator : action-expression | origin-declarationorigin-declaration : physical-address size [follow-expression][action-expression][debug-expression]origin-type: rcodorg | xcodorg | wcodorg | rvarorgfollow-expression : follows identifier [splitbin]action-expression : resume | applydebug-expression : debug | nodebug | allsize : constant-expressionphysical-address : constant-expression constant-expressionThe non-terminals, identifier and constant-expressions, are defined in the ANSI C specification.6.5.2 Origin Statement SemanticsAn origin statement associates a code pointer and a memory region with a particular type of code.The type of code is specified by #origin-type.Table 3. Origin types recognized by the compilerorigin typeroot codexmem codewatch coderoot datakeywordrcodorgxcodorgwcodorgrvarorgAll code sections (rcodorg, xcodorg code and wcodorg) grow up. All non-constant datasections (rvarorg) grow down. Root constants are generated to the rcodorg region. xdataand xstring are generated to the current xcodorg region.34 <strong>Rabbit</strong> 2000 <strong>Microprocessor</strong>
All origin statements must have a unique ANSI C identifier. The scope of this identifier is only withother origin statements or declarations. In the pre 7.05 syntax this is the .Each memory region is defined by calculating a physical address from an 8-bit base address (firstconstant-expression of physical-address) and a 16-bit logical address (second constant-expression ofphysical-address). The size of the memory region is determined by 20-bit size. Overflow of thesethree values is truncated. In the pre 7.05 syntax these three values are , and .The keywords apply and resume are action-expressions. They tell the compiler to generate codeor data in the memory region specified by identifier. Anapply action resets the code or datapointer for the specified region to the starting physical address of the region and makes the regionactive. A resume action does not reset the code or data pointer, but does make the memory regionactive.A region remains active (i.e., the compiler will continue to generate code or data to it) untilanother region of the same origin-type is activated with an apply or resume action or until thememory region is full.The option follow-expression is best described with an example. First, let us declare yourcodein an origin statement containing an origin-declaration. Afollow-expression can only name aregion that has already been declared in an origin-declaration.#rcodorg yourcode 0x0 0x5000 0x500then the origin statement:#rcodorg mycode 0x0 0x5500 0x500 follows yourcodetells the compiler to activate mycode when yourcode is full. This action does an implicitresume on the memory region identified by yourcode. In this example, the implicit resumealso generates a jump to mycode when yourcode is full. For data regions, the data that wouldoverflow the region is moved to the region that follows. Combined data and code regions (like#rcodorg) use both methods, which one is used depends on whether code or data caused theregion to overflow. In our example, if data caused yourcode to overflow, the data would be writtento the memory region identified by mycode.Furthermore, a follow-expression may specify that when the code or data resumes at the nextregion it should generate a separate bin file. This option is designed to support burning multipleflash or EPROM devices. The binary files generated share the same base name as the original file,but appended with a number which is followed by the .bin extension. For example, if hello.c,alarge program that spans both flash chips, is compiled to file with the splitbin option on,hello1.bin and hello2.bin will be generated. Obviously, this option is only meaningfulwhen compiling to a file.The optional debug-expression is only valid with the xcodorg origin-type. It tells the compiler togenerate only debug or nodebug code in that physical memory region. If debug-expression isnot specified, the declaration is treated as an all region. An all region can have both debugand nodebug code. Activating an all region (by using apply or resume) will cause bothdebug and nodebug regions to become inactive. If an all region is active, both debug andnodebug regions must be made active to entirely deactivate the all region. In other words, if anall region is active and a debug region is activated, any nodebug code will still be generatedto the all region until a nodebug region is made active.Designer’s Handbook 35
With regard to follow-expressions, adebug region may not follow a nodebug region or viceversa. An all region may follow either a debug or a nodebug region. Only an all region mayfollow another all region. This allows debug and nodebug regions to spill into a commonall region.6.5.3 Origin Statement ExamplesThe diagram below shows how the origin statements define the mapping between the logical andphysical address spaces.#define DATASEGVAL 0x91#rvarorg rootdata (DATASEGVAL) 0xc5ff 0x6600 apply // grows down#rcodorg rootcode 0x00 0x0000 0x6000 apply#wcodorg watcode (DATASEGVAL) 0xc600 0x0400 apply#xcodorg xmemcode 0xf8 0xe000 0x1a000 apply// data declarations start hereDynamic C defines macros that include information about compiling to RAM or flash and identifyingmemory device types, memory sizes, and board type. The origin setup shown above differs fromthat included in the standard BIOS included with Dynamic C as the standard BIOS uses additionalmacros values for dealing with a wider range of boards and memory device types.0xFFFF0xE0000xCDFF0xC5FFLogical Address SpacexmemcodestackwatcoderootdataPhysical Address Spacerootdatawatcode0xFFFFF0x9DDFF0x970000x6000rootcodexmemcode0x200000x0000rootcode0x060000x000006.5.4 Origin Directives in Program CodeTo place programs in different places in root memory or to compile a boot strapping program, suchas a pilot BIOS or cold loader, origin statements may be used in the user’s program code.For example, the first line of a pilot BIOS program, pilot.c, would be#rcodorg rootcode 0x0 0x0 0x6000 applyA program with such an origin directive could only be compiled to a .bin file, because compiling itto the target would overwrite the running BIOS.36 <strong>Rabbit</strong> 2000 <strong>Microprocessor</strong>
7. The System ID BlockThe BIOS supports a system identification block to be placed at the top of flash memory. Identificationinformation for each device can be placed in it for access by the BIOS, flash driver, andusers. This block will contain specific part numbers for the flash and RAM devices installed, theproduct’s serial number, Media Access Control (MAC) address if an Ethernet device, and so on. Inaddition, the ID block is designed with future expansion in mind by including a table version numberand storing the block’s size in bytes within the block itself. Pointers for a “user block” of protecteddata exist as well, with the planned use for storage of calibration constants, etc., althoughthe user may use it if desired.Note that version 1 of the ID block (tableVersion = 0x01) has only limited functionality. In particular,only the following parameters are valid: tableVersion, productID, timestamp,macAddr, idBlockSize, idBlockCRC, andmarker. Version 2 and later ID blocks have allthe values filled with the exception of the flash and RAM speed fields, and Dynamic C versions7.04x2 and later support use of the user block.If Dynamic C does not find an ID block on a device, the compiler will assume that it is a Z-WorldBL1810 (Jackrabbit) board.Designer’s Handbook 37
7.1 Definition of SysIDBlockThe following global struct is defined in IDBLOCK.LIB andisloadedfromtheflashdeviceduringBIOS startup. Users can access this struct in RAM if they need information from it. The definitionbelow is for a 128-byte ID block; the actual size can vary according to the value inidBlockSize.Thereserved[] field will expand and/or shrink to compensate for the changein size.typedef struct {int tableVersion; // ver. num for this table layoutint productID; // Z-World part #int vendorID; // 1 = Z-Worldchar timestamp[7]; // YY/M/D H:M:Slong flashID; // Z-World part #int flashType; // Write methodint flashSize; // in 1000h pagesint sectorSize; // size of flash sector in bytesint numSectors; // number of sectorsint flashSpeed; // in nanosecondslong flash2ID;// Z-World part #, 2nd flashint flash2Type; // Write method, 2nd flashint flash2Size; // in 1000h pages, 2nd flashint sector2Size; // byte size of 2nd flash's sectorsint num2Sectors; // number of sectorsint flash2Speed; // in nanoseconds, 2nd flashlong ramID; // Z-World part #int ramSize; // in 1000h pagesint ramSpeed; // in nanosecondsint cpuID; // CPU type identificationlong crystalFreq; // in Hertzchar macAddr[6]; // Media Access Control (MAC) addrchar serialNumber[24]; // device serial numberchar productName[30]; // NULL-terminated stringchar reserved[1]; // reserved 4 later use - size can// growlong idBlockSize; // size of the SysIDBlock structint userBlockSize; // size of user block (directly// below ID block)int userBlockLoc; // offset of start of user block// from this blockint idBlockCRC; // CRC of this block (when this// field is set to zero)char marker[6]; // should be 0x55 0xAA 0x55 0xAA// 0x55 0xAA} SysIDBlock;38 <strong>Rabbit</strong> 2000 <strong>Microprocessor</strong>
7.2 AccessThe BIOS will read the system ID block during startup, so all a user needs to do is access the systemID block struct SysIDBlock in memory. If the BIOS does not find an ID block, it sets allparameters in SysIDBlock to zero.7.2.1 Reading the SystemID BlockIf the user desires to read the ID block off the flash, the following function (from IDBLOCK.LIB)should be called:_readIDBlockint _readIDBlock(int flash_bitmap)DESCRIPTION:PARAMETERAttempts to read the system ID block from the highest flash quadrant and save it in thesystem ID block structure. It performs a CRC check on the block to verify that the blockis valid. If an error occurs, SysIDBlock.tableVersion is set to zero.flash_bitmapBitmap of memory quadrants mapped to flash. Examples:0x01 = quadrant 0 only0x03 = quadrants 0 and 10x0C = quadrants 2 and 3RETURN VALUE:0: Successful-1: Error reading from flash-2:IDblockmissing-3: ID block invalid (failed CRC check)7.2.2 Writing the SystemID BlockThe WriteFlash() function does not allow writing to the ID block. If the ID block needs to berewritten, a utility to do so is available for download from the Z-World website:http://www.zworld.com/support/feature_downloads.htmlor contact <strong>Rabbit</strong> Semiconductor’s Technical Support.Designer’s Handbook 39
7.3 Determining the Existence of the SystemID BlockThe following sequence of events can be used to determine if an ID block is present:1. The top 16 bytes of the flash device are read (if a 256KB flash in stalled, 16 bytes starting ataddress 0x3FFF0 will be read) into a local buffer.2. The top six bytes of the buffer (read from 0x3FFF8-0x3FFFF) are checked for an alternatingsequence of 0x55, 0xAA, 0x55, 0xAA, 0x55, 0xAA. If this is not found, the block does notexist and an error (-2) is returned.3. The ID block size (=SIZE) is determined from the first 4 bytes of the 16-byte buffer.4. A block of bytes containing all fields from the start of the SysIDBlock struct up to but notincluding the reserved field is read from flash at address 0x40000-SIZE, essentially filling theSysIDBlock struct except for the reserved field (since the top 16 bytes have been read earlier).5. The CRC field is saved in a local variable, then set to 0x0000. A CRC check is then calculatedfor the entire ID block except the reserved field and compared to the saved value. If they do notmatch, the block is considered invalid and an error (-3) is returned. The CRC field is thenrestored.The reserved field is avoided in the CRC check since its size may vary, depending on the size of theID block.Table 4. The System ID BlockOffset fromstartofblockSize (bytes)Description00h 2 ID block version number02h 2 Product ID04h 2 Vendor ID06h 7 Timestamp (YY/MM/D/H/M/S)0Dh 4 Flash ID11h 2 Flash size (in 1000h pages)13h 2 Flash sector size (in bytes)15h 2 Numberofsectorsinflash17h 2 Flash access time (nanoseconds)19h 4 Flash ID, 2nd flash1Dh 2 Flash size (in 1000h pages), 2nd flash1Fh 2 Flash sector size, 2nd flash (in bytes)21h 2 Number of sectors in 2nd flash23h 2 Flash access time (nanoseconds), 2nd flash25h 4 RAM ID29h 2 RAM size (in 1000h pages)40 <strong>Rabbit</strong> 2000 <strong>Microprocessor</strong>
Table 4. The System ID Block (Continued)Offset fromstart of blockSize (bytes)Description2Bh 2 RAM access time (nanoseconds)2Dh 2 CPU ID2Fh 4 Crystal frequency (Hertz)33h 6 Media Access Control (MAC) address39h 24 Serial number (as a null-terminated string)51h 30 Product name (as a null-terminated string)6Fh N Reserved (variable size)SIZE - 10h 4 Size of thisID blockSIZE - 0Ch 2 SizeofuserblockSIZE - 0Ah 2 Offset of user block location from start of this blockSIZE - 08h 2 CRC value of this block (when this field = 0000h)SIZE - 06h 6 Marker, should = 55h AAh 55h AAh 55h AAhDesigner’s Handbook 41
42 <strong>Rabbit</strong> 2000 <strong>Microprocessor</strong>
8. BIOS Support for ProgramCloningThe BIOS supports copying designated portions of flash memory from one controller (the master)to another (the clone). The <strong>Rabbit</strong> 2000 Cloning Board connects to the programming port of themaster and to the programming port of the clone.J1J2RXARXAGNDGNDCLKACLKAConnectto MasterProgrammingPort+5 V/RESETTXAN/CSTATUSSMODE0RESET MASTERCLONE STATUS+5 V/RESETTXAN/CSTATUSSMODE0Connectto CloneProgrammingPortSMODE1470 WSMODE1Figure 12. Cloning Board8.1 Overview of CloningIf the cloning board is connected to the master, the signal CLKA is held low. This is detected inthe BIOS after the reset ends, invoking the cloning support of the BIOS. If cloning has beenenabled in the master’s BIOS, it will cold boot the target system by resetting it and downloading aprimary boot program. The master then sends the entire BIOS over to the clone, where the bootprogram receives it and stores it in RAM (just like Dynamic C does when compiling the BIOS). ACRC check of the BIOS is performed on both the master and clone, and the results are compared.The clone is reset again, and the BIOS on the clone begins running. Finally, the master sends theuser’s program at high speed, and the program is written to the flash memory.When the designated portion of the flash has been transferred, the clone flashes the cable LED in adistinctive pattern to indicate that the programming is done. At that point the cloning board can beunplugged and plugged into another target. When the master is reset, it will program the nextclone.Designer’s Handbook 43
8.1.1 Evolution of Cloning SupportOver several versions of Dynamic C, cloning has improved in terms of data transfer rates andoptions that may be set in the BIOS.Dynamic CVersion6.507.057.20Summary of Cloning SupportInitial cloning support added. Data transfer rates of57,600 bps or 115,200 bps available.Fast cloning introduced with restrictions. Maximumdata transfer rates determined by the crystal frequency.Only fast cloning is available. Fast cloning restrictionsremoved. More options introduced.For details on both the fast cloning restrictions and options, please see Technical Note 207 “<strong>Rabbit</strong>2000 Cloning Board.” This document may be found at:www.zworld.comorwww.rabbitsemiconductor.com.8.2 Creating a CloneBefore cloning can occur, the master controller must be readied. Once this is done, any number ofclones may be created from the same master.8.2.1 Steps to Enable and Set Up CloningThe step-by-step instructions to enable and set up cloning on the master are in Technical Note 207.In brief, the steps break down to: attaching the programming cable, running Dynamic C, makingany desired changes to the cloning macros, and then compiling the BIOS and user program to themaster.The only cloning macro that must be changed is ENABLE_CLONING, since the default conditionis cloning is disabled.8.2.2 Steps to Perform CloningOnce cloning is enabled and set up on the master controller, detach the programming cable andattach the cloning board to the master and the clone. Make sure the master end of the cloningboard is connected to the master controller (the cloning board is not reversible) and that pin 1 linesup correctly on both ends. Once this is done, reset the master by hitting Reset on the cloningboard. The cloning process will begin.44 <strong>Rabbit</strong> 2000 <strong>Microprocessor</strong>
8.2.3 LED PatternsThe following table describes the LED patterns that may occur on the Cloning Board.Table 5. LED Patterns on Cloning BoardDynamic CVersionCloning StatusCloning is active Cloning successfully completed Error occurredUp thru 7.06LED blinks severaltimes per second.LED will blink quickly in adistinctive pattern of four flashes,then pause, then four moreflashes…LED stops blinking.7.05 thru 7.10in fastcloning modeLED is off. LED is on. LED starts blinking.Starting with7.20LED toggles on andoff about once persecond.LED stays on.LED starts blinking.8.3 Cloning QuestionsThe following sections answer questions about different aspects of cloning.8.3.1 MAC AddressSome Ethernet-enabled boards do not have the EEPROM with the MAC address, namely theRCM 2100, the RCM 2200 and the BL2000. These boards can still be used as a clone because theMAC address is in the system ID block and this structure is shipped on the board and is not overwrittenby cloning unless CLONE_WHOLE_FLASH and CL_INCLUDE_ID_BLOCKS are both setto one. (Prior to Dynamic C 7.20, the option to overwrite the systemID block did not exist.)If, however, you have a custom-designed board that does not have the EEPROM or the system IDblock, you may download a program at:http://www.zworld.com/support/feature_downloads.htmlto write the system ID block (which contains the MAC address) to your board.8.3.2 Different Flash SizesSince the BIOS supports a variety of flash types, the flash EPROM on the two controllers do nothave to be identical. Cloning works between master and clone controllers that have different-sizedflash chips because the master copies its own universal flash driver to the clone. The flash driverdetermines the particulars of the flash chip that it is driving.The master controller’s BIOS must allocate a memory buffer sufficiently large to work on the target.Prior to Dynamic C version 7.02, the cloning software used root memory for this buffer, whichreduces the root memory available to the application program. The size of the buffer is given bythe macro MAX_FLASH_SECTORSIZE. This macro is defined near the top of the\LIB\BIOSLIB\FLASHWR.LIB file. The default value is 1024 (4096 in older versions). TheDesigner’s Handbook 45
user can reduce this buffer size to the maximum of the master and target’s sector sizes if root dataspace is a problem, or increase it to 4096 if needed.Starting with Dynamic C version 7.02, the cloning implementation uses xmem for the buffer, soroot data space will not be a problem; and no changes should be made to FLASHWR.LIB.8.3.3 Design RestrictionsDigital I/O line PB1 should not be used in the design if cloning is to be be used.46 <strong>Rabbit</strong> 2000 <strong>Microprocessor</strong>
9. Low-Power Design and SupportTo get the most computation for a given power level, the operating voltage should be approximately3.3 V. At a given operating voltage, the clock speed should be reduced as much as possibleto obtain the minimum power consumption that is acceptable.Some applications, such as a control loop, may require a continuous amount of computationalpower. Other applications, such as slow data logging or a portable test instrument, may spendlong periods with low computational requirements interspersed with short periods of high computationalload.The current (and thus power) consumption of a microprocessor-based system generally consists ofa part that is independent of frequency and a part that depends on frequency. The part that is independentof frequency consists of leakage or current or current drawn by special circuits such aspullup resistors or circuits that continuously draw power. Ordinary CMOS logic uses power whenit is switching from one state to another, and this is the power that is dependent on frequency. Thepower drawn while switching is used to charge capacitance or is used when both N and P FETs aresimultaneously on for a brief period during a transition.Floating inputs or inputs that are not solidly either high or low can also draw current because bothN and P FETs are turned on at the same time. To avoid excessive power consumption, floatinginputs should not be included in a design (except that some inputs may float briefly during poweronsequencing). Most unused inputs on the <strong>Rabbit</strong> can be made into outputs by proper softwareinitialization to remove the floating property. Pullup resistors will be needed on a few inputs thatcannot be programmed as outputs. An alternative to a pullup resistor is to tie an unused output tothe unused inputs. If pullup (or pulldown) resistors are required, they should be made as large aspossible if the circuit in question has a substantial part of its duty cycle with current flowingthrough the resistor.<strong>Rabbit</strong> 2000forf/2disable f/2ext pinCLKMainOscillatorClockDoublerf/8CPU32 kHzOscillatorTo watchdog timer andtime/date clockPeripheralDevicesNote: Peripherals cannot be clocked slower than the CPU.Figure 13. <strong>Rabbit</strong> Clock DistributionDesigner’s Handbook 47
For extreme low-power operation it should be taken into account that some memory chips drawsubstantial current at zero frequency. For example, a Samsung static RAM (part numberKM684000BPL-7L) was found to draw 1 mA at 5 V when chip select and output enable were heldenabled and all the other signals were held at fixed levels (a long read). When the microprocessoris operating at the slowest frequency (32 kHz clock), the memory cycle is about 64 µs and thememory chip spends most of its time with the chip enable and output enable on. The current drawduring a long read cycle is not specified in most memory data sheets. The Samsung chip, accordingthe data sheet, typically draws about 4 mA per megahertz when it is operating. However, itappears that current consumption curve flattens out at about 250 kHz because of the constant 1mA draw during a long read.In order to take full advantage of the <strong>Rabbit</strong>’s ultra slow sleepy execution modes, a memory thatdoes not consume power during a static read is required. Advanced Micro Devices has a line of 3V flash memories (AM29LV010, AM29LV040) that power down automatically whenever theaddress (and control) lines do not change for a period of time slightly longer than the access time.These memories will consume on the order of 30 µA when operated at a data rate of 1/64 MHz.Prior to version 7.10, Dynamic C did not allow debugging with flash chips having sector sizesgreater than 4096 bytes, nor did the flash drivers provided in the Dynamic C libraries support suchflash chips. To use a large sector flash in your product design if you are using a version ofDynamic C prior to 7.10, you can debug your application in RAM by using the “Compile toRAM” compiler option, or use a board with small sector flash for development only.The <strong>Rabbit</strong> low-power sleepy mode of operation is achieved by switching the main clock to the32.768 kHz clock and then disabling the main oscillator. In this mode, the <strong>Rabbit</strong> executes about 3instructions every millisecond. Adding memory wait states can further slow the processor to about500 instructions per second or one every 2 ms. At these speeds the power consumed by the microprocessor,exclusive of the 32.768 kHz oscillator, is very low, in the area of 50 µA to 100 µA. The<strong>Rabbit</strong> will generally test for some external event and leave sleepy mode when that event isdetected. The 32.768 kHz oscillator is a major consumer of power, requiring approximately 80 µAat 3.3 V. This drops dramatically to about 18 µA at 2.2 V. For the lowest standby power it may bedesirable to use an external oscillator to generate the 32.768 kHz clock. The Intersil (formerlyHarris) part HA7210 can be used to construct a 32.768 kHz oscillator that consumes approximately5 µA at 3.3 V.For the very lowest power consumption the processor can execute a long string of mul instructionswith the de and bc registers set to zero. Few if any internal registers change during the executionof a string of mul zero by zero, and a memory cycle takes place only once in every 12clocks. By combining all these techniques it may be possible to get the sleepy current under 50µA.48 <strong>Rabbit</strong> 2000 <strong>Microprocessor</strong>
9.1 Software Support for Low-Power Sleepy ModesIn sleepy mode the microprocessor executes instructions too slowly to support most interrupts.The serial ports can function but cannot generate standard baud rates since the system clock is at32.768 kHz. The 48-bit battery backable clock continues to operate without interruption.Usually the programmer will want to reduce power consumption to a minimum, either for a fixedtime period or until some external event takes place. On entering sleepy mode by calling use32kHzOsc(), the periodic interrupt is completely disabled, the system clock is switched to32.768 kHz, and the main oscillator is powered down. On exiting sleepy mode by calling useMainOsc(), the main oscillator is powered up, a time delay is inserted to be sure that it hasresumed regular oscillation, and then the system clock is switched back to the main oscillator. Atthis point the periodic interrupt is reenabled. Data will probably be lost if interrupt-driven communicationis attempted while in sleepy mode.While in sleepy mode the user has available a routine, updateTimers(), that can be calledperiodically to keep Dynamic C time variables updated. These time variables keep track of secondsand milliseconds and are normally used by Dynamic C routines to measure time intervals orto wait for a certain time or date. This routine reads the real-time clock and then computes newvalues for the Dynamic C time variables. The normal method of updating these variables is theperiodic interrupt that takes place 2048 times per second.9.2 Baud Rates in Sleepy ModeThe available baud rates in sleepy mode are 1024, 1024/2, 1024/3, 1024/4, etc. (The baud rate113.77 is available as 1024/9 and may be useful for communicating with other systems operatingat 110 bps - a 3.4% mismatch. In addition the standard PC compatible UART 16450 with a baudrate divider of 113 generates a baud rate of 1019 bps, a 0.5% mismatch with 1024 bps. Baud ratemismatches of up to 5% may be tolerated.) If there is a large baud rate mismatch, the serial portcan usually detect that a character has been sent to it, but can not read the exact character.Designer’s Handbook 49
50 <strong>Rabbit</strong> 2000 <strong>Microprocessor</strong>
10. Memory PlanningThe following requirements should be considered when planning memory configuration for a <strong>Rabbit</strong>system.• The size of the code anticipated. Usually code size up to 512K is handled by one flash memorychip. Static data tables can be conveniently placed in the same space using the xdata andxstring declarations supported by Dynamic C, so the amount of space needed for static datacan be added to the amount of space needed for code. If you are writing a program from scratch,remember that 512K of code is equivalent to 25,000 to 50,000 C statements, and such a largeprogram can take years to write.• C programs vary in how much RAM will be required. Many programs can subsist on 32K ofRAM. Having more RAM on the system is convenient for debugging since debugging and programtesting generally operates more powerfully and faster when sufficient RAM is available tohold the program and data. For this reason, most Z-World controllers based on the <strong>Rabbit</strong> use adual footprint for RAM that can accommodate either a 32K x 8, which is in a 28-pin package, ora 128K x 8 or 512K x 8, which is in a 32-pin package. The base RAM is interfaced to /CS1 and/WE1, and /OE1.RAM is required for the following items:Root variables—maximum of 48K.Stack pages—rarely more than 20K.RAM for debugging convenience on prototype units—512K is usually enough toaccommodate programs.RAM for extended memory—such as data logging applications or communicationsapplications. The amount needed depends on application.10.1 Making a RAM-only board.Some <strong>Rabbit</strong> customers are designing boards that have only a single RAM chip and no flash memory.Although this is not generally recommended, it may be safe to use only a RAM chip as longas the board has a continuous power supply and is set up to be field-programmable via the <strong>Rabbit</strong>bootstrap mode.For example, a <strong>Rabbit</strong> board in a noncritical system such as a lawn sprinkler system may be monitoredfrom a remote location via the Internet or Ethernet, where the remote monitor has the abilityto reload the application program to the board. One way to achieve field programmability is withthe <strong>Rabbit</strong>Link Network Gateway.There are certain hardware and software changes that are required to make this work which arediscussed here. Dynamic C starting with version 6.57 has the software files discussed here whichare necessary to make a RAM only board work.Designer’s Handbook 51
10.1.1 Hardware ChangesOrdinarily, CS0/OE0/WE0 of the <strong>Rabbit</strong> processor are connected to a flash chip, andCS1/OE1/WE1 are connected to RAM. However, if only RAM is to be used, CS0/OE0/WE0 mustbe connected the RAM. This is because on power up or reset, the <strong>Rabbit</strong> will begin fetchinginstructions from whatever is hooked up to CS0/OE0/WE0.10.1.2 Software ChangesIn order to program a RAM only board from Dynamic C or the <strong>Rabbit</strong> Field Utility (RFU), severalchanges are needed. When Dynamic C or the RFU first start, they put the <strong>Rabbit</strong> based targetboard in bootstrap mode where it awaits data sent via “triplets.” These programs then send tripletsthat map the lowest quadrant of physical memory to CS1/OE1/WE1 in order to load a primaryloader to RAM. The first set of triplets loaded to the target is contained in a file called coldload.bin.A different coldload.bin is required in order to map the lowest memory quadrant toCS0/OE0/WE0. The image file for this program is \BIOS\RAMONLYCOLDLOAD.BIN.Touseit,rename BIOS\COLDLOAD.BIN to BIOS\COLDLOAD.BAK, and rename \BIOS\RAMONLY-COLDLOAD.BIN to \BIOS\COLDLOAD.BIN. (Later versions of Dynamic C may have a GUImethod of choosing the cold loader.)The primary loader loads a secondary loader, which doesn’t affect the memory mapping. The secondaryloader loads the <strong>Rabbit</strong> BIOS to RAM (from the application program image file in the caseof the RFU, by compiling the BIOS straight to the target in the case of Dynamic C.) One of thefirst things the BIOS does in program mode is copy itself to flash, and then transfer execution tothe flash copy. When the board powers up later without the programming cable attached, it willstart running the BIOS in flash.The special BIOS file \BIOS\RAMONLYBIOS.C eliminates the self copy step and initializes theMIU/MMU correctly to match the hardware configuration. This BIOS can be selected as the userdefinedBIOS by using the Options | Compiler dialog box.52 <strong>Rabbit</strong> 2000 <strong>Microprocessor</strong>
11. Flash MemoriesThe flash memories listed in the table below have been qualified for use with the <strong>Rabbit</strong> 2000microprocessor. Starting with Dynamic C version 7.20 large sector flash devices (sectors greaterthan 4096 bytes) are supported. To incorporate a large-sectored flash into an end product, the beststrategy is have a small-sectored development board.IMPORTANT: The rapidly changing market for flash devices may affect availability. The inclusionof a flash device in the following table does not speak to its availability.Table 6. 32-Pin Flash Memories Supported by the <strong>Rabbit</strong> 2000, Small SectorVendorDeviceNameDeviceSize(bytes)SectorSize(bytes)NumberofSectorsWriteModeBestAccessTime(ns)OperatingVoltage(V)PackageTypes aDynamicC VersionAtmel AT29C1024 64K 128 512 sector 70 4.5–5.5 5, 6 7.02 bAtmel AT29LV1024 64K 128 512 sector 150 3.0–3.6 5, 6 7.02 bAtmel AT29C010 128K 128 1024 sector 70 4.5–5.5 1, 2, 4 AllAtmel AT29LV010 128K 128 1024 sector 150 3.0–3.6 2, 4 AllAtmel AT29BV010 128K 128 1024 sector 200 2.7–3.6 2, 4 7.02 bAtmel AT29C020 256K 256 1024 sector 70 4.5–5.5 1, 2, 4 6.50Atmel AT29LV020 256K 256 1024 sector 200 3.0–3.6 2, 4 6.50Atmel AT29BV020 256K 256 1024 sector 250 2.7-3.6 2, 4 7.02 bAtmel AT29C040 512K 256 2048 sector 120 4.5–5.5 1, 4 6.57 bAtmel AT29LV040 512K 256 2048 sector 200 3.0–3.6 4 6.57 bAtmel AT29BV040 512K 256 2048 sector 200 2.7–3.6 4 6.57 bMosel/Vitelic V29C51001 128K 512 256 byte 45 4.5–5.5 1, 2, 4 6.50Mosel/Vitelic V29LC51001 128K 512 256 byte 90 4.5–5.5 1, 2 7.02 bMosel/Vitelic V29C51002 256K 512 512 byte 55 4.5–5.5 1, 2, 4 6.50Mosel/Vitelic V29LC51002 256K 512 512 byte 90 4.5–5.5 1, 2 7.02 bMosel/Vitelic V29C51004 512K 1024 512 byte 70 4.5–5.5 2, 4 6.57 bMosel/Vitelic V29C31004 512K 1024 512 byte 90 3.0–3.6 2, 4 7.02 bSST SST29EE512 64K 128 512 sector 70 4.5–5.5 1, 2, 3, 4 6.50 cSST SST29LE512 64K 128 512 sector 150 3.0–3.6 1, 2, 3, 4 6.50 cSST SST29VE512 64K 128 512 sector 150 2.7–3.6 1, 2, 3, 4 7.20SST SST29EE010 128K 128 1024 sector 90 4.5–5.5 1, 2, 3, 4 AllDesigner’s Handbook 53
VendorTable 6. 32-Pin Flash Memories Supported by the <strong>Rabbit</strong> 2000, Small SectorDeviceNameDeviceSize(bytes)SectorSize(bytes)NumberofSectorsWriteModeBestAccessTime(ns)OperatingVoltage(V)PackageTypes aDynamicC VersionSST SST29LE010 128K 128 1024 sector 150 3.0–3.6 1, 2, 3, 4 AllSST SST29VE010 128K 128 1024 sector 150 2.7–3.6 1, 2, 3, 4 7.20 bSST SST29EE020 256K 128 2048 sector 120 4.5–5.5 1, 2, 3, 4 7.02 bSST SST29LE020 256K 128 2048 sector 200 3.0–3.6 1, 2, 3, 4 7.02 bSST SST29VE020 256K 128 2048 sector 200 2.7–3.6 1, 2, 3, 4 7.20 bSST SST29SF512 64K 128 512 byte 55 4.5–5.5 1, 2, 3 7.20 bSST SST29VF512 64K 128 512 byte 55 2.7–3.6 1, 2, 3 7.20 bSST SST29SF010 128K 128 1024 byte 55 4.5–5.5 1, 2, 3 7.20 bSST SST29VF010 128K 128 1024 byte 55 2.7–3.6 1, 2, 3 7.20 bSST SST29SF020 256K 128 2048 byte 55 4.5–5.5 1, 2, 3 7.20 bSST SST29VF020 256K 128 2048 byte 55 2.7–3.6 1, 2, 3 7.20 bSST SST29SF040 512K 128 4096 byte 55 4.5–5.5 1, 2, 3 7.20 bSST SST29VF040 512K 128 4096 byte 55 2.7–3.6 1, 2, 3 7.20 bSST SST39SF512 64K 4096 16 byte 45 4.5–5.5 1, 2, 3 7.20 bSST SST39LF512 64K 4096 16 byte 45 3.0–3.6 1, 2, 3 7.20 bSST SST39VF512 64K 4096 16 byte 70 2.7–3.6 1, 2, 3 7.20 bSST SST39SF010 128K 4096 32 byte 45 4.5–5.5 1, 2, 3 7.02 bSST SST39LF010 128K 4096 32 byte 45 3.0–3.6 1, 2, 3 7.20 bSST SST39VF010 128K 4096 32 byte 70 2.7–3.6 1, 2, 3 7.20 bSST SST39SF020 256K 4096 64 byte 45 4.5–5.5 1, 2, 3 6.50SST SST39LF020 256K 4096 64 byte 45 3.0–3.6 1, 2, 3 7.20 bSST SST39VF020 256K 4096 64 byte 70 2.7–3.6 1, 2, 3 7.20 bSST SST39SF040 512K 4096 128 byte 45 4.5–5.5 1, 2, 3 7.02 bSST SST39LF040 512K 4096 128 byte 45 3.0–3.6 1, 2, 3 7.20 bSST SST39VF040 512K 4096 128 byte 70 2.7–3.6 1, 2, 3 7.20 bWinbond W29CEE011 128K 128 1024 sector 90 4.5–5.5 1, 2, 4 7.02 bWinbond W29C020CT 256K 128 2048 sector 70 4.5–5.5 1, 2, 4 All cWinbond W29C040 512K 256 2048 sector 90 4.5–5.5 2, 4 7.02 b54 <strong>Rabbit</strong> 2000 <strong>Microprocessor</strong>
Table 7. 32-Pin Flash Memories Supported by the <strong>Rabbit</strong> 2000, Large SectorVendorDeviceNameDeviceSize(bytes)SectorSize(bytes)NumberofSectorsWriteModeBestAccessTime(ns)OperatingVoltage(V)PackageTypes aDynamicC VersionAMD AM29LV001 128K varies 10 byte 45 4.5–5.5 2, 4 7.20 bAMD AM20LV001T 128K varies 5 byte 45 4.5–5.5 2, 4 7.20Atmel AT49F002 256K varies 5 byte 55 4.5–5.5 1, 2, 3, 4 7.20 bAtmel AT49F002T 256K varies 5 byte 55 4.5–5.5 1, 2, 3, 4 7.20 bFujitsu MBM29F002T 256K varies 7 byte 55 4.5–5.5 2, 4 7.20 bFujitsu MBM29F002B 256K varies 7 byte 55 4.5–5.5 2, 4 7.20 bHyundai HY29F002T 256K varies 7 byte 45 4.5–5.5 1, 2, 4 7.20Hyundai HY29F002B 256K varies 7 byte 45 4.5–5.5 1, 2, 4 7.20 ba. Package Types:1. 32-pin PDIP 2. 32-pin PLCC3. 32-pin TSOP (8 mm × 14 mm) 4. 32-pin TSOP (8 mm × 20 mm)5. 44-pin PLCC 6. 48-pin TSOP (8 mm × 14 mm)b. These flash devices are supported as of the Dynamic C version listed, but have not all been tested withthose versions. 512KB flash in particular may not work with versions prior to 7.04, but a software patchis available from Z-World tech support for 512KB flash support under versions 6.57 and 7.03.c. Dynamic C Versions 6.04-6.1x:The FLASH_SIZE parameter in the JRABBIOS.C file needs to be changed to reflect the correctnumber of 4K pages for the selected device. By default, the FLASH_SIZE parameter contains a 0x20that corresponds to a 128K x 8 device with thirty-two 4K pages of flash. Dynamic C versions 6.5x andgreater determine the flash size automatically and no code change is required.Designer’s Handbook 55
11.1 Supporting Other Flash DevicesIf a user wishes to use a flash memory not listed in the above tables, but still uses the same standardJEDEC write sequences as one of the supported flash devices, the existing Dynamic C flashlibraries may be able to support it simply by modifying a few values in the BIOS. Specifically,three modifications need to be made:1. The flash device needs to be added to the list of known flash types. This table can be found bysearching for the label FlashData in the file LIB\BIOSLIB\FLASHWR.LIB.Theformatis described in the file and consists of the flash ID code, the sector size in bytes, the total numberof sectors, and whether the flash is written one byte at a time or one entire sector at a time.2. NearthetopofthemainBIOSfile(BIOS\RABBITBIOS.C for most users), in the line#define FLASH_SIZE _FLASH_SIZE_ change _FLASH_SIZE_ to a fixed value foryour flash (the total size of the flash in 4096-byte pages).3. If a version of Dynamic C prior to 7.02 is being used, the macro _SECTOR_SIZE_ near thetop of LIB\BIOSLIB\FLASHWR.LIB needs to be hard-coded in a manner similar to step 2above. In the line#define MAX_FLASH_SECTORSIZE _SECTOR_SIZE__SECTOR_SIZE_ should be replaced with the sector size of your flash in bytes.Note that prior to Dynamic C 7.20, the BIOS only supported flash devices with equally-sized sectorsof either 128, 256, 512, 1024, or 4096 bytes (i.e. small sector flash) If you are using an olderversion of Dynamic C (prior to version 7.20) and your flash device does not fall into that category,it may be possible to support it by rewriting the BIOS flash functions; see Section 11.2 for moreinformation.Starting with Dynamic C 7.20, large sector flash devices are supported by the BIOS. Typicallylarge sector flash devices have a variety of sector sizes on a single chip.11.2 Writing Your Own Flash DriverIf a user wishes to install a flash memory that cannot be supported by following the steps in theabove section (for example, if it uses a completely different unlock/write sequence), two functionsneed to be rewritten for the new flash. This section explains the requirements of these two functions:_InitFlashDriver and _WriteFlash. Theywillneedtoreplacedinthelibrarythatimplements the Z-World flash driver, FLASHWR.LIB.Below is the C struct used by the flash driver to hold the required information about the flashmemory installed. The _InitFlashDriver function is called early in the BIOS to fill thisstruct before any accesses to the flash.struct {char flashXPC;int sectorSize;int numSectors;char writeMode;void *eraseChipPtr;void *writePtr;} _FlashInfo;// XPCrequiredtoaccessflashviaXMEM// byte size of one flash memory sector// number of sectors on flash// write method used by the flash// pointer to erase chip function in RAM// (eraseChipPtr is currently unused)// ptr to write flash sector function (RAM)56 <strong>Rabbit</strong> 2000 <strong>Microprocessor</strong>
The field flashXPC contains the XPC required to access the first flash physical memory locationvia XMEM address E000h. The pointer writePtr should point to a function in RAM to avoidaccessing the flash memory while working with it. You will probably be required to copy the functionfrom flash to a RAM buffer in the flash initialization sequence.The field writeMode specifies the method that a particular flash device uses to write data. Currently,only two common modes are defined: “sector-writing” mode, as used by the SST SST29and Atmel AT29 series (writeMode=1); and “byte-writing” mode, as used by the Mosel/VitelicV29 series (writeMode=2). All other values of writeMode are currently undefined, althoughthey may be defined by Z-World as new flash devices are used._InitFlashDriverThis function is called from the BIOS. A bitmap of quadrants mapped to flash (0x01, 0x02, 0x04,0x08 correspond to the 1st-4th quadrants, 0x0C = the topmost two quadrants) is passed to it in HL.This function needs to perform the following actions:1. Load _FlashInfo.flashXPC with the proper XPC value to access flash memory address00000h via XMEM address E000h. The quadrant number for the start of flash memory ispassed to the function in HL and can be used to determine the XPC value, if desired. For example,if your flash is located in the third memory quadrant, the physical address of the first flashmemory location is 80000h. 80000h - E000h = 72000h, so the value placed into_FlashInfo.XPC should be 72h.2. Load _FlashInfo.sectorSize with the flash sector size in bytes.3. Load _FlashInfo.numSectors with the number of sectors on the flash.4. _FlashInfo.writePtr should be loaded with the memory location in RAM of the functionthat will perform that action. The function will need to be copied from flash to RAM at thistime as well.5. This function should return zero if successful, or -1 if an error occurs._WriteFlashThis function writes exactly one sector of data from a buffer in RAM to the flash memory, alignedalong a flash sector boundary. _WriteFlash is called from the BIOS (the user will normally callhigher-level flash writing functions) as well as several libraries, and should be written to conformto the following requirements:• For versions of Dynamic C prior to 7.02, it should assume that the source data is located at thelogical RAM address passed in BC. In all later versions of Dynamic C, a fixed 4096-byte blockof XMEM is used for the flash buffer, which can be accessed via macros located at the top ofFLASHWR.LIB. These macros include FLASH_BUF_PHYS, the unsigned long physicaladdress of the buffer; FLASH_BUF_XPC and FLASH_BUF_ADDR, the logical address of thebuffer via the XMEM window; and FLASH_BUF_0015 and FLASH_BUF_1619, the physicaladdress of the buffer broken down to be used with the LDP opcodes.• It should assume that the flash address to be written to is passed as an XMEM address in A:DE.The destination must be aligned with a flash memory sector boundary.• It should check to see whether the sector being written contains the ID or user blocks. If so, itshould exit with an error code (see below). Otherwise, it should perform the actual write operationrequired by the particular flash used.Designer’s Handbook 57
• Interrupts should be turned off (set the interrupt level to 3) whenever writes are occurring to theflash. Interrupts should not be turned back on until the write is complete -- an interrupt mayattempt to access a function in flash while the write is occurring and fail.• It should not return until the write operation is finished on the chip.• It should return a zero in HL if the operation was successful, a -3 if a timeout occurred duringthe wait, or a -4 if an attempt was made to write over the ID block.58 <strong>Rabbit</strong> 2000 <strong>Microprocessor</strong>
12. Troubleshooting Tips for New<strong>Rabbit</strong>-Based SystemsWhen a user designs a new microprocessor system around the <strong>Rabbit</strong> and carefully follows the<strong>Rabbit</strong> design conventions, it is possible that the system will not boot up when Dynamic C is connectedto the programming connector. This can happen because of a design error or even becauseof a random hardware defect in the new system. A hardware procedure is available to make it easierto debug systematically in such a situation.A series of steps may be performed in order to diagnosis a problem that keeps Dynamic C frombooting.12.1 Initial ChecksPerform the following checks with the /RESET (pin 37) line tied to ground.• With a voltmeter check for the +5 V or other operating voltage on pins 3,28,53,78,92 and 42.Check for ground on pins 2, 27, 39, 52, 77 and 89.• With an oscilloscope check the 32.768 kHz oscillator on XTALA2 (pin 41). Make sure that it isoscillating and that the frequency is correct.• With an oscilloscope check the main system oscillator by observing the signal CLK (pin 1).With the reset held high this signal should have a frequency one eighth of the main crystal oroscillator frequency.12.2 Diagnostic Test #2This test goes through a series of steps repeatedly. The steps are:1. Apply the reset for approximately 1/4 second and then release the reset.2. In cold boot send the following sequence of triplet characters to serial port A via the programmingconnector.80 0E 20 // sets status pin low80 0E 30 // sets status pin high80 0E 20 // sets status pin low again3. Wait for approximately 1/4 second and then repeat starting at step #1.While the test is running, an oscilloscope can be used to observe the results. The scope can be triggeredby the reset line going high. It should be possible to observe the data characters being transmittedon the RXA pin of the processor or the programming connector. The status pin can also beobserved at the processor or programming connector. Each byte transmitted has 8 data bits precededby a start bit which is low and followed by a stop bit which is high (viewed at the processoror programming connector). The data bits are high for 1 and low for 0.Designer’s Handbook 59
The cold boot mode and the triplets sent are described in Section 4.1 on page 20. Each triplet consistsof a 2-byte address and a 1-byte data value. The data value is stored in the address specified.The uppermost bit of the 16-bit address is set to one to specify an internal I/O write. The remaining15 bits specify the address. If the write is to memory then the uppermost bit must be zero andthe write must be to the first 32k of the memory space. The user should see the 9 bytes transmittedat 2400 bps or 416 µs per bit. The status bit will initially toggle fairly rapidly during the transmissionof the first triplet because the default setting of the status bit is to go low on the first byte ofan opcode fetch. While the triplets are being read instructions are being executed from the smallcold boot program within the microprocessor. The status line will go low after the first triplet hasbeen read. It will go high after the second triplet is finished. It will return to low again after the 3rdtriplet is transmitted. and stay that way until the sequence starts again.If this test fails to function it may be that the programming connector is connected improperly orthe proper pull-up resistors are not installed on the SMODE lines. Other possibilities are that oneof the oscillators is not working or is operating at the wrong frequency. The reset could be failing.12.3 Diagnostic Test #3This test checks the functioning of the RAM connected to /CS1/OE1/WE1. The test applies thereset, then sends a series of triplets to set up the necessary control registers. Then it writes severalinstructions to RAM. Finally it begins executing instructions in RAM. These instructions disablethe watchdog timer.80 14 05 //set MB0CR to 1 to select RAM80 09 51 //ready watchdog for disable80 09 54 //disable watchdog timer//sequence of triplets to write program below to memory// starting at address zero.00 01 2100 02 0100 03 0000 04 0600 05 1000 06 7e00 07 2900 08 1000 09 FC00 0A C300 0B 0060 <strong>Rabbit</strong> 2000 <strong>Microprocessor</strong>
80 24 80 //terminate bootstrap, start at address zero;test programld hl,1ld b,16loop:ld a,(hl)add hl,hl ; shift leftdjnz loop ; 16 stepsjp 0 ; continue testIf this test runs it will toggle the first 16 address lines. In addition, all of the data lines must befunctioning or the program would not execute correctly.Designer’s Handbook 61
62 <strong>Rabbit</strong> 2000 <strong>Microprocessor</strong>
Appendix A. Supported <strong>Rabbit</strong> 2000Baud RatesThis table contains divisors to put into TATxR registers. All frequencies that allow 57600 baud upto 30MHz are shown (as well as a few higher frequencies):CrystalFreq. (MHz)Example Boards2400baud9600baud19200baud57600baud115200baud1.8432 23 5 2 0 -3.6864 BL1800 divided by 8 47 11 5 1 05.5296 71 17 8 2 -7.3728 BL1810, not doubled 95 23 11 3 19.2160 RCM2020, not doubled 119 29 14 4 -11.0592 RCM2100, not doubled 143 35 17 5 212.9024 RCM2000. not doubled 167 41 20 6 -14.7456 BL1820, doubled 191 47 23 7 316.5888 215 53 26 8 -18.4320 TCP/IP Dev. Kit 239 59 29 9 420.2752 * 65 32 10 -22.1184 RCM2100, doubled * 71 35 11 523.9616 * 77 38 12 -25.8048 RCM2010, doubled * 83 41 13 627.6480 * 89 44 14 -29.4912 BL1800 (can’t double) * 95 47 15 736.8640 * 119 59 19 944.2368 * 143 71 23 11Designer’s Handbook 63
This information is calculated with the following equation:divisor = (crystal frequency in Hz) / (32 * baud rate) - 1If the divisor is not an integer value, that baud rate is not available for that frequency (identified bya “-” in the table).If the divisor is above 255, that baud rate is not available without further BIOS modification (identifiedby a “*” in the table). To allow that baud rate, you need to clock the serial port desired viatimer A (by default they run off the CPU clock / 2), then scale down timer A to make the serialport divisor fall below 256.64 <strong>Rabbit</strong> 2000 <strong>Microprocessor</strong>
Appendix B.Wait State BugB.1 Overview of the BugA bug associated with the use of memory wait states was discovered in the <strong>Rabbit</strong> 2000 processorapproximately 13 months after the product was introduced. This bug was not discovered previouslybecause the use of wait states in situations that evoke the problem is unusual. A number ofmodifications to Dynamic C starting with version 7.05 have been made to make it easy, or in somecases automatic, to avoid problems created by the bug. The bug manifests when memory waitstates are used during certain instruction fetches or during certain read operations. The data readinstructions are the simpler case and we will describe them first.Wait states for I/O devices work normally and are not associated with this problem.B.2 Wait States In Data MemoryThe two instructions LDDR and LDIR are repeating instructions that move a block of data in memory.If wait states are enabled, then one wait state less than specified is used on every data readexcept the first one in the block. This can be corrected in either of two ways.An additional wait state can be specified, which will cause there to still be sufficient wait stateswhen one is lost, or a directive can be issued to the Dynamic C compiler to automatically substitutedifferent instructions for LDDR or LDIR which accomplish the same operation.The directive is:#pragma DATAWAITSUSED on#pragma DATAWAITSUSED offThis will cause Dynamic C to substitute code as follows:ldirbecomescall ldir_funcandlddrbecomescall lddr_funcThis change causes the block move to proceed at 11 clock cycles per byte (on average) rather than7 clock cycles per byte.For small memory blocks (
B.3 WaitStatesinCodeMemoryThere are two manifestations of the wait state bug in code memory. If wait states are enabled, thereare certain instructions that will execute incorrectly and there are certain other instructions whoseuse will reduce the length of the output enable signal.B.3.1 Instructions Affected by the Wait State BugIf wait states in code memory are enabled, the 20 instructions in the table below execute incorrectlyand should not be used:Table 1. <strong>Rabbit</strong> 2000 Instructionsset b, (ix+d)res b, (ix+d)bit b, (ix+d)rl (ix+d)rlc(ix+drr (ix+d)rrc (ix+d)sla (ix+d)sra (ix+d)srl (ix+d)set b, (iy+d)res b, (iy+d)bit b, (iy+d)rl (iy+d)rlc(iy+d)rr (iy+d)rrc (iy+d)sla (iy+d)sra (iy+d)srl (iy+d)These instructions work correctly if there are zero wait states. If wait states are desired, equivalentinstructions work without any problem. For example:SRA (IX+8) ; 13 clockscan be replaced by:LD B,(IX+8) ; 9 clocksSRA B ; 4 clocksLD(IX+8),B ; 10 clocksAny of the registers A, H, L, D, E, B, C can be used to hold the intermediate value, so you shouldbe able to find a free register.For:BIT 3,(IX+4) ; 10 clocksuse:LD B,(IX+4) ; 9 clocksBIT 3,B ; 4 clocks66 <strong>Rabbit</strong> 2000 <strong>Microprocessor</strong>
If the atomic nature of the operation is important then the operation can be shifted to the hl indexregister. For example:SET 3,(IX+4)Use instead:PUSH HLPUSH DELD HL,IXLD DE,4ADD HL,DESET 3,(HL)POP DEPOP HLB.3.1.1 Dynamic C version 7.05Starting with version 7.05, Dynamic C does not generate any of the instructions in Table 1, andthey are not used in the library routines. If any of these instructions are used in an application program,a warning will be generated by the compiler.B.3.1.2 Prior versions of Dynamic CIn versions of Dynamic C prior to 7.05, the library, SLICE.LIB, contains one of these instructions:bit b,(iy+d). Do not use wait states with slice statements in these earlier versions ofDynamic C. If any of the instructions in the table above are used in an application program, nowarning is generated and you are on your own.B.3.2 Output Enable Signal and Conditional JumpsIf wait states are enabled for code memory, the memory output enable signal is shortened by oneclock cycle for the first byte read after any conditional jump instruction that does not jump. This isnot the same as losing a wait state, and in some cases the shortened output enable signal will notcause a problem. The conditional jump instructions are:jp cc, mnjr cc, ecc (condition code) is one of the following:NZ, Zero flag not set;Z,Zeroflagset;NC, Carry flag not set;C, Carry flag set;LZ, Logical/Overflow flag is not set;LO, Logical/Overflow flag is set;P, Sign flag not set;M, Sign flag setcc (condition code) is one of the following:NZ, Zero flag not set;Z,Zeroflagset;NC, Carry flag not set;C, Carry flag set;djnz eDesigner’s Handbook 67
B.3.2.1 Workaround for Wait State Bug with Conditional JumpsOne way to compensate for the shortened output enable signal is to add one more wait state thanwould otherwise be needed. An example of the memory access with the shortened output enablesignal is shown in the figure below.chip selectaddressoutput enablelost part of output enablesignalWait State Bug Memory Read, 1 Wait StateB.3.3 Output Enable Signal and Mul InstructionIf wait states are enabled for code memory, the length of the output enable signal is reduced to asingle clock cycle for the first instruction byte fetch after a multiply (mul) instruction. This is thelength the output enable signal would be if there were zero wait states. The read of this byte isalways a long read cycle (the same as 10 wait states) since it is shared with the execution ofmul.This effectively precludes the use of mul with wait states unless the following condition ismet: the length of time from the start of the output enable signal to when the data becomes readyto sample is less than 1 clock cycle - 9 nanoseconds.If the clock doubler is used alternate clocks may have slightly different lengths and a slightlystricter standard may need to be applied.B.3.4 Alternatives to Wait States in Code MemoryIf the code memory is slow and requires wait states at a certain clock speed, the simplest alternativeis to lower the clock speed so that no wait states will be required. Lowering the clock speed to2/3 of its previous value has the same effect as adding one wait state. Lowering the clock speed to1/2 is the same as 2 wait states. Lowering the clock speed to 1/3 is the same as 4 wait states.Theclock speed can be cut in half by turning of the clock doubler. The clock speed can be divided by 8by enabling the clock divider.Another way to avoid wait states is to run normally with the clock doubler enabled, and when youneed to execute code from the slower memory turn off the clock doubler. This doubles the lengthof the memory cycle, which is equivalent to adding 2 wait states.68 <strong>Rabbit</strong> 2000 <strong>Microprocessor</strong>
B.4 Enabling Wait StatesMemory wait states can be specified independently for each of 4 different addressing zones in thememory space. The 4 memory bank control registers (MBxCR) control the wait states inserted formemory accesses in each zone. The number of wait states can be programmed as 0, 1, 2 or 4. Theprinciple reasons for enabling memory wait states are:1. During startup of the <strong>Rabbit</strong> 2000, wait states are automatically set to 4 wait states. Unless ithas been modified, the BIOS promptly sets the processor to zero wait states.2. Enabling wait states can be used as a strategy for reducing power consumption. This can still bedone if the restrictions and work-arounds detailed in this chapter are adhered to. For example,you don’t use the 20 instructions that execute incorrectly.3. A slow flash memory used for data storage may be interfaced to the processor as a memorydevice and it may require wait states. This will still work as long as only data accesses are madeto the memory. If instructions are to be executed from the memory, then the restrictions andwork-arounds detailed in this chapter must be adhered to.B.5 SummaryIn a typical design implementation, wait states are not used for access to the main instructionmemory. Normally the processor clock speed is selected so that with zero wait states the processormemory cycle is matched with the instruction memory access time. Hence, the wait state bug willnot be encountered by most users.If the memory used is fast enough to run at zero wait states and the 20 failing instructions are notused, then inserting wait states will not cause problems. Thus, when the <strong>Rabbit</strong> starts up after areset and maximum wait states are enabled there will not be a problem. Nor will there be a problemif wait states are inserted to conserve power. Controller boards produced by Z-World or <strong>Rabbit</strong>Semiconductor will not experience the wait state bug unless the default setup in the BIOS isoverridden.Z-World flash write routines may move code into RAM memory and execute it there in order toperform a write on the flash code memory. These routines automatically avoid any wait state bugproblems.Wait states in memory used for data are not a problem because of the compiler directive that canbe used to avoid the bug. There is no reason to avoid wait states for data memory.Designer’s Handbook 69
70 <strong>Rabbit</strong> 2000 <strong>Microprocessor</strong>
Legal Notice<strong>Rabbit</strong> Semiconductor products are not authorized for use as critical components in lifesupportdevices or systems unless a specific written agreement regarding such intendeduse is entered into between the customer and <strong>Rabbit</strong> Semiconductor prior to use. Life-supportdevices or systems are devices or systems intended for surgical implantation into thebody or to sustain life, and whose failure to perform, when properly used in accordancewith instructions for use provided in the labeling and user’s manual, can be reasonably expectedto result in significant injury.No complex software or hardware system is perfect. Bugs are always present in a systemof any size. In order to prevent danger to life or property, it is the responsibility of the systemdesigner to incorporate redundant protective mechanisms appropriate to the risk involved.Designer’s Handbook 71