Installation and Maintenance Instructions for NCA Louvers
Installation and Maintenance Instructions for NCA Louvers
Installation and Maintenance Instructions for NCA Louvers

Create successful ePaper yourself
Turn your PDF publications into a flip-book with our unique Google optimized e-Paper software.
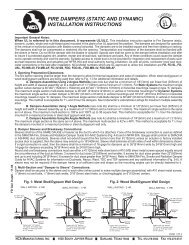
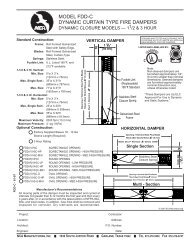
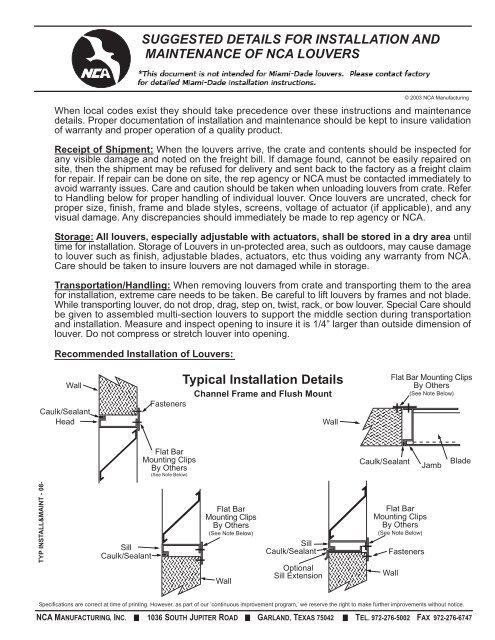
SUGGESTED DETAILS FOR INSTALLATION ANDMAINTENANCE OF <strong>NCA</strong> LOUVERSWhen local codes exist they should take precedence over these instructions <strong>and</strong> maintenancedetails. Proper documentation of installation <strong>and</strong> maintenance should be kept to insure validationof warranty <strong>and</strong> proper operation of a quality product.Receipt of Shipment: When the louvers arrive, the crate <strong>and</strong> contents should be inspected <strong>for</strong>any visible damage <strong>and</strong> noted on the freight bill. If damage found, cannot be easily repaired onsite, then the shipment may be refused <strong>for</strong> delivery <strong>and</strong> sent back to the factory as a freight claim<strong>for</strong> repair. If repair can be done on site, the rep agency or <strong>NCA</strong> must be contacted immediately toavoid warranty issues. Care <strong>and</strong> caution should be taken when unloading louvers from crate. Referto H<strong>and</strong>ling below <strong>for</strong> proper h<strong>and</strong>ling of individual louver. Once louvers are uncrated, check <strong>for</strong>proper size, finish, frame <strong>and</strong> blade styles, screens, voltage of actuator (if applicable), <strong>and</strong> anyvisual damage. Any discrepancies should immediately be made to rep agency or <strong>NCA</strong>.Storage: All louvers, especially adjustable with actuators, shall be stored in a dry area untiltime <strong>for</strong> installation. Storage of <strong>Louvers</strong> in un-protected area, such as outdoors, may cause damageto louver such as finish, adjustable blades, actuators, etc thus voiding any warranty from <strong>NCA</strong>.Care should be taken to insure louvers are not damaged while in storage.Transportation/H<strong>and</strong>ling: When removing louvers from crate <strong>and</strong> transporting them to the area<strong>for</strong> installation, extreme care needs to be taken. Be careful to lift louvers by frames <strong>and</strong> not blade.While transporting louver, do not drop, drag, step on, twist, rack, or bow louver. Special Care shouldbe given to assembled multi-section louvers to support the middle section during transportation<strong>and</strong> installation. Measure <strong>and</strong> inspect opening to insure it is 1/4” larger than outside dimension oflouver. Do not compress or stretch louver into opening.Recommended <strong>Installation</strong> of <strong>Louvers</strong>:© 2003 <strong>NCA</strong> ManufacturingWallCaulk/SealantHeadTypical <strong>Installation</strong> DetailsChannel Frame <strong>and</strong> Flush MountFastenersWallFlat Bar Mounting ClipsBy Others(See Note Below)Flat BarMounting ClipsBy Others(See Note Below)Caulk/SealantJambBladeTYP INSTALL&MAINT - 08-SillCaulk/SealantFlat BarMounting ClipsBy Others(See Note Below)WallSillCaulk/SealantOptionalSill ExtensionFlat BarMounting ClipsBy Others(See Note Below)FastenersWallSpecifications are correct at time of printing. However, as part of our ‘continuous improvement program,’ we reserve the right to make further improvements without notice.<strong>NCA</strong> MANUFACTURING, INC. 1036 SOUTH JUPITER ROAD GARLAND, TEXAS 75042 TEL. 972-276-5002 FAX 972-276-6747
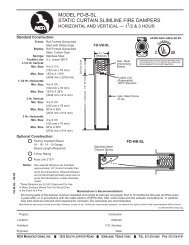
SUGGESTED DETAILS FOR INSTALLATION ANDMAINTENANCE OF <strong>NCA</strong> LOUVERSFlangeHeadWallTypical <strong>Installation</strong> Details - Cont.Flange Frame <strong>and</strong> Angle MountWall© 2003 <strong>NCA</strong> ManufacturingAngle Mounting Clips& Fasteners By Others(See Note Below)Angle Mounting Clips& FastenersBy Others(See Note Below)SillFlangeWallAngle Mounting Clips& FastenersBy Others(See Note Below)Flange Jamb BladeNote: <strong>NCA</strong> does not recommend fastening through the flange. Apply caulking/sealant to backof flange be<strong>for</strong>e installation or to outside perimeter of flange between flange <strong>and</strong> wall.Shown above are general mounting arrangements <strong>for</strong> wall louvers. Because local building codes<strong>and</strong> installation st<strong>and</strong>ards may vary from our recommended minimums, we recommend that theybe used over <strong>NCA</strong>’s when <strong>and</strong> where required. All structural supports, mounting clips/angles,mounting fasteners, sealant/caulk, shims, <strong>and</strong> anchors are furnished by others. <strong>NCA</strong> does not providethese as a st<strong>and</strong>ard item on louvers. For installation into walls the same thickness as the louver(Flush Mount), <strong>NCA</strong> recommends the use of 1-1/2” x 1-1/2” x 1/8” mounting plates or flat bar on 24”centers spaced such that there is a minimum of 2 fasteners per side. The recommended mountingin walls thicker than the louver is the use of 1-1/2” x 1-1/2” x 1/8” angle continuous or clips on aminimum of 24” centers, spaced such that there is a minimum of 2 fasteners per side. <strong>NCA</strong>recommends a minimum of #12 screws when used in wood or steel <strong>and</strong> 1/4” when used in masonry.The opening shall be square <strong>and</strong> the sides shall be straight (not bowed). The views shown aboveshould cover most mounting situations encountered. Large multi-panel louvers may require additionalstructural support on interior of opening which is not provided by <strong>NCA</strong>.<strong>Maintenance</strong>: All louvers should be checked <strong>and</strong> serviced on a regular basis. In general, stationarylouvers require very little maintenance. All louvers should be cleaned with a mild soap solution <strong>and</strong>rinsed with fresh water on a regular basis, depending on system usage <strong>and</strong> atmospheric conditionsto maintain a good appearance. If any other chemicals are used to clean the surface, be sure toread the instruction carefully to insure no damage is done to the finish. Screens should be checked<strong>for</strong> build up of debris. Debris between screen <strong>and</strong> blades could cause water penetration (due toreduced free area), unsightly stains to appear on the face of the louver, or unwanted nesting ofanimals. The caulk around the louver should be checked <strong>for</strong> cracking, distortion, shrinkage, etc.Repair or replace any damaged or worn caulking to prevent water intake. Operable <strong>and</strong> adjustablelouvers do require more periodic inspections <strong>and</strong> maintenance due to moving parts. All connections,fasteners, linkages, pivot points, seals, bearings, swivels, <strong>and</strong> actuators should be checked <strong>for</strong>tightness, proper alignment, corrosion, <strong>and</strong> wear. Replace any worn or corroded parts. Pivot pointssuch as bearings <strong>and</strong> swivels should be lubricated with a light Moly-Lubricant <strong>and</strong> excess wipedaway to prevent any build up or staining. Check actuator mounting braces to insure they have notbroken or loosened, which may cause leakage, vibration or lack of ventilation.Specifications are correct at time of printing. However, as part of our ‘continuous improvement program,’ we reserve the right to make further improvements without notice.<strong>NCA</strong> MANUFACTURING, INC. 1036 SOUTH JUPITER ROAD GARLAND, TEXAS 75042 TEL. 972-276-5002 FAX 972-276-6747