Importing CSV data and digital boundary files in MapInfo.pdf
Importing CSV data and digital boundary files in MapInfo.pdf
Importing CSV data and digital boundary files in MapInfo.pdf

You also want an ePaper? Increase the reach of your titles
YUMPU automatically turns print PDFs into web optimized ePapers that Google loves.
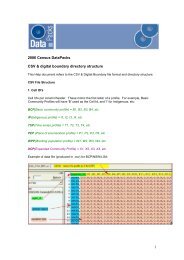
2006 Census DataPacks<strong>Import<strong>in</strong>g</strong> <strong>CSV</strong> <strong>data</strong> <strong>and</strong> <strong>digital</strong> <strong>boundary</strong> <strong>files</strong> <strong>in</strong> <strong>MapInfo</strong>The follow<strong>in</strong>g step by step method is employed to how a user will obta<strong>in</strong> the correct <strong>data</strong> <strong>and</strong>geographical labels <strong>in</strong>tegrated <strong>in</strong>to the <strong>CSV</strong> <strong>data</strong> file <strong>and</strong> import<strong>in</strong>g this file <strong>in</strong>to <strong>MapInfo</strong> withthe correspond<strong>in</strong>g <strong>digital</strong> boundaries <strong>and</strong> f<strong>in</strong>aliz<strong>in</strong>g with a thematic map: See Helpdocument: GIS Users 'Walk Through'Notes:1. The <strong>CSV</strong> <strong>data</strong> <strong>and</strong> <strong>digital</strong> <strong>boundary</strong> file requires to be unzipped from the DataPack folderstructure prior to import<strong>in</strong>g the .MID/.MIF <strong>boundary</strong> <strong>files</strong> <strong>in</strong>to <strong>MapInfo</strong>.See Help document: How to unzip the <strong>CSV</strong> <strong>and</strong> <strong>digital</strong> <strong>boundary</strong> <strong>files</strong>2. Prior to open<strong>in</strong>g a <strong>CSV</strong> <strong>data</strong> table <strong>in</strong>to <strong>MapInfo</strong> the user may wish to <strong>in</strong>tegrate thegeography labels <strong>and</strong> cell descriptions to the <strong>CSV</strong> <strong>data</strong> file. These may be saved as .xls <strong>files</strong><strong>and</strong> open<strong>in</strong>g <strong>in</strong> <strong>MapInfo</strong> (version 7.0 <strong>and</strong> above). See Help document: Add<strong>in</strong>g theGeographic Labels <strong>and</strong> Cell Descriptors to <strong>CSV</strong> <strong>data</strong> <strong>files</strong> <strong>in</strong> ExcelOpen the <strong>CSV</strong> <strong>data</strong> table <strong>in</strong>to <strong>MapInfo</strong>Once the <strong>data</strong> has had the geographic labels <strong>and</strong> cell descriptors added to the file <strong>in</strong> excel<strong>and</strong> has been opened <strong>in</strong> <strong>MapInfo</strong> <strong>and</strong> saved as a .tab file.Prior to open<strong>in</strong>g a <strong>CSV</strong> <strong>data</strong> table <strong>in</strong>to <strong>MapInfo</strong>, the user must go through a variety of steps<strong>and</strong> save it to a <strong>MapInfo</strong> .tab file before it can be used <strong>in</strong> the <strong>MapInfo</strong> software. Please seeHelp document: How to open the <strong>CSV</strong> <strong>data</strong> <strong>in</strong> <strong>MapInfo</strong>.1
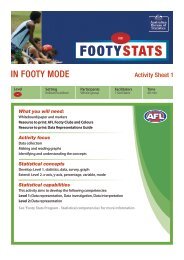
Step 1Open <strong>MapInfo</strong>Step 2File > Open:Locate the csv <strong>data</strong> <strong>files</strong> where they are stored on your directory, e.g.;:\BCP_ASGC_06_R2\LGA\NSW\LGA_NSW_B01new.csv.Select the <strong>data</strong> file for the geographic level. In this case select the LGA folder.Select the State/Territory. In this case select the NSW folder.Select the table. In this case, select the LGA_NSW_B01new.csv file.This opens the <strong>CSV</strong> <strong>data</strong> as a browser table. You may save it also as a .tab <strong>MapInfo</strong> file, sothen you can work <strong>and</strong> edit the <strong>data</strong> file accord<strong>in</strong>gly <strong>in</strong> <strong>MapInfo</strong>, also. You must save the <strong>CSV</strong><strong>data</strong> as a <strong>MapInfo</strong> .tab file if you want to jo<strong>in</strong> the <strong>data</strong> to <strong>digital</strong> boundaries to create athematic map.2
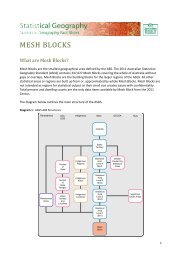
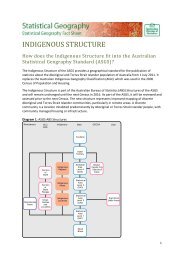
Import the <strong>digital</strong> <strong>boundary</strong> fileThe correspond<strong>in</strong>g <strong>digital</strong> <strong>boundary</strong> file requires to be imported as .MID/.MIF <strong>in</strong>to <strong>MapInfo</strong> <strong>and</strong>then saved as <strong>MapInfo</strong> .tab file prior to jo<strong>in</strong><strong>in</strong>g the <strong>data</strong>sets <strong>and</strong> creat<strong>in</strong>g a thematic map. SeeHelp document: How to open the <strong>digital</strong> boundaries <strong>in</strong> <strong>MapInfo</strong>Step 1Select File > Open Table > locate <strong>and</strong> select the .MID/.MIF <strong>files</strong> saved as <strong>MapInfo</strong> .tab <strong>files</strong>,<strong>in</strong> this case :\GEO_ASGC_06_R2\LGA\NSW\LGA_NSW_06.tab > Open.To view all of the NSW select Map > View Entire Layer > All layers, OK - a map isdisplayed show<strong>in</strong>g the NSW Local Government Areas.Jo<strong>in</strong><strong>in</strong>g the <strong>data</strong> file <strong>and</strong> map file us<strong>in</strong>g SQL SelectOnce you have your <strong>data</strong> <strong>and</strong> <strong>digital</strong> <strong>boundary</strong> file open <strong>in</strong> <strong>MapInfo</strong>, do the follow<strong>in</strong>g.3
Step 1Select Query > SQL Select - a similar dialogue box is displayed.4
Step 2Select the Clear button to remove any previous dialogue.From the 'Tables' drop down menu select both tables, i.e. LGA_NSW_06<strong>and</strong>NSW_NSW_B01newNote: ensure you select the Map table first.The follow<strong>in</strong>g dialogue appears <strong>in</strong> the 'where Condition' area, 'LGA_NSW_06.LGA_Code =LGA_NSW_B01new.code'Select Verify - the follow<strong>in</strong>g dialogue box is displayed.Select OK.Select OK - a Query 1 Browser is displayed, which has jo<strong>in</strong>ed the <strong>data</strong> <strong>and</strong> map <strong>files</strong>together.Note: Query browsers <strong>and</strong> maps are temporary tables. Therefore you should save the Query1Browser to make it a permanent table by select<strong>in</strong>g File > Save Copy As - a similar dialoguebox is displayed.5
Step 3Select the Query1 Browser.Select Save As - a similar dialogue box is displayed.Step 4Locate <strong>and</strong> select the location <strong>in</strong> which to save the Query1 table. In this caseC:\Data\Census 2006\GEO_ASGC_06_R2\LGA\Map_midmif\NSW6
Step 5In the 'File name' area, type a name for the file. In this case LGA_NSW_06new.tabIn the 'Save as type' area leave as the default <strong>MapInfo</strong> (*.tab).Select Save - the Query1 browser is saved.Step 6Select File > Close All.7
Step 7Select File > Open Table - a similar dialogue box is displayed.Note: Alternatively depend<strong>in</strong>g on which version of <strong>MapInfo</strong> you have, you may be able toselect File > Recent Files > LGA_NSW_06new.tab8
Step 8Locate <strong>and</strong> select the file previously saved <strong>in</strong> this case LGA_NSW_06new.tabSelect Open - a map is displayed.9
Step 3In the 'Table' area, from the drop down menu select the table. In this caseLGA_NSW_06new.In the 'Field' area, from the drop down menu select the <strong>data</strong> item you wish to create athematic map of. In this case Total P_P (Total Persons).Place a tick <strong>in</strong> the box 'Ignore Zeroes or Blanks.Select Next - the 3rd step dialogue box is displayed.11
Step 4Customize the Ranges if you would like to produce a more visually effective Thematic Map.To achieve this select the Ranges or Styles buttons <strong>and</strong> change the variables/colours with<strong>in</strong>.12
Step 5Now amend the Title of the Legend.Select the Legend button.Amend the Fonts, if required.Change the Legend title to someth<strong>in</strong>g more suitable, i.e., <strong>in</strong> the 'Title' area type TotalPersons by LGA NSW <strong>and</strong> then Click on OK.13
Step 6Select OK - the Thematic Map is displayed.14