Installation and Service Manual - Harmar
Installation and Service Manual - Harmar
Installation and Service Manual - Harmar
You also want an ePaper? Increase the reach of your titles
YUMPU automatically turns print PDFs into web optimized ePapers that Google loves.
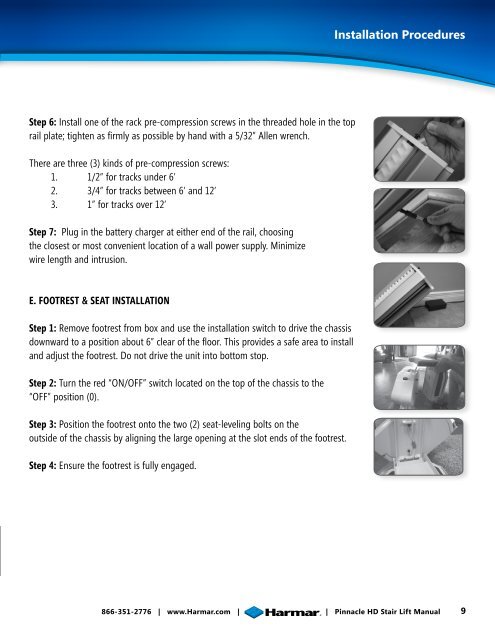
Table of Contents<strong>Installation</strong> ProceduresStep 6: Install one of the rack pre-compression screws in the threaded hole in the toprail plate; tighten as firmly as possible by h<strong>and</strong> with a 5/32” Allen wrench.There are three (3) kinds of pre-compression screws:1. 1/2” for tracks under 6’2. 3/4” for tracks between 6’ <strong>and</strong> 12’3. 1” for tracks over 12’Step 7: Plug in the battery charger at either end of the rail, choosingthe closest or most convenient location of a wall power supply. Minimizewire length <strong>and</strong> intrusion.E. FOOTREST & SEAT INSTALLATIONStep 1: Remove footrest from box <strong>and</strong> use the installation switch to drive the chassisdownward to a position about 6” clear of the floor. This provides a safe area to install<strong>and</strong> adjust the footrest. Do not drive the unit into bottom stop.Step 2: Turn the red “ON/OFF” switch located on the top of the chassis to the“OFF” position (0).Step 3: Position the footrest onto the two (2) seat-leveling bolts on theoutside of the chassis by aligning the large opening at the slot ends of the footrest.Step 4: Ensure the footrest is fully engaged.866-351-2776 | www.<strong>Harmar</strong>.com | | Pinnacle HD Stair Lift <strong>Manual</strong> 9


