User Manual Lightweight Wheelchair - Aidacare
User Manual Lightweight Wheelchair - Aidacare
User Manual Lightweight Wheelchair - Aidacare

You also want an ePaper? Increase the reach of your titles
YUMPU automatically turns print PDFs into web optimized ePapers that Google loves.
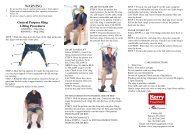
TRANSPORTING YOUR CHAIRK•Care does not recommend that you travel in a vehicle whilst sitting in your wheelchair. Where possible, wheelchairoccupants should be transferred into a seat and use the proper vehicle seat restraints. However, if you wish your chair tobe transported in a vehicle, your vehicle wheelchair restraint system must comply with AS2942-1994.COMMON MISUSE OF MANUAL WHEELCHAIRSThere are several common misuses of wheelchairs known to K•Care that may lead to personal injury or damage to thewheelchair.• Not utilising correct lifting techniques when lifting the wheelchair.• Using the wheelchair when the pneumatic wheels are flat or only partially inflated may lead to tyre tube damage.• This wheelchair has not been designed to be used in a wet environment (shower, pool, etc). Exposure to largeamounts or long periods of moisture may lead to deterioration of the product.• Do not leave an occupant unattended in a transporter wheelchair.USE OF YOUR MANUAL WHEELCHAIRDescending/ascending steep gradientsWhen transferring either into, or out of the wheelchair, the braking mechanisms must be activated. Using the wheelchairin difficult situations such as steep gradients, side angled pathways and obstacles may be hazardous. We recommendthe following methods should be used to avoid tipping over:Picture OnePicture Two• By leaning the body forward, the stability of the wheelchair can be improved greatly when ascending a gradient (ascan be seen in Picture One).• On downward gradients, the back should be in a straight position, with the speed and direction of the wheelchaircontrolled by the user utilising the push rims, not by riding the brakes (as can be seen in Picture Two).• Under normal conditions (clean and dry surface with no side angle) it is possible to climb slopes safely of up tothirteen degrees.Crossing kerbs/obstaclesWe recommend that when accessing difficult terrain, unless you are an experienced or strong wheelchair user, that anattendant be present. The attendant can tilt the chair back using the handgrips and the rear tilt bars.When an attendant is not present, we recommend that you avoid difficult terrain and obstacles such as kerbs, by utilizingprovided walkways, wheelchair access points, etc. If these are not available and kerbs need to be accessed, carefully liftthe castors over the top of the kerb then ease the rest of the chair forward. This practice should only be attempted byexperienced and strong wheelchair users.3
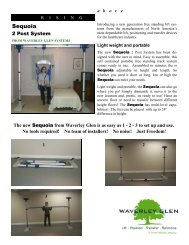
Descending from kerbs/obstaclesPicture ThreePicture FourRolling forward and keeping the back in an upright position should allow you to safely descend from a kerb (PictureThree).Higher obstacles can be dealt with by approaching the kerb in a reverse position. Bring the two large rear wheels to theedge of the obstacle and slowly easing your chair down using the push rim as a steady/brake. Improve your stability byleaning your body forward in the chair throughout this maneuver (Picture Four).BREAKDOWN OF MAIN WHEELCHAIR COMPONENTSErgonomic pushhandlesPadded armrest24” pneumaticwheelsSwing back side arm<strong>User</strong> operatedhand brakeRemovable, swingaway leg restAnti tilt bars8” solid castorsFold up footplate4
LEG RESTSThe swing away leg rests provided on the K•Care wheelchairs are removable and feature fold up footplates.To remove:• Pull lever outwards to allow the leg rest to swing outwards.• Lift upwards to remove from mounting pinsTo install:• Insert footrest back on the mounting pins and swing inwards.• The lever will automatically click into a locked position.To adjust footplates:• Remove hexagonal head bolt (with tool provided with your wheelchair).• Move up or down until desired height is achieved.• Replace the hexagonal head bolt and tighten.ARM RESTSThe armrests provided on our wheelchairs are of full length, and include a full-length padded top arm. The armrest has aswing back feature to assist with side transfer of user, and when positioning the wheelchair close to a table.To remove:• Push button and hold in on front of arm socket.• Using your other hand, lift the armrest upwards and back.To install:• Swing arm back down and forward, push into place until an audible “click” lets you know the arm is locked back inplace.• Never lift the wheelchair by its arm rests as damage may occur.BRAKESThe brakes should not be used for slowing the wheelchair. Brakes are designed as a locking device only and should beapplied when the wheelchair is stationary.Use the push rims as a means of slowing the wheelchair.The brakes should be checked on a regular basis, or when you notice that their performance is starting to diminish.Brake Adjustment• Check that the large rear tyres have been inflated to a correct pressure before making any brake adjustments.• Loosen the nut on brake body and adjust the brake so that when the lever is in the locked position the wheel isfirmly held by the brake arm.• Re-tighten the locking nut.• The bars should not rub against the tyre when the brakes are in the off position.• If rolling occurs when both brakes have been applied, the brakes have not been adjusted far enough, repeat theabove process.5
LARGE WHEELS 24-INCHThe large wheels on the W18 are fitted with a quick release mechanism. The wheel is removed simply by pushing in thehub button, and pulling the wheel off the frame.On the W16 model, a nut secures the rear wheels and axle. Refer below for removal.The large rear wheel tyres should only be replaced in pairs. Worn and/or under inflated tyres may make the wheelchairdifficult to steer and propel, always maintain correctly inflated tyres in order to minimize these problems and to maximizetyre lifespan.Rear wheels should be inflated to manufacturer’s recommended pressure, refer to sidewall of tyre for correct pressuresettings.To remove large rear wheels (W16 model)• Remove dust cap.• Unscrew the locking nut and unscrew the axle bolt, remove axle bolt.• To reinstall, reverse the above procedure.FORKS AND CASTORSTo remove fork with castor• Remove dust cap.• Unscrew the locking nut and remove fork with attached castor.• To reinstall, reverse the above procedure.CLEANING YOUR WHEELCHAIRWith a regular cleaning routine, you can preserve the appearance of your wheelchair for a very long time. Listed beloware some simple procedures that will make cleaning your wheelchair easier.UPHOLSTERYThe build up of body oils/sweat, hair or fluff can lead to the deterioration of the upholstery. Cleaning should be performedapproximately once a week/fortnight.To Clean• Vacuum upholstery, any staining may be removed with a mild soap and warm water. Stubborn grime may requiregentle scrubbing with a soft brush.• When finished, allow to air dry or dry with a soft cloth.PLEASE NOTENever use furniture polishes, abrasive cleaners or steel wool on this wheelchair as it may severely damage the finish ofthe chair.Regular use of cleaners containing hydrocarbons or similar additives may cause damage to the upholstery and possiblyleading to permanent degradation of the product.We recommend that you replace broken upholstery screws immediately to avoid potential tearing of the vinyl.Ensure stretched, torn or split upholstery is replaced for your safety.FRAMETo Clean• Simply wipe over the frame once a week with a soft cloth and a mild evaporative cleaner such as glass/windowcleaner to remove any prints/smudges, this will restore the frame’s finish.6
GENERAL SERVICINGApproximately every 3 months or so, we recommend that you perform the following routine to maximize the usefullifespan of your wheelchair.• Check castor/rear wheel play, remove dust caps and ensure area around the axle’s locking nut is free of dust anddebris.• Check brakes and adjust if necessary.• Ensure that all nuts and screws on the frame are tight.• Check the large rear Nylon wheels for cracked or broken spokes. The wheel should be replaced immediately.If replacement parts are ever required (such as tyres, tubes, footplates, etc), please contact your nearest K•Care distributorfor pricing and availability of materials.WARRANTY• K•Care warrants our range of wheelchairs for a period of twelve (12) months from date of purchase.• K•Care or an authorised K•Care Distributor must inspect the product within the warranty period. K•Care is not liablefor any costs borne from the shipping of non-conforming product to place of inspection (e.g. distributor address).• K•Care’s warranty does not cover product damaged accidentally through misuse or neglect. K•Care does notwarrant product that has been modified from its original form.• Due to logistical reasons, it is imperative that you contact your place of purchase who will lodge an officialcomplaint/claim on your behalf.K•CARE CONTACT DETAILSHEAD OFFICEK•Care Perth100 Mulgul RoadMalaga WA 6090AustraliaTelephone +61 8 9248 4444Facsimile +61 8 9248 4190Email sales@hillshealthcare.com.auWebsite www.hillshealthcare.com.au7