Calibration of Volumetric Glassware - Colorado State University
Calibration of Volumetric Glassware - Colorado State University
Calibration of Volumetric Glassware - Colorado State University

You also want an ePaper? Increase the reach of your titles
YUMPU automatically turns print PDFs into web optimized ePapers that Google loves.
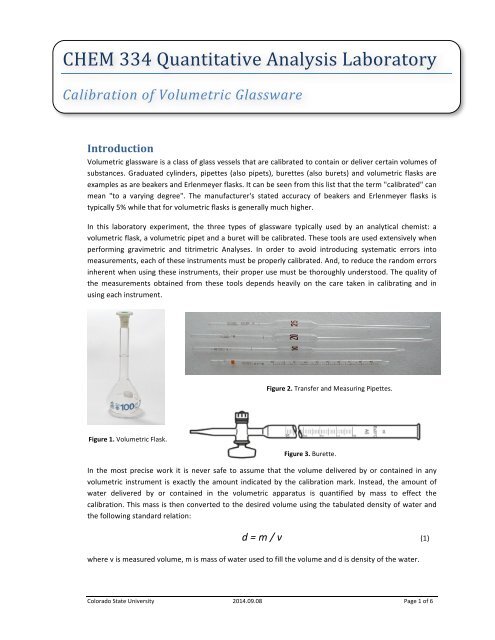
<strong>Calibration</strong> <strong>of</strong> <strong>Volumetric</strong> <strong>Glassware</strong> CHEM 334 Quantitative Analysis Laboratory from the pipet must be carefully controlled so as to leave a uniform and reproducible film along the inner glass surface. Measuring Pipets will be gradated in appropriate units. Once the pipet is cleaned and ready to use, make sure the outside <strong>of</strong> the tip is dry. Then rinse the pipet with the solution to be transferred. Insert the tip into the liquid to be used and draw enough <strong>of</strong> the liquid into the pipet to fill a small portion <strong>of</strong> the bulb. Hold the liquid in the bulb by placing your fore finger over the end <strong>of</strong> the stem. Withdraw the pipet from the liquid and gently rotate it at an angle so as to wet all portions <strong>of</strong> the bulb. Drain out and discard the rinsing liquid. Repeat this once more. To fill the pipet, insert it vertically in the liquid, with the tip near the bottom <strong>of</strong> the container. Apply suction to draw the liquid above the graduation mark. Quickly place a forefinger over the end <strong>of</strong> the stem. Withdraw the pipet from the liquid and use a dry paper to wipe <strong>of</strong>f the stem. Now place the tip <strong>of</strong> the pipet against the container from which the liquid has been withdrawn and drain the excess liquid such that the meniscus is at the graduation mark. Figure 5. Pipet Usage Move the pipet to the receiving container and allow the liquid to flow out (avoiding splashing) <strong>of</strong> the pipet freely. When most <strong>of</strong> the liquid has drained from the pipet, touch the tip to the wall <strong>of</strong> the container until the flow stops and for an additional count <strong>of</strong> ten. <strong>Volumetric</strong> Flasks. The volumetric flask is used to prepare Standard Solutions or in diluting a sample. Most <strong>of</strong> these flasks are calibrated To-‐Contain (TC) a given volume <strong>of</strong> liquid. When using a flask, the solution or solid to be diluted is added and solvent is added until the flask is about two-‐thirds full. It is important to rinse down any solid or liquid that has adhered to the neck. Swirl the solution until it is thoroughly mixed. Now add solvent until the meniscus is at the calibration mark. If any droplets <strong>of</strong> solvent adhere to the neck, use a piece <strong>of</strong> tissue to blot these out. Stopper the flask securely and invert the flask at least ten times. Burets. The Buret is used to accurately deliver a variable amount <strong>of</strong> liquid. Fill the buret to above the zero mark and open the stopcock to fill the tip. Work air bubbles out <strong>of</strong> the tip by rapidly squirting the liquid through the tip or tapping the tip while solution is draining. The initial buret reading is taken a few seconds, ten to twenty, after the drainage <strong>of</strong> liquid has ceased. Holding a white piece <strong>of</strong> paper with a heavy black mark on behind the buret can highlight the meniscus. Place the flask into which the liquid is to be drained on a white piece <strong>of</strong> paper. (This is done during a titration to help visualize color changes that occur during the titration.) The flask is swirled with the right-hand while the stopcock is manipulated with the left-‐ hand. The buret is opened and allowed to drain freely until near the point where liquid will no longer be added to the flask. Smaller additions are made as the end-‐point <strong>of</strong> the addition is neared. Allow a few seconds after closing the stopcock before making any readings. At the end-‐point, read the buret in a manner similar to that above. <strong>Colorado</strong> <strong>State</strong> <strong>University</strong> 2014.09.08 Page 3 <strong>of</strong> 6
<strong>Calibration</strong> <strong>of</strong> <strong>Volumetric</strong> <strong>Glassware</strong> CHEM 334 Quantitative Analysis Laboratory As with pipets, drainage rates must be controlled so as to provide a reproducible liquid film along the inner barrel <strong>of</strong> the buret. Cleaning <strong>of</strong> <strong>Volumetric</strong> <strong>Glassware</strong>. Cleaning <strong>of</strong> volumetric glassware is necessary to not only remove any contaminants, but to ensure its accurate use. The film <strong>of</strong> water that adheres to the inner glass wall <strong>of</strong> a container as it is emptied must be uniform. Two or three rinses with tap water, a moderate amount <strong>of</strong> agitation with a dilute detergent solution, several rinses with tap water, and two or three rinses with distilled water are generally sufficient if the glassware is emptied and cleaned immediately after use. If needed, use a warm detergent solution (60-‐70°C). A buret or test tube brush can be used in the cleaning <strong>of</strong> burets and the neck <strong>of</strong> volumetric flasks. <strong>Volumetric</strong> flasks can be filled with cleaning solution directly. Pipets and burets are filled by inverting them and drawing the cleaning solution into the device using suction. Avoid getting cleaning solution in the stopcock. Allow the warm cleaning solution to stand in the device for about 15 minutes; never longer than 20 minutes. Drain the cleaning solution and rinse thoroughly with tap water and finally 2-‐3 times with distilled water. Pipets and burets should be rinsed at least once with the solution they are to filled with before use. A General <strong>Calibration</strong> Procedure As was noted above, volumetric glassware is calibrated by measuring the mass <strong>of</strong> water that is contained-in or delivered-‐by the device. This mass data is then converted to volume data using the tabulated density <strong>of</strong> water (See Appendix) at the temperature <strong>of</strong> calibration. (In very accurate work, the thermometer is calibrated also as an incorrect temperature reading will lead to the use <strong>of</strong> an incorrect density for water. This, in turn, will give an inaccurate volume calibration.) Finally, this volume data is corrected to the standard temperature <strong>of</strong> 20 °C. This can be accomplished using (1) to describe the thermal volume expansion coefficient <strong>of</strong> water. Further details concerning calibration <strong>of</strong> laboratory glassware can be found in the NIST publication identified in the references. In this experiment a volumetric flask, a measuring pipette and a transfer pipette will be using gravimetrically determined water. In each case, the measured mass <strong>of</strong> the calibrating water will be standardized to 20 °C. Procedure Record the laboratory temperature. For this experiment use distilled water contained in one <strong>of</strong> the carboys -‐ not directly from the distilled water tap. (Why?) Clean and dry (in a 100 °C oven for a few minutes, followed by cooling to room temperature) a weighing bottle and its cap Use detergent if necessary followed by tap water then distilled water (also from its own tap, why?) rinses. Use a 100 °C oven for a few minutes for drying and cool to room temperature. Do not handle the clean glassware with bare hands. (Why?) <strong>Colorado</strong> <strong>State</strong> <strong>University</strong> 2014.09.08 Page 4 <strong>of</strong> 6
<strong>Calibration</strong> <strong>of</strong> <strong>Volumetric</strong> <strong>Glassware</strong> CHEM 334 Quantitative Analysis Laboratory Measuring Pipette. Fill a 10 mL measuring pipette with deionized water, then drain it to ensure that no droplets remain on the inner walls. If droplets remain, clean the pipette thoroughly and repeat. Fill the pipette and deliver approximately two milliliters into the weighed bottle. Estimate all volume readings to the nearest 0.01 mL. Cap the bottle and reweigh. Repeat this procedure for samples <strong>of</strong> 4, 6 and 8 mL. Perform three replicate measurements for the pipette. Transfer Pipette. Fill a 10 mL transfer pipette with deionized water and drain to ensure that no droplets remain on the inner walls. If droplets remain, clean the pipette thoroughly and repeat. Fill the pipette to the fill line and deliver the total volume <strong>of</strong> liquid into a dry bottle. Cap the weighing bottle and reweigh. Perform three replicate measurements for the pipette. <strong>Volumetric</strong> Flask. Calibrate a 10 mL volumetric flask by weighing it empty (and dry) and filled to the mark with distilled water. Perform three replicate measurements for the flask. Results Transfer Pipette. Use the density <strong>of</strong> water to convert the mass <strong>of</strong> water to the volume delivered by your pipette. Determine the average and 95% confidence interval for the three replicate measurements for the pipette. If the 95% confidence intervals are greater than the tolerance for the 10 mL pipette and if time permits repeat these measurements. <strong>Volumetric</strong> Flask. Convert the mass <strong>of</strong> water contained in your volumetric flask to volume. Determine the average volume and 95% confidence interval. If time permits, repeat the calibration if the 95% confidence intervals greater than the tolerance for the 10 mL flask. In the future, use this average value as the exact volume contained in the flask. Measuring Pipette. Convert the mass <strong>of</strong> water to the volume delivered by the pipette. Plot the average measured volume obtained from your replicate measurements delivered versus the expected volume delivered as read on the pipette for the 10 mL pipette. Plot y-‐value error bars corresponding to the standard deviation obtained from your replicate measurements. (Can you see the error bars?) Using a linear regression analysis, determine the best-‐fit equation for the relationship between measured and expected volumes. Include both slope and intercept in the analysis. Report the slope, its standard deviation, the y-‐intercept, its standard deviation and the R 2 value <strong>of</strong> the calibration line. Calculate the 95% confidence interval for each value <strong>of</strong> expected volume. Discussion Prepare a Laboratory Report as described previously. Present all measured data in the report together with the expected data. Describe and explain the relationships between the two sets <strong>of</strong> data. Include good-‐quality figures and tables to substantiate your discussions. Include answers to the several "why?" questions that appear in this description. Include a quantitative error analysis in your discussion. Compare your assessment <strong>of</strong> the various volumetric glassware accuracy values to the manufacturer's stated values. References Tufte, E.R., "Envisioning Information" (1990), Graphic Press, CT, Chapters 1 and 6. <strong>Colorado</strong> <strong>State</strong> <strong>University</strong> 2014.09.08 Page 5 <strong>of</strong> 6
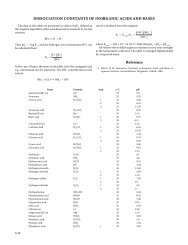
<strong>Calibration</strong> <strong>of</strong> <strong>Volumetric</strong> <strong>Glassware</strong> CHEM 334 Quantitative Analysis Laboratory Pierce, C., Haenisch, E.L. and Sawyer, D.T., "Quantitative Analysis" (1948) Fourth Edition Wiley & Sons, several locations. Lembeck, J., “The <strong>Calibration</strong> <strong>of</strong> Small <strong>Volumetric</strong> Laboratory <strong>Glassware</strong>”, NBSIR 74-‐461. Available at: http://ts.nist.gov/MeasurementServices/<strong>Calibration</strong>s/upload/74-‐461.pdf. Harris, D.C., "Quantitative Chemical Analysis" (2007) 7th edition, Freeman & Co., NY. Appendix 1. The density <strong>of</strong> water as a function <strong>of</strong> temperature. Temperature (°C) Density (g/mL) 15 0.999 102 6 16 0.998 946 0 17 0.998 777 9 18 0.998 598 6 19 0.998 408 2 20 0.998 207 1 21 0.997 995 5 22 0.997 773 5 23 0.997 541 5 24 0.997 299 5 25 0.997 047 9 26 0.996 786 7 27 0.996 516 2 28 0.996 236 5 29 0.995 947 8 30 0.995 650 2 <strong>Colorado</strong> <strong>State</strong> <strong>University</strong> 2014.09.08 Page 6 <strong>of</strong> 6