Set-Pro with Express Mode Manual - Evenheat Kilns
Set-Pro with Express Mode Manual - Evenheat Kilns
Set-Pro with Express Mode Manual - Evenheat Kilns

Create successful ePaper yourself
Turn your PDF publications into a flip-book with our unique Google optimized e-Paper software.
<strong>Set</strong>-<strong>Pro</strong> w/ <strong>Express</strong> <strong>Mode</strong> Operating <strong>Manual</strong>Ceramic version – March 2012For Use <strong>with</strong> Studio <strong>Pro</strong> STP and Kingpin 88 <strong>Mode</strong>ls <strong>with</strong> “EX” at End of Serial NumberFor Use <strong>with</strong> All Other <strong>Set</strong>-<strong>Pro</strong> Equipped <strong>Kilns</strong> <strong>with</strong> Serial Number’s 102077 and AboveSET-PROw/ <strong>Express</strong> <strong>Mode</strong>CERAMIC FIRINGControl Operating <strong>Manual</strong>Use your Smart-phone to scan this QR code to watch <strong>Set</strong>-<strong>Pro</strong> how-to <strong>Pro</strong>gramming Videos!Page 1 of 19
<strong>Set</strong>-<strong>Pro</strong> w/ <strong>Express</strong> <strong>Mode</strong> Operating <strong>Manual</strong>Ceramic version – March 2012Thank you for purchasing a <strong>Set</strong>-<strong>Pro</strong> w/ <strong>Express</strong> <strong>Mode</strong> equipped kiln from <strong>Evenheat</strong>. Whether you’re a beginner or a seasoned pro, the <strong>Set</strong>-<strong>Pro</strong> <strong>with</strong> <strong>Express</strong><strong>Mode</strong> offers the ease and performance you expect from <strong>Evenheat</strong>.The <strong>Set</strong>-<strong>Pro</strong> w/ <strong>Express</strong> <strong>Mode</strong> offers four programming modes: Ceramic <strong>Express</strong>, Glass <strong>Express</strong>, Metal Clay <strong>Express</strong> and Custom.Ceramic <strong>Express</strong> <strong>Mode</strong> is designed exclusively for ceramic firing. Choose your cone number and firing speed and the <strong>Set</strong>-<strong>Pro</strong> does the restautomatically.Glass <strong>Express</strong> <strong>Mode</strong> is designed exclusively for glass firing. It’s quick, easy and accurate using preset firing parameters. Simply answer a fewquestions and you’re ready to fire.Metal Clay <strong>Express</strong> <strong>Mode</strong> is designed exclusively for firing Art Clay and PMC brands of metal clay. Preset firing programs for each brand makeprogramming easy and accurate.Custom <strong>Mode</strong> is designed for the creation of individual, custom firing programs.This manual describes the use of the <strong>Set</strong>-<strong>Pro</strong> w/ <strong>Express</strong> <strong>Mode</strong> as it relates to using the Ceramic <strong>Express</strong> <strong>Mode</strong> and Custom <strong>Mode</strong>. For <strong>Set</strong>-<strong>Pro</strong> w/ <strong>Express</strong><strong>Mode</strong> manuals relating to using the Glass <strong>Express</strong> <strong>Mode</strong> and Metal Clay <strong>Express</strong> <strong>Mode</strong> please refer to the manuals disc included <strong>with</strong> your kiln, visit ourweb site at www.evenheat-kiln.com or contact us at info@evenheat-kiln.com.CAUTION: The <strong>Set</strong>-<strong>Pro</strong> is used to control temperature, it is not a safety devise. Never leave the kiln unattended while firing. Check on the kiln at the endof the firing to ensure firing program has completed as planned.CAUTION: Throw control power switch, located on kiln control panel, to the OFF position (O) when not in use.Table of ContentsQuick Step <strong>Pro</strong>grammingQuick Steps for Ceramic <strong>Express</strong> <strong>Mode</strong> <strong>Pro</strong>gramming ................... 3Quick Steps for Custom <strong>Mode</strong> <strong>Pro</strong>gramming ................................. 4Detailed <strong>Pro</strong>gramming<strong>Set</strong>-<strong>Pro</strong> Key Descriptions ................................................................ 5Ceramic <strong>Express</strong> <strong>Mode</strong> <strong>Pro</strong>gramming (Detailed) ............................ 6Custom <strong>Mode</strong> <strong>Pro</strong>gramming (Detailed) ......................................... 8On-the-Fly FeaturesAdding Time to a Hold .................................................................. 10Adding Temperature to a Hold ..................................................... 10Skipping Ahead to the next Segment ........................................... 10View Segment Feature ................................................................. 10<strong>Pro</strong>gramming & Use FeaturesInitialization ................................................................................. 11Idle ............................................................................................... 11Beginning and End <strong>Pro</strong>cess Alarms .............................................. 11Pre-Heat ....................................................................................... 12Selecting the <strong>Pro</strong>per Cone Number .............................................. 12<strong>Pro</strong>gram Review ........................................................................... 12Start Now ..................................................................................... 12Storing a Custom <strong>Mode</strong> <strong>Pro</strong>gram ................................................. 12Selecting and Running a Custom <strong>Mode</strong> <strong>Pro</strong>gram ......................... 13Stopping the <strong>Pro</strong>gram .................................................................. 134 User <strong>Pro</strong>grams in Custom <strong>Mode</strong> ............................................... 138 Segments per Custom <strong>Mode</strong> <strong>Pro</strong>gram ...................................... 13<strong>Pro</strong>gramming a Time Value .......................................................... 13Temperature Rate Options .......................................................... 13Using UP & Down Arrow Keys ...................................................... 13Number of Segments ................................................................... 13Writing Over Data ........................................................................ 14Clearing Function ......................................................................... 14Fahrenheit or Celsius ................................................................... 14Maximum <strong>Pro</strong>grammable Temperature ...................................... 14Firing Down to Room Temperature ............................................. 14Delay Start Feature ...................................................................... 14Display & Preset Information<strong>Set</strong>-<strong>Pro</strong> Display Conditions ........................................................... 15<strong>Set</strong>-<strong>Pro</strong> Display Messages ............................................................ 15Key Function Table....................................................................... 16<strong>Set</strong>-<strong>Pro</strong> Error Messages................................................................ 16Preset Ceramic <strong>Express</strong> <strong>Mode</strong> Data ............................................. 17Cone Table ................................................................................... 18Kiln Trouble Shooting ................................................................... 19Use your Smart-phone to scan this QR code to watch <strong>Set</strong>-<strong>Pro</strong> how-to <strong>Pro</strong>gramming Videos!Page 2 of 19
<strong>Set</strong>-<strong>Pro</strong> w/ <strong>Express</strong> <strong>Mode</strong> Operating <strong>Manual</strong>Ceramic version – March 2012Use this Quick Guide to Immediately Begin the Ceramic <strong>Express</strong> <strong>Mode</strong> <strong>Pro</strong>gramming <strong>Pro</strong>cess (Ceramic Firing Only)Ceramic <strong>Express</strong> <strong>Mode</strong> programming allows you to fire your ceramic by simply choosing your desired cone number and firing speed. It’s quick and easy toprogram and gives accurate and repeatable results time after time.Quick Steps for Ceramic <strong>Express</strong> <strong>Mode</strong> <strong>Pro</strong>gramming1. Throw the power switch on the kiln control panel to the On position.2. The <strong>Set</strong>-<strong>Pro</strong> begins its initialization process and the display will illuminate.3. The <strong>Set</strong>-<strong>Pro</strong> will finish its initialization process and then display IdLE (Idle).4. Press the Enter key one time to begin the programming process. The display will read GLAS, ALAr, M-C, CEr or CUSt.5. Use the Up or Down arrow keys to make the display read CEr (Ceramic <strong>Express</strong> <strong>Mode</strong>) if it does not already.6. Press the Enter key. The display will read PrHt. The <strong>Set</strong>-<strong>Pro</strong> is asking for any Pre-heat time. See page 11 for details.7. Use the Up or Down arrow keys to select your desired pre-heat time. If no pre-heat is desired select 00.00.8. Press the Enter key. The display will read COnE. You may choose any cone number between 022 and 10.9. Use the Up or Down arrow keys to choose the desired cone number. See pages 11 and 17 for details.10. Press the Enter key. The display will read FASt, MEd or SLO. These represent firing speed choices: FASt is Fast, MEd is Medium and , SLO is Slow.11. Use the Up or Down arrow keys to choose the desired firing speed.12. Press the Enter key. The display will read HLd. HLd stands for Hold and this setting allows you to hold the final temperature for a period of time. If noHold at final temperature is no desired select 00.00.13. Use the Up and Down arrows to choose the desired hold time.14. Press the Enter key. The display will read rEdI which stands for Ready.13. Press the Enter key to begin the firing. The <strong>Set</strong>-<strong>Pro</strong> is now running your Ceramic <strong>Express</strong> <strong>Mode</strong> program.When the firing is complete the display alternates between CPLt and total firing time. Press the Start/Stop key at this point will cause the display to brieflyread StOP and then IdLE.You may stop the firing at any time by pressing the Enter key. Doing so will cause the firing to stop and StOP will briefly be displayed.Use your Smart-phone to scan this QR code to watch <strong>Set</strong>-<strong>Pro</strong> how-to <strong>Pro</strong>gramming Videos!Page 3 of 19
<strong>Set</strong>-<strong>Pro</strong> w/ <strong>Express</strong> <strong>Mode</strong> Operating <strong>Manual</strong>Ceramic version – March 2012Use this Quick Guide to Immediately Begin the Custom <strong>Mode</strong> <strong>Pro</strong>gramming <strong>Pro</strong>cessThe Custom <strong>Mode</strong> allows the creation of your own, individual firing programs. You choose the rate of temperature increase or decrease, the temperatureyou want to achieve and any hold time once you’re there. These 3 items, taken together create what’s known as a segment. Segments are basicallychained together to create a multi-segment program. Enjoy full artistic control <strong>with</strong> Custom <strong>Mode</strong> <strong>Pro</strong>gramming.Quick Steps for Custom <strong>Mode</strong> <strong>Pro</strong>gramming1. Throw the power switch on the kiln control panel to the On position.2. The <strong>Set</strong>-<strong>Pro</strong> begins its initialization process and the display will illuminate.3. The <strong>Set</strong>-<strong>Pro</strong> will finish its initialization process and then display IdLE (Idle).4. Press the Enter key one time to begin the programming process. The display will read GLAS, ALAr, M-C, CEr or CUSt.5. Use the Up or Down arrow keys to make the display read CUSt (Custom <strong>Mode</strong>) if it does not already.6. Press the Enter key. USr is displayed along <strong>with</strong> some number.7. Use the Up arrow key to choose. You’re choosing which of the 4User program numbers will be used to store your program. Your choices are 1 thru 4.8. Press the Enter key. SEG is displayed along <strong>with</strong> some number.9. Use the Up or Down arrow keys to choose. You’re choosing the total number of segments used in the program. Your choices are 1 thru 8.10. Press the Enter key. rA 1 is displayed along <strong>with</strong> some number.11. Use the Up and Down arrow keys to choose. You’re programming the temperature rate (°/hr.) for this segment.12. Press the Enter key. °F 1 is displayed along <strong>with</strong> some number.13. Use the Up and Down arrow keys to choose. You’re programming the temperature set point for this segment.14. Press the Enter key. HLd 1 is displayed along <strong>with</strong> some number.15. Use the Up and Down arrow keys to choose. You’re programming the hold time for this segment.16. Press the Enter key. rA 2 is displayed. Repeat steps 11 thru 14 for all remaining segments.17. Once all remaining segments have been programmed the display will read rEdI (Ready).18. Press the Enter key to begin the firing. The <strong>Set</strong>-<strong>Pro</strong> is now running your Custom <strong>Mode</strong> program.When the firing is complete the display alternates between CPLt and total firing time. Press the Start/Stop key at this point will cause the display to brieflyread StOP and then IdLE.You may stop the firing at any time by pressing the Enter key. Doing so will cause the firing to stop and StOP will briefly be displayed.Use your Smart-phone to scan this QR code to watch <strong>Set</strong>-<strong>Pro</strong> how-to <strong>Pro</strong>gramming Videos!Page 4 of 19
<strong>Set</strong>-<strong>Pro</strong> w/ <strong>Express</strong> <strong>Mode</strong> Operating <strong>Manual</strong>Ceramic version – March 2012<strong>Set</strong>-<strong>Pro</strong> Key Layout & Key DescriptionsF or °C -The <strong>Set</strong>-<strong>Pro</strong> can be set to displayin either Fahrenheit or Celsius.Display -Large, bright LED displaycan be seen from a distance.Start/Stop - EnterThe Start/Stop key starts and stops the firing process. It’s also used to enter or store firing program information during the programming process.UP Arrow – VIEW SEG – SKIP SEGUsed to select values when programming and allows for Viewing the current running segment as well as performing the Skip Ahead feature.Down Arrow – REVIEWUsed to select values when programming and allows for the Review program feature.See the <strong>Set</strong>-<strong>Pro</strong> Key Function Table on page 16, for more detailed key information.Use your Smart-phone to scan this QR code to watch <strong>Set</strong>-<strong>Pro</strong> how-to <strong>Pro</strong>gramming Videos!Page 5 of 19
<strong>Set</strong>-<strong>Pro</strong> w/ <strong>Express</strong> <strong>Mode</strong> Operating <strong>Manual</strong>Ceramic version – March 2012Ceramic <strong>Express</strong> <strong>Mode</strong> <strong>Pro</strong>gramming (Detailed)Ceramic <strong>Express</strong> <strong>Mode</strong> features easy programming that automatically develops your firing program based on your desired cone number and firing speed.Simply tell the <strong>Set</strong>-<strong>Pro</strong> what cone you want to go to and how fast to get there and you’re ready to fire. It’s quick, it’s easy and gives reliable, repeatableresults fire after fire.1. Throw the power switch on the kiln control panel to the On position.2. The <strong>Set</strong>-<strong>Pro</strong> begins its initialization process and the display will illuminate.3. The <strong>Set</strong>-<strong>Pro</strong> will finish its initialization process and then display IdLE (Idle).Idle simply means the <strong>Set</strong>-<strong>Pro</strong> is at rest and is not running any programs.4. Press the Enter key one time to begin the Ceramic <strong>Express</strong> <strong>Mode</strong> programming process. The display will read GLAS, ALAr, M-C, CEr or CUSt.The <strong>Set</strong>-<strong>Pro</strong> includes preset programs designed to fire glass, metal clays, ceramic as well as offering custom programs.These choices are displayed as:GLAS – Glass <strong>Express</strong> <strong>Mode</strong>ALAr – Beginning and End <strong>Pro</strong>cess AlarmsM-C – Metal Clay <strong>Express</strong> <strong>Mode</strong>CEr – Ceramic <strong>Express</strong> <strong>Mode</strong>CUSt – Custom <strong>Mode</strong>5. Use the Up or Down arrow keys to make the display read CEr (Ceramic <strong>Express</strong> <strong>Mode</strong>) if it does not already.6. Press the Enter key. The display will read PrHt.The <strong>Set</strong>-<strong>Pro</strong> allows you to pre-heat your ceramic for a period of time to dry it. The pre-heat feature will take the kiln temperature to 200°F(93°C) and hold this temperature for a period of time chosen by you.You may choose a pre-heat hold time up to 100 hours. It is not necessary to use the pre-heat feature if you choose not to. In this case choose00.00 as your pre-heat hold time.When selecting pre-heat hold time please note that all values to the left of the decimal point are in hours and all values to the right of thedecimal point are in minutes.7. Use the Up or Down arrow keys to select your pre-heat hold time (if any).8. Press the Enter key. The display will read COnE.The <strong>Set</strong>-<strong>Pro</strong> is asking for the cone number you would like to fire to. You may choose any cone number between 022 and 10. See the includedcone chart on page 18 for cone number descriptions.Be careful when selecting your cone number. Cones use a numbering system that’s not particularly clear or obvious, especially to the casual andbeginning user. Some cone numbers have a “0” in front of them and some do not. This “0” is very important. If the cone number has a “0”infront of it, it has a “0” in front of it. If the cone number doesn’t have a “0” in front of it, it doesn’t have a “0” in front of it.Here’s a cautionary example to alert you to the importance of using the proper cone number. In ceramic firing there is a cone 06 and a cone 6.A cone 06 will fire up to 1828°F. A cone 6 will fire up to 2232°F. That’s a difference of more than 400°F!!!! If you want to fire using a cone 06 andyou select cone 6 instead you will have a severe overfire. It won’t be pretty and expect some kiln damage along <strong>with</strong> it. We will note at thispoint that <strong>Evenheat</strong> does not warrant or cover overfire damage, regardless of cause.Always know the cone number you wish to fire to and always pay attention to the entire cone number.Use your Smart-phone to scan this QR code to watch <strong>Set</strong>-<strong>Pro</strong> how-to <strong>Pro</strong>gramming Videos!Page 6 of 19
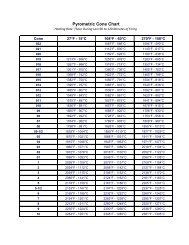
<strong>Set</strong>-<strong>Pro</strong> w/ <strong>Express</strong> <strong>Mode</strong> Operating <strong>Manual</strong>Ceramic version – March 20129. Press the Enter key. The display will read FASt, MEd or SLO.The <strong>Set</strong>-<strong>Pro</strong> is asking for the desired firing speed.Ceramic <strong>Express</strong> <strong>Mode</strong> <strong>Pro</strong>gramming (Detailed) – continued from previous pageYou are free to use any speed for any firing as you wish. However, <strong>Evenheat</strong> does recommend using Fast for glaze firings, Medium for bothglaze and bisque firings and Slow for bisque firings.For a detailed explanation of the preset Ceramic <strong>Express</strong> <strong>Mode</strong> firing data please see the tables on page 17. These tables describe the varioustemperature rates, temperature set points and hold times used in each of the firing speed selections.Firing Speed choices are displayed as:FASt - Fast (Use for Glaze firings)MEd - Medium (Use for Both Glaze and Bisque Firings)SLO – Slow (Use for Bisque Firings)10. Use the Up or Down arrow keys to select your desired firing speed.11. Press the Enter key. The display will read HLd.The <strong>Set</strong>-<strong>Pro</strong> is asking if you would like to hold or soak your ceramic at final temperature for a period of time.You may find benefit in adding a bit of hold time to the final temperature. Perhaps you’re finding that your ceramic ware is almost, but notquite mature. Adding a few minutes of hold to the final temperature is valid way increasing the heatwork, and thus maturity to your ceramicware. Keep in mind that values to the left of the decimal point are in hours and values to the right of the decimal point are in minutes.If you choose to not add any hold time at final temperature simply select 00.00 as your hold time.12. Use the Up and Down arrow keys to choose your desired hold time.13. Press the Enter key. The display will display rEDI (Ready). You have successfully programmed your Ceramic <strong>Express</strong> <strong>Mode</strong> <strong>Pro</strong>gram.14. Press the Enter key to begin the firing. The <strong>Set</strong>-<strong>Pro</strong> Ceramic <strong>Express</strong> <strong>Mode</strong> program you created is now running and firing the kiln.When the firing is complete the display alternates between CPLt and total firing time. Pressing the Start/Stop key at this point will cause the display tobriefly read StOP and then IdLE.The <strong>Set</strong>-<strong>Pro</strong> automatically stops running the firing program once complete. However, you may always stop a firing in progress, at any time, by pressing theStart/Stop key. StOP is displayed briefly and then IdLE.Ceramic <strong>Express</strong> <strong>Mode</strong> Firing Data TablesThe Ceramic <strong>Express</strong> <strong>Mode</strong> uses preset firing data to fire your ceramic. You will find the actual, preset firing data used in the Ceramic <strong>Express</strong> <strong>Mode</strong>programs on page 17 of this manual.Ceramic <strong>Express</strong> <strong>Mode</strong> Cone ChartCones, or more precisely, pyrometric cones, measure “heatwork”. Heatwork is a combination of temperature and time. As the <strong>Set</strong>-<strong>Pro</strong> controls the speedof the firing along <strong>with</strong> the final temperature it will create the conditions needed to achieve proper ceramic maturity.We have included a cone chart, found on page 18, which identifies each cone along <strong>with</strong> its final firing temperature used by the <strong>Set</strong>-<strong>Pro</strong>. This chart is basedon a temperature rate (used at the end of the firing) of 108°F per hour.Use your Smart-phone to scan this QR code to watch <strong>Set</strong>-<strong>Pro</strong> how-to <strong>Pro</strong>gramming Videos!Page 7 of 19
<strong>Set</strong>-<strong>Pro</strong> w/ <strong>Express</strong> <strong>Mode</strong> Operating <strong>Manual</strong>Ceramic version – March 2012Custom <strong>Mode</strong> <strong>Pro</strong>gramming (Detailed)The Custom <strong>Mode</strong> is a method of programming that allows the artist to precisely define every aspect of the firing. You’re creating a custom firing programdesigned for the work at hand. Creating a custom program is not difficult. It does, however, require some knowledge and forethought about what youwant to do and how to go about it.1. Throw the power switch on the kiln control panel to the On position.2. The <strong>Set</strong>-<strong>Pro</strong> begins its initialization process and the display will illuminate.3. The <strong>Set</strong>-<strong>Pro</strong> will finish its initialization process and then display IdLE (Idle).Idle simply means the <strong>Set</strong>-<strong>Pro</strong> is at rest and is not running any programs.4. Press the Enter key one time to begin the Custom <strong>Mode</strong> programming process. The display will read GLAS, ALAr, M-C, CEr or CUSt.The <strong>Set</strong>-<strong>Pro</strong> includes preset programs designed to fire glass, metal clays, ceramic as well as offering custom programs.These choices are displayed as:GLAS – Glass <strong>Express</strong> <strong>Mode</strong>ALAr – Beginning and End <strong>Pro</strong>cess AlarmsM-C – Metal Clay <strong>Express</strong> <strong>Mode</strong>CEr – Ceramic <strong>Express</strong> <strong>Mode</strong>CUSt – Custom <strong>Mode</strong>5. Use the Up or Down arrow keys to make the display read CUSt (Custom <strong>Mode</strong>) if it does not already.6. Press the Enter key. The display will read USr along <strong>with</strong> some number.The <strong>Set</strong>-<strong>Pro</strong> needs to know which of the 4 available locations you would like to store your Custom <strong>Mode</strong> program. In other words: a programnumber. Your choices are 1 thru 4.7. Use the Up arrow key only to select the desired program number.8. Press the Enter key. The display will read SEG along <strong>with</strong> some number.The <strong>Set</strong>-<strong>Pro</strong> needs to know the total number of segments you would like to use for the Custom <strong>Mode</strong> program.Most ceramic firing programs require the kiln to go to multiple temperatures and to use multiple heating rates throughout the firing. In orderfor the <strong>Set</strong>-<strong>Pro</strong> to perform all these changes, it breaks the entire program down into smaller bits called “Segments”. Your program will consist ofmany segments, chained together, one after another, to create the finished program. During firing, the <strong>Set</strong>-<strong>Pro</strong> works from one segment to thenext until all segments have been completed.A Segment consists of these 3 questions: Rate: how fast am I supposed to get to temperature? <strong>Set</strong> Point: what temperature am I going to? HoldTime: the amount of time to hold at my <strong>Set</strong> Point temperature?You can use up to 8 segments for your program. Your choices are 1 thru 8.9. Use the Up and Down arrow keys to select desired number of segments to be used in the Custom program.10. Press the Enter key. The display will read rA-1 along <strong>with</strong> some number.The <strong>Set</strong>-<strong>Pro</strong> is asking for the desired temperature rate to be used in segment 1. rA stands for Rate and the 1 means you’re programming therate of temperature change for segment 1.Rate means speed and you need to tell the <strong>Set</strong>-<strong>Pro</strong> how fast you want the temperature to change. Rate for the <strong>Set</strong>-<strong>Pro</strong> is programmed indegrees per hour (°/hr.). The choice is yours.Use your Smart-phone to scan this QR code to watch <strong>Set</strong>-<strong>Pro</strong> how-to <strong>Pro</strong>gramming Videos!Page 8 of 19
<strong>Set</strong>-<strong>Pro</strong> w/ <strong>Express</strong> <strong>Mode</strong> Operating <strong>Manual</strong>Ceramic version – March 201211. Use the UP and DOWN arrow keys to select your desired rate.12. Press the Enter key. The display will read °F 1 (°C 1 if using Celsius).Custom <strong>Mode</strong> <strong>Pro</strong>gramming (Detailed) – continued from previous pageThe <strong>Set</strong>-<strong>Pro</strong> is asking for the temperature set point you wish to reach in segment 1. °F stands for the temperature set point (°C is displayed ifyou’re using the Celsius scale) and the 1 means you’re programming the temperature you would like to reach in segment 1.The choice is yours.13. Use the Up and Down arrow keys to select your set point temperature.14. Press the Enter key. The display will read HLd1 along <strong>with</strong> some number.The <strong>Set</strong>-<strong>Pro</strong> is asking for the amount of time you wish to hold at the set point temperature. HLd stands for Hold (a.k.a. soak or dwell) and the 1means you’re programming the amount of time you want the temperature to stay at the segment 1 temperature once you reach it.Hold time is programmed in hours and minutes. Values to the left of the decimal point are hours and values to the right of the decimal areminutes. You do not have to hold at temperature if you don’t want to, in which case hold time would be 0.15. Use the Up and Down arrow keys to select your desired hold time.16. Press the Enter key. If you have chosen to use more than 1 segment for your firing the display will read rA 2 along <strong>with</strong> some number. If you havechosen to use only 1 segment for this firing skip ahead to line #21 for further instruction.The <strong>Set</strong>-<strong>Pro</strong> is asking for temperature rate, this time for segment 2.17. Use the Up and Down arrow keys to select your desired rate.18. Press the Enter key. The display will read °F 2 along <strong>with</strong> some number.The <strong>Set</strong>-<strong>Pro</strong> is asking for the temperature set point, this time for segment 2.19. Use the Up and Down arrow keys to select your desired temperature set point.20. Press the Enter key. The display will read HLd2 along <strong>with</strong> some number.The <strong>Set</strong>-<strong>Pro</strong> is asking for the amount of hold time at your temperature set point, this time for segment 2.As you can see from the emerging pattern, the <strong>Set</strong>-<strong>Pro</strong> will continue to ask the same three questions: rate, temperature and time for all remainingsegments. Just keep answering the questions. Doing so creates that beautiful chain of events called a firing program!21. Once all your segments are programmed the <strong>Set</strong>-<strong>Pro</strong> will display rEdI which means it’s ready to fire your Custom <strong>Mode</strong> program.22. Press the Enter key to begin the firing. The <strong>Set</strong>-<strong>Pro</strong> Custom <strong>Mode</strong> program you created is now running and firing the kiln.When the firing is complete the display alternates between CPLt and total firing time. Pressing the Start/Stop key at this point will cause the display tobriefly read StOP and then IdLE.The <strong>Set</strong>-<strong>Pro</strong> automatically stops running the firing program once complete. However, you may always stop a firing in progress, at any time, by pressing theStart/Stop key. StOP is displayed briefly and then IdLE.Use your Smart-phone to scan this QR code to watch <strong>Set</strong>-<strong>Pro</strong> how-to <strong>Pro</strong>gramming Videos!Page 9 of 19
<strong>Set</strong>-<strong>Pro</strong> w/ <strong>Express</strong> <strong>Mode</strong> Operating <strong>Manual</strong>Ceramic version – March 2012On-The-Fly FeaturesThe <strong>Set</strong>-<strong>Pro</strong> contains a set of features that allow you to adjust and tweak the firing while it’s actually running! We’ve dubbed these features as “On-the-Fly”. With these features it’s possible to add a little bit of time to a hold if needed, add a little bit of temp to a hold or just leave the segment entirely andmove to the next segment (like anneal).Admittedly, most ceramic firing does not require much intervention and tweaking so these On-the-Fly features may be of little use. However, at somepoint you may find yourself interested in other particular fired arts that do. Glass firing immediately comes to mind. Knowing that these features areavailable will positively affect your firing skills and allow you to create the art you desire.Adding Time to a HoldDuring a hold period it’s sometimes necessary to add just a little more time to the programmed hold time. The <strong>Set</strong>-<strong>Pro</strong> allows you to add time to a hold in5 minute increments. It’s a handy little feature that you should really get to know.To Use the Add Time FeatureWhile holding at a temperature (display reads temperature along <strong>with</strong> remaining hold time), repeatedly press the UP arrow key until the displayreads tME (stands for time). Press the ENTER key one time. You have now added 5 minutes to the hold time. The display will go back to readingtemperature and remaining hold time and you will notice that 5 minutes has been added to the hold. You may use this procedure as often asnecessary during a hold to get the hold time you desire. It should be noted that the Adding Time to a Hold feature is a temporary adjustmentonly. That is, it does not change the program stored in memory.Adding Temperature to a HoldDuring a hold period it’s sometimes necessary to add just a little extra temperature to the programmed set point temperature. The <strong>Set</strong>-<strong>Pro</strong> allows you toadd more temperature in °5 increments.To Use the Add Temperature FeatureWhile holding at a temperature (display reads temperature along <strong>with</strong> remaining hold time), repeatedly press the UP arrow key until the displayreads tMP (stands for temperature). Press the ENTER key one time. You have now added 5 degrees to the set point temperature. Once set, thedisplay will go back to reading temperature and remaining hold time. You may use this procedure as often as necessary during a hold to get thehold temperature you desire. It should be noted that the Adding Temperature to a Hold feature is a temporary adjustment only. That is, it doesnot change the program stored in memory.Skipping Ahead to the Next SegmentDuring firing it’s often desired to stop what you’re currently doing and skip ahead to another segment in the program. For instance, when firing glass youmay have the perfect result before your hold time completes. Allowing the hold time to complete would further change the glass and lead todisappointment. In such a case the <strong>Set</strong>-<strong>Pro</strong> allows you to skip ahead to the next segment in the program for the annealing or cooling portion of theprogram. It’s a handy little feature that you should really get to know.To Use the Skip Ahead FeatureAt any time during the firing press the UP arrow key one time. The display will eventually read SStP (stands for Skip Step). When it does, pressthe ENTER key one time. You have now skipped to the next programmed segment. If you need to continue to skip ahead even further feel freeto do so. Once you skip the display will go back to reading temperature.View Segment FeatureAt any point during the firing you may press the UP arrow one time to display the current action (ramping or holding) and current segment. This will tellyou if you’re ramping or holding and which segment you’re doing this in. After a moment or two the display will go back to normal operation.Use your Smart-phone to scan this QR code to watch <strong>Set</strong>-<strong>Pro</strong> how-to <strong>Pro</strong>gramming Videos!Page 10 of 19
<strong>Set</strong>-<strong>Pro</strong> w/ <strong>Express</strong> <strong>Mode</strong> Operating <strong>Manual</strong>Ceramic version – March 2012<strong>Pro</strong>gramming and Use FeaturesInitialization (Boot-Up)When the <strong>Set</strong>-<strong>Pro</strong> is powered up it goes through an initialization process. Various data is displayed until the initialization is complete and the display readsIdLE.IdLE (Idle)Idle simply means the <strong>Set</strong>-<strong>Pro</strong> is not running any firing programs at the moment.Beginning and End of <strong>Pro</strong>cess Alarm FeatureThe <strong>Set</strong>-<strong>Pro</strong> allows you to set a special Beginning of <strong>Pro</strong>cess Alarm and End of <strong>Pro</strong>cess Alarm to sound at final temperature.The Beginning of <strong>Pro</strong>cess Alarm sounds when you have reached your process temperature (cone) and the ware is beginning its hold/soak period(if any is programmed).The End of <strong>Pro</strong>cess Alarm sounds when your ware has completed its firing. This information may be useful if you wish to pull the ware from thekiln at this point for further high temperature processing such as special glaze development.To choose your desired Beginning and End of <strong>Pro</strong>cess Alarms combination:1. Throw the power switch on the kiln control panel to the On position.2. The <strong>Set</strong>-<strong>Pro</strong> begins its initialization process and the display will illuminate.3. The <strong>Set</strong>-<strong>Pro</strong> will finish its initialization process and then display IdLE (Idle). Idle simply means the <strong>Set</strong>-<strong>Pro</strong> is at rest and is not running anyprograms.4. Press the Enter key one time to begin the Alarm setting process. The display will read GLAS, ALAr, M-C, CEr or CUSt.5. Use the Up or Down arrow keys to make the display read ALAr (<strong>Pro</strong>cess Alarm) if it does not already.6. Press the Enter key. The display will read either OFF, bEGn, End or botH. These choices allow you to decide at what point the <strong>Pro</strong>cess Alarmsfunction. You can set them to both be silent (OFF), have just the beginning of process alarm sound (bEGn), have just the end of process alarmsound (End) or have both of them sound (botH).OFF = Beginning of <strong>Pro</strong>cess and End of <strong>Pro</strong>cess Alarms are both Off and will not sound.bEGn = Beginning of <strong>Pro</strong>cess Alarm will sound, End of <strong>Pro</strong>cess Alarm will not sound.End = End of <strong>Pro</strong>cess Alarm will sound, Beginning of <strong>Pro</strong>cess alarm will not sound.botH = Both the Beginning and End of <strong>Pro</strong>cess Alarms will sound.7. Use the Arrow keys to choose your desired process alarm setting. Press the Enter key to store your choice.8. Press the Enter key. The display will read IdLE which stands for Idle. You <strong>Pro</strong>cess Alarm choice is now programmed.Once you have chosen which combination of process alarms you desire, your choice stays programmed for all remaining programs and use until youdecide to choose a different combination.To silence any alarms simply press one of the arrow keys.Use your Smart-phone to scan this QR code to watch <strong>Set</strong>-<strong>Pro</strong> how-to <strong>Pro</strong>gramming Videos!Page 11 of 19
<strong>Set</strong>-<strong>Pro</strong> w/ <strong>Express</strong> <strong>Mode</strong> Operating <strong>Manual</strong>Ceramic version – March 2012<strong>Pro</strong>gramming and Use Features – continued from previous pagePre-HeatCeramic artists often find it useful to dry their ware prior to firing. During Ceramic <strong>Express</strong> <strong>Mode</strong> programming the <strong>Set</strong>-<strong>Pro</strong> asks if you would like to “preheat"your ceramic ware. This pre-heat feature is designed exclusively to dry your ceramic ware. During pre-heat, the <strong>Set</strong>-<strong>Pro</strong> takes the kiln temperature to200°F and holds there for the amount of pre-heat time you have chosen.Pre-heat hold times can be set anywhere between 0 and 100 hours. It is not necessary to pre-heat if you don’t want to. In this case, simply select 00.00 asyour pre-heat time.Once the pre-heat is completed (timed out) the <strong>Set</strong>-<strong>Pro</strong> begins to run the firing program.Selecting the <strong>Pro</strong>per Cone Number“Cone” refers to a pyrometric cone that is designed to deform after being subjected to a given amount of heatwork (time and temperature). It’s amechanical devise most recognized in its “witness cone” form.Ceramic ware is most often specified as being fired to a “cone” number as opposed to a temperature. It makes sense as both time and temperature affectthe final outcome of the finished ware.What doesn’t make much sense, however, is the numbering system developed to describe these cones. We’re fairly sure this strange numbering systemmakes perfect sense to someone, somewhere but as a practical matter it falls short, particularly for the new ceramicist.The cone numbering system uses a “0” prefix at the lower temperature cones and drops the “0” as the cone numbers get hotter. Not only that, itseemingly repeats numbers. We have included a cone chart on page 17 of this manual. Have a look at it and note that some cone numbers have a “0” infront of them and some do not.Here’s a cautionary example to alert you to the importance of using the proper cone number. In ceramic firing there is a cone 06 and a cone 6. A cone 06will fire up to 1828°F. A cone 6 will fire up to 2232°F. That’s a difference of more than 400°F!!!! If you want to fire using a cone 06 and you select cone 6instead you will have a severe overfire. It won’t be pretty and expect some kiln damage along <strong>with</strong> it. We will note at this point that <strong>Evenheat</strong> does notwarrant or cover overfire damage, regardless of cause.Always know the correct cone number you wish to fire to and always pay attention to the entire cone number.<strong>Pro</strong>gram ReviewIt’s always best to review your program before starting it. When the controller is reading IdLE just press the REVIEW key and the display will automaticallyshow you what’s programmed. Just watch. When it’s done reviewing rEdI will be displayed. Press Start/Stop key to start the program. If it’s not what youwant, Press the Start/Stop key again to get to IdLE and enter a new program.When reviewing a Ceramic <strong>Express</strong> <strong>Mode</strong> program the <strong>Set</strong>-<strong>Pro</strong> will display your chosen Pre-heat hold time, Cone number, final firingtemperature, firing speed and hold time at final temperature. You will find more information describing the preset Ceramic <strong>Express</strong> <strong>Mode</strong> datastarting on page 16 of this manual.Start NowFor you brave souls out there who want to skip the program review you can get to the rEdI command quickly by pressing the REVIEW key twice (when IdLEis displayed). This bypasses the review process and gets you directly to rEdI. Just press the Start/Stop to start the program.Storing a Custom <strong>Mode</strong> <strong>Pro</strong>gramAs you go through the Custom <strong>Mode</strong> programming process and complete it, your program is automatically stored in the program number you selected atthe beginning of the programming process.Use your Smart-phone to scan this QR code to watch <strong>Set</strong>-<strong>Pro</strong> how-to <strong>Pro</strong>gramming Videos!Page 12 of 19
<strong>Set</strong>-<strong>Pro</strong> w/ <strong>Express</strong> <strong>Mode</strong> Operating <strong>Manual</strong>Ceramic version – March 2012Selecting and Running a Custom <strong>Mode</strong> <strong>Pro</strong>gram<strong>Pro</strong>gramming and Use Features – continued from previous pageAt some point you are likely to have set all 4 Custom <strong>Mode</strong> programs set to something you like and want to run again and again. The <strong>Set</strong>-<strong>Pro</strong> allows you toquickly select the program you desire.To Select a Custom <strong>Mode</strong> <strong>Pro</strong>gramFrom IdLE press the Enter key one time. Use the UP or DOWN arrow keys to choose USEr. Press the Enter key. Use the UP arrow key to choosethe Custom <strong>Mode</strong> program you wish to run and then press the DOWN arrow. The <strong>Set</strong>-<strong>Pro</strong> display automatically cycles through the chosenprogram settings and then displays rEdI. Simply press Start to begin the firing.Stopping the <strong>Pro</strong>gramAt any time you may stop the program while it’s running by pressing the Start/Stop key. The display will briefly read StOP and then read IdLE along <strong>with</strong>chamber temperature.4 User <strong>Pro</strong>grams in Custom <strong>Mode</strong>The <strong>Set</strong>-<strong>Pro</strong> allows the artist to save up to 4 Custom <strong>Mode</strong> programs in memory. Your programs remain in these 4 locations indefinitely and can be recalledor changed at any time.8 Segments per Custom <strong>Mode</strong> <strong>Pro</strong>gramFiring programs are built using segments. The <strong>Set</strong>-<strong>Pro</strong> allows you to use up to 8 segments for each Custom <strong>Mode</strong> firing program.<strong>Pro</strong>gramming a Time ValueThe <strong>Set</strong>-<strong>Pro</strong> accepts time as Hours and Minutes. When programming a time value, a red dot will illuminate in the middle of the four display digits.Numbers to the left of the dot indicate hours and numbers to the right of the dot indicate minutes.Temperature Rate OptionsTemperature is programmed in degrees per hour (°/hr.). At some point you may like to go as fast as possible. You can do this in two ways. You canprogram in the maximum rate of 9999 which works fine or use the FULL command. The FULL command instructs the controller to go Full on (or Full off) tothe set point temperature. To set your rate to FULL simply press the down arrow key until the display stops at 0000, then release the key. Wait a momentor two, then press the down arrow one time. The display will read FULL.Using the UP and DOWN Arrow KeysWhen using the arrow keys, especially when holding them down, the “tens” position will change first then the “hundreds” position will change then the“thousands” position will change. This process is designed to get you where you want to go a little faster, and easier. Another twist to this feature allowsyou to “tap” the button to change the position slowly. For instance: let’s say you’re holding down the up arrow key and the hundreds position is changing.Simply let go of the arrow key and press it once to increment the hundreds up by 1. Press it once again and it moves up by 1 again. And so on and so forth.Number of SegmentsThe <strong>Set</strong>-<strong>Pro</strong> can control up to 8 segments per Custom <strong>Mode</strong> program. However, that doesn’t mean that you need to use all 8. If your program only needs 1or 2 segments to operate, great, use only 1 or 2. When it comes time to choose just select the number of segments you need.Use your Smart-phone to scan this QR code to watch <strong>Set</strong>-<strong>Pro</strong> how-to <strong>Pro</strong>gramming Videos!Page 13 of 19
<strong>Set</strong>-<strong>Pro</strong> w/ <strong>Express</strong> <strong>Mode</strong> Operating <strong>Manual</strong>Ceramic version – March 2012<strong>Pro</strong>gramming and Use Features – continued from previous pageWriting Over DataYou will want to change the data in your Custom <strong>Mode</strong> programs at some point. We expect this as you try new techniques and fine tune your skills. Whenyou do, you’ll see the old firing data as you’re programming in the new data. Simply key in the new data as though the old never existed.Clearing FunctionThere is no feature that allows you to perform an “ALL CLEAR” function, i.e. set all the settings to 0.Fahrenheit or CelsiusYour <strong>Set</strong>-<strong>Pro</strong> was set at the factory for use in the Fahrenheit or Celsius temperatures scales. If programmed to the Fahrenheit scale you will see °F whenprogramming your set point temperatures. If set to Celsius you will see °C when programming your set point temperature. You will also note that a small,red dot will be illuminated at the bottom right of the <strong>Set</strong>-<strong>Pro</strong> display area to indicate a Celsius temperature. This small, red dot is not illuminated whenusing the Fahrenheit scale. If you would like to change which temperature scale you are using please consult <strong>Evenheat</strong> if you wish to adjust this setting.Maximum <strong>Pro</strong>grammable TemperatureThe maximum temperature and cone that can be programmed in the <strong>Set</strong>-<strong>Pro</strong> is 2350°F (1288°C), cone 10.Firing Down to Room TemperatureOver the years we’ve seen users attempt to program their kilns to come down to room temperature at the end of the firing. They have literallyprogrammed in 72° as the last segment temperature. Don’t do this. If your actual room temperature goes above what you have programmed the firingwon’t end until the room temp drops, you get an error or you stop the firing. If you want to control the cooling down to some low, final temperature don’tmake it room temperature. We suggest 200° or above.Delay Start FeatureThe <strong>Set</strong>-<strong>Pro</strong> can delay the start of your firing for up to 100 hours. This feature becomes valuable when different electrical rates are charged at differenttimes of the day.To Use the Delay Start featureWith the display reading rEdI press the DOWN arrow key one time. dELA is displayed. Use the UP and DOWN arrow keys to select the amountof delay start time. Press the Enter key. The display will read rEdI. Press the Start/Stop key one time. The <strong>Set</strong>-<strong>Pro</strong> will display dLY along <strong>with</strong>remaining delay start time. When the delay start counts down to 0 the firing program will start.To stop the delay start feature press the Start/Stop one time.Use your Smart-phone to scan this QR code to watch <strong>Set</strong>-<strong>Pro</strong> how-to <strong>Pro</strong>gramming Videos!Page 14 of 19
<strong>Set</strong>-<strong>Pro</strong> w/ <strong>Express</strong> <strong>Mode</strong> Operating <strong>Manual</strong>Ceramic version – March 2012<strong>Set</strong>-<strong>Pro</strong> Display ConditionsDisplay Alternating Between IdLE (Idle) and Temperature<strong>Pro</strong>gram is not running: kiln chamber temperature is displayed.Display Reading Temperature<strong>Pro</strong>gram is running and is ramping to temperature: kiln chamber temperature is displayed.Display Alternating Between Time Value and Temperature<strong>Pro</strong>gram is running and is holding at temperature: kiln chamber temperature is displayed along <strong>with</strong> the time value counting down remaining hold time.Dot Displayed Between the 10’s and 100’s DigitsIndicates the value being displayed is a time value.Dot Displayed to the Right of the 1’s DigitIndicates that a Celsius temperature is being displayed. If no dot is displayed the <strong>Set</strong>-<strong>Pro</strong> is displaying in Fahrenheit.<strong>Set</strong>-<strong>Pro</strong> Display MessagesALAr <strong>Pro</strong>cess Alarm, page 11 ErrF Error F, page 16 PC <strong>Pro</strong>metheus Clay, N/AArtC Art Clay, N/A ErrP Error P, page 16 PMC PMC, N/AbEGn Beginning <strong>Pro</strong>cess Alarm, page 11 Err1 Error 1, page 16 PrHt Pre Heat, page 6botH Both Beginning and End Alarms, page 11 °F Fahrenheit, page 14 rA Rate, page 8bron <strong>Pro</strong>metheus Bronze, N/A FASt Fast, page 7 rEdI Ready, pages 7 & 9°C Celsius (Centigrade), page 14 FULL Full, page 13 rSLO Extra Slow, N/ACASt Cast, N/A FUSE Fuse, N/A S.S. Art Clay Silver Standard, N/ACEr Ceramic <strong>Express</strong> <strong>Mode</strong>, page 6 GLAS Glass <strong>Express</strong> <strong>Mode</strong>, N/A S.S.-S Art Clay Silver Standard Slow Dry, N/ACO82 COE 82, N/A GoLd PMC Gold Slow, N/A SEG Segments, page 8CO90 COE 90, N/A HLd Hold, pages 7 & 9 SLO Slow, page 7CO96 COE 96, N/A IdLE Idle, page 11 SOFt Soften, N/ACOnE Cone, page 6 LAM Laminate, N/A SStP Skip Segment, page 10COP2 <strong>Pro</strong>metheus Copper, N/A LF Art Clay Silver 650/1200 Low Fire, N/A Stnd PMC Standard, N/ACOPP Art Clay Copper, N/A LF-S Art Clay Silver 650/1200 Low Fire Slow Dry, N/A StOP Stop, page 13CPLt Firing Complete, pages 7 & 9 M-C Metal Clay <strong>Express</strong> <strong>Mode</strong>, N/A tC Thermocouple, page 16CUSt Custom <strong>Mode</strong>, page 8 MEd Medium, page 7 tC/FAIL Thermocouple Failure, page 16dELA Delay Start, page 14 OFF Off, page 11 tME Time, page 10dLY Delay Start, page 14 P F PMC+ Fast, N/A tMP Temperature, page 10End End, page 11 P3 F PMC3 Fast, N/A USr User, page 8Errd Error D, page 16 P3 S PMC3 Slow, N/AUse your Smart-phone to scan this QR code to watch <strong>Set</strong>-<strong>Pro</strong> how-to <strong>Pro</strong>gramming Videos!Page 15 of 19
<strong>Set</strong>-<strong>Pro</strong> w/ <strong>Express</strong> <strong>Mode</strong> Operating <strong>Manual</strong>Ceramic version – March 2012Key Function TableStart/Stop - ENTERWhile at the Idle Position (IdLE) While Running a <strong>Pro</strong>gram At Any Other PositionPressing once allows you to choose between<strong>Express</strong> <strong>Mode</strong> and Custom <strong>Mode</strong> programmingStops the currently running programPressing once <strong>with</strong> rEdI displayed startsthe currently loaded firing program.While programming, it stores thecurrently displayed data and movesprogramming to the next step.UP Arrow – VIEW SEG – SKIP SEGWhile at the Idle Position (IdLE) While Running a <strong>Pro</strong>gram At Any Other PositionNo FunctionAllows you to access the View Segment,Add Temperature, Add Time andSkip Segment features.Used to select various programvalues while programming.DOWN Arrow - REVIEWWhile at the Idle Position (IdLE) While Running a <strong>Pro</strong>gram At Any Other PositionPressing twice takes youdirectly to the rEdI positionAllows you to view entirecurrently running program.Used to select various programvalues while programming.Pressing once while rEdI is displayedallows for setting of any delay time.<strong>Set</strong>-<strong>Pro</strong> Error MessagesThe <strong>Set</strong>-<strong>Pro</strong> monitors each firing and compares performance to a set of standards. If the firing does not meet performance standards the <strong>Set</strong>-<strong>Pro</strong>automatically stops the firing and displays a corresponding Error Code describing the fault. These codes are identified and described below.tC FAIL - tC alternating <strong>with</strong> FAIL indicates the thermocouple has failed. Replace the defective thermocouple <strong>with</strong> <strong>Evenheat</strong> supplied thermocouple only.To clear, press any key.Err1 – Error 1 indicates the temperature in the kiln is rising slower than 15°F/hr during an up ramp. If this rate continues for 8 minutes, the firing will bestopped. Err1 may be an indication that elements are worn or defective or that a relay has stopped working.ErrF – Error F indicates the temperature in the kiln is decreasing less than 15°F/hr during a down ramp. If this rate continues for 8 minutes, the firing willbe stopped. ErrF may be an indication that a relay has stuck in the on position.Errd – Error d indicates that the kiln temperature is 100°F above the traveling set point, which is the current desired temperature in the kiln. The travelingset point will increase or decrease according to the programmed rate. Errd may indicate a stuck relay in the on position or a problem <strong>with</strong> a thermocouplenot reading properly.ErrP – ErrP is displayed whenever there is a power interruption that is long enough to stop the firing. If the power interruption is brief, the kiln willcontinue to fire when power is restored; in this case there will be no indication of a power failure. To clear the error, press any key.tC – The Red and Yellow thermocouple wires are reversed.Use your Smart-phone to scan this QR code to watch <strong>Set</strong>-<strong>Pro</strong> how-to <strong>Pro</strong>gramming Videos!Page 16 of 19
<strong>Set</strong>-<strong>Pro</strong> w/ <strong>Express</strong> <strong>Mode</strong> Operating <strong>Manual</strong>Ceramic version – March 2012Preset Ceramic <strong>Express</strong> <strong>Mode</strong> DataFAST SPEEDSegment 1 Segment 2 Segment 3 Segment 4Rate 570°F/Hr. 570°F/Hr. 570°F/Hr. 200°F/Hr.<strong>Set</strong> Point Temperature 200°F 1050°FCone TemperatureMinus 256°FCone TemperatureHold TimeUser Defined Pre-Heat(if any)0 Min. 0 Min. User Defined Hold (if any)MEDIUM SPEEDSegment 1 Segment 2 Segment 3 Segment 4Rate 120°F/Hr. 400°F/Hr. 300°F/Hr. 120°F/Hr.<strong>Set</strong> Point Temperature 200°F 1050°FCone TemperatureMinus 256°FCone TemperatureHold TimeUser Defined Pre-Heat(if any)10 Min. 0 Min. User Defined Hold (if any)SLOW SPEEDSegment 1 Segment 2 Segment 3 Segment 4Rate 80°F/Hr. 200°F/Hr. 200°F/Hr. 108°F/Hr.<strong>Set</strong> Point Temperature 200°F 1050°FCone TemperatureMinus 256°FCone TemperatureHold TimeUser Defined Pre-Heat(if any)30 Min. 0 Min. User Defined Hold (if any)Use your Smart-phone to scan this QR code to watch <strong>Set</strong>-<strong>Pro</strong> how-to <strong>Pro</strong>gramming Videos!Page 17 of 19
<strong>Set</strong>-<strong>Pro</strong> w/ <strong>Express</strong> <strong>Mode</strong> Operating <strong>Manual</strong>Ceramic version – March 2012Cone TableCone Table / Equivalent Cone Temperatures (Factory <strong>Set</strong>tings)°F - Equivalent Cone Temperatures Taken from 108°F TableCone Temperature Cone Temperature Cone Temperature Cone Temperature022 1087°F 014 1485°F 06 1828°F 3 2106°F021 1112°F 013 1539°F 05 1888°F 4 2124°F020 1159°F 012 1582°F 04 1945°F 5 2167°F019 1252°F 011 1607°F 03 1987°F 6 2232°F018 1319°F 010 1657°F 02 2016°F 7 2262°F017 1360°F 09 1688°F 01 2046°F 8 2280°F016 1422°F 08 1728°F 1 2079°F 9 2300°F015 1456°F 07 1789°F 2 2088°F 10 2345°F°C - Equivalent Cone Temperatures Taken from 108°F TableCone Temperature Cone Temperature Cone Temperature Cone Temperature022 586°C 014 807°C 06 998°C 3 1152°C021 600°C 013 837°C 05 1031°C 4 1162°C020 626°C 012 861°C 04 1063°C 5 1186°C019 678°C 011 875°C 03 1086°C 6 1222°C018 715°C 010 903°C 02 1102°C 7 1239°C017 738°C 09 920°C 01 1119°C 8 1249°C016 772°C 08 942°C 1 1137°C 9 1260°C015 791°C 07 976°C 2 1142°C 10 1285°CUse your Smart-phone to scan this QR code to watch <strong>Set</strong>-<strong>Pro</strong> how-to <strong>Pro</strong>gramming Videos!Page 18 of 19
<strong>Set</strong>-<strong>Pro</strong> w/ <strong>Express</strong> <strong>Mode</strong> Operating <strong>Manual</strong>Ceramic version – March 2012Kiln Trouble ShootingListed below are some of the more probable kiln problems you’ll encounter along <strong>with</strong> their most common cause and repair advice. Please feel free tocontact <strong>Evenheat</strong> for assistance when dealing <strong>with</strong> these and other potential kiln problems.No DisplayCheck to see that the kiln is actually plugged in. It happens! Also check the circuit protection (breakers or fuses) to see that they are not tripped or open.Breakers and fuses don’t trip or open for no reason. They indicate a fault which should be investigated by licensed personnel. See below.Kiln Won’t Reach TemperatureA low voltage will certainly slow a kiln down and, if the drop is low enough, it may cause failure to reach temperature. Low voltage is generally associated<strong>with</strong> your power service or provider and is rarely a fault in the kiln.A failed element reduces the heat produced. Failed elements tend to be very visual and are easily seen. With the kiln off (not running and unplugged) havea look at the elements for any breaks. If you see no breaks in the heating element then suspect a relay problem.A failed relay (fails to close) reduces the heat produced. While a relay failure acts like an element failure, a relay is not visible. If the heating elementsappear to be intact replace the relay.Kiln won’t stop firing (won’t shut off)Most likely a failed relay (failed closed). A failed relay may cause the kiln temperature to increase when it should be decreasing. Depending upon yourparticular kiln model you may see up to 3 relays used in its design. Identifying the failed relay is fairly simple as the element connected to it will remain on.Unplug the kiln and remove the kiln control panel. Simply follow the element leads to the relay to identify it. Relays are maintenance items and werecommend replacing all of them when needing to replace one.Check your program.tC/Fail is DisplayedThe thermocouple (temperature sensor) circuit is faulty. The thermocouple circuit is broken at some point, usually the thermocouple itself. Thethermocouple circuit consists of the thermocouple, any connecting blocks and the thermocouple lead wire connecting to the <strong>Set</strong>-<strong>Pro</strong>.Circuit <strong>Pro</strong>tection Opens (“Blown” Breaker or Fuse)Circuit protection can open for various reasons. The BIG TWO are a short circuit and overheating. We’ll look at each separately.Short circuits occur when line voltage finds it’s way to another line or ground. They are usually violent occurrences <strong>with</strong> lots of noise, flashes of light andmaybe a bit of smoke! During a short circuit the amperage goes very high. This increase in amperage exceeds your breaker/fuse rating which causes themto open (“blow”). That’s exactly why they’re there. Short circuits generally happen immediately upon plugging the kiln in or running the firing. Theygenerally do NOT happen after the kiln has been on for some time.Overheating of the breakers/fuses can cause them to open (“blow”). Overheating needs time to happen. If the kiln is running fine for a while and then thebreakers or the fuses open we can be fairly confident that the problem is overheating and not a short circuit. Overheating reduces the amount ofamperage a breaker/fuse will allow to pass before it opens. Overheating is caused by many factors, the most common are: loose wire connections at thebreakers/fuses, the size of the wire “feeding” the kiln is too small, the electrical receptacle is faulty or breaker/fuse is faulty.Reasons for a Failed Heating ElementGlass kiln elements rarely fail on their own. When they do fail it’s usually from contamination. Contamination is stuff like glass bits, glass separator, fiberpaper, etc. that finds its way into the element groove. If you do have an element failure, double check the groove at the point of failure. Remove powerform the kiln and attempt to remove any debris from the groove <strong>with</strong> a sharp tool. Not doing so may allow the debris to destroy the replacement element.Reasons for a Failed RelayRelays are the switches that turn the heating elements on and off. They are moving parts and they’re working all the time. Long, slow firings and extendedanneals make the relays work more which shortens their overall lifespan. Relay replacement is expected at some point.Use your Smart-phone to scan this QR code to watch <strong>Set</strong>-<strong>Pro</strong> how-to <strong>Pro</strong>gramming Videos!Page 19 of 19