HT-1 Product Manual - Evenheat Kilns
HT-1 Product Manual - Evenheat Kilns
HT-1 Product Manual - Evenheat Kilns
- No tags were found...

You also want an ePaper? Increase the reach of your titles
YUMPU automatically turns print PDFs into web optimized ePapers that Google loves.
<strong>HT</strong>-1 Oven Operating <strong>Manual</strong><strong>HT</strong>-1Table of ContentsThank you for purchasing an <strong>Evenheat</strong> heat treating oven. At <strong>Evenheat</strong> we like tools that work and work well. Not just in the tools we use but in the toolswe make. Quality doesn't just happen. It takes an understanding of what you want and how to accomplish it. It takes a good eye, patience and ability. Inother words, craftsmanship. We understand this and it’s how we build.The <strong>HT</strong>-1 oven is designed specifically for the heat treating of metals. These ovens find use in many applications including die and prototype work totempering and color case hardening.Cautions & Safety ............................................................................ 2Oven Set-UpIntended Use........................................................................... 3Oven Location ......................................................................... 3Electrical Requirements .......................................................... 3Oven FeaturesDoor Handle Installation ......................................................... 4Temperature Controls ............................................................. 4Thermocouple Install & Use .................................................... 4Power Interrupt Switch ........................................................... 4Door Handle / Latch ................................................................ 5Control Power Switch ............................................................. 5Heating Elements .................................................................... 5Insulating Firebrick .................................................................. 5Using the OvenInitial Use ................................................................................ 5Loading the Oven .................................................................... 6Running the Oven ................................................................... 6Entering the Chamber While Hot ............................................ 6Periods of Non-Use ................................................................. 6Reduction Atmospheres.......................................................... 6Heat Treating Data ........................................................................... 7Oven Maintenance and RepairHeating Elements .................................................................... 10Thermocouple ......................................................................... 10Control Relay .......................................................................... 10Set-Pro & Rampmaster Controls ............................................. 11Fire Brick ................................................................................. 11Control Fuse ............................................................................ 11Cleaning .................................................................................. 11Warranty .......................................................................................... 12© Copyright <strong>Evenheat</strong> Kiln, Inc. 2012Page 1
<strong>HT</strong>-1 Oven Operating <strong>Manual</strong><strong>HT</strong>-1Cautions & SafetyCAUTIONS & SAFETYREAD AND UNDERSTAND THIS OPERATING MANUAL BEFORE OPERATING THE OVENA qualified electrician or service person should be used for all electricalservice or repairs. All electrical codes must be followed.Unplug or disconnect the oven from the electrical service before servicingor vacuuming.Use correct voltage, wire size and fuse or breakers. Information neededto determine proper electrical service is printed on the oven nameplate.Make sure all electrical connections are tight.Avoid aluminum wire for electrical service.Ovens must be properly grounded.Always use the proper electrical receptacle.Never use an extension cord to operate the oven.Never alter the power supply cord or power supply cord plug. Alterationscan be dangerous. Alterations will void any warranties.Never allow the power supply cord to touch the oven. If the powersupply cord, plug or receptacle becomes damaged replace immediately.Do not attempt to touch or replace the heating elements while the ovenis plugged in or connected to the electrical service. Electrical shock mayresult in serious injury or death.Do not touch heating elements with anything.Do not alter or modify the oven in any way.Replace any worn, damaged or defective parts immediately with <strong>Evenheat</strong>replacements only. Alterations can be dangerous. Alterations willvoid any warranties.Do not remove the stand from the oven. The original factory suppliedstand must remain attached to the oven.Do not install the oven closer than 12” from combustible wall surface orobject.Place the oven only on a non-combustible surface.Do not place the oven in any structure resembling a carport or screenedin porch. Avoid areas that are subject to outdoors weather.Never install outdoors. Avoid moisture.It is the user’s responsibility to provide ventilation capable of removingall gases, fumes and other airborne contaminants produced duringfiring safely from work area and building structure.The surface of the oven is hot and burns are possible. Keep all childrenand unsupervised personnel away.Do not position the oven near combustible materials.Do not position the oven near flammable materials. Flammable materialsshould not be used or stored in the same location as the oven. Theoven is a heat source by definition. Keep flammable materials wellaway.Never place anything under or above the oven for storage. Absolutelynothing should be propped against the oven.The oven should be permanently positioned - it’s not mobile.Do not operate the oven with the door open.Do not operate the oven over the maximum temperature rating printedon the nameplate. In most cases, the temperature of the oven shouldnot exceed 2200°F.Do not use the oven to prepare food.Never fire the oven unattended.Always wear protective clothing when operating the oven. Protectiveclothing includes, but is not limited to, loose fitting cotton clothing, heatresistant gloves and eyewear capable of filtering infrared light.Know what you’re heating. If you are unsure as to the safety of heatinga particular metal or substance contact your materials supplier for guidance.If you are unsure as to the safety of heating a particular materialdo not do it.Do not heat salts, cyanide. Gases produced are toxic.Install in a covered, well ventilated area. Never place the oven in asmall, enclosed area such as a closet, cabinet or very small room.© Copyright <strong>Evenheat</strong> Kiln, Inc. 2012Page 2
<strong>HT</strong>-1 Oven Operating <strong>Manual</strong><strong>HT</strong>-1Oven Set-UpIntended Use<strong>Evenheat</strong> Heat Treat Ovens are a controlled heat source designed for the sole purpose of heat treating metals. Do not use the oven for anything otherthan this intended purpose. It is the operators responsibility to determine the suitability and safety of any material to be heated or heat treated. Manymaterials are unsafe to heat such as various salts and cyanide which emit toxic gases when heated. Please contact your materials supplier for guidance inthe materials response to elevated temperature, suitability and required safety precautions. If you are not completely sure as to the safety of heating aparticular material, don’t do it.Oven LocationFirst and foremost, choose a permanent location for the oven that gives you room to move. You’ll be handling some very hot material and the last thingyou need is a restricted space. So, give yourself some room!As you run the heat treat process you’ll be handling some very hot material outside the oven. That means, at some point, you’ll drop something youdon’t want to drop. Something very, very hot!! For this reason the supporting surface of the oven (whatever your oven is placed on) and the surroundingfloor most be made of, or covered with a non-combustible material. There’s no negotiation here folks, it just has to be.The oven must be placed no closer than 12” from any walls, or other anything else for that matter. Further if you like, but no closer. This distance shouldbe maintained throughout the travel path of the oven door as it is both fully opened and fully closed. While it’s not absolutely necessary that walls andother structures be non-combustible we do like the idea of using some type of concrete based sheeting on these areas. This material is readily availableat most home improvement stores.Your location should give you at least 36” from the top of the oven to the ceiling. Again, while it’s not absolutely necessary that the ceiling be noncombustiblewe do like the idea of using some type of concrete based sheeting on these areas. This material is readily available at most home improvementstores.Keep your flammable materials in a separate room from your oven. The oven, by definition, is a heat source and an ignition source for flammables.Please keep these items stored separate, safe location, thank you.The oven location should be well ventilated and covered. That means give it space and keep it protected from the outdoors. We’ve heard reports ofsome using their ovens in carports, screened-in porches and the like. We’ve also been told about folks placing their ovens in small, closeted areas. Don’tdo these things. If you keep it indoors and unconfined and you’re doing it just right.Try to choose a location that is a low-traffic area. The oven will get hot when in use. Hot enough to cause burns and serious injury. Instruct your spouse,kids and guests to avoid contact.Electrical Requirements<strong>Evenheat</strong> Heat Treat Ovens are powered electrically. It is recommended that the oven be operated from a dedicated circuit. That is, the oven should bethe only device being operated from the circuit. It is also recommended that all electrical installations be performed by a licensed electrician.Model Voltage Amperage Watts Minimum Wire Size Breaker/Fuse Electrical Receptacle<strong>HT</strong>-1 240V 18A 4320W 12AWG 20A NEMA 6-20RUse copper wire only, do not use aluminum wire. Wire size is a minimum and is intended for runs less than 40 feet. Wire and breaker/fuse sizes are forreference only. Electrical installation must comply with all local codes.© Copyright <strong>Evenheat</strong> Kiln, Inc. 2012Page 3
<strong>HT</strong>-1 Oven Operating <strong>Manual</strong><strong>HT</strong>-1Oven FeaturesDoor Handle/Latch Installation and UseThe oven door handle must be attached before use and will be found packed with the instructions. Simply thread the handle onto the handle stud, locatedon the oven door, until it stops. Then, using a 7/16” wrench, back the jam nut up to the handle and tighten to lock.To close and latch the door for use: Close the door using the handle and continue to push forward on the handle to insert the keyed handlestud into the keyed receiver attached to the oven and rotate 90° to secure.To open and unlatch the door: Push slightly on the door handle while rotating the handle 90°. Pull the handle away from the oven to open.Temperature ControlsOur ovens are equipped with either our Set-Pro or Rampmaster temperature controls. Separate operating instructions have been included with youroven. All of our electronic temperature controls are designed & manufactured exclusively for <strong>Evenheat</strong> by Bartlett Instrument Co. in Iowa, USA.Scan this QR code to view instructional programming videos for both the <strong>Evenheat</strong> Set-Pro and Rampmastercontrols.You will also find these instructional videos and manuals on our web site www.evenheat-kiln.comThermocouple Installation and UseThe thermocouple is removed from the chamber for shipping and must be re-installed be fore use. Insert the thermocouple (temperature sensor) intothe back wall of the <strong>HT</strong>-1 and secured with the included screws.The thermocouple is the temperature sensor and is located in the back wall of the oven. The thermocouple is a rugged component that can take someabuse but try to avoid hitting it if you can. The thermocouple passes through the chamber wall and is connected to a block fastened to the outside of theoven. From this block, extension wire runs directly to the electronic controls. Care should be taken to see that the extension wire be kept from harm. Ifthe extension wire becomes damaged it must be replaced with TYPE K extension wire only which is available from <strong>Evenheat</strong>. Replacing it with any othertype of wire will introduce an error into the temperature reading.The thermocouple works best if it’s not crowded against your work. Give it as much room as practically possible. Avoid blocking the thermocouple fromthe sides, particularly both sides at once.If thermocouple replacement is necessary replace only with a TYPE K thermocouple which is available from <strong>Evenheat</strong>. Replacing it with any thermocoupletype other than TYPE K will introduce an error into the temperature reading. So, TYPE K only.Power Interrupt SwitchYour oven is equipped with a power interrupt switch that is designed to automatically remove power from the heating elements as the oven door isopened. This automatic power interrupt switch adds an additional level of security against electrical shock. However, this power interrupt switch, likeany mechanical device, can fail. Do not touch the heating elements with anything without first unplugging the kiln from the electrical service.The automatic power interrupt switch is located on the lower door hinge. The switch uses a camming action as the door is operated to activate theswitch. Do not alter or modify this switch assembly in any way.© Copyright <strong>Evenheat</strong> Kiln, Inc. 2012Page 4
<strong>HT</strong>-1 Oven Operating <strong>Manual</strong><strong>HT</strong>-1Oven FeaturesDoor & Door Handle/LatchWorking in the heat is fun, trying to avoid it isn’t. Doors that swing down throw off massive amounts of heat just below the chamber entrance. Our sidehinged doors swing out to the left to keep the heat away for more cool and comfortable use.The handle on our swing out door is conveniently located at the front of the door, not hidden along the side. This spring loaded, phenolic handle is coolto the touch, is one-handed in design and serves as the door latch as well. This spring loaded design allows the oven door to move and expand during usewithout creating stress.Control Power SwitchThe power switch located on the oven control panel applies power to the temperature controls. When the oven is not in use we recommend throwingthis power switch to the OFF position.Heating ElementsYour oven may contain up to 4 heating elements. The heating elements are embedded into the oven walls and produce all the heat within the oven. Theheating elements will be energized with electrical power during use. Do touch the heating elements at any time with anything while the oven is pluggedin. Doing so presents an electrical shock hazard.Insulating Firebrick<strong>Evenheat</strong> uses nothing but American insulating firebrick in its construction. American insulating firebrick consistently outperforms all others when itcomes to thermal efficiency, strength and machinability. It makes for one tough oven.Insulating firebrick, by its nature and design, is relatively soft compared to what we would normally think of as “brick”. While strong, it can be damagedwith rough handling. If you use reasonable care during use you’ll have no problem. If you start throwing stuff around expect to see some wear & tear.Initial UseWe recommend operating the oven empty before attempting any heat treating operations. This serves a few purposes: It allows you to become familiarwith the controls, it allows the elements to develop a protective oxide coating and it introduces you to accessing the chamber under high heat conditions.Close the oven door and program & run your controls for a rate of 1000°/hour to 1800°F and hold for 10 minutes. See the included controls operatinginstructions for details. As the oven is heating you’ll notice a clicking sound along with an increasing chamber temperature. The clicking sound comesfrom the control relay as it turns the heating element on and off.Once the oven has reached temperature and finishes holding it will go to the Idle or Standby condition (depending on control). The control is no longerrunning the program and is off. This would be a great time access the oven chamber and learn what high temperature is going to look and feel like duringactual use. Before accessing the oven, throw the control power switch to the OFF position (0).Before you access the chamber we need to go over some ground rules!! High heat will escape very quickly. Keep your body well awayfrom the chamber, particularly your face. We also recommend that you wear loose fitting cotton clothing, wear eye protection capableof filtering UV and IR light and tie all hair back. Always approach the chamber slowly.Ready? Stand back and extend your left hand to the door latch, rotate the latch and slowly open the oven door. Feel that rush of heat? We weren’t kiddingwhen we said it escapes quickly. This is the environment you will be working in.During use the heating elements produce a naturally occurring, protective oxide coating. Their appearance will have gone from a shiny to dull look. Thisis normal and welcome.© Copyright <strong>Evenheat</strong> Kiln, Inc. 2012Page 5
<strong>HT</strong>-1 Oven Operating <strong>Manual</strong><strong>HT</strong>-1Using the OvenLoading the OvenBefore loading (or unloading) the oven throw the power switch to the OFF position. This is a question of safety. Contact with electrically charged heatingelements may result in serious injury or death.There are those who load their metal into the oven cold and those who prefer to load the oven once it has reached temperature. We prefer loading theoven cold for a few reasons. Placement of your materials is much easier and more comfortable in a cold oven as opposed to one that’s hot. We also tendto like the idea of the metal coming up to temperature with the chamber. Having said that, there are many who prefer to load a hot oven. In either case,the oven power switch should be in the OFF position when loading.When placing any material into the oven avoid making contact with the heating elements and thermocouple.We recommend placing your metal no closer than 1-1/2” from the heating elements.Once the metal is properly loaded and positioned close the oven door and latch it. You are now free to throw the power switch the ON position andperform your heat treating operation.Running the OvenOnce your metal is loaded and the oven door has been latched closed it is now time to run the heat treating process. Your oven is supplied with eitherthe Set-Pro or Rampmaster controls. A separate operators manual has been included with your oven describing the use of the these controls. The operatorsmanuals for these controls can also be found on our web site www.evenheat-kiln.com.We have included heat treating data starting on page 7 of this manual. This particular data has been supplied to us by various sources. There are manyother sources out there that deal not only with the actual temperatures and times, but techniques and procedures as well. We encourage to seek thisinformation.Entering the Chamber While HotGenerally speaking you will not enter the oven chamber while the heat treating program is in process. You will, however, enter the oven chamber at thevery end of the process.Before entering the oven throw the power switch to the OFF position. Contact with electrically charged heating elements may result in serious injury ordeath.Operate the latching action of the door handle and slowly open the oven door. Approach the oven slowly, high heat escapes quickly. Use tongs to removethe metal for quenching.Once all metal is removed shut the oven door. This helps to retain heat in the fire brick for any subsequent tempering processes.Periods of Non-UseThrow the oven power switch to the OFF position when the oven is not in use. Keep the oven door latched closed as well.Don’t store anything on or around the oven.Reduction AtmospheresIt is permissible to introduce the inert gases of Argon, Helium or Nitrogen into the heating chamber.© Copyright <strong>Evenheat</strong> Kiln, Inc. 2012Page 6
<strong>HT</strong>-1 Oven Operating <strong>Manual</strong><strong>HT</strong>-1Heat Treat DataHeat Treat DataThe following heat treat data is taken from many sources and may or may not give you exactly what you’re looking for. Such is the nature of the beast.We suggest using this data more as a starting and reference point from which to build your heat treating experience. You are encouraged to seek outmore specific data and procedural information regarding your specific metal. Such information is available from your steel suppliers and manufacturersas well as published books and, of course, the internet.Observations and TipsThere are two schools of thought on when to load metal into the oven: cold oven or hot oven. People do both. If it makes no difference to you we wouldchoose loading cold. We tend to like the idea of the metal responding to temperature changes over a longer period of time. That being said, the choice isyours.While our temperature controls do allow you to control the rate of heating it is generally accepted that the rate (°F/hour) of heating can be As Fast AsPossible. To achieve As Fast As Possible with our Rampmaster control simply choose a rate of 9999. To achieve As Fast As Possible with our Set-Pro controlsimply choose a rate of Full.A vast majority of heat treating firings are simple up to temperature, hold for a period of time and then shut off sort of things. In the world of controlsthis type of firing is referred to as a 1 segment firing. As you program either the Set-Pro or Rampmaster controls they ask how many SEGS you want touse. The simple answer is 1. In the event that your heat treating program requires more than 1 segment, you’re welcome to do so.As we just noted, most heat treat programs are 1 segment affairs. The data in the following tables are all 1 segment programs. Our tables are set-up inthe order in which you will program the controls: number of segments first, then rate, then temperature then hold time.Before removing any of your work from the oven throw the power switch to the off position. Safety first and we thank you!Complete Heat Treating generally involves both hardening and tempering (drawing). Harden first then Temper. These are two separate processes andrequire different temperatures and different hold times. The following tables are labeled as Hardening and Tempering.Hardening is a one-time firing process. It’s usually never repeated on the same piece unless you screw up and need to take another shot at it.Tempering is often a repeated process. That is, your steel may require you to perform the tempering operation more than one time. It’s not always thecase but you will see in the following tables that some steels require up to 3 tempering firings.How to quench or quickly cool your metals once at harden temperature? Air Quench? Oil quench? Plate Quench? Other? It’s up to you and your needs.We would tell you to be careful when pulling the metal for quenching. Opening the oven allows heat to escape quickly, do so carefully and move slowlyto the chamber to avoid burns. You don’t need any more scars.© Copyright <strong>Evenheat</strong> Kiln, Inc. 2012Page 7
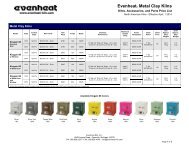
<strong>HT</strong>-1 Oven Operating <strong>Manual</strong><strong>HT</strong>-1Heat Treat Data - HardeningThis data should be viewed as a starting and reference point on which to build your experience.You will note on the table that we have shown information in the order in which you will program your Set-Pro or Rampmaster control: Number of segmentsfirst, rate used to reach temperature, the hardening temperature and the amount of hold time at the hardening temperature.HARDENINGSteel TypeNumber ofSegments Usedin ProgramRate to ReachHardening TemperatureHardening TemperatureHold Time atTemperatureD2 Tool Steel 1 9999 or Full 1880°F 15 minutesD2 Tool SteelSprings and Rockers1 9999 or Full 1880°F 15 minutes154CM S.S. 1 9999 or Full 1900°F 15 minutes154CM S.S.Springs and Rockers1 9999 or Full 1900°F 15 minutes440C S.S. 1 9999 or Full 1880°F 15 minutes440C S.S.Springs and Rockers1 9999 or Full 1880°F 15 minutesCPM 440V S.S. (S60V) 1 9999 or Full 1950°F 30 minutesCPM 440V S.S. (S60V)Springs and Rockers1 9999 or Full 1950°F 30 minutesATS-34 S.S. 1 9999 or Full 1900°F 15 minutesATS-34 S.S.Springs and Rockers1 9999 or Full 1900°F 15 minutesVascoware & Cru-ware 1 9999 or Full 1950°F 30 minutesBoye Dendritic S.S. 1 9999 or Full 1880°F 30 minutes440A S.S. 1 9999 or Full 1880°F 15 minutesCMP420V 1 9999 or Full 2150°F 10 minutes© Copyright <strong>Evenheat</strong> Kiln, Inc. 2012Page 8
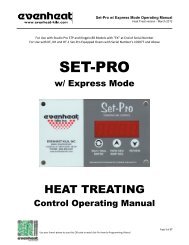
<strong>HT</strong>-1 Oven Operating <strong>Manual</strong><strong>HT</strong>-1Heat Treat Data - TemperingThe following data relates directly to the hardening data detailed on the previous page. Again, this data should be viewed as a starting and referencepoint on which to build your experience.You will note on the table that we have shown information in the order in which you will program your Set-Pro or Rampmaster control: Number of segmentsfirst, rate used to reach temperature, the tempering temperature and the amount of hold time at the tempering temperature.TEMPERINGSteel TypeTo AchieveRockwellHardnessNumber ofSegments Usedin ProgramRate to Reach HardeningTemperatureTempering TemperatureHold Time at TemperatureD2 Tool Steel 58 RC 1 9999 or Full 500°F 2 hours – 2 timesD2 Tool SteelSprings and Rockers43 to 45 RC 1 9999 or Full 1200°F 2 hours – 1 time154CM S.S. 58 RC 1 9999 or Full 400°F 2 hours – 2 times154CM S.S. 61 RC 1 9999 or Full 275°F 2 hours – 2 times154CM S.S.Springs and Rockers43 to 45 RC 1 9999 or Full 1200°F 2 hours – 1 time440C S.S. 58 RC 1 9999 or Full 225°F 2 hours – 1 time440C S.S.Springs and Rockers43 to 45 RC 1 9999 or Full 1100°F 2 hours – 1 timeCPM 440V S.S. (S60V) 58 RC 1 9999 or Full 300°F 2 hours – 2 timesCPM 440V S.S. (S60V)Springs and Rockers43 to 45 RC 1 9999 or Full 1100°F 2 hours – 1 timeATS-34 S.S. 58 RC 1 9999 or Full 400°F 2 hours – 1 timeATS-34 S.S. 61 RC 1 9999 or Full 275°F 2 hours – 1 timeATS-34 S.S.Springs and Rockers43 to 45 RC 1 9999 or Full 1200°F 2 hours – 2 timesVascoware & Cru-ware 1 9999 or Full 1000°F 2 hours – 3 timesBoye Dendritic S.S. 1 9999 or Full 400°F 1 hour – 2 times440A S.S. 1 9999 or Full 212°F 2 hours – 1 timeCMP420V 1 9999 or Full 400°F 2 hours – 2 times© Copyright <strong>Evenheat</strong> Kiln, Inc. 2012Page 9
<strong>HT</strong>-1 Oven Operating <strong>Manual</strong><strong>HT</strong>-1Oven Maintenance and RepairHeating ElementsThe heating elements we install in our heat treat ovens are made of a special alloy that promotes long life and element retention. Under normal operatingconditions you should easily get 10+ years of life. Normal operating conditions means you avoid getting debris on the elements, you don’t go beyondthe 2000°F and you don’t smoke up the chamber.There is one maintenance issue that you can periodically perform on the elements/element grooves: vacuuming! Unplug the oven and carefully vacuumthe entire element groove. No need to be rough just run the vacuum along the grooves. This helps to remove any loose debris that may accumulate inthe grooves.In the unlikely event that you do need to replace an element we invite you to visit our web site for detailed replacement instructions complete withimages and text. You’ll find it at www.evenheat-kiln.com. Click on Technical in the upper navigation bar and choose Knife Ovens.ThermocoupleThe thermocouple is your temperature sensor. It’s located in the back wall of the oven. Our standard thermocouple is known as a Type K. The term“Type K” refers to the type of alloys used to manufacturer the thermocouple. We’ve chosen a gauge that is small enough to respond quickly to temperaturesyet not so small that it’s delicate. It’s a good match with our controls.The thermocouple itself needs no maintenance other than replacement if it fails. Failure of the thermocouple is seen as an error message on the controls.The thermocouple must be replaced with another Type K thermocouple. There are many “Types” out there but only a Type K will work properly. Using adifferent “Type” will introduce an error into the temperature reading and that’s not a good thing. For best results replace your thermocouple with anoriginal <strong>Evenheat</strong> thermocouple.We have included detailed thermocouple replacement instructions on our web site www.evenheat-kiln.com. Click on Technical in the upper navigationbar and choose Knife Ovens. We did feel that replacement was easy enough with simple text instructions so we have included those below.To replace the thermocouple first unplug the oven and allow it to return to room temperature.The thermocouple is part of an assembly that is located in the back wall of the oven. Simply remove the 2 screws that fasten the assembly tothe oven and pull it from the oven.Loosen the 2 screws that fasten the thermocouple to the oval shaped block and remove the thermocouple. The damaged thermocouple isnow free and can be disposed of.Attach the replacement thermocouple to the oval shaped block being mindful to place the red thermocouple lead to the red thermocouplelead wire. Tighten the screws fairly snug. If you hook it up backwards, don’t worry, you won’t hurt anything, the controller just won’t work.Insert the thermocouple into the oven and re-fasten the thermocouple assembly to the jacket. That’s it.Control RelayThe control relays are the switches that turn the heating elements on and off on command from the control electronics. They are an electromechanicalstyle which means it’s literally a moving, mechanical devises. You’ll actually hear them clicking on and off as the oven is operating, particularly whileholding at some temperature. Our oven designs tend to run no more than 50% of the relays maximum current. This is fairly conservative approach whichextends relay life. However, given the constant cycling of on and off the relay’s we don’t expect that they will last forever.There is no maintenance to be performed on the relay’s other than replacement in the event of failure. Failure is usually seen as the oven heating upslowly or not heating at all.In the event that you do need to replace a relay we invite you to visit our web site for detailed replacement instructions complete with images and text.You’ll find it at www.evenheat-kiln.com. Click on Technical in the upper navigation bar and choose Knife Ovens.© Copyright <strong>Evenheat</strong> Kiln, Inc. 2012Page 10
<strong>HT</strong>-1 Oven Operating <strong>Manual</strong><strong>HT</strong>-1Oven Maintenance & RepairSet-Pro & RampMaster ControlsBoth of our Set-Pro and Rampmaster controls are maintenance free. In the unlikely event that you do need to replace a controller we invite you to visitour web site for detailed replacement instructions complete with images and text. You’ll find it at www.evenheat-kiln.com. Click on Technical in theupper navigation bar and choose Knife Ovens.Fire BrickThe insulating fire brick while strong, can be damaged with rough handling. Generally speaking, damage that is small or minor may be ignored. Any brickdamage that affects performance should be repaired. If you need to repair any brick please contact us for assistance and preferred repair methods.Control FuseThe electronic controls are protected with a control fuse located in a fuseholder on the backside of the oven control panel. The fuse is rated at250V/250mA. If replacement is necessary, replace only with a fuse of the same rating.CleaningPeriodic vacuuming of the oven chamber removes debris that may damage the heating elements. A gentle vacuuming with a soft brush is perfect. Payparticular attention to the element grooves. Unplug the oven before vacuuming.The oven jacket is Stainless Steel and requires no real maintenance or cleaning.The oven control panel requires no cleaning.© Copyright <strong>Evenheat</strong> Kiln, Inc. 2012Page 11
<strong>HT</strong>-1 Oven Operating <strong>Manual</strong><strong>HT</strong>-1WarrantyLIMITED HEAT TREAT OVEN WARRANTY<strong>Evenheat</strong> Kiln, Inc. guarantees to the original purchaser that for a period of two full years from the date of purchase the oven will be free of defects inworkmanship and materials when used under normal and proper operating conditions. <strong>Evenheat</strong> will replace or repair any defective part as specifiedbelow.FOR THE WARRANTY TO BE EFFECTIVE THE PURCHASE MUST:Provide written proof of date of purchase. (Warranty card sent in at time of purchase.)Notify the <strong>Evenheat</strong> Distributor/Dealer from whom the oven was purchased, within 10 days after defect has been discovered.Make oven immediately available for inspection.FOR WARRANTY REPAIRS:Warranty repairs should be handled through the Distributor/Dealer from whom the oven was purchased, who will arrange for any repairs or replacementof parts under the terms of this warranty upon receipt of the oven (or defective part). Otherwise the defective part may be returned (postageprepaid) to <strong>Evenheat</strong> Kiln, Inc. P.O. Box 300 6949 Legion Drive Caseville, MI 48725. If, after factory examination, the original part is found to be defective,a new or repaired part will be shipped prepaid by <strong>Evenheat</strong> Kiln, Inc.If the entire oven is to be returned to the factory, all transportation costs will be borne but he purchaser. The purchaser should notify <strong>Evenheat</strong> Kiln, Inc.(989) 856-2281 prior to shipping. <strong>Evenheat</strong> will help advise the best shipping method and if it is necessary to return the entire oven or only certain parts.Warranty work will be performed within 30 days after defective part is returned to the factory.<strong>Evenheat</strong> Kiln, Inc. reserves the right, at its option, to replace the entire oven or any part of it in order to fulfill its obligation under this warranty.THIS WARRANTY DOES NOT COVER:Freight damage, ovens altered in any way, abuse or neglect, moisture, improper storage or installation.Ovens over fired (reaching temperature higher than melting point of ware inside kiln) regardless of cause.Ovens operated on incorrect voltage.Improper electrical installation.Knife Blade furniture or ware other than <strong>Evenheat</strong> Made.Ovens used for salt firing.Ovens used for purposes other than the firing of heat treating various metals.Ovens operated in excess of the temperature on the rating plate.Damage to Property or personal injury that may occur from ovens that are fired on or near wood floors or combustibles.Damage to property or personal injury that may occur from improper ventilation of the work area and building structure.This warranty is in lieu of all other warranties, expressed, or implied.<strong>Evenheat</strong> Kiln, Inc. neither assumes nor authorizes any Distributor/Dealer, Retailer or employee to assume for it any other obligations or liabilities inconnection with <strong>Evenheat</strong> <strong>Kilns</strong>.This warranty is limited as specified above and excludes incidental or consequential damages. Some states or providences do not allow the exclusion orlimitation of incidental or consequential damages, so the above limitations or exclusions may not apply to you.© Copyright <strong>Evenheat</strong> Kiln, Inc. 2012Page 12