Making your own FM Trap - Electus Distribution
Making your own FM Trap - Electus Distribution
Making your own FM Trap - Electus Distribution
- TAGS
- electus

You also want an ePaper? Increase the reach of your titles
YUMPU automatically turns print PDFs into web optimized ePapers that Google loves.
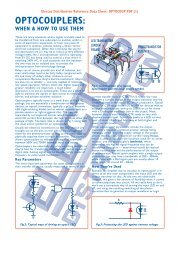
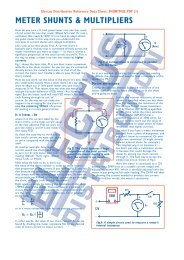
<strong>Electus</strong> <strong>Distribution</strong> Reference Data Sheet: <strong>FM</strong><strong>Trap</strong>El.PDF (2)Fig.2: How to wind thecoil, using the shank of a3.5mm twist drill as aformer or ‘mandrel’.When you’ve wound the10 turns, the coil can beslipped off the drillshank and its end tinnedto match the start.3.5mm TWISTDRILL ORSIMILAR20mmSTEP 1:WIRE IN POSITIONREADY TOWIND TURNSSTEP 2:ONE COMPLETETURN WOUNDSTEP 3:10 TURNCOIL NOWWOUNDSTEP 4:WIRE ENDTRIMMEDAND TINNEDwire at the far end of the coil, and scrape off theenamel from this end as well. You can tin this end in thesame way as the start end, before pushing both endsthrough holes in the stripboard from below (i.e., thecopper strip side). Each end is pushed through a hole inthe copper strips two-removed from the centre strip, asyou can see from the diagram above.Push the ends through their holes until the coil axis isabout 6-7mm away from the stripboard, and then soldereach wire to its copper strip. These joints will supportthe coil below the stripboard, as well as making theconnections to the trimmer capacitor (via the U-shaped75 SOCKET(PS-0628)15mm LONG M3 TAPPEDSPACERS (HP-0904)35 x 35mmSQUARE OFSTRIP BOARD(COPPERSTRIPS UNDER,VERTICAL)F16 SOCKET(PS-0645)COIL ENDSBARED &BROUGHTUP TOSOLDER TOCONNECTORCENTRE PINS6-30pF TRIMMER CAPACITOR2 x 6mm LONG M3MACHINE SCREWS(RV-5716)75 SOCKET(PS-0628)2 x 6mm LONG CSK HEADM3 MACHINE SCREWS10T COIL OF0.8mm ECW(UNDER)WIRE JOININGEARTH LUGSHB-5060BOX(51 x 51 x 32mm)TRIMMERCAP,ADJUSTABLEVIA HOLEIN BOX LIDF16 SOCKET(PS-0645)'U' LINKSJOININGADJACENTCOPPER STRIPSFig.3: Use this drawing as a guide when you’re buildingthe trap. Note that we’ve sh<strong>own</strong> ‘PAL’ type 75Ωsockets on the side view (top), but F16 type sockets onthe lower plan view to illustrate the use of either.links you fitted earlier).The stripboard assembly can then be fitted into thebox and screwed onto the mounting spacers. After thisis done the tinned ends of the coil can be bent over andsoldered to the centre lug of each 75Ω socket.It’s also a good idea to connect the two earth/shieldlugs of the 75Ω sockets together using a short length ofhookup wire or tinned copper wire, to make sure theconnection between them is reliable (and not purelydependent on the contact between the sockets and thealuminium box).This will complete the ‘wiring’ of the trap, so allthat remains is to drill a 5mm hole in the centre ofthe box lid (i.e., directly above the trimmer capacitor),and then screw the lid onto the box to finishthe assembly.Tuning the trapThe easiest way to tune the trap for rejection of<strong>your</strong> interfering station is by connecting it into the<strong>FM</strong> tuner’s antenna cable, and then setting the tunerfor reception of the interfering station itself.Now take a screwdriver with a 3mm wide blade,or better still a plastic alignment tool or an oldplastic knitting needle with its end filed into a flatscrewdriver shape. Insert this ‘tuning tool’ carefullythrough the hole in the trap box lid, and lower itd<strong>own</strong> until you feel its blade engage with the slot inthe trimmer capacitor. Then start rotating thetuning tool very slowly, while listening to theinterfering station’s signal – and also watching <strong>your</strong><strong>FM</strong> tuner’s signal strength meter or indicator LEDs,if it has them.If you do this very carefully, you’ll find that at oneparticular setting of the trimmer, the signal from theinterfering station will become a little more noisy –i.e., it will have a little more background hiss. If<strong>your</strong> tuner does have a signal meter or indicator,you’ll see the signal strength ‘dip’ at the same time.Once you’ve found this correct tuning position,carefully remove the tuning tool without disturbingthe trimmer setting. Then re-tune <strong>your</strong> <strong>FM</strong> tuner tothe weak local station you really want to receive.You should now find it’s coming in clearly andwithout interference from the stronger one –thanks to the trap.That’s all there is to it. Your trap is now finished,tuned up and already contributing to <strong>your</strong> <strong>FM</strong>listening enjoyment.Copyright © <strong>Electus</strong> <strong>Distribution</strong>, 2005.