- Page 3:
Running code without a compilerChap
- Page 8:
Creating errorsCreating warningsRec
- Page 11 and 12:
Analyzing tablesExtracting test res
- Page 13 and 14:
Working with Pivot TablesUsing the
- Page 15 and 16:
R For Dummies ®Published byJohn Wi
- Page 17 and 18:
About the AuthorsAndrie de Vries: A
- Page 19 and 20:
my choices. Professor Bruce Hardie
- Page 21 and 22:
IntroductionWelcome to R For Dummie
- Page 23 and 24:
: The prompt symbol, >, is not part
- Page 25 and 26:
You want to explore new stuff. You
- Page 27 and 28:
Icons Used in This BookAs you read
- Page 29 and 30:
Chapter 1Introducing R: The Big Pic
- Page 31 and 32:
eferred to as “free as in beer.
- Page 33 and 34:
you how to move data and graphics b
- Page 35 and 36:
If you have experience in other lan
- Page 37 and 38:
variables, get to look at the built
- Page 39 and 40:
Below all this information is the R
- Page 41 and 42:
that we use it to illustrate the ex
- Page 43 and 44:
Starting Your First R SessionIf you
- Page 45 and 46:
Using R as a calculator is very int
- Page 47 and 48:
Sourcing a ScriptUntil now, you’v
- Page 49 and 50:
Finding help on functionsWe discuss
- Page 51 and 52:
languages, the backslash character
- Page 53 and 54:
Vectorizing your functionsVectorize
- Page 55 and 56:
print()R tells you that it needs th
- Page 57 and 58:
extensions that much. But using .Rh
- Page 59 and 60:
Choosing a clear nameWhen Joris was
- Page 61 and 62:
opinions, so the naming of function
- Page 63 and 64:
Often, you want to add a bit of ext
- Page 65 and 66:
all of them at the beginning of eac
- Page 67 and 68:
Part IIGetting Down to Work in RIn
- Page 69 and 70:
calculator.Vector operations: Vecto
- Page 71 and 72:
Suppose that Granny and Geraldine d
- Page 73 and 74:
FunctionWhat It Doesabs(x)log(x,bas
- Page 75 and 76:
decision to use scientific notation
- Page 77 and 78:
operations in Chapter 7.Actually, o
- Page 79 and 80:
NaN in calculations. The outcome of
- Page 81 and 82:
Take a look at the vector baskets.o
- Page 83 and 84:
way the value is stored in memory.R
- Page 85 and 86:
[1] 12 4 4 6 9 3 5 3 2 2 12 9The re
- Page 87 and 88:
Okay, this example isn’t too impr
- Page 89 and 90:
R doesn’t have an Undo button, so
- Page 91 and 92:
x < yx baskets.of.Granny > 5[1] TR
- Page 93 and 94:
that value (refer to “Dealing wit
- Page 95 and 96:
all(). To find out whether Granny w
- Page 97 and 98:
You can tell quite a few things abo
- Page 99 and 100:
third game, and so on.The vector re
- Page 101 and 102:
1st 2nd 3rd 4th 5th 6th-67 25 20 50
- Page 103 and 104:
In this section, you take a look at
- Page 105 and 106:
LETTERS[24:26][1] “X” “Y”
- Page 107 and 108:
Creating and assigning named vector
- Page 109 and 110:
Similar to the way that R displays
- Page 111 and 112:
[1] “The quick brown FOX jumps ov
- Page 113 and 114:
R performs lexicographic sorting, a
- Page 115 and 116:
The result of grep() is a numeric v
- Page 117 and 118:
Suppose you have the sentence He is
- Page 119 and 120:
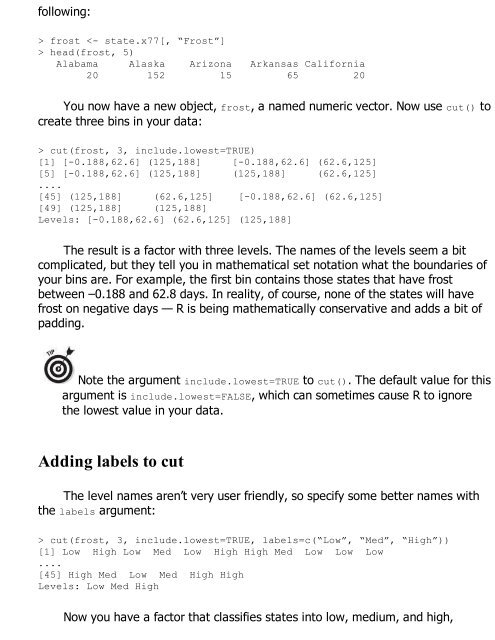
Regular expressions allow three way
- Page 121 and 122:
lexicographically sorted, unique va
- Page 123 and 124:
difference between the levels and t
- Page 125 and 126:
vector subsisting rules. For exampl
- Page 127 and 128:
table(state.region)state.regionNort
- Page 129 and 130:
Chapter 6Going on a Date with RIn T
- Page 131 and 132:
startDate xm xm[1] “2012-01-01
- Page 133 and 134:
Table 6-2 Some Format Codes for Dat
- Page 135 and 136:
As you can see, as.POSIXct() takes
- Page 137 and 138:
Formatting Dates and TimesTo format
- Page 139 and 140:
Now you know the exact time when we
- Page 141 and 142:
project.org/web/packages/lubridate/
- Page 143 and 144:
They contain only a single type of
- Page 145 and 146:
To get only the number of rows, you
- Page 147 and 148:
[1,] 1 4 7 10[2,] 2 5 8 11[3,] 3 6
- Page 149 and 150:
id first.matrix[-id][1] 1 2 3 4 5
- Page 151 and 152:
[2,] 2 5 8 11[3,] 3 4 9 12You also
- Page 153 and 154:
the way. You can try that out yours
- Page 155 and 156:
constructing a matrix second.matrix
- Page 157 and 158:
[2,] 4 5 6[3,] 7 8 9[4,] 10 11 12Yo
- Page 159 and 160:
Using the creator functionsYou can
- Page 161 and 162:
[2,] 5 17[3,] 8 20[4,] 11 23This re
- Page 163 and 164:
[1] 6Likewise, the ncol() function
- Page 165 and 166:
data frame with character vectors o
- Page 167 and 168:
section, earlier in this chapter.Ex
- Page 169 and 170:
As explained in the “Combining ve
- Page 171 and 172:
Create a matrix with two columns.Cr
- Page 173 and 174:
Although the row names of the data
- Page 175 and 176:
you, because data frames are, in fa
- Page 177 and 178:
You can’t use logical vectors or
- Page 179 and 180:
askets.nlist baskets.nlist[‘scor
- Page 181 and 182:
The second line contains a $, which
- Page 183 and 184:
Part IIICoding in RIn this part . .
- Page 185 and 186:
Making the scriptSuppose you want t
- Page 187 and 188:
There’s no way you can define in
- Page 189 and 190:
Luckily, this problem doesn’t occ
- Page 191 and 192:
addPercent
- Page 193 and 194:
addPercent(new.numbers)Error in x *
- Page 195 and 196:
list instead of using the dots.So,
- Page 197 and 198:
code. So, instead of giving a funct
- Page 199 and 200:
Instead of passing the code of the
- Page 201 and 202:
Using internal functionsWriting you
- Page 203 and 204:
weird, think again about data frame
- Page 205 and 206:
print.default(small.one)$a[1] 1 2$b
- Page 207 and 208:
can easily add a default method exa
- Page 209 and 210:
carry out a certain task. Many prog
- Page 211 and 212:
if you have only one short line of
- Page 213 and 214:
you do so within a function and you
- Page 215 and 216:
second value of the result.4. A vec
- Page 217 and 218:
Luckily, R allows you to write all
- Page 219 and 220:
VAT client switch(client, private
- Page 221 and 222:
3. In each round through the loop,
- Page 223 and 224:
workspace. This may be exactly what
- Page 225 and 226:
Applying functions on rows and colu
- Page 227 and 228:
4 6 8You can pass any arguments you
- Page 229 and 230:
hours public type“numeric” “l
- Page 231 and 232:
Chapter 10Debugging Your CodeIn Thi
- Page 233 and 234:
R always tells you in which code th
- Page 235 and 236:
If you get warning or error message
- Page 237 and 238:
logit() function. Even more, the tr
- Page 239 and 240: When you’re in browser mode, you
- Page 241 and 242: function only until the next round
- Page 243 and 244: In logit(as.numeric(x)/100) : x not
- Page 245 and 246: owsum.df strsplit(‘this is a sen
- Page 247 and 248: If you want to know the median numb
- Page 249 and 250: typing help(paste) returns help abo
- Page 251 and 252: From the description of ada::update
- Page 253 and 254: Getting Involved in the R Community
- Page 255 and 256: can ask and answer questions on a v
- Page 257 and 258: [1] “Diamonds 2” “Clubs 2”
- Page 259 and 260: [1] RCurl_1.6-10.1 tools_2.14.1The
- Page 261 and 262: Chapter 12Getting Data into and out
- Page 263 and 264: Using the Clipboard to copy and pas
- Page 265 and 266: Using special characters in escape
- Page 267 and 268: ‘data.frame’: 10 obs. of 9 vari
- Page 269 and 270: XLConnect also can write Excel file
- Page 271 and 272: These functions need a specific fil
- Page 273 and 274: Working with Files and FoldersYou k
- Page 275 and 276: [1] “F:/git/roxygen2/roxygen2/REA
- Page 277 and 278: can confirm this by taking a close
- Page 279 and 280: But in many practical situations, y
- Page 281 and 282: $: The dollar-sign operator selects
- Page 283 and 284: To illustrate subsetting of data fr
- Page 285 and 286: customary to specify a so-called se
- Page 287 and 288: Specify a logical vector, where FAL
- Page 289: After a short while of writing subs
- Page 293 and 294: Figure 13-1: Different ways of comb
- Page 295 and 296: function tries to identify columns
- Page 297 and 298: Both data frames have a variable Na
- Page 299 and 300: time, %in% is in infix operator. An
- Page 301 and 302: order. Do this using the order() fu
- Page 303 and 304: Sorting multiple columns in mixed o
- Page 305 and 306: FUN: The function to apply (for exa
- Page 307 and 308: 5.843333 3.057333 3.758000 1.199333
- Page 309 and 310: with(cars, tapply(mpg, list(gear, a
- Page 311 and 312: + y ~ a + b Include columns a as we
- Page 313 and 314: In the world of R, people usually r
- Page 315 and 316: Now you can start. First, create so
- Page 317 and 318: data: A molten data frame.formula:
- Page 319 and 320: Chapter 14Summarizing DataIn This C
- Page 321 and 322: that benefits from being converted
- Page 323 and 324: With this dataset in your workspace
- Page 325 and 326: ange(cars$mpg)[1] 10.4 33.9Calculat
- Page 327 and 328: As with most functions, you can sav
- Page 329 and 330: Plotting histogramsTo get a clearer
- Page 331 and 332: If this concept is unfamiliar to yo
- Page 333 and 334: multiple variables, there’s a lot
- Page 335 and 336: oxplot(mpg ~ cyl, data=cars)Figure
- Page 337 and 338: Statisticians love it when they can
- Page 339 and 340: You also can calculate the correlat
- Page 341 and 342:
with(cars, table(am, gear))3 4 5aut
- Page 343 and 344:
$ Var2: Factor w/ 2 levels “sick
- Page 345 and 346:
time specifying the margin argument
- Page 347 and 348:
Taking a Closer Look at Distributio
- Page 349 and 350:
Still, histograms leave much to the
- Page 351 and 352:
Now you want to do this for the tem
- Page 353 and 354:
Comparing Two SamplesComparing grou
- Page 355 and 356:
Again, you get the value for the te
- Page 357 and 358:
Many research questions revolve aro
- Page 360 and 361:
have to specify which margins you w
- Page 362 and 363:
str(InsectSprays)‘data.frame’:
- Page 364 and 365:
Checking the model tablesWith the m
- Page 366 and 367:
The difference between the means.Th
- Page 368 and 369:
The lm() function allows you to spe
- Page 370 and 371:
FunctionWhat It Doescoef()Returns a
- Page 372 and 373:
Model.anova Model.anovaAnalysis of
- Page 374 and 375:
predict(Model,newdata=new.cars, int
- Page 376 and 377:
Chapter 16Using Base GraphicsIn Thi
- Page 378 and 379:
The built-in R datasets are documen
- Page 380 and 381:
pch=21: Filled circlepch=22: Filled
- Page 382 and 383:
You also can use the function ablin
- Page 384 and 385:
It seems odd to use a plot function
- Page 386 and 387:
Figure 16-6: Adding main title, x-a
- Page 388 and 389:
Your graphic should look like Figur
- Page 390 and 391:
When your plot is complete, you nee
- Page 392 and 393:
getwd()[1] “C:/Users/Andrie”Nex
- Page 394 and 395:
Creating a Lattice PlotTo explore l
- Page 396 and 397:
Although cyl is a numeric vector, t
- Page 398 and 399:
into your R console.Changing Plot O
- Page 400 and 401:
xyplot(mpg ~ hp | factor(cyl), data
- Page 402 and 403:
Three-dimensional scatterplots: clo
- Page 404 and 405:
Notice that the function formula do
- Page 406 and 407:
millions of people. (The documentat
- Page 408 and 409:
Printing and Saving a Lattice PlotY
- Page 410 and 411:
Chapter 18Looking At ggplot2 Graphi
- Page 412 and 413:
aes() function to set up the mappin
- Page 414 and 415:
visual elements is the second eleme
- Page 416 and 417:
geom_point() Scatterplot stat_ident
- Page 418 and 419:
Creating line chartsTo create a lin
- Page 420 and 421:
Stat Description Default Geomstat_b
- Page 422 and 423:
Doing nothing with identitySometime
- Page 424 and 425:
Working with scalesIn ggplot2, scal
- Page 426 and 427:
Part VIThe Part of TensIn this part
- Page 428 and 429:
Then calculate the sum and mean for
- Page 430 and 431:
first supplied value as a fixed poi
- Page 432 and 433:
with(mtcars, length(mpg[hp > 150]))
- Page 434 and 435:
For example, to find the location o
- Page 436 and 437:
Your results should look similar to
- Page 438 and 439:
RGui and RStudio allow you to set t
- Page 440 and 441:
Reading the Package Manual and Vign
- Page 442 and 443:
Because the authors of R packages w
- Page 444 and 445:
AppendixInstalling R and RStudioBef
- Page 446 and 447:
a number of startup options by adap
- Page 448 and 449:
If you click Browse, you can select
- Page 450:
To access the cheat sheet specifica