Infrared Speed control for Direct and Alternating Current - Uhlenbrock
Infrared Speed control for Direct and Alternating Current - Uhlenbrock
Infrared Speed control for Direct and Alternating Current - Uhlenbrock

You also want an ePaper? Increase the reach of your titles
YUMPU automatically turns print PDFs into web optimized ePapers that Google loves.
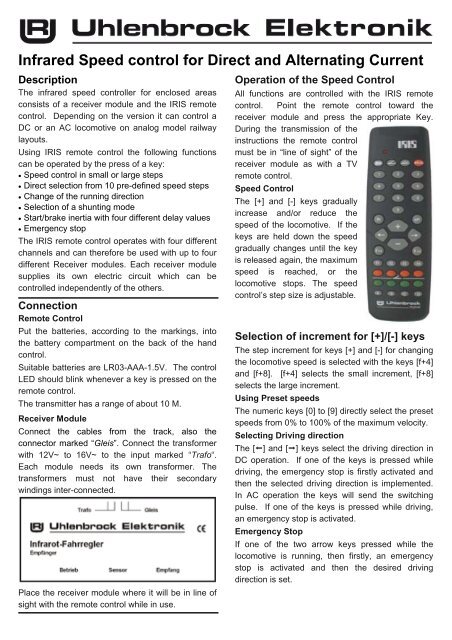
<strong>Infrared</strong> <strong>Speed</strong> <strong>control</strong> <strong>for</strong> <strong>Direct</strong> <strong>and</strong> <strong>Alternating</strong> <strong>Current</strong>DescriptionThe infrared speed <strong>control</strong>ler <strong>for</strong> enclosed areasconsists of a receiver module <strong>and</strong> the IRIS remote<strong>control</strong>. Depending on the version it can <strong>control</strong> aDC or an AC locomotive on analog model railwaylayouts.Using IRIS remote <strong>control</strong> the following functionscan be operated by the press of a key:• <strong>Speed</strong> <strong>control</strong> in small or large steps• <strong>Direct</strong> selection from 10 pre-defined speed steps• Change of the running direction• Selection of a shunting mode• Start/brake inertia with four different delay values• Emergency stopThe IRIS remote <strong>control</strong> operates with four differentchannels <strong>and</strong> can there<strong>for</strong>e be used with up to fourdifferent Receiver modules. Each receiver modulesupplies its own electric circuit which can be<strong>control</strong>led independently of the others.ConnectionRemote ControlPut the batteries, according to the markings, intothe battery compartment on the back of the h<strong>and</strong><strong>control</strong>.Suitable batteries are LR03-AAA-1.5V. The <strong>control</strong>LED should blink whenever a key is pressed on theremote <strong>control</strong>.The transmitter has a range of about 10 M.Receiver ModuleConnect the cables from the track, also theconnector marked “Gleis”. Connect the trans<strong>for</strong>merwith 12V~ to 16V~ to the input marked “Trafo“.Each module needs its own trans<strong>for</strong>mer. Thetrans<strong>for</strong>mers must not have their secondarywindings inter-connected.Place the receiver module where it will be in line ofsight with the remote <strong>control</strong> while in use.Operation of the <strong>Speed</strong> ControlAll functions are <strong>control</strong>led with the IRIS remote<strong>control</strong>. Point the remote <strong>control</strong> toward thereceiver module <strong>and</strong> press the appropriate Key.During the transmission of theinstructions the remote <strong>control</strong>must be in “line of sight” of thereceiver module as with a TVremote <strong>control</strong>.<strong>Speed</strong> ControlThe [+] <strong>and</strong> [-] keys graduallyincrease <strong>and</strong>/or reduce thespeed of the locomotive. If thekeys are held down the speedgradually changes until the keyis released again, the maximumspeed is reached, or thelocomotive stops. The speed<strong>control</strong>’s step size is adjustable.Selection of increment <strong>for</strong> [+]/[-] keysThe step increment <strong>for</strong> keys [+] <strong>and</strong> [-] <strong>for</strong> changingthe locomotive speed is selected with the keys [f+4]<strong>and</strong> [f+8]. [f+4] selects the small increment, [f+8]selects the large increment.Using Preset speedsThe numeric keys [0] to [9] directly select the presetspeeds from 0% to 100% of the maximum velocity.Selecting Driving directionThe [] <strong>and</strong> [] keys select the driving direction inDC operation. If one of the keys is pressed whiledriving, the emergency stop is firstly activated <strong>and</strong>then the selected driving direction is implemented.In AC operation the keys will send the switchingpulse. If one of the keys is pressed while driving,an emergency stop is activated.Emergency StopIf one of the two arrow keys pressed while thelocomotive is running, then firstly, an emergencystop is activated <strong>and</strong> then the desired drivingdirection is set.
Start/Brake InertiaThe [f1], [f2], [f3] <strong>and</strong> [f4] keys select the start/braking inertia <strong>for</strong> the <strong>control</strong>led electric circuit. [f1]none <strong>and</strong> [f4] selects the largest delay. From [f1] to[f4] the delay becomes more obvious.Shunting ModeWith the shunting mode the locomotive can be<strong>control</strong>led in particularly fine steps up to half themaximum velocity. It is switched on <strong>and</strong> off with the[f0] <strong>and</strong> [off] keys.Channel SelectionThe [A] to [D] keys can select one of the fourchannels, <strong>and</strong> there<strong>for</strong>e a particular electric circuit.Lok KeyInitiates the procedure <strong>for</strong> the allocation of anelectric circuit to the channel (see “Method“).Stop KeyThe [stop] key can switch the track power of theselected electric circuit on <strong>and</strong> off. If the key ispressed numerous times the locomotive will driveoff with a preset speed.Keys without functionThe S <strong>and</strong> T keys, as well as the red <strong>and</strong> greenkeys do not have a function in an analog layout.Messages of the <strong>control</strong> LEDThe <strong>control</strong> LED of the remote unit always flashes ifa key is pressed on the remote <strong>control</strong>. The <strong>control</strong>LED on the receiver module with the “Empfang”label always blinks when the module receives aninfrared signal.The <strong>control</strong> LED on the receiver module with thelabel “Betrieb” has different functions:• <strong>Speed</strong> indicationIf the locomotive is running the LED is on, theLED is off if locomotive is stopped. In the DCoperation it glows bright the higher the speed ofthe locomotive.• Slow blinkingThe track power was switched off with the [stop]key.• Rapid blinkingThe track has a short circuit. As soon as the shortcircuit is eliminated the [stop] key can be used tore-energize the track. The locomotive drives onwith its previous <strong>Speed</strong>.Our contact Details:Service: In the event of a defect or failure send theunit together with the invoice <strong>and</strong> a short descriptionof the fault back to us <strong>for</strong> repair.Hotline: We are available if you have any questions!Your direct line to a technician: 0 20 45 - 85 83 27Mon - Tue - Thu – Fri, 14:00~16:00 <strong>and</strong> Wed16:00~18:00Allocating an Electric circuit to a channelThe IRIS remote <strong>control</strong> works with four differentchannels. In that way it can address up to fourdifferent receiver modules, each of which suppliesits own electric circuit. Each electric circuit can be<strong>control</strong>led independently of the others. A channel(<strong>and</strong> thus an electric circuit) is selected with the [A]to [D] keys. By default each receiver module reactsto the <strong>control</strong> instructions of all channels. If severalreceiver modules are used on a layout a channel bywhich it is to be <strong>control</strong>led must be assigned toeach module.Method• Press the [lok] key 3 times in succession:The Control LED on the receiver module blinks.The module awaits the assignment of a channel.• Select the desired channel with the keys [A] to [D]or the [stop] key to restore the default state: themodule reacts to the <strong>control</strong> instructions on allchannels.NOTE! During programming it is very important thatonly the receiver module which is to be assigned toa channel is supplied with power. All other modulesmust have the power switched off.Technical DataMax. power output: 2ARange:10mBatteries:LR03-AAA-1.5VReceiver Trans<strong>for</strong>mer: 12-16V, 2APart Numbers26 200 Set <strong>for</strong> DC26 300 Set <strong>for</strong> AC26 210 Receiver <strong>for</strong> DC26 310 Receiver <strong>for</strong> AC66 510 IRIS Remote <strong>control</strong>20 040 Trans<strong>for</strong>mer 45 VA<strong>Uhlenbrock</strong> Elektronik GmbHMercatorstr. 6D-46244 BottropMade in GermanyElectronic devices do notbelong in household rubbish