29-650 Citroen Peugeot - www.incartec.co.u
29-650 Citroen Peugeot - www.incartec.co.u
29-650 Citroen Peugeot - www.incartec.co.u

Create successful ePaper yourself
Turn your PDF publications into a flip-book with our unique Google optimized e-Paper software.
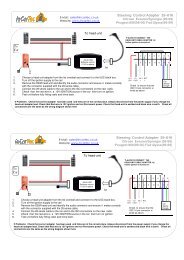
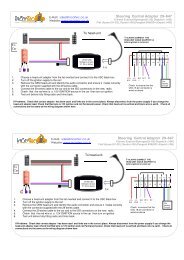
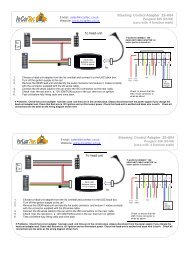
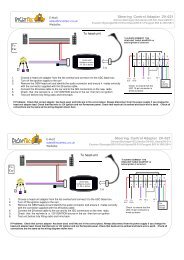
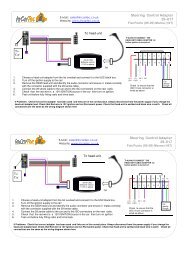
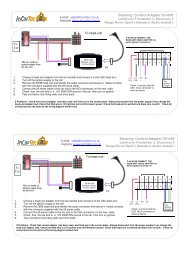
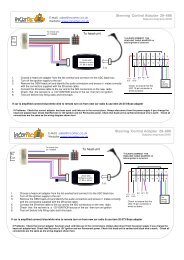
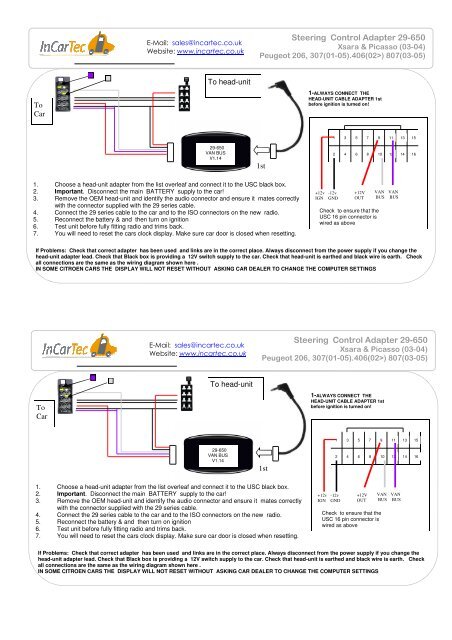
E-Mail: sales@<strong>incartec</strong>.<strong>co</strong>.ukWebsite: <strong>www</strong>.<strong>incartec</strong>.<strong>co</strong>.ukSteering Control Adapter <strong>29</strong>-<strong>650</strong>Xsara & Picasso (03-04)<strong>Peugeot</strong> 206, 307(01-05).406(02>) 807(03-05)To head-unitToCar1-ALWAYS CONNECT THEHEAD-UNIT CABLE ADAPTER 1stbefore ignition is turned on!1 3 579111315<strong>29</strong>-<strong>650</strong>VAN BUSV1.141st2 4 6 810 1214161. Choose a head-unit adapter from the list overleaf and <strong>co</strong>nnect it to the USC black box.2. Important. Dis<strong>co</strong>nnect the main BATTERY supply to the car!3. Remove the OEM head-unit and identify the audio <strong>co</strong>nnector and ensure it mates <strong>co</strong>rrectlywith the <strong>co</strong>nnector supplied with the <strong>29</strong> series cable.4. Connect the <strong>29</strong> series cable to the car and to the ISO <strong>co</strong>nnectors on the new radio.5. Re<strong>co</strong>nnect the battery & and then turn on ignition6. Test unit before fully fitting radio and trims back.7. You will need to reset the cars clock display. Make sure car door is closed when resetting.+12vIGN-12vGND+12VOUTCheck to ensure that theUSC 16 pin <strong>co</strong>nnector iswired as aboveVANBUSVANBUSIf Problems: Check that <strong>co</strong>rrect adapter has been used and links are in the <strong>co</strong>rrect place. Always dis<strong>co</strong>nnect from the power supply if you change thehead-unit adapter lead. Check that Black box is providing a 12V switch supply to the car. Check that head-unit is earthed and black wire is earth. Checkall <strong>co</strong>nnections are the same as the wiring diagram shown here .IN SOME CITROEN CARS THE DISPLAY WILL NOT RESET WITHOUT ASKING CAR DEALER TO CHANGE THE COMPUTER SETTINGSE-Mail: sales@<strong>incartec</strong>.<strong>co</strong>.ukWebsite: <strong>www</strong>.<strong>incartec</strong>.<strong>co</strong>.ukSteering Control Adapter <strong>29</strong>-<strong>650</strong>Xsara & Picasso (03-04)<strong>Peugeot</strong> 206, 307(01-05).406(02>) 807(03-05)To head-unitToCar1-ALWAYS CONNECT THEHEAD-UNIT CABLE ADAPTER 1stbefore ignition is turned on!1 3 579111315<strong>29</strong>-<strong>650</strong>VAN BUSV1.141st2 4 6 810 1214161. Choose a head-unit adapter from the list overleaf and <strong>co</strong>nnect it to the USC black box.2. Important. Dis<strong>co</strong>nnect the main BATTERY supply to the car!3. Remove the OEM head-unit and identify the audio <strong>co</strong>nnector and ensure it mates <strong>co</strong>rrectlywith the <strong>co</strong>nnector supplied with the <strong>29</strong> series cable.4. Connect the <strong>29</strong> series cable to the car and to the ISO <strong>co</strong>nnectors on the new radio.5. Re<strong>co</strong>nnect the battery & and then turn on ignition6. Test unit before fully fitting radio and trims back.7. You will need to reset the cars clock display. Make sure car door is closed when resetting.+12vIGN-12vGND+12VOUTCheck to ensure that theUSC 16 pin <strong>co</strong>nnector iswired as aboveVANBUSVANBUSIf Problems: Check that <strong>co</strong>rrect adapter has been used and links are in the <strong>co</strong>rrect place. Always dis<strong>co</strong>nnect from the power supply if you change thehead-unit adapter lead. Check that Black box is providing a 12V switch supply to the car. Check that head-unit is earthed and black wire is earth. Checkall <strong>co</strong>nnections are the same as the wiring diagram shown here .IN SOME CITROEN CARS THE DISPLAY WILL NOT RESET WITHOUT ASKING CAR DEALER TO CHANGE THE COMPUTER SETTINGS
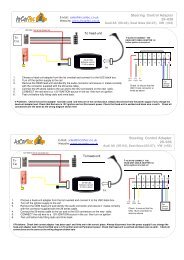
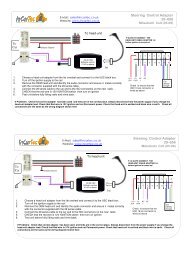
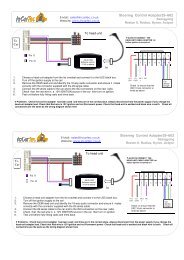
CHOOSE THE CORRECT HEAD-UNIT ADAPTER FROM THOSE BELOW<strong>29</strong>-001 Alpine <strong>29</strong>-002 Blaupunkt <strong>29</strong>-003 Clarion <strong>29</strong>-004 JVC1 3 5 79111 3 5 79111 3 5 79111 3 5 79112 4 6 810122 4 6 810122 4 6 810122 4 6 81012<strong>29</strong>-005 KenwoodSingle wire<strong>29</strong>-005D Kenwood4 pin DIN Plug<strong>29</strong>-006 PanasonicStandard CD units<strong>29</strong>-006A PanasonicAV head-units1 3 5 79111 3 5 79111 3 5 79111 3 5 79112 4 6 810122 4 6 810122 4 6 810122 4 6 81012<strong>29</strong>-009 SiemensVDO<strong>29</strong>-008 Sony3v & 5v units<strong>29</strong>-011 Zenec<strong>29</strong>-020 Pioneer &Sony1 3 5 79111 3 5 79111 3 5 79111 3 5 79112 4 6 810122 4 6 810122 4 6 810122 4 6 81012Special external drivePCB versionCHOOSE THE CORRECT HEAD-UNIT ADAPTER FROM THOSE BELOW<strong>29</strong>-001 Alpine <strong>29</strong>-002 Blaupunkt <strong>29</strong>-003 Clarion <strong>29</strong>-004 JVC1 3 5 79111 3 5 79111 3 5 79111 3 5 79112 4 6 810122 4 6 810122 4 6 810122 4 6 81012<strong>29</strong>-005 KenwoodSingle wire<strong>29</strong>-005D Kenwood4 pin DIN Plug<strong>29</strong>-006 PanasonicStandard CD units<strong>29</strong>-006A PanasonicAV head-units1 3 5 79111 3 5 79111 3 5 79111 3 5 79112 4 6 810122 4 6 810122 4 6 810122 4 6 81012<strong>29</strong>-009 SiemensVDO<strong>29</strong>-008 Sony3v & 5v units<strong>29</strong>-011 Zenec<strong>29</strong>-020 Pioneer &Sony1 3 5 79111 3 5 79111 3 5 79111 3 5 79112 4 6 810122 4 6 810122 4 6 810122 4 6 81012Special external drivePCB version