Mercedes CAN Steering Control Interface. 39 ... - www.incartec.co.u
Mercedes CAN Steering Control Interface. 39 ... - www.incartec.co.u
Mercedes CAN Steering Control Interface. 39 ... - www.incartec.co.u
- No tags were found...

You also want an ePaper? Increase the reach of your titles
YUMPU automatically turns print PDFs into web optimized ePapers that Google loves.
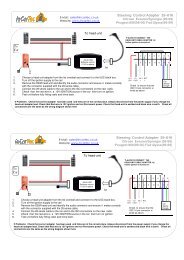
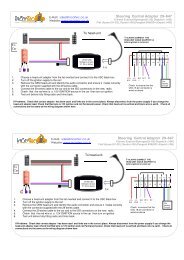
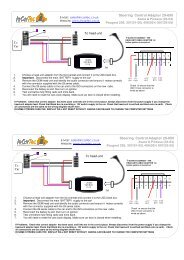
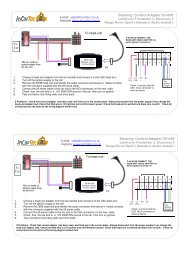
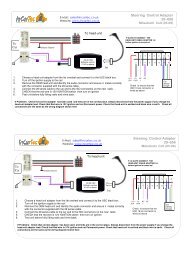
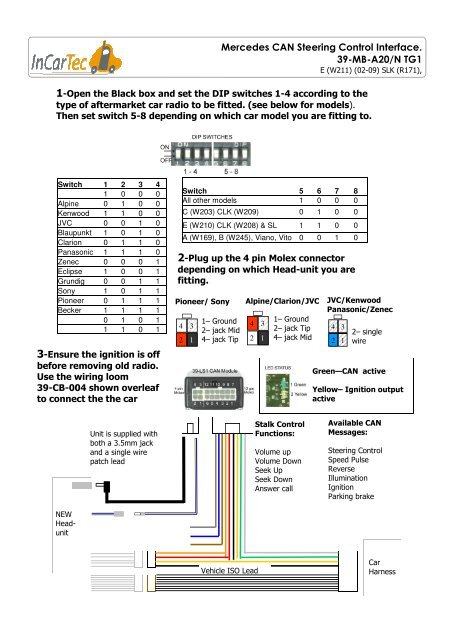
<strong>Mercedes</strong> <strong>CAN</strong> <strong>Steering</strong> <strong>Control</strong> <strong>Interface</strong>.<strong>39</strong>-MB-A20/N TG1E (W211) (02-09) SLK (R171),1-Open the Black box and set the DIP switches 1-4 ac<strong>co</strong>rding to thetype of aftermarket car radio to be fitted. (see below for models).Then set switch 5-8 depending on which car model you are fitting to.Switch 1 2 3 41 0 0 0Alpine 0 1 0 0Kenwood 1 1 0 0JVC 0 0 1 0Blaupunkt 1 0 1 0Clarion 0 1 1 0Panasonic 1 1 1 0Zenec 0 0 0 1Eclipse 1 0 0 1Grundig 0 0 1 1Sony 1 0 1 1Pioneer 0 1 1 1Becker 1 1 1 10 1 0 11 1 0 13-Ensure the ignition is offbefore removing old radio.Use the wiring loom<strong>39</strong>-CB-004 shown overleafto <strong>co</strong>nnect the the carSwitch 5 6 7 8All other models 1 0 0 0C (W203) CLK (W209) 0 1 0 0E (W210) CLK (W208) & SL 1 1 0 0A (W169), B (W245), Viano, Vito 0 0 1 02-Plug up the 4 pin Molex <strong>co</strong>nnectordepending on which Head-unit you arefitting.Pioneer/ Sony4 32 11– Ground2– jack Mid4– jack TipAlpine/Clarion/JVC4 32 11– Ground2– jack Tip4– jack MidJVC/KenwoodPanasonic/Zenec4 32 12– singlewireGreen—<strong>CAN</strong> activeYellow– Ignition outputactiveUnit is supplied withboth a 3.5mm jackand a single wirepatch leadStalk <strong>Control</strong>Functions:Volume upVolume DownSeek UpSeek DownAnswer callAvailable <strong>CAN</strong>Messages:<strong>Steering</strong> <strong>Control</strong>Speed PulseReverseIlluminationIgnitionParking brakeNEWHeadunitVehicle ISO LeadCarHarness
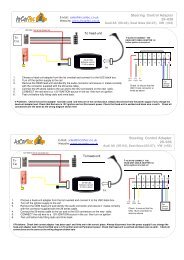
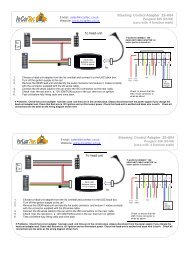
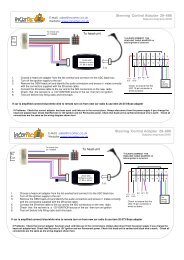
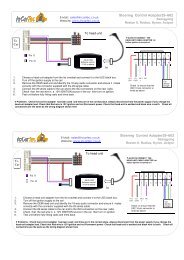
<strong>39</strong>-MB-A20/NTG1 Pin ConfigurationsURI 12 pin Connector-Wire entry side1– BLACK Gound K.l 31 to car –12v neg2– NC Kl. 313– ORANGE lights on Kl.58 +12v out4– PINK Reverse R +12v out5– NC Becker Navi C3 pin 1512 11651049382716– WHITE Can Low To car <strong>CAN</strong> LOW7– YELLOW 12v in Kl.30 to car +12v mem8– BROWN Handbrake HB -12v neg out9– RED Ignition out Kl.15 12v output10– GREY Speed pulse 1hz per km/h11- NC Becker Navi C3 pin 1612– GREEN Can High To car <strong>CAN</strong> HIGH<strong>Mercedes</strong> Car wiring diagrams1<strong>39</strong>Audio 20 NTG 1CLS, SLK & E (W211)141015161112B8– <strong>CAN</strong> LOW- Brown in CarB7-<strong>CAN</strong> HIGH- Brown/Red in Car15– GROUNDB8B716– MEM kl30 +12vCable number <strong>39</strong>-CB-004On some of these cars it may be necessary to <strong>co</strong>nfigure the interface to work <strong>co</strong>rrectly with thecars Menu System.-turn the key to ignition and switch on the aftermarket head-unit or navigation system-acknowledge any error messages on the on board <strong>co</strong>mputer-move to audio menu( menu up button until audio appears on display)-push and hold “end call” button on the steering wheel until the aftermarket radio switches to“night mode”-push menu up button again until audio is again in the display-push and hold “ end call” button again until the aftermarket radio switches back to day timeIf there is no AUDIO menu on the car , then the car needs to be reset by a <strong>Mercedes</strong> dealer withStar diagnosesGo to Menu Item “Configure <strong>co</strong>ntrol Unit” “Read and Change Coding” “General Parameters” and setthe Options to “audio unit active”