
You also want an ePaper? Increase the reach of your titles
YUMPU automatically turns print PDFs into web optimized ePapers that Google loves.
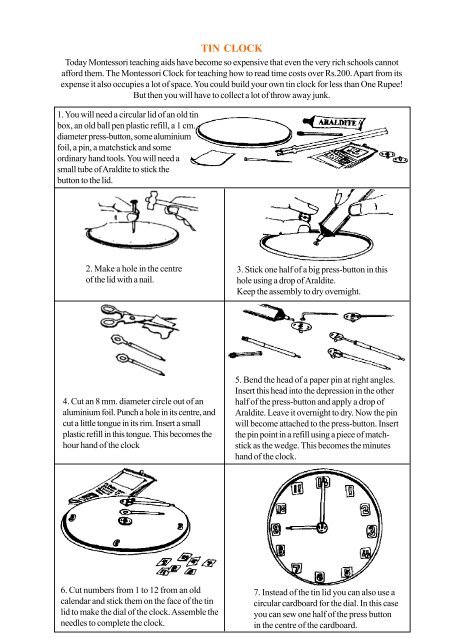
TIN CLOCKToday Montessori teaching aids have become so expensive that even the very rich schools cannotafford them. The Montessori Clock for teaching how to read time costs over Rs.200. Apart from itsexpense it also occupies a lot of space. You could build your own tin clock for less than One Rupee!But then you will have to collect a lot of throw away junk.1. You will need a circular lid of an old tinbox, an old ball pen plastic refill, a 1 cm.diameter press-button, some aluminiumfoil, a pin, a matchstick and someordinary hand tools. You will need asmall tube of Araldite to stick thebutton to the lid.2. Make a hole in the centreof the lid with a nail.3. Stick one half of a big press-button in thishole using a drop of Araldite.Keep the assembly to dry overnight.4. Cut an 8 mm. diameter circle out of analuminium foil. Punch a hole in its centre, andcut a little tongue in its rim. Insert a smallplastic refill in this tongue. This becomes thehour hand of the clock5. Bend the head of a paper pin at right angles.Insert this head into the depression in the otherhalf of the press-button and apply a drop ofAraldite. Leave it overnight to dry. Now the pinwill become attached to the press-button. Insertthe pin point in a refill using a piece of matchstickas the wedge. This becomes the minuteshand of the clock.6. Cut numbers from 1 to 12 from an oldcalendar and stick them on the face of the tinlid to make the dial of the clock. Assemble theneedles to complete the clock.7. Instead of the tin lid you can also use acircular cardboard for the dial. In this caseyou can sew one half of the press buttonin the centre of the cardboard.


![tq,a] diM+s vkSj vk/qfud ekuo - Vidya Online](https://img.yumpu.com/31264147/1/190x245/tqa-dim-s-vksj-vk-qfud-ekuo-vidya-online.jpg?quality=85)