

!OST #14_rev - O scale trains
!OST #14_rev - O scale trains
!OST #14_rev - O scale trains
- No tags were found...

You also want an ePaper? Increase the reach of your titles
YUMPU automatically turns print PDFs into web optimized ePapers that Google loves.
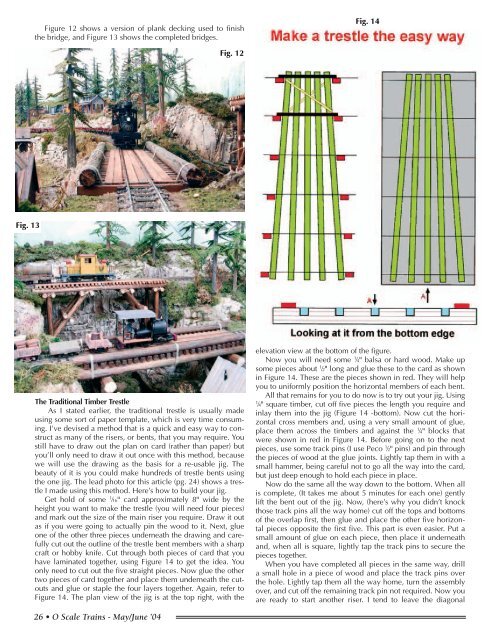
Figure 12 shows a version of plank decking used to finishthe bridge, and Figure 13 shows the completed bridges.Fig. 14Fig. 12Fig. 13The Traditional Timber TrestleAs I stated earlier, the traditional trestle is usually madeusing some sort of paper template, which is very time consuming.I’ve devised a method that is a quick and easy way to constructas many of the risers, or bents, that you may require. Youstill have to draw out the plan on card (rather than paper) butyou’ll only need to draw it out once with this method, becausewe will use the drawing as the basis for a re-usable jig. Thebeauty of it is you could make hundreds of trestle bents usingthe one jig. The lead photo for this article (pg. 24) shows a trestleI made using this method. Here’s how to build your jig.Get hold of some 1 ⁄16" card approximately 8" wide by theheight you want to make the trestle (you will need four pieces)and mark out the size of the main riser you require. Draw it outas if you were going to actually pin the wood to it. Next, glueone of the other three pieces underneath the drawing and carefullycut out the outline of the trestle bent members with a sharpcraft or hobby knife. Cut through both pieces of card that youhave laminated together, using Figure 14 to get the idea. Youonly need to cut out the five straight pieces. Now glue the othertwo pieces of card together and place them underneath the cutoutsand glue or staple the four layers together. Again, refer toFigure 14. The plan view of the jig is at the top right, with theelevation view at the bottom of the figure.Now you will need some 1 ⁄4" balsa or hard wood. Make upsome pieces about 1 ⁄2" long and glue these to the card as shownin Figure 14. These are the pieces shown in red. They will helpyou to uniformly position the horizontal members of each bent.All that remains for you to do now is to try out your jig. Using1⁄4" square timber, cut off five pieces the length you require andinlay them into the jig (Figure 14 -bottom). Now cut the horizontalcross members and, using a very small amount of glue,place them across the timbers and against the 1 ⁄4" blocks thatwere shown in red in Figure 14. Before going on to the nextpieces, use some track pins (I use Peco 1 ⁄2" pins) and pin throughthe pieces of wood at the glue joints. Lightly tap them in with asmall hammer, being careful not to go all the way into the card,but just deep enough to hold each piece in place.Now do the same all the way down to the bottom. When allis complete, (It takes me about 5 minutes for each one) gentlylift the bent out of the jig. Now, (here’s why you didn’t knockthose track pins all the way home) cut off the tops and bottomsof the overlap first, then glue and place the other five horizontalpieces opposite the first five. This part is even easier. Put asmall amount of glue on each piece, then place it underneathand, when all is square, lightly tap the track pins to secure thepieces together.When you have completed all pieces in the same way, drilla small hole in a piece of wood and place the track pins overthe hole. Lightly tap them all the way home, turn the assemblyover, and cut off the remaining track pin not required. Now youare ready to start another riser. I tend to leave the diagonal26 • O Scale Trains - May/June ’04


