

!OST #14_rev - O scale trains
!OST #14_rev - O scale trains
!OST #14_rev - O scale trains
- No tags were found...

You also want an ePaper? Increase the reach of your titles
YUMPU automatically turns print PDFs into web optimized ePapers that Google loves.
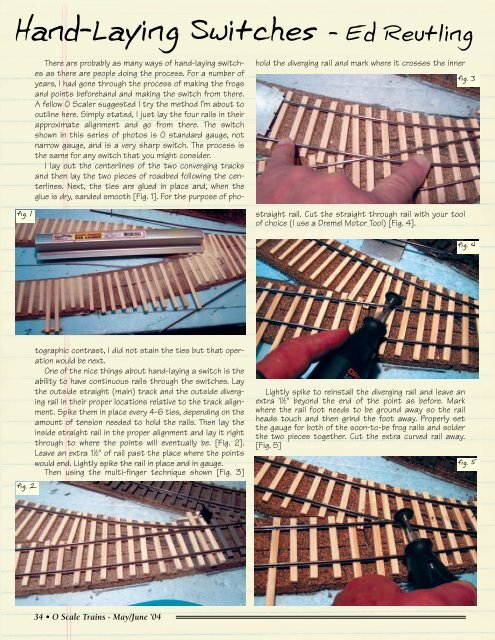
Hand-Laying Switches -EdReutlinghold the diverging rail and mark where it crosses the innerfig. 3fig. 1straight rail. Cut the straight through rail with your toolof choice (I use a Dremel Motor Tool) [Fig. 4].fig. 4fig. 2There are probably as many ways of hand-laying switchesas there are people doing the process. For a number ofyears, I had gone through the process of making the frogsand points beforehand and making the switch from there.A fellow O Scaler suggested I try the method I’m about tooutline here. Simply stated, I just lay the four rails in theirapproximate alignment and go from there. The switchshown in this series of photos is O standard gauge, notnarrow gauge, and is a very sharp switch. The process isthe same for any switch that you might consider.I lay out the centerlines of the two converging tracksand then lay the two pieces of roadbed following the centerlines.Next, the ties are glued in place and, when theglue is dry, sanded smooth [Fig. 1]. For the purpose of photographiccontrast, I did not stain the ties but that operationwould be next.One of the nice things about hand-laying a switch is theability to have continuous rails through the switches. Laythe outside straight (main) track and the outside divergingrail in their proper locations relative to the track alignment.Spike them in place every 4-6 ties, depending on theamount of tension needed to hold the rails. Then lay theinside straight rail in the proper alignment and lay it rightthrough to where the points will eventually be. [Fig. 2].Leave an extra 1 1 ⁄2" of rail past the place where the pointswould end. Lightly spike the rail in place and in gauge.Then using the multi-finger technique shown [Fig. 3]Lightly spike to reinstall the diverging rail and leave anextra 1 1 ⁄2" beyond the end of the point as before. Markwhere the rail foot needs to be ground away so the railheads touch and then grind the foot away. Properly setthe gauge for both of the soon-to-be frog rails and solderthe two pieces together. Cut the extra curved rail away.[Fig. 5]fig. 534 • O Scale Trains - May/June ’04


