vip300 user manual - Schneider Electric
vip300 user manual - Schneider Electric
vip300 user manual - Schneider Electric

Create successful ePaper yourself
Turn your PDF publications into a flip-book with our unique Google optimized e-Paper software.
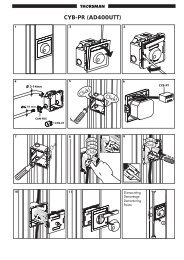
Installation and connectionMountingDimensionsThe VIP300 is designed for flush-mounting in rectangular cut-outs in sheet-metalpanels with a maximum thickness of 3 mm.DE103280.3VIP300 mounting dimensions.(*) The 4 holes are required only whenmounting the VIP on SFset or Evolis24 kV circuit breakers.DE10337Mounting the VIP300DE50981The latch may be put into the vertical position by looseningeach of the screws (V) before tightening them.b Insert the VIP300 in the cut-out and correctly position the two bottom pins (E) ofthe casing on the edge of the panel cut-out.b Tighten the screws (V) on the two mounting lugs accessible via the front afteropening the transparent cover.b After tightening, make sure that the latch (N) of each lock (visible on the rear face)is in the vertical position, pressing against the panel.b The hole (P) may be used to lead-seal the relay after the setting label has beenfitted and the settings made14