Rio 7" Precision Guillotine Shear - Rio Grande
Rio 7" Precision Guillotine Shear - Rio Grande
Rio 7" Precision Guillotine Shear - Rio Grande

Create successful ePaper yourself
Turn your PDF publications into a flip-book with our unique Google optimized e-Paper software.
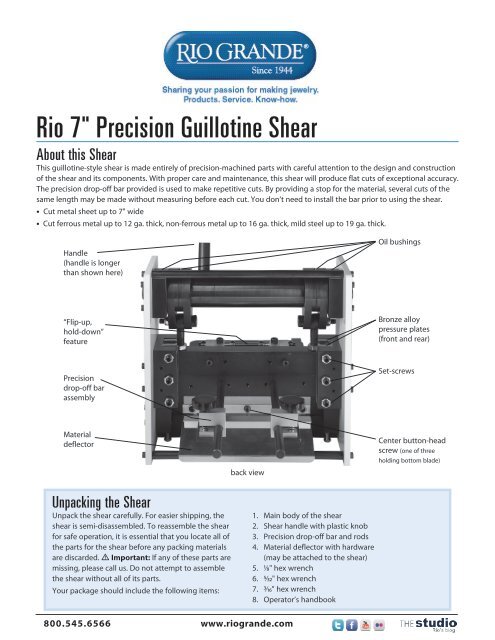
<strong>Rio</strong> 7" <strong>Precision</strong> <strong>Guillotine</strong> <strong>Shear</strong>About this <strong>Shear</strong>This guillotine-style shear is made entirely of precision-machined parts with careful attention to the design and constructionof the shear and its components. With proper care and maintenance, this shear will produce flat cuts of exceptional accuracy.The precision drop-off bar provided is used to make repetitive cuts. By providing a stop for the material, several cuts of thesame length may be made without measuring before each cut. You don’t need to install the bar prior to using the shear.• Cut metal sheet up to 7" wide• Cut ferrous metal up to 12 ga. thick, non-ferrous metal up to 16 ga. thick, mild steel up to 19 ga. thick.Handle(handle is longerthan shown here)Oil bushings“Flip-up,hold-down”featureBronze alloypressure plates(front and rear)<strong>Precision</strong>drop-off barassemblySet-screwsMaterialdeflectorback viewCenter button-headscrew (one of threeholding bottom blade)Unpacking the <strong>Shear</strong>Unpack the shear carefully. For easier shipping, theshear is semi-disassembled. To reassemble the shearfor safe operation, it is essential that you locate all ofthe parts for the shear before any packing materialsare discarded. • Important: If any of these parts aremissing, please call us. Do not attempt to assemblethe shear without all of its parts.Your package should include the following items:1. Main body of the shear2. <strong>Shear</strong> handle with plastic knob3. <strong>Precision</strong> drop-off bar and rods4. Material deflector with hardware(may be attached to the shear)5. 1/8" hex wrench6. 5/32" hex wrench7. 3/16" hex wrench8. Operator’s handbook800.545.6566 www.riogrande.com
<strong>Rio</strong> 7” <strong>Precision</strong> <strong>Guillotine</strong> <strong>Shear</strong> page 2Work SurfaceMake sure your work surface is clean and free of debris. Setthe shear on a flat, reasonably level surface with enoughroom on all sides to ensure that nothing will interfere withits safe operation.Assembling the <strong>Shear</strong>Install the HandleThe handle may be installed either on the right or left sideof the shear according to operator preference. To installthe handle, remove any shipping stops from the threadedholes for the handle and screw the handle into the desiredlocation until it is tight. Do not attempt operate the handleat this time.Install the <strong>Precision</strong> Drop-Off BarThe precision drop-off bar is attached to the top bladecarrier and moves up and down when the shear isoperated. In this position, it is above the material being cutand will not interfere with the cut-off piece clearing fromthe machine.The pecision drop-off bar consists of an angled aluminumbar with two extension arms, two glide blocks with arosette knob, and two threaded rods. Assemble the dropoffbar using the picture on page 1 as a guide, but don’tslide the threaded rods into the glide blocks at this time.There are two holes located on the top blade carrier. Athreaded rod is screwed into each hole. Use a lock-washeron each threaded rod to ensure that it will remain tightduring use. The assembled drop off bar is then placedon the rods. Please Note: When correctly mounted to thetop blade carrier, the main assembly of the drop-off bar isbelow the rods.After the shear is assembled, verify this set-up before usingthe shear.Proper Set-Up of the <strong>Shear</strong>Though we make every effort to protect the shear duringshipping, the transit can sometimes be rough. Check thefollowing features on your shear before you use it.Examine the BladesExamine the blades for nicks or other damage that mayhave occurred during shipping. If there is any damage,call us immediately.Test the <strong>Shear</strong> ActionTwo stops, placed in the holes for the shear handle toprevent it from moving during shipping, should have beenremoved to install the handle. Raise the blades to the up(or open) position. Slowly lower the handle, closing theblades. The blades should close smoothly. If you hear agrinding noise or feel unusual or excessive resistance orstiffness, stop immediately—moving the handle farthercould cause serious damage to the blades. Examine theTest the <strong>Shear</strong> Action (continued)shear for obstructions. If there are no obstructions, lift thehandle to open the blades and adjust the blades followingthe “Adjusting the Blades” instructions on page 3. If theshear action feels too stiff, read the section “Adjusting the<strong>Shear</strong> Action” on page 3. Please Note: A properly adjustedshear will feel firm, but operate smoothly.Adjust The BladesThe bottom blade may have been moved away from thetop blade to protect it from damage during shipping. Ifthe bottom blade has been moved, the blades must beadjusted for the shear to operate properly. To adjust theblades, read the section “Adjusting the Blades” (page 3).Square The RulerFor proper cutting, the ruler must be square to the blades.To check this, lower the upper blade to the closed position.Use a carpenter’s or drafting square to check the anglebetween the ruler and upper blade. If it is not a right angle(90°), loosen the screws in the ruler and adjust it to be aright angle. After you check the angle of the ruler, verifythat the ruler itself is placed accurately. You can do this byverifying that the 6" mark on the ruler is actually 6" fromthe upper blade when it is in the down position. If it isn’t,adjust the ruler accordingly, then recheck that the angleremains at 90°.Using the <strong>Precision</strong> Drop-Off BarTo use the precision drop-off bar, place a piece a materialon the table so that the portion to be cut is the desiredsize. Loosen the thumbscrews and slide the drop-off baragainst the material to be cut. Tighten the rosette knobs.Make a test cut and adjust as necessary by loosening andtightening the thumbscrews. Tip: You can make a cuttingaid using the extra ruler and instructions included withyour shear.Install the Material DeflectorThe material deflector is the Z-shaped piece of aluminumincluded with your shear. The purpose of the deflector todirect the cut material away from the back of the shear sothat it is easier to pick up. If it is not already installed onyour shear, follow the instructions below, referring to thephoto on page 1 as needed.1. The material deflector has three holes for mountingto lower blade at the rear of the shear. Remove theoutside button-head screws from the lower blade.2. Position the material deflector so that it is flush withthe rear blade and above the rear connector rod.3. Re-install the three button-head cap screws. Whenproperly installed, cut material will drop onto thedeflector and slide away from the machine.800.545.6566 www.riogrande.com
page 3Adjusting the <strong>Shear</strong> ActionThe shear action of your <strong>Precision</strong> shear is tested, properlyadjusted and lubricated prior to shipping. It should notrequire any initially adjustment; however, if your shear ismisaligned, follow these procedures (refer to photo below).Four bronze-alloy pressure plates control the stiffness ofthe shear action and the location of the top blade.Two pressure plates are located ateither end of the top blade holder.Each plate is controlled by three setscrews.The picture at right shows thelocation of one group of set-screws.Over time, with normal use, thepressure plates will wear and requireadjusting.Keeping the pressure plates properlyadjusted is important for tworeasons. First, the quality of the cut of the shear dependson maintaining the proper relationship between the topand bottom blades. Second, when properly adjusted, thepressure plates prevent the shear from closing accidentally.If the shear is cutting properly, but the shear action feelstoo tight or too loose, adjust the rear pressure plates first.• Caution! Test the action every time you change onesetting so you know how you are progressing. To adjustthe set-screws, loosen the locking nuts and turn the setscrewsusing the hex wrench supplied with the shear.Use the following procedure:1. Adjust one set-screw at a time.2. Move the set-screw no more than 1/8-turn at a time.3. Test the shear action after each adjustment.• Caution: A shear that’s too tight is just as dangerousas a shear that’s too loose. Learn to adjust your shearproperly and maintain that adjustment.Removing, Installing and Adjusting theBladesThe blades on the shear are both mounted vertically. Thetop and bottom blades are identical. The cutting edge oneach blade is on the side of the blade facing the oppositeblade on the shear. • Caution! Always consider the bladesas very sharp even if they have been used. They can causeserious harm to you or to bystanders.Removing the Blades1. Flip the “flip-up hold-down” feature up out of the way.2. Loosen the bolts/screws holding the top blade. After allare loosened, remove them one at a time using care toprevent the blade from dropping as the screws/boltsare removed. Wear a leather glove and hold the bladewhile removing it. The top blade may be in either theopen or closed position.<strong>Rio</strong> 7” <strong>Precision</strong> <strong>Guillotine</strong> <strong>Shear</strong>3. From the rear of the shear, loosen the three buttonheadscrews holding the bottom blade and remove itfrom the shear. These screws also fasten the materialdeflector to the shear. Refer to the photo on page 1for an illustration of their location.Installing the Blades1. Install the bottom blade first; carefully place the bottomblade in the milled pocket of its carrier. Wear a leatherglove while installing the blade.2. Insert and finger-tighten the middle screws to hold theblade in place. The cutting edge of the blade shouldface the top blade. If the top of the bottom blade is notlevel with the blade carrier and work table, place shimsunder the blade to make it level.3. Align the material deflector and insert the final twoscrews in the bottom blade. Tighten all screws evenly.Refer to the photo on page 1 for an illustration of theproper location of the blade and material deflector.4. Before installing the top blade, open the shear fully.Place the top blade in the milled pocket with the topedge against the top of the pocket. The cutting edge ofthe top blade should face the bottom blade. Insert thefour bolts/screws and finger-tighten.5. With the top blade in its proper location, tighten all fourbolts/screws. Slowly close the shear while observing theblades. If the top blade is going to touch, hit or comedown on top of the bottom blade, stop immediately.6. Open the shear and refer to the section below onadjusting the blades. If the blades close withouttouching each other, follow the test procedures belowbefore using the shear.Adjusting the BladesBecause the blades move up and down parallel to eachother, a gap is required to keep them from striking eachother and damaging one or both blades. The followinginstructions are for adjusting the blades of the shear to a.001" gap or clearance. If tasks involve heavier materials(see maximum gauge limits on page 1), you may need agreater clearance. • Caution! Proceed slowly and in smallincrements when adjusting the blades.1. Slowly close the shear while observing the blades.• If the top blade is going to touch, hit or come downon top of the bottom blade, stop immediately. Openthe shear and go to step 2.• If the blades close without touching each other, goto step 3 to verify the blade settings and to test theshear before using it.2. To provide clearance between the top and bottomblades, the top blade must be moved away fromthe bottom blade by adjusting the four bronze alloypressure plates. Start with the rear plates.• Loosen the locking nuts and then loosen the setscrewsabout 1/4-turn (each plate has three; refer to800.545.6566 www.riogrande.com
<strong>Rio</strong> 7” <strong>Precision</strong> <strong>Guillotine</strong> <strong>Shear</strong> page 4the photo on page 1 if needed).• Then, adjust the front plates. Loosen the lockingnuts and then tighten the set-screws about 1/4-turn.• Following the procedure in step 1, above, close theshear slowly while observing the blades.If additional clearance is needed, repeat theadjustment procedure in this step. When there issufficient clearance, proceed to step 3.3. With the top blade in the down position, check the gapbetween the two blades. If it is greater than .001" (or thegap you want to set), the top blade must be adjusted.For the initial setting, the top blade can be moved usingthe middle set-screws.• Move the blade in small increments and adjust bothends at the same time. Check the gap constantlywith feeler gauges.• When the desired gap is achieved, tighten the setscrews,first in the front, then in the back.• Slowly move the blade up, checking for problems.If there are any, stop and start the process over. Itis important to keep the top and bottom bladesparallel to each other so they do not make contactwith one another.• When you are satisfied with the adjustment, checkthe set-screws and locking nuts to make sure allare tight.4. Once the proper gap is set, test the shear before puttingit into service. Start with a thin piece of material andslowly make a test cut. If the cut is clean and smooth,progress through the materials you will normally cut.If the material has a bur after cutting or is bending, thegap is too great and the blades need to be re-adjusted.• Caution! When you are making your test cut, if youhear an unusual or grinding noise or you feel unusualor excessive resistance or stiffness, stop immediately—moving the handle farther could cause serious damageto the blades. Raise the top blade and start theadjusting process over. Refer also to the “Adjustingthe <strong>Shear</strong> Action” section on page 3.5. Re-install safety shields or guards.MaintenanceMaintaining the <strong>Shear</strong>Properly maintained, this shear will operate effectively andefficiently for many years. Inspect the shear periodically,and be aware of the normal operation of the shear, sothat any change in the operation of the shear is detectedimmediately. Establish a regular maintenance routine thatincludes the following:1. Clean the shear and surrounding work area. Do notuse harsh chemicals or solvents on the shear; they maydamage the appearance or operation of the shear.2. Ensure that the work area is flat and reasonably level.3. Check for loose bolts or fittings.4. Check the blade adjustment.5. Check the blades for sharpness.6. Lubricate pivot points and glides (light grease or oil).7. Four oil-impregnated bronze bushings in the shearrequire periodic lubrication through the two oil holeson the top of the shear (see illustration below). Oil theseregularly with a machine grade or heavier oil.Oil holesMaintaining the BladesOil holesMany shear owners have more than one set of blades.Store extra blades properly when they are not being used.To store properly store blades:1. Coat blades with rust-inhibiting oil.2. Store blades in a dry area.3. Store away from heavy objects that could drop orfall on them accidentally.4. Inspect each blade carefully before installing on shear.• Caution: Blades will wear over time and can bedamaged by carelessness or improper use. Always treatblades as pairs. When replacing a damaged or worn blade,replace both top and bottom blades. When sharpening adull blade, sharpen both blades. By treating them as pairs,both blades will be in the same general condition, and therisk of placing a new blade against a worn blade, ruiningthe new blade, is virtually eliminated.Safety Instructions1. Always wear safety glasses.2. Complete all installation and set-up operationsprior to operating the shear.3. Check all bolts, nuts, screws, fittings, shields, etc.for proper tightening.4. Keep the shear and work area clean.5. Do not remove the safety shields except formaintenance and adjustments.6. Do not operate the shear without the safetyshields in place.7. Do not operate the shear if it is not functioningproperly.8. Do not operate the shear if the blades aredamaged or not sharp.9. Do not operate the shear without reading theseinstructions.©2012 The Bell Group, Inc. All rights reserved.800.545.6566 www.riogrande.com