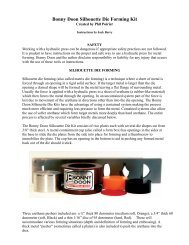
Metal Former - GRS Tools
Metal Former - GRS Tools
Metal Former - GRS Tools

Create successful ePaper yourself
Turn your PDF publications into a flip-book with our unique Google optimized e-Paper software.
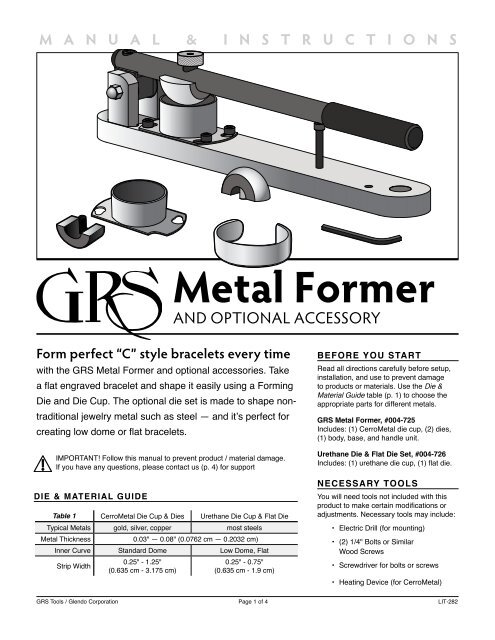
Fig. 11. Loosen-DO NOT REMOVE-BOTTOMaFig. 2Set Pivot TensionSurface = LevelInstall Pad / Plate -OR-Position for Easy Dismountor2X(2) 1/4" bolt orsimilar wood screwMountHolesFig. 31. Lift handle2. Insert die3. Threadand secureFig. 41. Lift handle2. Adjust stop screw so thathandle stops parallel to baseCerro<strong>Metal</strong> onlyTOP— Select Bolt or Screw3. Lift handle, then heat Cerro<strong>Metal</strong>2. Adjust3. TightenBOTTOMbc— Secure to level Benchusing Mount Holes4. Loosen die cup base screwsPlace cup, twist to align5. Tighten all die cup basescrews to secure5. Allow to cool4. Slowly lower dieto stop screw6. Lift handle, and store stop screwSetup & adjustmentsUse the illustrations as visual aids forthe following instructions.Setting the Pivot TensionThe pivot tension is factory-set duringassembly. However, if you prefer adifferent tension:1. Locate bolt shown in Fig. 1a. Loosen(DO NOT REMOVE) using includedhex wrench.2. Next, locate nut in Fig. 1b. Tighten orloosen to attain desired tension.3. Tighten loosened bolt. [ Fig. 1c]Mounting the <strong>Former</strong>Mounting the former, which we suggestfor best performance, gives you a freehand to guide the bracelet.1. First, make sure desired pivottension is set and the mounting areais level (to avoid spills when heatingthe Cerro<strong>Metal</strong>).2.Do one of the following:• Install a ceramic pad or metalplate to provide insulationfor your bench surface.OR• Position the <strong>Metal</strong> <strong>Former</strong> so it iseasy to remove from the benchbefore using a heating device.3. Use the two mount holes on thebase [Fig. 2] with 1/4" bolt or similarsize wood screw and secure to yourbench surface.Changing the Die & CupThe larger die and die cup are installedduring assembly. To change [Fig. 3]:1.Lift handle to a comfortable level.2. If die is installed, use thumb screw toremove. Insert new die on handle.3. Holding die in place, secure thumbscrew onto die set screw.4. Loosen die cup base screws on theformer base and remove current diecup if necessary. Place new die cupover screws and twist cup to align.5.Tighten screws to secure.6. Check that the die and die cup arealigned. If not, reinstall die.Forming the Cerro<strong>Metal</strong>The Cerro<strong>Metal</strong> is an alloy composed ofbismuth and tin, which melts at 281°F.The alloy is soft enough to preventdamage to the material being formed,but stable enough to prevent distortionsduring the forming process. A levelsurface is required. To form [Fig. 4]:1.Lift handle away from die cup.2. Install and set Stop Screw so thathandle stops parallel to base.3. Lift handle, then heat die cupmaterial with heating device until thematerial has liquefied.4. Slowly lower die into material untilthe handle is against the Stop Screw.5. Allow material to cool. Do not movethe former until cooled.6. When cooled, lift handle. Removeand store screw.Using the <strong>Former</strong>Easily shape “C” style bracelets afterengraving and before setting stones.Before you begin forming, check theDie & Material Guide (p. 1) first. To use:1. Start with end of bracelet on the diecup under forming die.2. Press down on handle with adequatepressure to form the material.3. Continue to work the braceletthrough the former until you havereached the desired “C” style shape.You may find that additional shapingby hand or small hammer is needed toachieve a more specific shape.TIPS & NOTES• Any future adjustments to the pivottension may be made only afterdismounting the former.• Every time you change the die for theCerro<strong>Metal</strong> Die Cup, you must heatand form the metal to the die again.• Recreate a uniform Cerro<strong>Metal</strong>surface by heating and reforming.• Forming should ALWAYS take placeafter engraving but before stonesetting.• Protect work from light abrasionsduring the forming process bycovering with non-damaging tape.<strong>GRS</strong> <strong>Tools</strong> / Glendo Corporation Page 2 of 4 LIT-282
<strong>GRS</strong> <strong>Metal</strong> <strong>Former</strong> PARTS LIST #004-725002-489044-077 044-079022-830044-083044-084044-078022-832022-833SECURE USINGLOCTITE 609002-400002-742 002-490044-081044-076044-082044-080 022-831002-448044-075044-164022-222022-833SECURE USINGLOCTITE 609003-140Part No. Description002-400 1 - Cap Screw for Handle(1/4-20 x 1-3/4" SHCS)002-448 Nut - 2 (5/16-18 Acorn Z/P)002-489 5 - Cap Screw for Die Cup(1/4-20 x 1-3/4" SHCS)002-490 2 - Cap Screw for <strong>Former</strong>(1/4-20 x 1-3/4" SHCS)002-742 3/16" Hex Wrench003-140 <strong>GRS</strong> Decal022-222 Stop Screw(1/4-20 x 1-3/4" SHCS)022-830 Cerro<strong>Metal</strong>022-831 Handle Grip022-832 Washer for Pivot Block022-833 Set Screw(1/4-28 x 1" SHSS)044-075 <strong>Former</strong> Base044-076 Right Post044-077 Left Post044-078 Center Pivot Block044-079 Pivot Shaft044-080 <strong>Former</strong> Handle044-081 2" x 1/2" Forming Die044-082 2" x 1" Forming Die044-083 Die Cup044-084 Base Plate for Die Cup044-164 Thumb Screw (1/4-28)Urethane Die Cup & Flat Die SetOPTIONAL ACCESSORY FOR THE <strong>GRS</strong> METAL FORMERYou can purchase the optional UrethaneDie Cup & Flat Die Set to shape nontraditionaljewelry metal such as steel.It’s designed to work with harder metals,and this set is useful for creating lowdome or flat bracelets.This set features a conformableurethane die cup and a flat forming die.Works as an optional accessory for the<strong>GRS</strong> <strong>Metal</strong> <strong>Former</strong> (#004-725).Please contact <strong>GRS</strong> if you have anyquestions about this product.Urethane Die Cup & Flat Die Set PARTS LIST #004-726Do not heat or ingest. For Material Safety Data Sheet on Urethane Material contained in #023-062, please contact us.Part No. Description002-489 2 - Cap Screw for Die Cup(1/4-20 x 1-3/4" SHCS)022-833 Set Screw (1/4-28 x 1" SHSS)023-062 Urethane Die Material044-168 1.5" x 0.84" Flat Forming Die044-083 Die Cup044-084 Base Plate for Die Cup022-833USE LOCTITE 609TO SECURE044-168023-062044-083044-084002-489<strong>GRS</strong> <strong>Tools</strong> / Glendo Corporation Page 3 of 4 LIT-282
MATERIAL SAFETY DATA SHEETI. Product IdentificationTrade Name: Cerro<strong>Metal</strong>Part Numbers: 022-830MFG’s Name: Glendo CorporationAddress: 900 Overlander Rd.Emporia, KS 66801Phone: 620-343-1084EMERGENCY HAZARD RATINGHealth: 2 Flammability: 0 Reactivity: 0II. CompositionChemical Name: TinReg. by OSHA: ??CAS#: 7440-31-5OSHA PEL: 2.0ACGIH / TLV: mg/cu mCarcinogen: NoChemical Name: BismuthReg. by OSHA: ??CAS#: 7440-69-9OSHA PEL: NEACGIH / TLV: NECarcinogen: NoIII. Physical PropertiesMelting point: 281°FBoiling point: N/ASpecificgravity g/cc: 8.721Vapor pressure: Not VolatileVapor density(air is 1): Not VolatileEvaporation: N/ASolubility in water: NILAppearanceand color: Silver to gray metalOdor: None% Volatile: NilpH: N/AIV. Fire and Explosion DataFlash Point: Information not availableFlammabilityLimits: Information not availableAutoignitionTemperature: Information not availableSolid, massive form of material is not combustibleunder ordinary fire conditions. Fire and explosionhazards are moderate when material is in the formof dust and exposed to heat or flames, chemicalreaction, or contact with powerful oxidizers. Fireextinguishing methods: Use special mixtures ofdry chemicals. Do not use water or moist sand.Fire fighters should wear self-contained breathingapparatus and protective clothing.V. Reactivity DataMassive material is stable at ordinarytemperatures, but dust presents moderate fire andexplosion hazards. Material may be incompatiblewith acids, bases, and oxidizers. Molten metalmay react violently with water. For additionalinformation, users should consult data sheets onindividual component elements.VI. Health Hazards DataTLV: See Section II.Primary routes of entry: Ingestion of dust,inhalation of dust or fume.Exposure to the massive form of tin presents fewhazards in itself. However, normal handling of tinmay result in generation of dusts containing thecomponent elements, and inhalation or ingestionof these dusts may present potentially significanthealth hazards. Thermal cutting and melting of tinmay produce fumes containing the componentselements, and breathing these fumes may alsopresent potentially significant health hazards.Special precautions should be taken if metal iscontaminated: See section IX.Prolonged inhalation of tin fumes or dust, oringestion of tin compounds can result in tinpoisoning. Symptoms include abdominal painor colic, constipation, nausea, joint and musclepains, and muscular weakness. Severe cases ofoverexposure may lead to central nervous systemsdisorders, characterized by somnolence, stupor,and ultimately death.Bismuth is not considered a toxic or dangerousmaterial, however, it is always good practice tomaintain good housekeeping procedures and washthoroughly.VII. Spill ProceduresNo special precautions are necessary for spillsof bulk material. If large quantities of dust arespilled, remove by vacuuming with a “Hepa” filteror net sweeping to prevent heavy concentrationsof airborne dust. Clean-up personal should wearrespirators and protective clothing. <strong>Metal</strong> can bereclaimed for refuse. Follow federal, state, andlocal regulations regarding disposal.VIII. Special Protection InformationUse general and local exhaust ventilation to keepairborne concentrations of dust or fume below theTLV. Employees should wear OSHA or NIOSHapproved respirators for protection against airbornedust or fumes. Full protective clothing should beworn by workers exposed to heavy concentrationsof dust, and showering should be requiredbefore changing into street clothes. Gloves andbarrier creams may be necessary to prevent skinsensitization and dermatitis.Approved safety glasses or goggles should beworn when working with dusty material and moltenmetal. Safety stations should be provided in closeproximity to work areas.For Material Safety Data Sheet on Urethane materialcontained in #023-062, please contact us.Request Literature #023-062MSDS.Pre-employment and periodic medical evaluationsshould be provided. Attention should be directedtoward skin, eyes, respiratory tract, blood, kidneys,pulmonary function, and neurologic health. Chestx-rays should be included if Symptoms are resent.Food should not be consumed in the work area.No smoking in work area. Hands and face mustbe washed before eating or smoking. Cosmeticsshould not be applied in areas where this productis used.IX. Special PrecautionsUse good housekeeping practices to preventaccumulations of dust and to keep airborne dustconcentrations at a minimum. Avoid breathing dustor fumes.Store material away from incompatible materials,and keep dust away from sources of ignition.XI. Other InformationThis fact sheet was prepared by Hallmark <strong>Metal</strong>sCorporation. The information recommendationsand suggestions were compiled from referencematerials and other sources believed to thereliable. However, the fact sheets’ accuracy orcompleteness is not guaranteed by Hallmark<strong>Metal</strong>s Corporation, nor is any responsibilityassumed or implied for any loss or damageresulting from inaccuracies or omissions.Appropriate warning and safe handling proceduresshould be provided to handlers and users. Nowarranty is implied or expressed regardingthe accuracy of this data. Liability is expresslydisclaimed for loss or injury arising out of useof this information or the use of any materialsdesignated.This MSDS is based on data on data consideredaccurate. However, no warranty is expressed orimplied regarding the accuracy of this data or theresults to obtained from the use thereof. Vendorassumes no responsibility for injury to vendee orthird persons proximately caused by the material ifreasonable safety procedures are not adhered toas stipulated in the data sheet. Additionally, vendorassumes no responsibility for injury to vendee or thirdpersons proximately caused by abnormal use of thematerial even if reasonable safety procedures arefollowed. Furthermore, vendee assumes the risk in hisuse of the material.900 Overlander RoadP.O. Box 1153Emporia, KS 66801 USAToll-Free: 1-800-835-3519Phone: 620-343-1084Fax: 620-343-9640E-mail: grs@grstools.comwww.grstools.com<strong>GRS</strong> <strong>Tools</strong> / Glendo Corporation Page 4 of 4 LIT-282