this product is designed for use in closed course racing ... - MotoSport
this product is designed for use in closed course racing ... - MotoSport
this product is designed for use in closed course racing ... - MotoSport

Create successful ePaper yourself
Turn your PDF publications into a flip-book with our unique Google optimized e-Paper software.
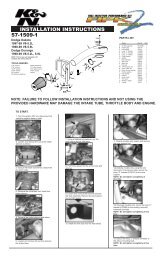
Installation Procedures: Page 2Caution: Exhaust system can be extremely hot. Letmotorcycle cool down be<strong>for</strong>e beg<strong>in</strong>n<strong>in</strong>g <strong>in</strong>stallation. Alwayswear hand and eye protection and take precautionarymeasures to avoid <strong>in</strong>jury.Tools Needed:Metric socket set3/8” ratchet and extension12mm wrench4mm and 6mm allen wrenchTorque wrenchSmall flat head screwdriverInstallation Steps:1 Remove left and right side fair<strong>in</strong>gs (see Fig. 1 and Fig. 2).2 Remove stock muffler (see Fig. 3 and Fig. 4).Fig. 23 Remove stock rear muffler bracket.4 Remove lower radiator support bracket and sw<strong>in</strong>g radiator <strong>for</strong>ward toease removal of stock header.5 Remove stock header and exhaust port gaskets.NOTE: Th<strong>is</strong> Yoshimura full system <strong>is</strong> <strong>designed</strong> to be <strong>in</strong>stalled withoutexhaust port gaskets. If exhaust port gaskets are <strong>use</strong>d, there may be<strong>in</strong>sufficient clearance between the header and radiator.6 Install Yoshimura manifolds and flanges <strong>in</strong>to exhaust ports us<strong>in</strong>gstock header nuts (see Fig. 5 <strong>for</strong> flange orientation).7 Torque header nuts to 1.0 kgf-m (7.3 lb-ft).MufflerMountMufflerMount8 Install Yoshimura header from one end of the eng<strong>in</strong>e to the other byslipp<strong>in</strong>g one tube at a time onto manifolds.Fig. 3Stock CollectorClampMufflerMountFig. 1 Fig. 4