van Aaken SmartBox⢠F Installation Instructions - 4 Wheel Online
van Aaken SmartBox⢠F Installation Instructions - 4 Wheel Online
van Aaken SmartBox⢠F Installation Instructions - 4 Wheel Online

Create successful ePaper yourself
Turn your PDF publications into a flip-book with our unique Google optimized e-Paper software.
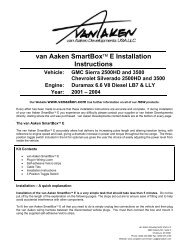
<strong>van</strong> <strong>Aaken</strong> SmartBox FPowerstroke V8 6.0L <strong>Installation</strong> instructions1) Where does the module connect?The <strong>van</strong> <strong>Aaken</strong> SmartBox F connects to the vehicle throughan ECU plug located on the driver’s side of the engine bay, inbetweenthe battery and the chassis as shown in the pictureopposite.ECUOn the <strong>van</strong> <strong>Aaken</strong> SmartBox F wiring harness (loom) there isboth a male side and a female side of the 46-way ECU(Engine Control Unit) plug which will connect to the centre plugon the ECU.The smaller grey 12-pin plug is used to connect the loom tothe <strong>van</strong> <strong>Aaken</strong> SmartBox F unit.2) Accessing the ECUTo gain access to the ECU the battery cover has to be removed.Using a 5/16” (8mm) Spanner, first remove the batteries negative(-) connection and then remove the positive (+, Red cover)connection.ECU locatedunder coverNow gently move the cables away so that the cover can be liftedand removed from the vehicle. The ECU can now be seenbetween the battery and the vehicle body.3) Connecting the LoomLocate the centre black plug on the ECU. Disconnectthis plug by pressing the release latch on the greylever and pushing it backwards (towards the wiring atthe rear of the plug). It will now be possible tocompletely remove the plug from the ECU (See pictureopposite)The <strong>van</strong> <strong>Aaken</strong> SmartBox F wiring loom can now befitted. Plug the vehicles original red and blackconnector into the female side of the <strong>van</strong> <strong>Aaken</strong> wiringloom and push the lever lock back down until it clicksinto place.<strong>van</strong> <strong>Aaken</strong> Developments USA LLC4490 Valenty Rd., Suite CChubbuck, ID 83202Phone: (208) 234-5660 Fax: (208) 637-0287Website: www.<strong>van</strong>aaken.com Email: usa@<strong>van</strong>aaken.com
<strong>van</strong> <strong>Aaken</strong> SmartBox FPowerstroke V8 6.0L <strong>Installation</strong> instructionsNow carefully push these connectors down into the spacebelow the ECU plugs and insert the male plug of the <strong>van</strong><strong>Aaken</strong> wiring loom into the female ECU connector, againensuring that the lever lock on the plug is correctly located tolatch firmly into place.Bring the <strong>van</strong> <strong>Aaken</strong> SmartBox F braided wires with theattached 12 pin Grey plug out from the space below the ECUso that the unit can be connected and mounted.Now refit the Battery cover and reconnect the positive andnegative battery terminals, ensuring that you connect thepositive terminal first and then the negative terminal.You are now ready to mount the unit.4) Mounting the UnitThe unit should be mounted on the side of thebattery cover (as shown in the picture opposite) oron top of the battery cover.Fix the unit in place using the supplied selfadhesive Velcro strips. The area on the vehiclewhere the unit is to be attached should bethoroughly cleaned first to remove all traces of oil,engine lacquer or dirt.The grey 12-pin plug on the supplied wiring loomshould be led over to the unit and firmly connectedto the socket on the <strong>van</strong> <strong>Aaken</strong> SmartBox F unitso that both catches on the sides of the plug areseated into place.5) Toggle Switch <strong>Installation</strong> and Connection(Optional)The supplied toggle switch may be installed in any suitable place withinthe vehicle cab. The wires from the switch should be passed through thebulkhead using a rubber grommet to seal the hole and protect the wires.Make sure that the switch wires cannot get entangled in any moving partsbehind the dashboard such as heating controls.Connect the 2-pin plug on the switch loom to the remaining plug on themain loom, which is located at the end nearest to the <strong>van</strong> <strong>Aaken</strong>SmartBox F. Secure the wires using the supplied cable ties.<strong>van</strong> <strong>Aaken</strong> Developments USA LLC4490 Valenty Rd., Suite CChubbuck, ID 83202Phone: (208) 234-5660 Fax: (208) 637-0287Website: www.<strong>van</strong>aaken.com Email: usa@<strong>van</strong>aaken.com
<strong>van</strong> <strong>Aaken</strong> SmartBox FPowerstroke V8 6.0L <strong>Installation</strong> instructionsThere is a small groove (keyway) cut into thethreaded metal section of the switch. Thisgroove can be used to decide the orientationof the switch.Power positions are:• Switch towards the keyway : Fullpower position• Switch in the middle : Lower powerposition• Switch Away from the keyway : Unitis turned off (no power gain)Switch Operation• If no switch is connected to the <strong>van</strong> <strong>Aaken</strong> SmartBox F the default setting will be Power 2 – it will givemaximum extra power all the time.• If the included 3-position switch is connected the unit can be switched between Off, Power 1 and Power 2.Power 1 will typically give half the gain of Power 2 but this is entirely dependent on the tuning file programmedinto the unit. If in doubt about the function of each switch position please contact your SUPPLYING dealer.6) After Fitting and Before Starting the Vehicle – Please ReadPlease check :• All connections are firmly made• All wiring is adequately secured so as not to comeinto contact with sharp edges or moving parts.• The <strong>van</strong> <strong>Aaken</strong> SmartBox F is securelymounted.• No tools have been left in the engine bay.<strong>van</strong> <strong>Aaken</strong> SmartBox F INSTALLATION IS NOW COMPLETEThe <strong>van</strong> <strong>Aaken</strong> SmartBox F for Ford Powerstroke 6.0L is a high performance product that will change theoperating characteristics of your engine. When using this product, as with any performance increasing product,we would strongly recommend the use of EGT (Exhaust Gas Temperature) and Manifold Boost pressure gaugesto monitor conditions within the engineStart the vehicle in the usual mannerYou are now ready to experience <strong>van</strong> <strong>Aaken</strong> SmartBox power!IN THE UNLIKELY EVENT THAT THE VEHICLE WILL NOT START1 Check all of the plug-in connections to make sure they are pushed all the way home.2 Ensure that the <strong>van</strong> <strong>Aaken</strong> SmartBox F wiring harness has not been accidentally damaged.3 Ensure that no pins have been dislodged during the connection of the large plugs – To do this disconnect theECU plugs and visually inspect the pins on both the male and female side to ensure that none have been bent orpushed back in their socket.4 Make sure that no other connections in the engine bay have been disturbed accidentally.If you can find nothing wrong and the vehicle will still not start, contact your supplier or contact <strong>van</strong> <strong>Aaken</strong> Developmentsdirectly stating where and when your <strong>van</strong> <strong>Aaken</strong> SmartBox F was purchased.<strong>van</strong> <strong>Aaken</strong> Developments USA LLC4490 Valenty Rd., Suite CChubbuck, ID 83202Phone: (208) 234-5660 Fax: (208) 637-0287Website: www.<strong>van</strong>aaken.com Email: usa@<strong>van</strong>aaken.com
<strong>van</strong> <strong>Aaken</strong> SmartBox FPowerstroke V8 6.0L <strong>Installation</strong> instructionsWarranty Statement<strong>van</strong> <strong>Aaken</strong> Developments Ltd12 Month Warranty Statement<strong>van</strong> <strong>Aaken</strong> Developments Ltd (vAD) warrants to the original purchaser that any parts purchased shallbe free from defects in material and workmanship. A defect is defined as a condition that wouldrender the product inoperable. This warranty does not cover deterioration of plating, paint or anyother coating. vAD liability is limited to the repair or replacement, at vAD's option, of any warrantableproduct returned prepaid with a complete service history and proof of purchase to the factory. A validproof of purchase is a dated bill of sale. Repaired or replaced product will be returned to thecustomer freight collect. Accepted warranty units which have been replaced become the soleproperty of vAD.Product returned for warranty determination must be accompanied by a complete servicehistory, including details of the circumstances under which the defect occurred, and a ReturnMaterial Authorization (RMA) number obtained in ad<strong>van</strong>ce from a vAD customer servicesrepresentative. vAD will be the final authority on all warranty decisions.This warranty shall not apply to any unit which has been improperly stored or installed; subjected tomisapplication, improper operating conditions, accidents, or neglect; or which has been improperlyrepaired or altered or otherwise mistreated by the owner or his agent.This warranty shall terminate at the end of 12 months in service with the original user. Laborcost incurred by the removal and replacement of a vAD product, while performing warrantywork, will be the responsibility of the vehicle owner, in no case does the obligation of <strong>van</strong><strong>Aaken</strong> Developments Ltd exceed the original purchase price of the product as indicated onthe original bill of sale.Except as set forth in this warranty, vAD disclaims any implied warranty, including implied warrantiesof merchantability and fitness for a particular purpose. vAD also disclaims any liability forincidental or consequential damages including but not limited to, repair labor, rental vehicles,hotel costs or any other inconvenience costs. This warranty is in view of all warranties orguarantees, either expressed or implied and shall not extend to any customer or to any person otherthan the original purchaser residing within the boundaries of the continental U.S or Canada.<strong>van</strong> <strong>Aaken</strong> Developments USA LLC4490 Valenty Rd., Suite CChubbuck, ID 83202Phone: (208) 234-5660 Fax: (208) 637-0287Website: www.<strong>van</strong>aaken.com Email: usa@<strong>van</strong>aaken.com