Instruction Manual (English) - Service - Dewalt.no
Instruction Manual (English) - Service - Dewalt.no
Instruction Manual (English) - Service - Dewalt.no
Create successful ePaper yourself
Turn your PDF publications into a flip-book with our unique Google optimized e-Paper software.
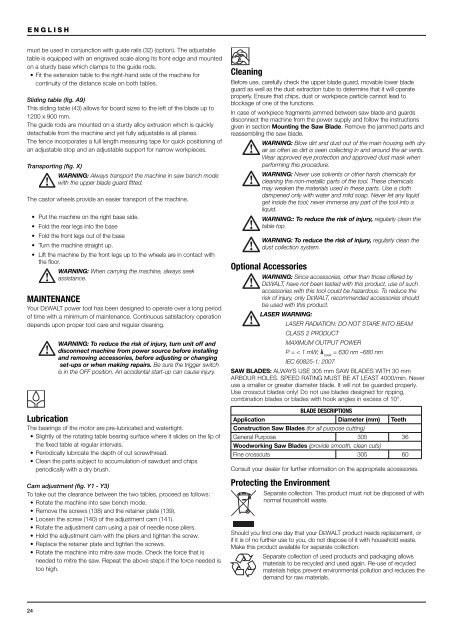
ENGLISHmust be used in conjunction with guide rails (32) (option). The adjustabletable is equipped with an engraved scale along its front edge and mountedon a sturdy base which clamps to the guide rods.• Fit the extension table to the right-hand side of the machine forcontinuity of the distance scale on both tables.Sliding table (fig. A9)This sliding table (43) allows for board sizes to the left of the blade up to1200 x 900 mm.The guide rods are mounted on a sturdy alloy extrusion which is quicklydetachable from the machine and yet fully adjustable is all planes.The fence incorporates a full length measuring tape for quick positioning ofan adjustable stop and an adjustable support for narrow workpieces.Transporting (fig. X)WARNING: Always transport the machine in saw bench modewith the upper blade guard fitted.The castor wheels provide an easier transport of the machine.• Put the machine on the right base side.• Fold the rear legs into the base• Fold the front legs out of the base• Turn the machine straight up.• Lift the machine by the front legs up to the wheels are in contact withthe floor.WARNING: When carrying the machine, always seekassistance.MAINTENANCEYour DEWALT power tool has been designed to operate over a long periodof time with a minimum of maintenance. Continuous satisfactory operationdepends upon proper tool care and regular cleaning.WARNING: To reduce the risk of injury, turn unit off anddisconnect machine from power source before installingand removing accessories, before adjusting or changingset-ups or when making repairs. Be sure the trigger switchis in the OFF position. An accidental start-up can cause injury.LubricationThe bearings of the motor are pre-lubricated and watertight.• Slightly oil the rotating table bearing surface where it slides on the lip ofthe fi xed table at regular intervals.• Periodically lubricate the depth of cut screwthread.• Clean the parts subject to accumulation of sawdust and chipsperiodically with a dry brush.Cam adjustment (fig. Y1 - Y3)To take out the clearance between the two tables, proceed as follows:• Rotate the machine into saw bench mode.• Remove the screws (138) and the retainer plate (139).• Loosen the screw (140) of the adjustment cam (141).• Rotate the adjustment cam using a pair of needle <strong>no</strong>se pliers.• Hold the adjustment cam with the pliers and tighten the screw.• Replace the retainer plate and tighten the screws.• Rotate the machine into mitre saw mode. Check the force that isneeded to mitre the saw. Repeat the above steps if the force needed istoo high.CleaningBefore use, carefully check the upper blade guard, movable lower bladeguard as well as the dust extraction tube to determine that it will operateproperly. Ensure that chips, dust or workpiece particle can<strong>no</strong>t lead toblockage of one of the functions.In case of workpiece fragments jammed between saw blade and guardsdisconnect the machine from the power supply and follow the instructionsgiven in section Mounting the Saw Blade. Remove the jammed parts andreassembling the saw blade.WARNING: Blow dirt and dust out of the main housing with dryair as often as dirt is seen collecting in and around the air vents.Wear approved eye protection and approved dust mask whenperforming this procedure.WARNING: Never use solvents or other harsh chemicals forcleaning the <strong>no</strong>n-metallic parts of the tool. These chemicalsmay weaken the materials used in these parts. Use a clothdampened only with water and mild soap. Never let any liquidget inside the tool; never immerse any part of the tool into aliquid.WARNING:: To reduce the risk of injury, regularly clean thetable top.WARNING: To reduce the risk of injury, regularly clean thedust collection system.Optional AccessoriesWARNING: Since accessories, other than those offered byDEWALT, have <strong>no</strong>t been tested with this product, use of suchaccessories with this tool could be hazardous. To reduce therisk of injury, only DEWALT, recommended accessories shouldbe used with this product.LASER WARNING:LASER RADIATION: DO NOT STARE INTO BEAMCLASS 2 PRODUCTMAXIMUM OUTPUT POWERP = < 1 mW; = 630 nm –680 nmpeakIEC 60825-1: 2007SAW BLADES: ALWAYS USE 305 mm SAW BLADES WITH 30 mmARBOUR HOLES. SPEED RATING MUST BE AT LEAST 4000/min. Neveruse a smaller or greater diameter blade. It will <strong>no</strong>t be guarded properly.Use crosscut blades only! Do <strong>no</strong>t use blades designed for ripping,combination blades or blades with hook angles in excess of 10°.BLADE DESCRIPTIONSApplication Diameter (mm) TeethConstruction Saw Blades (for all purpose cutting)General Purpose 305 36Woodworking Saw Blades (provide smooth, clean cuts)Fine crosscuts 305 60Consult your dealer for further information on the appropriate accessories.Protecting the EnvironmentSeparate collection. This product must <strong>no</strong>t be disposed of with<strong>no</strong>rmal household waste.Should you find one day that your DEWALT product needs replacement, orif it is of <strong>no</strong> further use to you, do <strong>no</strong>t dispose of it with household waste.Make this product available for separate collection.Separate collection of used products and packaging allowsmaterials to be recycled and used again. Re-use of recycledmaterials helps prevent environmental pollution and reduces thedemand for raw materials.24


