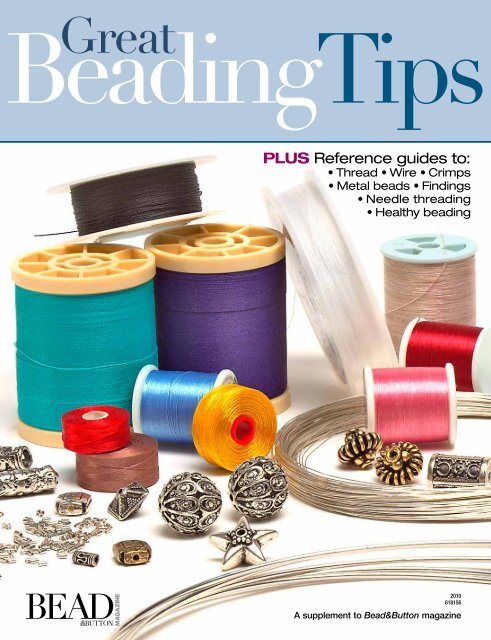
PLUS Reference guides to: - Bead and Button Magazine
PLUS Reference guides to: - Bead and Button Magazine
PLUS Reference guides to: - Bead and Button Magazine

Create successful ePaper yourself
Turn your PDF publications into a flip-book with our unique Google optimized e-Paper software.
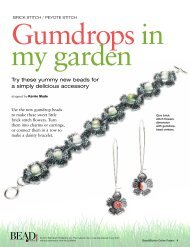
Needles <strong>and</strong> knotsNeedle s<strong>to</strong>rageSometimes I think sorting my beads<strong>and</strong> findings is as much fun as beading,so I am always excited <strong>to</strong> find anew container or other solution <strong>to</strong>organize my supplies. I found thisthree-compartment container by Planofor a dollar in the fishing departmen<strong>to</strong>f my local outdoor sports s<strong>to</strong>re. I cutthree small, adhesive-backed magneticstrips <strong>and</strong> positioned one in eachcompartment. Now my needles ares<strong>to</strong>red by size. I have one containerfor long needles <strong>and</strong> one for sharps.You can write the needle size on thecompartment with a permanent finepointmarker. – Kerri West, JohnsonCreek, WisconsinPeyote aidWhen working in flat peyote with 110seed beads, I slip a quilter’s pin throughthe first row after completing the thirdrow. This maintains the project’s shape<strong>and</strong> makes it easy <strong>to</strong> hold. Cover thepin’s tip with tape <strong>to</strong> protect againstscratches. – Pat Harter, Cary,North CarolinaS<strong>to</strong>p tangles in FirelineI use Fireline 4 lb. test <strong>and</strong> a #12 needlefor almost all my beading. To preventthe short end from tangling around theworking thread, I tie an overh<strong>and</strong> knotat the tail end. The knot won’t pullthrough the needle’s eye, but you caneasily go through 150 seed beads two orthree times. – Jane A. Alley, Silver City,New MexicoHide thread endsWhen knotting two threads <strong>to</strong>gether,at least two (four, if doubled) ends ofthread remain near the knot. I used <strong>to</strong>pull the ends through several beads <strong>to</strong>hide them, but sooner or later, a shortend or two would protrude in themiddle of the beadwork. To solve thisproblem, put a twisted-wire needlethrough several beads <strong>and</strong> thread oneshort end through the eye. Beforepulling it inside the beads, dab someglue on the thread. The short endbecomes glued <strong>to</strong> the main threadinside the bead <strong>and</strong> will never comeout. Repeat with the other ends, butgo through several beads in theopposite direction. When the gluedries, trim the ends. – EvelinaKolchinsky, Andover, MassachusettsEasier stringing for beadcrochet or knittingSeveral years ago, I made a smallknitted bag with beads. I developeda good method for stringing beads on<strong>to</strong>the thread used in the project. Theknitted bag was made with perlecot<strong>to</strong>n, but this tip would work withall cot<strong>to</strong>n threads. I threaded my longbeading needle with Nymo, then usedTacky Glue <strong>to</strong> glue the two ends of theNymo <strong>to</strong> the end of the perle cot<strong>to</strong>n,overlapping both. After it dried for anhour or so, I picked up the beads withthe needle, <strong>and</strong> they glided easily overthe join. I found I was able <strong>to</strong> stringabout 1000 beads on<strong>to</strong> the perle cot<strong>to</strong>nbefore the join broke. I repeated thegluing process with fresh pieces ofNymo <strong>and</strong> perle cot<strong>to</strong>n <strong>and</strong> kept onstringing. – Althea Church, Oxford,Mississippi8
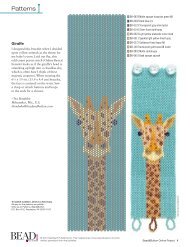
5 steps for easier needle threading1Start with stretches: Cut thethread, hold one end in each h<strong>and</strong>,<strong>and</strong> pull. If you’re working with Nymo,condition it. This relaxes the thread’skinks <strong>and</strong> curls, making it easier <strong>to</strong> use.2Shear the edge: Trim the end ofyour thread on an angle using verysharp scissors. A tapered edge free ofstray fibers will slide gracefullythrough the needle’s eye.3Sink your teeth in<strong>to</strong> it: Flatten thethread’s cut edge <strong>to</strong> its thinnestprofile by pressing it with your fingernails,squeezing it with pliers, or bitingit gently with your teeth.4Bring needle <strong>to</strong> thread: Hold theneedle in your dominant h<strong>and</strong>, <strong>and</strong>grab the thread close <strong>to</strong> the cut edgewith your other h<strong>and</strong>. Move the needle<strong>to</strong> the thread, sliding the eye over thethread’s end.#10Use with60 <strong>to</strong> 110seed beads#12Use with80 <strong>to</strong> 130seed beads5If all else fails: Pass the wire loopof a needle threader through the eyeof your needle. Put your thread throughthe loop, then pull the loop out of theneedle. Success!#13Use with110 <strong>to</strong> 150seed beads#16Use with160 <strong>to</strong> 240seed beadsGet the pointTo choose a needle, consider your bead<strong>and</strong> thread sizes, the number of passesyou’ll make through the beads, <strong>and</strong> thebeading technique.Big Eye:Use forloomwork,macramé,<strong>and</strong> transferringbeadsTwisted wire: Usefor stringing <strong>and</strong>tight spotsSmallBig Eye:Use foroff-loomstitches<strong>and</strong> tightspots#12 long:Use forloomwork,off-loomstitches, <strong>and</strong>transferringbeadsA HackySack, or footbag,makes a colorfulpin cushion.<strong>Bead</strong>ing needles (Use for off-loom stitches <strong>and</strong> loomwork): the smaller the needle,the bigger the number.9
<strong>Bead</strong> s<strong>to</strong>rage <strong>and</strong> organizationProject organizersI like <strong>to</strong> s<strong>to</strong>re my beading projects incanvas notebook pencil cases with aclear plastic front panel. These casesare inexpensive <strong>and</strong> sturdy enough <strong>to</strong>withst<strong>and</strong> needle piercings. They’relarge enough <strong>to</strong> hold all the materialsneeded for a project, <strong>and</strong> the clear panelmakes it easy for me <strong>to</strong> find the projectI want <strong>to</strong> work on. – Jill S. Banning,Newberry, FloridaKeep ’em containedRecently, I decided <strong>to</strong> organize my seedbead collection. I put the beads in a64-drawer cabinet <strong>and</strong> labeled thedrawers with the size <strong>and</strong> color of thebeads. I chose <strong>to</strong> s<strong>to</strong>re most of the beadsloose because the tubes didn’t fit in thedrawers. Then one day, my husb<strong>and</strong>accidentally kicked over the cabinet <strong>and</strong>64 drawers of seed beads spilled on<strong>to</strong>the floor. (He felt so bad; I justlaughed.) So, unless you want uniquecolor mixes like I have, if you decide <strong>to</strong>s<strong>to</strong>re your beads this way, secure themin little plastic zip bags first. – HeidiInskeep, Scottsdale, ArizonaDesign platformsI found that the little racks used inScrabble are approximately 7 in. (18 cm)long — perfect for designing a bracelet.The beads rest in an upright position —a better perspective than on a flatbead board. Three or four racks canbe positioned side by side for necklacesalso. – Louise Lessing, Drexel Hill,PennsylvaniaInexpensive bead boardsLike most beaders, I often have morethan one project going at a time. SinceI only have one bead design board butstill want <strong>to</strong> see my designs as I laythem out, I have found a way <strong>to</strong> makemy own disposable boards. These areportable, inexpensive, <strong>and</strong> great <strong>to</strong> haveon h<strong>and</strong> for a jewelry-making party.To make one, cut an 8 1 ⁄2 x 11-in.(21.6 x 28 cm) piece of cards<strong>to</strong>ck inhalf so you have two 4 1 ⁄4 x 11-in.(10.8 x 28 cm) pieces. Fold one piecein half lengthwise. Then fold the edgesback <strong>to</strong>ward the center fold, making anM shape. Mark the center with a 0 <strong>and</strong>,using a ruler, mark 1 ⁄2-in. (1.3 cm) <strong>and</strong>1-in. (2.5 cm) increments in each direction.Place your beads in the channel,using 0 as the center, as on a commercialdesign board. Make another boardwith the other piece of cards<strong>to</strong>ck.– Tracey Kirk, Clarksville, Tennessee<strong>Bead</strong> travelerEmpty travel-sized baby-wipecontainers make great s<strong>to</strong>rage forbead projects. They’re lightweight,the right depth <strong>to</strong> hold tubes of beads<strong>and</strong> projects, <strong>and</strong> they fit easily in<strong>to</strong> apurse or carry-on. Best of all, you canrecycle something that would otherwiseend up in the garbage. I line mine witha beading surface cut <strong>to</strong> fit. In fact, thecontainer seals so tightly, you don’thave <strong>to</strong> put the beads back in the tubesif you’re in a rush <strong>to</strong> close up yourbeading. You won’t lose anything.– Sherry Magid, Skokie, Illinois10
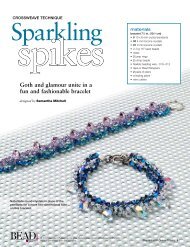
Metal beads <strong>and</strong> findingsMetal beads <strong>and</strong> findings are great foradding character <strong>and</strong> durability <strong>to</strong> jewelrydesigns. A wide array of metal productsis available, ranging from 24k gold <strong>and</strong>fine silver <strong>to</strong> pewter <strong>and</strong> brass, <strong>and</strong> it canbe a challenge knowing what’s what.Below is a brief description of the metalsthat are commonly available at s<strong>to</strong>res <strong>and</strong>online merchants. Be aware that unscrupulousdealers sometimes misrepresentCopper disk withinlaid sterlingGold-platedconeproducts. If a price seems <strong>to</strong>o good <strong>to</strong> betrue, the item may not be genuine.Our thanks <strong>to</strong> Keith Seib of Planet <strong>Bead</strong><strong>and</strong> Sylvia Sur for their assistance.Vermeil bead<strong>and</strong> claspTurkish silver beadsIsraeli silver beads <strong>and</strong> claspBali silver spacerHill Tribessilver beadsNiobium earring wireMetallook-alikesEast Indiansilver starMany styles of beads look likemetal but aren’t. These includemetallic-finished glass, plastic, <strong>and</strong>s<strong>to</strong>ne (pyrite <strong>and</strong> hematite). These areall good alternatives <strong>to</strong> metal forsome uses, but it’s important <strong>to</strong>know what you’re using.Metal Composition Characteristics Commentsb a s e m e t a l g o l ds i l v e rFine silver 99.9% silver Lustrous white, soft, <strong>and</strong> malleable; the mostinexpensive <strong>and</strong> accessible precious metalSterlingsilver92.5% silver, 7.5% other, usually copper;92.5% is minimum silver contentfor an item labeled silver in the U.S.The addition of copper or other base metal makessterling silver harder <strong>and</strong> more prone <strong>to</strong> tarnishingthan fine silverToo soft <strong>to</strong> be made in<strong>to</strong> beads; available as wire<strong>and</strong> is the resulting material in metal clay silverItems sold as sterling should be stamped “925,”“sterling,” or “ster”; however, no internationalagency exists <strong>to</strong> enforce this policySilver plate Thin layer of pure silver over base metal Looks much like sterling Silver plating wears off over timeBali silver Sterling silver H<strong>and</strong>made in Bali; characterized by surfacegranulation <strong>and</strong> fine detailHill Tribessilver95%–98% pure silver H<strong>and</strong>made in Thail<strong>and</strong>; no two pieces areexactly alikeTurkish silver Sterling silver H<strong>and</strong>made in Turkey; characterized by surfacegranulation <strong>and</strong> filigreeEast IndiansilverItems labeled “Bali-style” are usually not made inBali <strong>and</strong> are often not sterlingNatural themes, such as flora <strong>and</strong> fauna,predominateOften lightweight <strong>and</strong> ornateSterling silver, various alloys Wide array of styles Many “Bali-style” beads are made in IndiaIsraeli silver Sterling silver Often smooth, sleek, <strong>and</strong> modern-looking Usually high quality <strong>and</strong> relatively inexpensiveMexican silver Sterling silver Often inlaid with s<strong>to</strong>nes Vintage items may have lower silver contentKarated gold24k = 99.9% gold; 22k = 91.3% gold;18k = 75% gold; 14k = 58.5% gold;12k = 50% gold; 10k = 41.7% goldBright yellow metal that does not tarnish orcorrode; one of the most prized precious metalsAll items sold as gold should be labeled with akarat designation; 10k is the minimum st<strong>and</strong>ardfor gold in the U.S.Gold-filled 10k or higher over base metal Gold layer will wear off over time Gold must account for at least 1/20 the weight ofthe piece <strong>to</strong> be called “gold-filled”Gold plate 10k or higher over base metal Gold layer will wear off over time Gold layer is thinner than in gold-filled itemsGold vermeil 14k or higher over sterling silver Gold layer will wear off over time Nice, relatively inexpensive alternative <strong>to</strong> pure goldCopper 100% copper Reddish-gold metal that ages <strong>to</strong> warm brown Develops green patina <strong>and</strong> can turn skin greenBrass Copper <strong>and</strong> zinc alloy Inexpensive gold-colored metal Tarnishes <strong>and</strong> turns brown over timeNickel 100% nickel White metal that looks like silver Many people are allergic <strong>to</strong> nickelPewter Tin alloyed with various other metals Soft, grayish-silver metal Vintage pewter may contain leadNiobium 100% niobium Very strong <strong>and</strong> hard inert gray metal, usuallyanodized <strong>to</strong> various attractive colorsSurgicalsteelIron, carbon, chromium, <strong>and</strong> variousother base metalsHas a smooth surface that prevents germsfrom attachingHypoallergenic; great as earring findingsBecause it sometimes contains nickel, it’s not agood choice for people with nickel allergiesGerman silver Copper, zinc, <strong>and</strong> nickel Looks like sterling, but contains no silver Also known as “nickel silver” <strong>and</strong> “Alpaca silver”11
Wire <strong>and</strong> finishingEasy sizing for braceletsI’ve made many bracelets that are thesame length, yet each one fits differentlybecause the size of the beads affects thebracelet’s inside diameter. Here’s an easyway <strong>to</strong> make sure the bracelet is theright length for the size of your beads.First, find the inside diameter of abracelet that fits you. Then, turn aStyrofoam cup upside down, slide thebracelet on<strong>to</strong> the cup, <strong>and</strong> mark the cupwhere the bracelet sits. Use the cup as aform <strong>to</strong> make another bracelet of thesame size. This also lets you determinethe lengths for bracelets slightly smalleror larger in diameter. – Pearl Hresil,Chicago, IllinoisEarrings in a flashIf you’ve been searching for fast, easy earring ideas,try this great-looking pair. On a 4-in. (10 cm) pieceof .012 or .014 flexible beading wire, center yourchoice of beads <strong>and</strong> two four-loop components, asshown. Cross the wire’s ends through the loop onan earring finding, then bring each wire through thecorresponding loop on the <strong>to</strong>p silver component.Slide a crimp bead over both wire ends. Adjust thetension of the wires, flatten the crimp bead withchainnose pliers, <strong>and</strong> trim the excess wire. Make asecond earring <strong>to</strong> match the first. – Helene Tsigistras,Brookfield,WisconsinPin orpendantI have a favoriteladybug pinthat I wanted<strong>to</strong> use as apendant. So, Idesigned a neckstrap <strong>and</strong> finishedboth ends with lobster clawclasps. Then, I attached the lobsterclaws <strong>to</strong> the pin back. – MerleBerelowitz, New York, New York<strong>Bead</strong> healthyBack pain remedyI discovered a marvelous item <strong>to</strong> sooththe constant pain under my shoulderblades caused by working in front ofa computer screen all day. It’s calledBody-Rite <strong>and</strong> features two straps thatslip over your shoulders <strong>and</strong> a 3-lb.counterbalance weight at the baseof your back. Wearing it is supposed<strong>to</strong> prevent lower back, neck, <strong>and</strong>shoulder strain <strong>and</strong> encourages goodposture. I recommend this <strong>to</strong> mybeading students with positive results.Mine is from Nancy’s Notions(nancysnotions.com), but I havealso seen them in fabric s<strong>to</strong>res.– Terry Leming, Hous<strong>to</strong>n, Texas<strong>Bead</strong>ing stretchesI work with 150 beads in a painterlyfashion <strong>and</strong> spend many weeks <strong>and</strong>months on my pieces. Of course,spending hours in one position leavesmy neck <strong>and</strong> upper-back musclesstrained, <strong>and</strong> causes pain from poorcirculation in my legs. Now, I setmy kitchen timer <strong>to</strong> go off every30 minutes <strong>to</strong> remind myself <strong>to</strong> movemy legs <strong>and</strong> neck. My chiroprac<strong>to</strong>rsuggests getting a 6-in. ball, puttingit between my head <strong>and</strong> the wall, <strong>and</strong>pressing <strong>to</strong> strengthen the neck muscles.– Maxine Hull, Atlanta, GeorgiaEye exercisesRecently, a guest of my beading grouptaught us many exercises <strong>to</strong> use whilesitting <strong>and</strong> beading for long periods oftime. We had the most fun with an eyeexercise — writing the letters of thealphabet with our eyes. It is easyenough <strong>and</strong> elicits a lot of laughs ifyou happen <strong>to</strong> meet someone else’s eyemid-letter. – Lynda Pedersen, Adelaide,Australia12
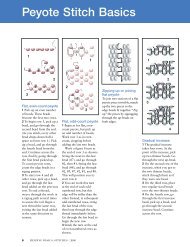
Although beadingisn’t generally viewed as aphysically dem<strong>and</strong>ing activity,holding the body in stiff or unnaturalpositions for extended periods of time cancause long-term damage <strong>to</strong> the musculoskeletalsystem. Cindy Marti, a physicaltherapist with Spinal Dynamics of Wisconsin(cmarti@sdwpt.com), showed us a h<strong>and</strong>fulof fast <strong>and</strong> simple exercises designed forhealthy beading. She suggests interruptingyour work at least once every30 <strong>to</strong> 60 minutes <strong>to</strong> do thefollowing exercises.>> 1. Chin tuckWhen we bead, we usually extend our necks forward <strong>and</strong>down. This puts sustained pressure on the cervical discs<strong>and</strong> also overloads the cervical muscles. To relieve thesepressures, raise the head so you’re looking forward <strong>and</strong> yourneck is straight. Put your h<strong>and</strong> on your chin, <strong>and</strong> gently pushbackward. Hold this stretch for about 5 seconds. Release.Do a <strong>to</strong>tal of five repetitions.>> 2. Upper shoulder stretchTo loosen the shoulder muscle, place your left h<strong>and</strong> under your posterior.With your right h<strong>and</strong>, hold the left side of your head, <strong>and</strong> gently tilt it <strong>to</strong> theright, creating a stretch in the trapezius muscle. Hold for 20 seconds, release,<strong>and</strong> repeat. For additional stretch, pull slightly back <strong>and</strong> over or slightlyforward <strong>and</strong> over. Repeat on the other side.> 4. Thumb stretchPlace your h<strong>and</strong> sideways on your work surface with the thumbfacing upward. With your other h<strong>and</strong>, grasp the thumb, <strong>and</strong>gently pull backward. Hold for 20 seconds. Release, <strong>and</strong> repeat.Repeat on the other h<strong>and</strong>. For additional stretch, angle thethumb <strong>to</strong>ward the back of the h<strong>and</strong>, <strong>and</strong> pull.> 6. Backward bendSit on the edge of your chair, <strong>and</strong> place your h<strong>and</strong>s on your waist.Angling your elbows behind you <strong>and</strong> looking up, arch your back.Hold for five seconds. Release. Do a <strong>to</strong>tal of five repetitions.If desired, do this stretch while st<strong>and</strong>ing instead of sitting.
More great tips<strong>Bead</strong> dish coverI am a busy sports mom, <strong>and</strong> I like <strong>to</strong>take my bead projects with me. SinceI use a porcelain bead dish, I normallyscoop the beads in<strong>to</strong> their originalcontainers when it’s time <strong>to</strong> go <strong>to</strong> thenext event. I have tried using plastic lidsfrom various containers <strong>and</strong> have yet <strong>to</strong>find one that fits snugly around thepetal shape of the dish. The kitchenwrap Press ’n Seal by Glad has anadhesive on one side, <strong>and</strong> it sticks <strong>to</strong>smooth surfaces. Now, I simply covermy bead dish with a piece of Press ’nSeal <strong>and</strong> secure it by running my fingerover the outer edge <strong>and</strong> divisions inthe dish. Then I pull the excess wraparound the sides <strong>to</strong> the bot<strong>to</strong>m.The beads stay in their individualcompartments, <strong>and</strong> I can <strong>to</strong>ss the trayin my bag <strong>and</strong> not worry about it.Occasionally, some beads stick <strong>to</strong> thewrap, but they don’t pick up anyresidue from it. – Cindy Vaughn,Teague, TexasQuick color clipColor cards are a nice way <strong>to</strong> keep trackof your beads, but they’re inconvenient<strong>to</strong> carry. I also love the concept ofbeaded swatch samples, but that meanshaving the time <strong>to</strong> bead them. So hereis my solution. String a single color ofbeads on a 1-in. (2.5 cm) safety pin.(I used Dritz br<strong>and</strong> pins.) Make a smalllabel for the color number <strong>and</strong> attachit <strong>to</strong> the other side of the pin. Slide theloop on the end of the safety pin on<strong>to</strong>a loose-leaf ring or split ring. Carry itin your purse or attach a chain or cord<strong>and</strong> wear it around your neck <strong>to</strong> keepyour h<strong>and</strong>s free as you shop. I alsomade one for my crystals.– Rafannette Dooley, Franklin, TexasSpiraling beadsI use beading <strong>and</strong> scrapbooking techniques<strong>to</strong> transform spiral notebooksin<strong>to</strong> cus<strong>to</strong>m keepsakes. Select a bookwith a colorful cover design or adheredecorative paper <strong>to</strong> the front usingdouble-sided tape. Add a layer of stampsor stickers. Sew beads <strong>and</strong> sequins on<strong>to</strong>the cover using an embroidery needle<strong>and</strong> conditioned Nymo. Cover exposedthreads by taping decorative paper <strong>to</strong>the inside cover. Remove the wire spiral.Wind the spiral back in<strong>to</strong> the book,adding a few beads <strong>to</strong> the wire eachtime it exits one of the binding’s holes.– Althea Church, Oxford, MississippiPho<strong>to</strong> backgroundsFor about $1 each, I can buy a varietyof professional-looking backgrounds <strong>to</strong>pho<strong>to</strong>graph my beadwork on. Scrapbookpapers (12 x 12 in./31 x 31 cm)come in a variety of colors <strong>and</strong> texturesat most craft s<strong>to</strong>res, <strong>and</strong> they are easy <strong>to</strong>s<strong>to</strong>re in a folder. When it comes <strong>to</strong> lightingmy beadwork, I find that naturallight works the best. – KimberlySzalkiewicz, Escondido, California© 2010, Kalmbach Publishing Co. All rights reserved. <strong>Bead</strong>&But<strong>to</strong>n is a registered trademark. This bookmay not be reproduced in part or in whole without written permission from the publisher. Published byKalmbach Publishing Co., 21027 Crossroads Circle, Waukesha, WI 53187. Printed in U.S.A.14