manual - UNI-T
manual - UNI-T
manual - UNI-T
- No tags were found...

You also want an ePaper? Increase the reach of your titles
YUMPU automatically turns print PDFs into web optimized ePapers that Google loves.
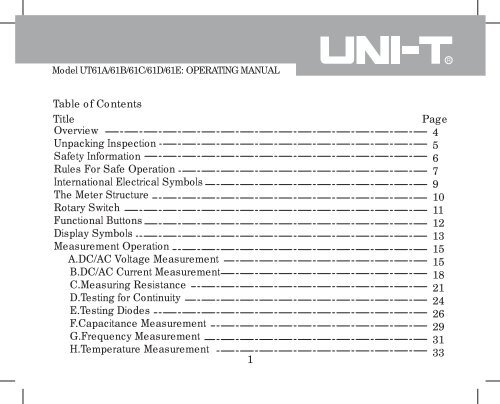
Model UT61A/61B/61C/61D/61E: OPERATING MANUALTable of ContentsTitleOverviewUnpacking InspectionSafety InformationRules For Safe OperationInternational Electrical SymbolsThe Meter StructureRotary SwitchFunctional ButtonsDisplay SymbolsMeasurement OperationA.DC/AC Voltage MeasurementB.DC/AC Current MeasurementC.Measuring ResistanceD.Testing for ContinuityE.Testing DiodesF.Capacitance MeasurementG.Frequency MeasurementH.Temperature Measurement1Page4567910111213151518212426293133
Model UT61A/61B/61C/61D/61E: OPERATING MANUALTitleI.Transistor hFE MeasurementJ.EF FunctionOperation of Hold ModeRANGE ButtonMAX MIN ButtonPEAK ButtonData OutputtingThe Use of Relative Value ModeThe BLUE ButtonTurning on the Display BacklightSleep ModeGeneral SpecificationsAccuracy SpecificationsA.DC VoltageB.AC VoltageC.DC CurrentD.AC CurrentE.ResistancePage3537383939394040414141424344464952552
Model UT61A/61B/61C/61D/61E: OPERATING MANUALTitleF.CapacitanceG.FrequencyH.Diode TestI.Continuity TestJ.TemperatureK.Transistor hFEMaintenanceA.General ServiceB.Replacing the BatteryC.Replacing the FusesUSB and RS232C Serial PortPage57596060616262626365673
Model UT61A/61B/61C/61D/61E: OPERATING MANUALThis Operating Manual covers information on safety and cautions. Please read therelevant information carefully and observe all the Warnings and Notes strictly.Warning4
Model UT61A/61B/61C/61D/61E: OPERATING MANUALExcept where noted, the descriptions and instructions in this Operating Manual applyto all Model UT61A/UT61B/UT61C/UT61D/UT61E.Unpacking InspectionOpen the package case and take out the Meter. Check the following items carefullyto see any missing or damaged part:Item12345678DescriptionOperating ManualTest LeadPoint Contact K type Temperature Probe (UT61B and UT61C only)UT61 Multi-Purpose Socket9V Battery (NEDA1604, 6F22 or 0006P) (installed inside the Meter)RS232C Interface Cable(except UT61A)USB Interface Cable (Optional at extra cost) (except UT61A)Installation Guide & Computer Interface Software (CD-ROM) (Comealong with the RS232C or USB Interface Cable) (except UT61A)5Qty1 piece1 pair1 piece1 piece1 piece1 piece1 piece1 piece
Model UT61A/61B/61C/61D/61E: OPERATING MANUALIn the event you find any missing or damage, please contact your dealer immediately.Safety InformationThis Meter complies with the standards IEC61010: in pollution degree 2, overvoltagecategory (CAT. III 1000V, CAT. IV 600V) and double insulation.CAT III: Distribution level, fixed installation, with smaller transient overvoltages thanCAT. IV.CAT IV: Primary supply level, overhead lines, cable systems etc.Use the Meter only as specified in this operating <strong>manual</strong>, otherwise the protectionprovided by the Meter may be impaired.In this <strong>manual</strong>, a Warning identifies conditions and actions that pose hazards to theuser, or may damage the Meter or the equipment under test.A Note identifies the information that user should pay attention on.International electrical symbols used on the Meter and in this Operating Manual areexplained on page9.6
Model UT61A/61B/61C/61D/61E: OPERATING MANUALRules For Safe OperationWarningTo avoid possible electric shock or personal injury, and to avoid possibledamage to the Meter or to the equipment under test, adhere to the followingrules:• Before using the Meter inspect the case. Do not use the Meter if it isdamaged or the case (or part of the case) is removed. Look for cracks ormissing plastic. Pay attention to the insulation around the connectors.• Inspect the test leads for damaged insulation or exposed metal. Checkthe test leads for continuity. Replace damaged test leads with identicalmodel number or electrical specifications before using the Meter.• Do not apply more than the rated voltage, as marked on the Meter, betweenthe terminals or between any terminal and grounding.• The rotary switch should be placed in the right position and no anychangeover of range shall be made during measurement is conducted toprevent damage of the Meter.• When the Meter working at an effective voltage over 60V in DC or 30Vrms in AC, special care should be taken for there is danger of electricshock.7
Model UT61A/61B/61C/61D/61E: OPERATING MANUAL• Do not use or store the Meter in an environment of high temperature,humidity, explosive, inflammable and strong magnetic field. The performanceof the Meter may deteriorate after dampened.• When using the test leads, keep your fingers behind the finger guards.• Disconnect circuit power and discharge all high-voltage capacitors beforetesting resistance, continuity and diodes.• Before measuring current, check the Meterís fuses and turn off the currentto be tested before connecting the Meter to the circuit. After connectingthe circuit reliably, turn the current to be tested on.• Replace the battery as soon as the battery indicator appears. With alow battery, the Meter might produce false readings that can lead to electricshock and personal injury.• When servicing the Meter, use only the same model number or identicalelectrical specifications replacement parts.• The internal circuit of the Meter shall not be altered at will to avoid damageof the Meter and any accident.• Soft cloth and mild detergent should be used to clean the surface of theMeter when servicing. No abrasive and solvent should be used to preventthe surface of the Meter from corrosion, damage and accident.• The Meter is suitable for indoor use.8
Model UT61A/61B/61C/61D/61E: OPERATING MANUAL• Turn the Meter off when it is not in use and take out the battery when notusing for a long time.• Constantly check the battery as it may leak when it has been using forsome time, replace the battery as soon as leaking appears. A leakingbattery will damage the Meter.International Electrical SymbolsAC or DCDouble InsulatedWarning. Refer to the OperatingManualGroundingDeficiency of Built-In BatteryConforms to Standards ofEuropean Union9
Model UT61A/61B/61C/61D/61E: OPERATING MANUALThe Meter Structure (see figure 1)12345LCD DisplayFunctional ButtonsBlue buttonRotary SwitchInput Terminal:figure 110
Model UT61A/61B/61C/61D/61E: OPERATING MANUALRotary SwitchBelow table indicated for information about the rotary switch positions.AC and DC Voltage MeasurementmVAC Voltage Measurement (UT61D only)DC Voltage Measurement (UT61D only)Resistance MeasurementDiode TestContinuity TestCapacitance TestFrequency and Duty Cycle TestTemperature in Celsius (UT61B and UT61C only)Temperature in Fahrenheit (UT61B and UT61C only)Transistor (UT61A only)DCA and ACA MeasurementDCmA and ACmA Measurement10A DC and AC MeasurementSensor Test (UT61A only)OFF Power off11
Model UT61A/61B/61C/61D/61E: OPERATING MANUALFunctional ButtonsBelow table indicated for information about the functional button operations.ButtonHoldBLUE ButtonRANGERELPEAK (UT61E only)Operation PerformedPress and hold for 2 serconds to turn the display backlight on or off.Press to enter or exit data hold mode.Press to select the alternate featurePress RANGE to enter the <strong>manual</strong> ranging mode;the Meter beeps.Press RANGE to step through the ranges available for theselected function; the Meter beeps.Press and hold RANGE for 2 seconds to return to autoranging;the Meter beepsPress to select the maximum and minimum value.Press to enter REL mode.Press again to exit REL modeFor Model UT61C, UT61C andPress and hold for over 2 seconds to enter or exit RS232C orUSB mode."CAL" means the meter enter self-calibration mode.12
Model UT61A/61B/61C/61D/61E: OPERATING MANUALDisplay SymbolsNo123456789101112131415SymbolMeaningData hold is active.Sleep Mode indicatorIndicates negative reading.Indicator for AC measurementIndicator for DC measurementThe Meter is in the auto range mode in which the Meter automaticallyselects the range with the best resolution.Indicator for <strong>manual</strong> ranging mode.The input value is too large for the selected range.Transistor testing indicatorTest of diodeThe continuity buzzer is on.Maximum and Minimum reading.Data output is in progressThe battery is low.Warning: To avoid false readings, which could lead topossible electric shock or personal injury, replace the batteryas soon as the battery indicator appears.Sensor test is in progress13
Model UT61A/61B/61C/61D/61E: OPERATING MANUALNo1617SymbolMeaningThe REL is on to display the stored value minus the present value.: Ohm. The unit of resistance.k : kilohm. 1 x 10 3 or 1000 ohms.M : Megaohm. 1 x 10 6 or 1,000,000 ohms.V: Volts. The unit of voltage.mV: Millivolt. 1 x 10 -3 or 0.001 volts.A: Amperes (amps). The unit of current.mA: Milliamp. 1 x 10 -3 or 0.001 amperesµA : Microamp. 1x 10 -6 or 0.000001 amperesF: Farad. The unit of capacitance.µF : Microfarad. 1 x 10 -6 or 0.000001 farads.nF : Nanofarad. 1 x 10 -9 or 0.000000001 farads.: Centigrade. The unit of temperature.: Fahrenheit. The unit of temperature.Hz: Hertz. The unit of frequency in cycles/second.kHz: Kilohertz. 1 x 10 3 or 1,000 hertz.MHz: Megahertz. 1 x 10 6 or1,000,000 hertz.The unit of transistor14
Model UT61A/61B/61C/61D/61E: OPERATING MANUALMeasurement OperationA. DC/AC Voltage Measurement (See figure 2)figure 215
Model UT61A/61B/61C/61D/61E: OPERATING MANUALWarningTo avoid harms to you or damages to the Meter from electric shock, please donot attempt to measure voltages higher than 1000V although readings may beobtained.When measuring high voltage, take extra care to avoid electric shock.1. Insert the red test lead into the V terminal and the black test lead into the COMterminal.2. Set the rotary switch to V; DC measurement is default or press BLUE button toswitch between DC and AC measurement mode.3. Connect the test leads across with the object being measured. The measuredvalue shows on the display.UT61A, UT61B and UT61C: display effective value of sine wave (mean valueresponse).UT61D and UT61E: display true rms value.4. Press Hz% to obtain the frequency and duty cycle value.Input Amplitude: (DC electric level is zero)Input Amplitude: range 30%Frequency respouse:UT61A and B 400HzUT61C,UT61D and UT61E 1KHz16
Model UT61A/61B/61C/61D/61E: OPERATING MANUALNote• In each range, the Meter has an input impedance of 10M except mV rangewhich input impedance is 3000M . This loading effect can cause measurementerrors in high impedance circuits. If the circuit impedance is less than or equalto 10k , the error is negligible (0.1% or less).• For UT61A and UT61B:When measuring mV, you must press RANGE <strong>manual</strong>lyto enter mV range.• When voltage measurement has been completed, disconnect the connectionbetween the testing leads and the circuit under test, and remove the testing leadsaway from the input terminals of the Meter.17
Model UT61A/61B/61C/61D/61E: OPERATING MANUALB. DC/AC Current Measurement (See figure 3)Afigure 318
Model UT61A/61B/61C/61D/61E: OPERATING MANUALWarningBefore connecting the Meter to the return circuit to be tested, cut off the currentof the return circuit.If the fuse burns out during measurement, the Meter may be damaged or theoperator himself may be hurt.Use proper terminals, function, and range for the measurement.When the testing leads are connected to the current terminals, do not parallelthem across any circuit.To measure current, do the following:1. Insert the red test lead into the mA or A input terminal and the black test leadinto the COM terminal.2. Set the rotary switch to A, mA, or A.3. The Meter defaults to DC current measurement mode. To toggle between DCand AC current measurement function, press BLUE button.4. Connect the test lead in serial to the return circuit to be tested. The measuredvalue shows on the display.19
Model UT61A/61B/61C/61D/61E: OPERATING MANUALUT61A, UT61B and UT61C: display effective value of sine wave (meanvalue response).UT61D and UT61E: display true rms value.5. Press Hz% to obtain the frequency and duty cycle value.Input Amplitude: (DC electric level is zero)Input Amplitude: range 30%Frequency response:UT61A and B 400HzUT61C , UT61D andUT61E 1KHzNote• If the value of current to be measured is unknown, use the maximum measurementposition, and reduce the range step by step until a satisfactory reading is obtained.• For safety sake, each measurement time for >5A current should be less than10 seconds and the interval time between 2 measurements should be greaterthan 15 minutes.• When current measurement has been completed, disconnect the connectionbetween the testing leads and the circuit under test, and remove the testing leadsaway from the input terminals of the Meter.20
Model UT61A/61B/61C/61D/61E: OPERATING MANUALC. Measuring Resistance (See figure 4)figure 421
Model UT61A/61B/61C/61D/61E: OPERATING MANUALWarningTo avoid damages to the Meter or to the devices under test, disconnect circuitpower and discharge all the high-voltage capacitors before measuring resistance.To avoid harm to yourself, do not input higher than DC 60V or AC 30V voltages.To measure resistance, connect the Meter as follows:1. Insert the red test lead into the terminal and the black test lead into the COMterminal.2. Set the rotary switch to resistance measurement ( ) is default or press BLUEbutton to select measurement mode.3. Connect the test leads across with the object being measured. If there is lead onthe resistor or SMT resistor, it is more convenience to use the included multipurposesocket to carry out testing.The measured value shows on the display.22
Model UT61A/61B/61C/61D/61E: OPERATING MANUAL23
Model UT61A/61B/61C/61D/61E: OPERATING MANUALD. Testing for Continuity (See figure 5)figure 524
Model UT61A/61B/61C/61D/61E: OPERATING MANUALWarningTo avoid damages to the Meter or to the devices under test, disconnect circuitpower and discharge all the high-voltage capacitors before testing for continuity.To avoid harm to yourself, do not input higher than DC 60V or AC 30V voltages.To test for continuity, connect the Meter as below:1. Insert the red test lead into the terminal and the black test lead into the COMterminal.2. Set the rotary switch to and press BLUE button to select measurement mode.3. The buzzer sounds continuously if the resistor to be tested is 35Note• UT61A, UT61B, UT61C and UT61D: open circuit voltage is around 0.45VUT61E: open circuit voltage is around -1.2V• When continuity testing has been completed, disconnect the connectionbetweenthe testing leads and the circuit under test, and remove the testing leads awayfrom the input terminals of the Meter.25
Model UT61A/61B/61C/61D/61E: OPERATING MANUALE. Testing Diodes (See figure 6)figure 626
Model UT61A/61B/61C/61D/61E: OPERATING MANUAL27
Model UT61A/61B/61C/61D/61E: OPERATING MANUAL• Connect the test leads to the proper terminals as said above to avoid errordisplay. The LCD will display OL indicating diode being tested is open or polarityis reversed. The unit of diode is Volt (V), displaying the forward voltage dropreadings.• When diode testing has been completed, disconnect the connection betweenthe testing leads and the circuit under test, and remove the testing leads awayfrom the input terminals of the Meter.28
Model UT61A/61B/61C/61D/61E: OPERATING MANUALF. Capacitance Measurement (See figure 7)figure 729
Model UT61A/61B/61C/61D/61E: OPERATING MANUALWarningTo avoid damage to the Meter or to the equipment under test, disconnect circuitpower and discharge all high-voltage capacitors before measuring capacitance.Use the DC Voltage function to confirm that the capacitor is discharged.To measure capacitance, connect the Meter as follows:1. Insert the red test lead into the terminal and the black test lead into the COMterminal.2. Set the rotary switch to and press BLUE button to select nF measurement mode.• At that time, the Meter will display a fixed value as below which is the Meterinternal fixed distributed capacitance value. To ensure accuracy whenmeasuring a small value of capacitance, the tested value must subtract thisvalue, REL mode can help on that.UT61A, UT61B, UT61C, UT61D and UT61E: around 10nFUT61E: around 50PF• For more convenience, use the included multi-purpose socket for measuringcapacitor with leads or SMT capacitor. Insert the capacitor to be tested intothe corresponding "+" and "-" jack of the multi-purpose socket. This methodis more stable and correct for small value of capacitance testing.3. Connect the test leads across with the object being measured.The measured value shows on the display.30
Model UT61A/61B/61C/61D/61E: OPERATING MANUALn the tested capacitor is more than 100uFfigure 831
30040MHz:unspecified4For UT61E:Measuring Audio frequency,if the input voltage is more than 15 volt.the meter will simulate the sound in same frequency.4Model UT61A/61B/61C/61D/61E: OPERATING MANUAL32
Model UT61A/61B/61C/61D/61E: OPERATING MANUAL• When frequency measurement has been completed, disconnect the connectionbetween the testing leads and the circuit under test, and remove the testing leadsaway from the input terminals of the Meter.H. Temperature Measurement (UT61B and UT61C only) (See figure 9)figure 9)33
Model UT61A/61B/61C/61D/61E: OPERATING MANUALWarningTo avoid harm to yourself, do not input higher than DC 60V or AC 30V voltages.To measure temperature, connect the Meter as follows:1. Set the rotary switch to .2. Insert the temperature probe into the input terminal as shown on the figure 9.3. Place the temperature probe to the object being measured.After few seconds, the measured value shows on the display.4. Press BLUE button to toggle between and temperature.Note• To avoid measurement error especially low temperature measurement, theoperating temperature must not exceed 18 ~ 28 .• When temperature measurement has been completed, disconnect the connectionbetween the temperature probe and the object being measured, and remove thetemperature probe away from the input terminals of the Meter.34
Model UT61A/61B/61C/61D/61E: OPERATING MANUALI. Transistor hFE Measurement (UT61A only) (See figure 10)figure 1035
Model UT61A/61B/61C/61D/61E: OPERATING MANUAL1. Set the rotary switch to hFE.2. Insert the multi-purpose socket into the input terminal as shown on figure 10.3. Insert the transistor to be tested into the corresponding multi-purpose socket jacks.4. The LCD display hFE nearest valueNote• When transistor measurement has been completed, disconnect all the connectionbetween multi-purpose socket, transistor and the Meter.36
Model UT61A/61B/61C/61D/61E: OPERATING MANUALJ. EF Function (UT61A only) (See figure 11)figure 1137
Model UT61A/61B/61C/61D/61E: OPERATING MANUALTo use EF function, connect the Meter as follows:1. Set the rotary switch to EF and remove the test lead from the input terminals.2. Place the housing front part with marking towards the object being measured.3. There will be three types of displays:‣ LCD displays different size of digits to represent the strength of detectedsignal.‣ When the LCD displays OL, the buzzer beeps and the red LED blinks.Operation of Hold ModeWarningTo avoid possibility of electric shock, do not use Hold mode to determine if circuitsare without power. The Hold mode will not capture unstable or noisy readings.The Hold mode is applicable to all measurement functions.• Press HOLD to enter Hold mode; the Meter beeps.• Press HOLD again to exit Hold mode; the Meter beeps.• In Hold mode, is displayed.38
Model UT61A/61B/61C/61D/61E: OPERATING MANUALRANGE button• Press RANGE to enter the <strong>manual</strong> ranging mode; the Meter beeps.• Press RANGE to step through the ranges available for the selected function;the Meter beeps.• Press and hold RANGE for over 2 seconds to return to autoranging; the Meterbeeps.MAX MIN button (UT61A, UT61B, UT61C and UT61D only)• Press MAX MIN to start recording of maximum and minimum values. Stepsthe display through high (MAX) and low (MIN) readings. The Meter enters<strong>manual</strong> ranging mode after pressing MAX MIN button.• Press and hold MAX MIN for over 2 seconds to exit MAX MIN mode and returnto the present measurement range.PEAK Hold (UT61E only)• Under voltage and current measurement mode, press PEAK button to enter<strong>manual</strong> ranging mode and start recording of Pmax and Pmin values. The LCDdisplays MANU/Pmax.• Press PEAK again to display MANU/Pmin.• Press PEAK to step the display through Peak Max and Peak Min readings.• Press and hold PEAK for over 2 seconds to exit Peak mode, the LCD displaysthe present measurement values.• Don't press the "PEAK" Key.If the meter have entered "CAL" mode.39
Model UT61A/61B/61C/61D/61E: OPERATING MANUALFor UT61E,Auto entering Data outputting mode.40
Model UT61A/61B/61C/61D/61E: OPERATING MANUAL41
Model UT61A/61B/61C/61D/61E: OPERATING MANUALGeneral Specifications• Maximum Voltage between any Terminals and Grounding:Refer to the different ranges input protection voltage..• Fused Protection for AmA Input Terminal:1A H 240V 6x25mm.• Fused Protection for 10A Input Terminal:10A H 240V 6x25mm.• DisplayUT61A and UT61B:Maximum reading 4000 (frequency 9999), analoguebar graph 41 segmentsUT61C and UT61D:Maximum reading 6000 (frequency 9999), analoguebar graph 61 segments.UT61E:Maximum reading 22000, analogue bar graph 46 segments• Measurement Speed:• Range: Auto or Manual• Polarity Display: Auto• Overload indication: Display OL• Battery Deficiency: DisplayUpdates 2~3 times/second.42
Model UT61A/61B/61C/61D/61E: OPERATING MANUAL43
Model UT61A/61B/61C/61D/61E: OPERATING MANUAL44
Model UT61A/61B/61C/61D/61E: OPERATING MANUAL(0.8%+3)45
Model UT61A/61B/61C/61D/61E: OPERATING MANUAL46
Model UT61A/61B/61C/61D/61E: OPERATING MANUAL347
Model UT61A/61B/61C/61D/61E: OPERATING MANUAL48
Model UT61A/61B/61C/61D/61E: OPERATING MANUAL49
Model UT61A/61B/61C/61D/61E: OPERATING MANUAL050
Model UT61A/61B/61C/61D/61E: OPERATING MANUAL51
Model UT61A/61B/61C/61D/61E: OPERATING MANUAL353
Model UT61A/61B/61C/61D/61E: OPERATING MANUAL55
Model UT61A/61B/61C/61D/61E: OPERATING MANUAL56
Model UT61A/61B/61C/61D/61E: OPERATING MANUAL44444457
Model UT61A/61B/61C/61D/61E: OPERATING MANUAL58
Model UT61A/61B/61C/61D/61E: OPERATING MANUAL0.01Hz0.001Hz40M30040 40059
Model UT61A/61B/61C/61D/61E: OPERATING MANUAL0.001V0.0001V60
Model UT61A/61B/61C/61D/61E: OPERATING MANUALVac61
Model UT61A/61B/61C/61D/61E: OPERATING MANUALMaintenanceThis section provides basic maintenance information including battery and fusereplacement instruction.WarningDo not attempt to repair or service your Meter unless you are qualified to doso and have the relevant calibration, performance test, and service information.To avoid electrical shock or damage to the Meter, do not get water inside thecase.A. General Service• Periodically wipe the case with a damp cloth and mild detergent. Do not useabrasives or solvents.• To clean the terminals with cotton bar with detergent, as dirt or moisture in theterminals can affect readings.• Turn off the power of the Meter when it is not in use.• Take out the battery when it is using for a long time.62
Model UT61A/61B/61C/61D/61E: OPERATING MANUAL• Do not use or store the Meter in a place of humidity, high temperature, explosive,inflammable and strong magnetic field.B. Replacing the Batteryfigure 1263
Model UT61A/61B/61C/61D/61E: OPERATING MANUALWarningTo avoid false readings, which could lead to possible electric shock or personalinjury, replace the battery as soon as the battery indicator "c" appears.Make sure the test leads are disconnected from the circuit being tested beforeopening the case bottom.To replace the battery: (See figure 12)1. Turn the Meter power off and remove all connections from the terminals.2. Remove the screw from the tilt stand and the battery compartment and separatethe battery compartment and the tilt stand from the case bottom.3. Remove the battery from the battery compartment.4. Replace the battery with a new 9V battery (NEDA1604, 6F22 or 006P)5. Rejoin the tilt stand, battery compartment and case bottom, and reinstall the screw.64
Model UT61A/61B/61C/61D/61E: OPERATING MANUALC. Replacing the Fusesfigure 1365
Model UT61A/61B/61C/61D/61E: OPERATING MANUALWarningTo avoid electrical shock or arc blast, or personal injury or damage to the Meter,use specified fuses ONLY in accordance with the following procedure.To test the fuse: (See figure 13)The Meter does not response when measuring current and transistor hFE, go toinspect the Meter built-in fuses if they are broken.To replace the Meterís fuse: (See figure 12)1. Turn the Meter power off and remove all the connections from the terminals.2. Remove the screw from the tilt stand and the battery compartment and separatethe battery compartment and the tilt stand from the case bottom.3. Remove the two screws from the case bottom, and separate the case top from thecase bottom.4. Remove the fuse by gently prying one end loose, then take out the fuse from itsbracket.5. Install ONLY replacement fuses with the identical type and specification as followsand make sure the fuse is fixed firmly in the bracket.A mA range: F1, 1A H 240V, 6x25mm (CE)10A range: F2, 10A H 240V, 6x25 mm. (CE)6. Rejoin the case bottom and case top, and reinstall the screw.7. Rejoin the tilt stand, battery compartment and case bottom, and reinstall the screw.66
Model UT61A/61B/61C/61D/61E: OPERATING MANUALUSB Serial Port (UT61B, UT61C , UT61D and UT61E only)It is optional at extra cost.Please refer to the ìInstallation Guide & Computer Interface Softwareî for installingand operating instructions of the UT61 Interface Program.**END**67
Model UT61A/61B/61C/61D/61E: OPERATING MANUALThis operating <strong>manual</strong> is subject to change without notice.Copyright 2008 Uni-Trend Group Limited.All rights reserved.Manufacturer:Uni-Trend Technology (Dongguan) LimitedDong Fang Da DaoBei Shan Dong Fang Industrial Development DistrictHu Men Town, Dongguan CityGuang Dong ProvinceChinaPostal Code: 523 925Headquarters:Uni-Trend Group LimitedRm901, 9/F, Nanyang Plaza57 Hung To RoadKwun TongKowloonHong KongTel: (852) 2950 9168Fax: (852) 2950 930368