
Create successful ePaper yourself
Turn your PDF publications into a flip-book with our unique Google optimized e-Paper software.
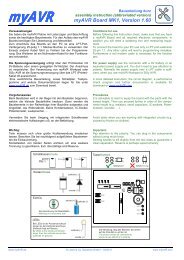
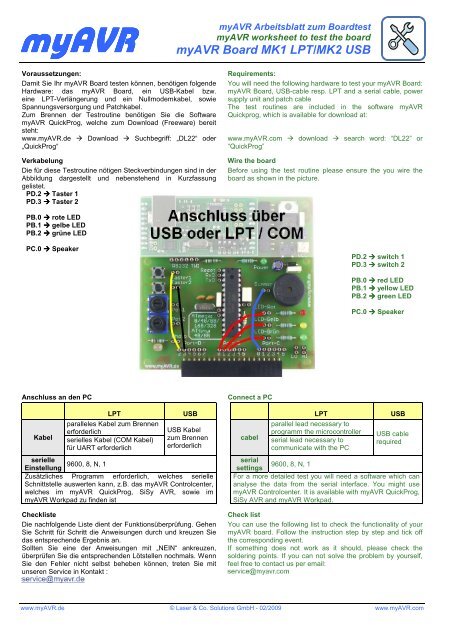
<strong>myAVR</strong><strong>myAVR</strong> Arbeitsblatt zum <strong>Board</strong>test<strong>myAVR</strong> worksheet to test the board<strong>myAVR</strong> <strong>Board</strong> <strong>MK1</strong> <strong>LPT</strong>/<strong>MK2</strong> <strong>USB</strong>Voraussetzungen:Damit Sie Ihr <strong>myAVR</strong> <strong>Board</strong> testen können, benötigen folgendeHardware: das <strong>myAVR</strong> <strong>Board</strong>, ein <strong>USB</strong>-Kabel bzw.eine <strong>LPT</strong>-Verlängerung und ein Nullmodemkabel, sowieSpannungsversorgung und Patchkabel.Zum Brennen der Testroutine benötigen Sie die Software<strong>myAVR</strong> QuickProg, welche zum Download (Freeware) bereitsteht:www.<strong>myAVR</strong>.de Download Suchbegriff: „DL22“ oder„QuickProg“VerkabelungDie für diese Testroutine nötigen Steckverbindungen sind in derAbbildung dargestellt und nebenstehend in Kurzfassunggelistet.PD.2 Taster 1PD.3 Taster 2Requirements:You will need the following hardware to test your <strong>myAVR</strong> <strong>Board</strong>:<strong>myAVR</strong> <strong>Board</strong>, <strong>USB</strong>-cable resp. <strong>LPT</strong> and a serial cable, powersupply unit and patch cableThe test routines are included in the software <strong>myAVR</strong>Quickprog, which is available for download at:www.<strong>myAVR</strong>.com download search word: “DL22” or“QuickProg”Wire the boardBefore using the test routine please ensure the you wire theboard as shown in the picture.PB.0 rote LEDPB.1 gelbe LEDPB.2 grüne LEDPC.0 SpeakerPD.2 switch 1PD.3 switch 2PB.0 red LEDPB.1 yellow LEDPB.2 green LEDPC.0 SpeakerAnschluss an den PCKabel<strong>LPT</strong>paralleles Kabel zum Brennenerforderlichserielles Kabel (COM Kabel)für UART erforderlich<strong>USB</strong><strong>USB</strong> Kabelzum Brennenerforderlichserielle9600, 8, N, 1EinstellungZusätzliches Programm erforderlich, welches serielleSchnittstelle auswerten kann, z.B. das <strong>myAVR</strong> Controlcenter,welches im <strong>myAVR</strong> QuickProg, SiSy AVR, sowie im<strong>myAVR</strong> Workpad zu finden istChecklisteDie nachfolgende Liste dient der Funktionsüberprüfung. GehenSie Schritt für Schritt die Anweisungen durch und kreuzen Siedas entsprechende Ergebnis an.Sollten Sie eine der Anweisungen mit „NEIN“ ankreuzen,überprüfen Sie die entsprechenden Lötstellen nochmals. WennSie den Fehler nicht selbst beheben können, treten Sie mitunseren Service in Kontakt :Connect a PCcabel<strong>LPT</strong>parallel lead necessary toprogramm the microcontrollerserial lead necessary tocommunicate with the PC<strong>USB</strong><strong>USB</strong> cablerequiredserial9600, 8, N, 1settingsFor a more detailed test you will need a software which cananalyse the data from the serial interface. You might use<strong>myAVR</strong> Controlcenter. It is available with <strong>myAVR</strong> QuickProg,SiSy AVR and <strong>myAVR</strong> Workpad.Check listYou can use the following list to check the functionality of your<strong>myAVR</strong> board. Follow the instruction step by step and tick offthe corresponding event.If something does not work as it should, please check thesoldering points. If you can not solve the problem by yourself,feel free to contact us per email:www.<strong>myAVR</strong>.de © Laser & Co. Solutions GmbH - 02/2009 www.<strong>myAVR</strong>.com
<strong>myAVR</strong> Arbeitsblatt zum <strong>Board</strong>test / <strong>myAVR</strong> worksheet to test the board 2/2FunktionstestAktion / Ergebnis1. Anschließen des Programmierkabels an den Paralleloder<strong>USB</strong>-Port & <strong>myAVR</strong> <strong>Board</strong>2. Anschließen einer externen Spannungsversorgung andas <strong>myAVR</strong> <strong>Board</strong>Power LED leuchtet ? wenn ja: Spannungsregler OK3. Programmieren des Controllers mit SiSy AVR,<strong>myAVR</strong> Workpad oder anderer Programmiersoftwareunter Verwendung der TestroutineFehlerfrei gebrannt? JAYESJAYESJANEINNONEINNONEINFunctionality checkaction / result1. Connect the parallel cable respectively the <strong>USB</strong> cableto the <strong>myAVR</strong> board.2. Connect an external power supply unit to the <strong>myAVR</strong>board. Does the Power LED light?if yes: voltage controller OK3. Burn the test routine on the microcontroller withSiSy AVR, <strong>myAVR</strong> Workpad or any otherprogramming software.Has it burned correctly?wenn ja: SPI-Schnittstelle/Programmer, Verbindungund Controller OK<strong>myAVR</strong> <strong>Board</strong> bereit für Test4. Druck auf Taster 1YESJANONEINif yes: SPI-Interface / programmer, connection andcontroller OK<strong>myAVR</strong> <strong>Board</strong> can be tested4. push button 1Lauflicht ist zu sehen? Do you see a LED sequence?wenn ja: Taster 1 OK, LEDs OK5. Druck auf Taster 2YESJANONEINif yes: button 1 OK, LEDs OK5. push button 2Ton ist zu hören? Do you hear a beep?wenn ja: Taster 2 OK, Speaker OK6. Nur erforderlich beim <strong>myAVR</strong> <strong>Board</strong> <strong>MK1</strong> <strong>LPT</strong>:Anschluss des seriellen Kabels an PC und <strong>MK1</strong> <strong>LPT</strong>Hinweis : externe Spannungsversorgung kannerforderlich sein!YESNOif yes: button 2 OK, Speaker OK6. If you are using our <strong>myAVR</strong> <strong>Board</strong> <strong>MK1</strong> <strong>LPT</strong> connecta serial cable to it.Info: You might need to use a external power supply.7. Druck auf Taster 1JANEIN7. push button 1Ausgabe „Licht an“ ? output “Licht an” ?wenn ja: Taster 1 OK, serielle Verbindung OKserielle Einstellung OK8. Druck auf Taster 2YESJANONEINif yes: button 1 OK, serial connection OKserial settings OK8. push button 2Ausgabe „Ton an“ ? output „Ton an“ ?wenn ja: Taster 2 OK, serielle Verbindung OKserielle Einstellung OK9. Senden des Strings „Test“ an das <strong>myAVR</strong> <strong>Board</strong>YESJANONEINif yes: button 2 OK, serial connection OKserial settings OK9. Send the character string “Test” to the <strong>myAVR</strong> <strong>Board</strong>„Test“ wird zurückgesendet ? output “Test”?wenn ja: serielle Verbindung OK,serielle Einstellung OKYESNOif yes:serial connection OKserial settings OK10. Senden eines „v“ an das <strong>myAVR</strong> <strong>Board</strong>JANEIN10. Send the character “v” to the <strong>myAVR</strong> <strong>Board</strong>Ausgabe der Versionsnummer ? output of the actual version numberwenn ja: serielle Verbindung OK,serielle Einstellung OKYESNOif yes:serial connection OKserial settings OKHersteller / ProducerLaser & Co. Solutions GmbH · Promenadenring 8 · 02708 Löbau, Deutschland/GermanyInternet: www.<strong>myAVR</strong>.de / www.<strong>myAVR</strong>.com Email:Abbildungen können vom Inhalt abweichen. Änderungen im Sinne des technischen Fortschrittes behält sich der Hersteller vor.Images may vary from the content. The manufacturers retains changes in terms of technical advances.www.<strong>myAVR</strong>.de © Laser & Co. Solutions GmbH - 02/2009 www.<strong>myAVR</strong>.com