Blade CX2 Manual - hapo - trade Modellbau
Blade CX2 Manual - hapo - trade Modellbau
Blade CX2 Manual - hapo - trade Modellbau

You also want an ePaper? Increase the reach of your titles
YUMPU automatically turns print PDFs into web optimized ePapers that Google loves.
If at any time during the test the controls do not respond properly, double-check the servo reversing switches located under the door<br />
on the bottom left front of the transmitter. Dip switches 1 (THR channel reversing), 6 (AIL channel reversing), and 7 (ELE channel<br />
reversing) should be positioned as shown to ensure proper control response.<br />
CAUTION:All other dip switches should also be positioned as shown to ensure proper operation. DO NOT attempt to fly your<br />
<strong>Blade</strong> <strong>CX2</strong> with any of the dip switches set in positions that are not shown.<br />
If the controls still do not respond properly after ensuring that the servo reversing dip switch positions are correct, you may also<br />
check the servo connections on the receiver side of the 3-in-1 unit. These should be positioned as follows (when viewing the helicopter<br />
from behind):<br />
AIL Channel – Forward aileron servo<br />
ELE Channel – Rear elevator servo<br />
Once you have confirmed that the servo connection locations are correct, all controls should be functioning properly. If you do encounter<br />
any problems with your <strong>Blade</strong> <strong>CX2</strong> responding properly to the transmitter, do not fly.<br />
If you have confirmed proper control operation of your <strong>Blade</strong> <strong>CX2</strong>, unplug the flight battery from the 3-in-1 unit and reconnect the<br />
main motor plugs to the 3-in-1 unit, taking care to keep the proper polarity and location of each as they were before the test. Use the<br />
label on the 3-in-1 unit for reference of the proper polarity and locations. Note that the red wire leads are positive (+) and the black<br />
wire leads are negative (−).<br />
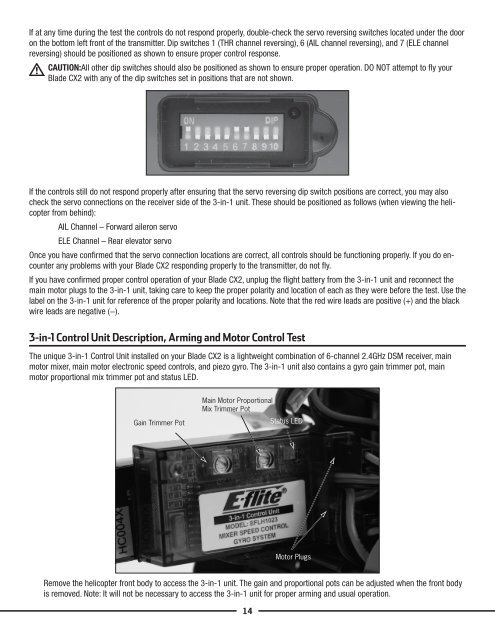
3-in-1 Control Unit Description, Arming and Motor Control Test<br />
The unique 3-in-1 Control Unit installed on your <strong>Blade</strong> <strong>CX2</strong> is a lightweight combination of 6-channel 2.4GHz DSM receiver, main<br />
motor mixer, main motor electronic speed controls, and piezo gyro. The 3-in-1 unit also contains a gyro gain trimmer pot, main<br />
motor proportional mix trimmer pot and status LED.<br />
Gain Trimmer Pot<br />
Main Motor Proportional<br />
Mix Trimmer Pot<br />
Status LED<br />
14<br />
Motor Plugs<br />
Remove the helicopter front body to access the 3-in-1 unit. The gain and proportional pots can be adjusted when the front body<br />
is removed. Note: It will not be necessary to access the 3-in-1 unit for proper arming and usual operation.