METAL BUILDING MAINTENANCE MANUAL - Ceco Building Systems
METAL BUILDING MAINTENANCE MANUAL - Ceco Building Systems
METAL BUILDING MAINTENANCE MANUAL - Ceco Building Systems

You also want an ePaper? Increase the reach of your titles
YUMPU automatically turns print PDFs into web optimized ePapers that Google loves.
<strong>METAL</strong> <strong>BUILDING</strong><strong>MAINTENANCE</strong> <strong>MANUAL</strong>C E C O B U I L D I N G S Y S T E M S
Eastern RegionP.O. Drawer 2387100 Red Iron Rd.Rocky Mount, NC 27802(252) 977-2131Midwestern RegionP.O. Box 72305 N. Iris St.Mt. Pleasant, IA 52641(319) 385-8001Southern RegionP.O. Drawer 9112400 Highway 45 NorthColumbus, MS 39703(662) 328-6722Company Division Headquarters ■ P.O. Box 6500 ■ Columbus, MS 39703http://www.cecobuildings.comGALVALUME® is a registered trademark of BIEC International, Inc. 1-800-474-CECO (2326)MM0106 5M
Metal <strong>Building</strong> Maintenance ManualUse the spaces below to record your building information for easy referencewhen contacting us for assistance.<strong>Building</strong> Information<strong>Building</strong> OwnerNameAddressPhoneE-mailAdditional contact infoAuthorized BuilderNameAddressPhoneE-mailAdditional contact infoProject InformationWork Order NumberDate of Completion1
Table of ContentsIntroductionScope 4Frequency of Maintenance 4SafetyGeneral Safety Recommendations 5Translucent Roof Panel Fall Protection 5Roof and Wall Translucent Panel Maintenance Recommendations 6SnowSnow and Ice Removal 7Snow and Ice Removal Procedure 8Structural Modifications 10AccessoriesEave Gutters, Valley Gutters, Downspouts and Scuppers 10Personnel Doors 11Windows 11Sliding Doors 12Overhead Doors 12Roof Ventilators 12Wall Mounted Exhaust Fans and Louvers 13Insulation 13FinishesCleaning Finish Paint <strong>Systems</strong> 14Project DocumentsDocumentation 16Maintenance Record Form 173
INTRODUCTIONScopeCongratulations, and thank you for choosing a metal building for your project. This manual isan important reference tool in maintaining your building. It provides guidance in inspections,adjustments, cleaning and care for your building.Metal buildings have evolved into structures requiring minimal maintenance because ofimprovements in materials, design applications and fabrication techniques. However, likemany other investments, your building does require some attention to maintain its value andappearance. This manual is provided to help you keep your metal building in good condition.The information in this manual is not intended to cover major work that should be done by anauthorized Builder, but only to provide a guide for periodic care.The information contained herein is only intended to provide recommendations for maintaining atypical building; due to special features and/or the location of your building, some or all of therecommendations contained herein may not apply to your building. Prior to performing anymaintenance work on your building, you should consult applicable local and federal safetyrequirements and your local building contractor. Failure to provide regular maintenance, as setforth in this manual, may void any warranty, actual or implied, that may be applicable to a buildingor its components.Frequency of MaintenanceThe frequency with which preventive maintenance activities should be performed will dependon several factors including the specific maintenance task, the environmental influences basedon the location of your building, the age and condition of the building and your commitment to apreventive maintenance program.Your maintenance schedule should begin immediately after a building is erected, modified orrepaired.We recommend most maintenance activities be performed at least twice annually. For buildingsthat are located in areas that have moderate to severe winters, inspections are recommended inthe spring closely following winter and in the fall early enough to complete any necessary repairsprior to winter. Additional inspections and maintenance may be needed following severe orunusual storms.Maintenance activities should be performed more frequently than twice per year on buildingslocated in coastal areas, areas subject to industrial pollution and areas with high humidity as aresult of the increased exposure to corrosive elements in these areas. In addition, buildingsused for activities that are potentially detrimental to the building such as indoor pools, animalconfinement or activities that generate corrosive chemicals should have maintenance activitiesperformed more frequently.4
!SAFETYGeneral Safety RecommendationsAlways follow and comply with all federal, state and local rules and regulations including,but not limited to, OSHA regulations when performing routine building maintenanceand/or renovations. Failure to follow these regulations could result in personal injury ordeath to you or bystanders.Always use OSHA approved Fall Protection when working in elevated places; do notwalk on wet roof panels; do not walk, step or sit on skylights (translucent roof panels),ridge-caps or gutters because of the possibility they may collapse.Always comply with governing regulations, use proper safety equipment, and follow appropriatesafety procedures for each maintenance activity.In addition, do not forget to consult your insurance carrier and fire hazard inspector aboutbuilding maintenance or major renovations. They can be valuable resources for the latestinformation on safety and risk management.Translucent Roof Panel Fall ProtectionDANGERDANGERDO NOT WALK ON ANYPART OF TRANSLUCENTPANELSROOF PANELPURLINTRANSLUCENTPANEL!TRANSLUCENT PANELS CAN COLLAPSE!It is important to understand that OSHA considers skylights a roof opening, and as such, it isthe building owner’s responsibility to provide fall protection. Translucent roof panels, commonlyknown as skylights and/or fiberglass reinforced panels (FRP), are not made to supportconcentrated loads such as foot traffic. Translucent panels are designed to allow natural light5
Panels may be able to be repaired/refinished when panels show excessive amounts of dullness,discoloration and fiber exposure, known as blooming. All of these contribute to the reduction oflight transmission through the panel. If the translucent panel is severely deteriorated, replacementshould be considered.Application of a refinisher typically requires only a minimal amount of effort and panelpreparation. First, wash panels off with water or non-corrosive cleaning compounds. Washing thetranslucent panels will normally remove any dirt that may be embedded in the panel’s surface. Ifan excessive amount of fiber exposure (blooming) has occurred, trapping large quantities of dirt,use a stiff bristle brush or fine steel wool to loosen the dirt, followed by a thorough rinsing withclear water to prepare the panels. Be sure that the panels are thoroughly dry before applyingthe refinisher. The refinisher can be applied by either brush or spray; however, brushing isrecommended for optimum results. You should always follow the refinisher manufacturer’sapplication, handling and safety instructions when working with the refinisher. It is recommendedthat protective gloves be worn when refinishing the translucent panels to protect your hands fromthe refinishing chemicals and/or splinters from exposed fibers.SNOWSnow and Ice Removal!Be aware of weather conditions that may contribute to snow and/or ice accumulation on the roof.If you suspect snow and ice accumulation has loaded the roof beyond its capacity, you shouldhave the snow and/or ice removed by people experienced in performing such work. An excessiveamount of snow and/or ice can cause the roof to collapse resulting in damage to property and/orpersonal injury or death.FM Global Property Loss Prevention Data Sheet 1-54 paragraph 2.1.1.1.19 recommendsthat roofs be cleared of snow when half of the safe maximum snow depth is reached.(See Snow Removal Chart.)Although it is difficult to accurately assess what a safe maximum accumulation of snow/icewould be, a close approximation can be made. The first step is for the building owner to obtainthe snow load that the building has been designed to carry. The design snow load is shown onthe cover sheet of the metal building erection drawings and on the Letter of Certification for thebuilding.Due to the differences in density between fresh and frozen snow there is no fixed correlationbetween snow depth and snow density. The density of snow can range from 10 pounds per cubicfoot for relatively dry fresh snow to 60 pounds per cubic foot for snow that has partially thawedand then frozen.One method of determining the density of snow on a roof is to carefully shovel or carve out a 1foot by 1 foot column of snow through the snow’s full depth. Be very careful not to damage the7
oof. Place this snow in a plastic trash bag or other water proof container for transporting theremoved snow to a scale to weigh the contents. Measure the depth of the snow where the samplewas removed.Using the measured weight and depth calculate the density of the snow in pounds per cubic foot.By dividing the design snow load (in pounds per square foot) by the snow density (in pounds percubic foot) you can determine the depth of snow at the design snow load for the actual density ofthe snow.The design snow depth can also be estimated based on the design snow load and the estimateddensity of the snow and/or ice buildup. The density of fresh relatively dry snow in lbs. per cubicfoot is estimated to be 0.13 multiplied by the Design Snow Load (in pounds per square foot,PSF) + 14. The following is a table of design snow loads and the corresponding one half designsnow depths obtained by using this method.Snow Removal Chart(for fresh dry snow)Note: Remove snow from roof when the depth of snow in the “One Half Design Snow Depth”column is reached for each corresponding “Design Snow Load.”Design SnowLoad (psf)101520253035405060708090100One Half Design SnowDepth (inches)4678101112141718202122Suggested Snow and Ice Removal Procedure!There are many safety concerns related to the removal of snow or ice from a roof. Plan any effortto remove snow or ice carefully and remain alert and cautious during the removal activity. Risksinclude, but are not limited to, slipping/falling from the roof, falling through translucent panels andinjuring others as large amounts of ice and/or snow fall from the roof striking someone standingor walking below. In order to help prevent accidents and injuries when removing snow and/or iceyou should always:8
1) Post warning signs or place safety barricades to keep people from entering an area belowa roof where snow removal is being performed.2) Perform snow removal if possible when a building is unoccupied.3) Always comply fully with all safety regulations and provide proper safety equipment toworkers before working on the roof. If possible, remove snow without getting on the roofby using draglines to remove the snow on the roof. Avoid standing in the path of sliding snowor ice as it is being removed from the roof.4) Place ladders at the end of the building away from where the snow is being removed so thatthe sliding snow will not knock the ladders over.5) Never send one person alone to remove snow. Always use a safety observer who canmonitor the snow removal process and be prepared to provide or obtain immediate assistanceif required.6) Be cautious of snow or ice breaking away and sliding down the roof, even on buildings havinga low sloped roof.7) Use extreme care when working along the edge of the roof.8) Watch for extreme deflections in roofing panels and listen for unusual noises when snow andice build-up conditions exist. Extreme deflections and/or noise can indicate the structuralintegrity of the roof has been compromised. If either of these conditions exist the area shouldbe evacuated immediately and a trained professional should be called to remove theaccumulation of snow and/or ice.The following are some suggestions that generally apply; however, it isrecommended that an Engineer be consulted before snow removal isinitiated.1) Remove all hanging icicles from eaves and gutters before removing snow from the roof. Snowmay accumulate on icicles during snow removal placing an additional load on the edge of theroof. Care must be exercised to avoid damage to the building and endangering people.2) Remove snow in a pattern that does not cause an unbalanced loading condition on the roof.Avoid large differences in snow depth between adjacent areas of the roof. Do not remove all ofthe snow from small areas and then move on to another area. Instead, remove the snow inlayers from the entire roof thereby decreasing the load gradually and evenly across the entiresurface of the roof.3) Remove snow from drifted areas first, down to a level with other snow. For example, if anarea has drifts four feet deep and the snow on the main roof is two feet deep, trim off the driftsto two feet before proceeding.4) Remove snow incrementally, removing snow from the eave towards the ridge, sliding the snowoff the roof over the gutter.5) Remove the snow from the middle one-third of each bay for the full width of the building,beginning with the most snow packed bay. Complete snow removal on the remainder of thebuilding.6) On gable buildings, remove snow on both sides of the ridge at the same time.7) Never use metal shovels on any type of roof. Do not use picks, axes or other sharp tools tobreak up ice on the roof. The use of such tools can easily damage the roof.8) Do not remove snow to less than a 3" depth over the roof panels. Care must be taken toeliminate hitting panel fasteners, snow guards, etc. If an ice layer above a roof panel is notexcessively thick it should be left.9) Care must be taken in removal of ice and snow around ventilator bases, pipe flashing andHVAC units, due to the ease of damaging neoprene boots, pipes, conduits, etc.9
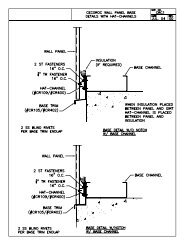
10)Snow or ice should not be allowed to accumulate at the base of metal wall panels;accumulation of snow in this location may permanently damage panels.Structural ModificationsBefore making any structural modifications you must contact a design professional forassistance. Always make certain you have a copy of the complete instructions and relatedinformation regarding any modifications from your design professional prior to making anymodification.Some typical major modifications include but are not restricted to:1) Removal or relocation of X-rod or other types of bracing2) Cutting into any structural component3) Removal or relocation of frame flange brace angles4) Addition of any load not specifically included in the certification letter for the original buildingdesign5) Adding adjacent building(s), especially if new one is taller.DRIFT SNOWBASESNOWBASESNOWNEW <strong>BUILDING</strong>EXISTING <strong>BUILDING</strong>20'-0"OR LESSPlacing a new taller building adjacent to an existing building can result in snow drift loads on theexisting building that were not considered in the original design. The new snow drift load couldcause the original building to collapse. When adding a new building within 20 feet of an existingbuilding, the existing building should be checked for potential additional loads and reinforced ifnecessary.ACCESSORIESEave Gutters, Valley Gutters, Downspouts and Scuppers!When working on or inspecting gutters, downspouts and/or scuppers, be aware of safety issuesin doing so including, but not limited to, falling from the roof and injuries from using a highpressurehose for cleaning. Always follow OSHA and other governing requirements for fallprotection and tie-off.10
Visually inspect gutters for accumulation of debris that would prevent gutters or downspouts fromoperating properly. Clean out all accumulated debris regularly using a water hose with sufficientpressure to flush dirt and small debris. Larger items such as rocks, cans, limbs and heavyaccumulations of leaves or pine needles should be removed by hand. It is recommended thatsuitable gloves be worn. Gutter obstructions can cause dirt to build up which holds moisture thatcan cause premature rusting and allow standing water to accumulate on the roof that may resultin a leak through an improperly sealed sidelap or endlap. Blocked downspouts can produce thesame results if they are not allowed to drain freely. The weight of accumulated debris in a guttercompounded with ice and snow could exceed the load carrying capacity of the gutter and guttersupport clips and cause the gutter to fall. Check for and repair any loose connections.The purpose of a scupper is to provide an emergency overflow for water collected on the roofand to provide a visible warning that the primary drainage system may be blocked.Personnel Doors!Although one person can perform most minor door maintenance, some activities such ascomplete removal or rehanging of a door may require two or more people to prevent injury.Personnel doors must be checked periodically for the following:1) Check for tightness of locksets, closure hardware and hinges2) Check for and repair any loose fasteners on all doors3) Check for and repair any misalignment of door leaf and its frame, making sure the leaf doesnot rub, bind or have too much of a gap between leaf, jambs, headers and/or threshold4) Lightly oil mechanical parts including hinges5) Check for and repair any wind damage and other physical damage6) Check for any delamination of door leaf’s skin and replace leaf if needed7) Check for and repair any air leaks with appropriate sealant, adjustments, and replacementpartsWindowsWindows usually require very little maintenance. Lubricate the window track, clear sill drain holesand inspect sealant at top and sides of windows. Check for and repair any air and water leaks atwindows and overhead doors. Remove all old caulk and apply new caulk as required.TRACKDRAINHOLE11
Sliding DoorsLubrication of door casters is generally not required as casters are packed with grease andsealed by the door manufacturer. If a sliding door becomes difficult to operate, adjustments to thebase guide or caster height may be necessary. Check for and remove any dirt or debris in thedoor guide.ADJUSTMENTNUT FOR SLIDINGDOOR TROLLEYSLIDINGDOOROverhead DoorsCheck and tighten the bolted connections of the framing supporting an overhead door asneeded. Contact the door manufacturer if the door becomes difficult to operate or is out ofalignment. Only a qualified technician should perform torsion spring adjustments.Roof Ventilators!Safety concerns when working on a roof ventilator include but are not limited to falling from theroof and possible electrical shock hazards if the ventilator includes an electrically operated fan.Make sure to use proper fall protection and tie-off when working in an elevated location and thatthe electric power to any electrical equipment is turned off and properly locked-out or tagged-outbefore maintenance is performed. The top of the ventilator will usually have an insect screen thatprevents making adjustments or repairs to the interior of the ventilator without removing theventilator. Maintenance or repair activities to the operational components inside of the ventilatorwill require accessing the unit from below, inside the building or removing the ventilator from theridge and turning the ventilator over to gain access. If a ventilator is removed for maintenancebe sure to properly mark and cover the opening in the roof where the ventilator was removed toprevent a fall hazard.SOME RIDGEVENTILATORS MAYREQUIRE ACCESSFROM <strong>BUILDING</strong>INTERIORRIDGE VENTILATOR12
Vents that do not have moving parts will require very little maintenance. Ventilators containingmoving parts such as pulleys, rollers or cranks for flue operation will require periodic lubricationat pivot points. Simple operation from time to time will aid in breaking corrosion loose. Avibrating fan indicates that there may be a problem with the fan. Not only can a vibrating fancause damage to itself, but may cause damage to the building as well. A fan that is vibratingneeds to be checked promptly and appropriate corrective measures taken before additionaldamage is caused. Many times a vibration could mean a bent fan blade.OILLIFTER ARMOILSECTION THROUGHRIDGE VENTILATORWall Mounted Exhaust Fans and Louvers!Safety concerns when working on a wall mounted exhaust fan or louvers include, but are notlimited to, falling if the fan or louver is elevated and possible electrical shock hazards if theexhaust fan or louver is electrically operated. Make sure that you have proper fall protectionequipment and that the electric power to any electrical equipment is turned off and properlylocked-out or tagged-out before maintenance is performed.Check operation of manual louvers and louvers electrically interlocked with exhaust fans, andrepair or replace as needed. Fixed louvers that do not have moving parts will require very littlemaintenance. Operable louvers containing moving parts such as vanes will require periodiclubrication at pivot points. Simple operation from time to time will aid in breaking corrosion loose.A vibrating ventilation fan indicates that there may be a problem with the fan. Not only can avibrating fan cause damage to itself, but may cause damage to the building as well. A fan thatis vibrating needs to be checked promptly and appropriate corrective measures taken beforeadditional damage is caused. Many times a vibration could mean a bent fan blade or worn belt.Insulation!Although we are not aware of any long-term health related concerns with fiberglass blanketinsulation, you should always wear protective clothing such as long sleeves, long pants, gloves,eye protection and/or a respiratory filter when working with insulation. Information concerning:RECOMMENDED WORK PRACTICES FOR FIBERGLASS, ROCK WOOL AND SLAG WOOL(SVF) INSULATION PRODUCTS is available from the North American Insulation ManufacturersAssociation (NAIMA, www.naima.org).13
Check for wet or damaged insulation periodically. Wet or damaged insulation transfers heat,whether from the heating system in winter or from the sun in summer, which is not only costlybut also uncomfortable for the people in your building which may reduce their productivity.Torn insulation backing, which is usually white vinyl or foil (called a water vapor retarder), canallow moist air (water vapor) inside the building to move directly through the insulation. The moistair can condense in the insulation making it less effective and on the inside surface of the roofand wall panels causing the panels to deteriorate. Pressure sensitive tapes with an exposed sidethat matches the facing used on the insulation are available from most insulation suppliers foruse in repairing a torn vapor retarder.Pockets of extremely moist air in the building can cause condensation problems. The followingprocedures will help or possibly eliminate the problem:1) Seal small tears in the water vapor retarder with vinyl tape2) Replace large areas of damaged insulation3) Install fans to disperse pockets of moisture-laden air4) Eliminate the source of high moisture in the buildingCaution: Condensation problems are easily mistaken for roof leaks. If your building isexperiencing excessive condensation have the HVAC contractor or engineer check humiditylevels to determine if they are within projected values.FINISHES!Protective clothing, protective eyewear and/or a respiratory filter may be appropriate whenworking with chemicals, paints or cleaners. Use appropriate caution and safety equipment whenusing a high-pressure hose to clean surfaces.Cleaning Finish Paint <strong>Systems</strong>The high quality paint finishes used on the metal roof and wall panels will maintain theirappearance and protective value for a long time if properly maintained. Improperly maintainedpanels will accumulate dirt and film deposits over time causing the panels to lose their originalappearance; to prevent this it is important to establish a proper maintenance program to keepthe finishes in prime condition.The most important cleaning is done immediately after the erection of the building, as metalshavings are present and are somewhat magnetized because of the screw and drill rotation.Shavings are not always visible and must be swept off the roof and walls to prevent corrosionof the particles, which will stain the panel surface.Under normal conditions, a fresh water washing two or three times per year using a regulargarden hose under pressure will keep the paint finish in good condition.14
1. Light Dirt Build-UpAfter longer periods of time, it may occasionally be desirable to wash a building with a suitablecleaner, using a long handle 4" soft bristle push broom similar to that used for sweeping floors.The use of a bristle broom will allow reaching the sides of the wall panel ribs and the scrubbingaction of the broom will work on top of the ribs and flat areas of the panels. Wetting down thearea to be cleaned with fresh water prior to washing will greatly ease the cleaning operation.The use of detergents in this case is NOT recommended, since the residual material left on thesurface by detergents may have a degrading effect on the paint film after a period of time.After cleaning with a cleaning solution, (tri-sodium phosphate, or similar solution is a goodcleaner) hosing down with fresh water will insure against any harmful residual material being lefton the paint finish.NEVER USE SOLVENTS OR THINNERS FOR WASHING DOWN ANY PAINTED SURFACEEXCEPT AS OTHERWISE PROVIDED HEREIN.Solvents and thinners may have a tendency to break down the surface of the paint and maycause spotty chalking on the paint finish wherever solvent is applied, solvents have a tendencyto convert the paint back to its original unbaked state.2. Heavy Dirt Build-UpIn areas where heavy dirt deposits dull the surface, a solution of water and a detergent (1/3 cupof Tide detergent per gallon of water, for example) may be used. A soft bristle brush/broom withlong handle may be useful. A clear water rinse should follow.3. MildewMildew may occur in areas subject to high humidity. To remove mildew along with dirt, thefollowing solution is recommended:1/3 cup detergent (Tide, for example)2/3 cup tri-sodium phosphate (Soilex, for example)1 quart sodium chlorite, 5% solution (Clorox, for example)3 quarts water4. Oil, Grease, Tar, Wax, Caulk, Etc., Clean-upA clean lint-free cloth soaked with mineral spirits should be used to remove oil, grease, tar,wax, caulk, etc. Wipe the mineral spirits dry with another clean lint-free cloth before the solventhas evaporated from the surface. Follow the mineral spirits wipe with a detergent cleaning andrinsing.15
Touch-up PaintingField applied touch-up paint used to repair scratches is not as durable as the original factoryapplied finish but will provide satisfactory service if properly applied. The touch-up paint may fadeat a faster rate than the factory applied paint so it is important to use as little touch-up paint aspossible; this will minimize the color differences as the paint ages. The smallest practical brushshould be used in all cases where touch-up spray equipment is not available.Touch-up paint must be thoroughly mixed to obtain the correct color and gloss. For best resultsdo not apply touch-up paint when surface to be coated is wet, or when the temperature is below55 degrees F (12.8 degrees C) or above 90 degrees F (32 degrees C). Touch-up paint willusually dry in four to five hours after application at 75 degrees F (23.9 degrees C). One coatis sufficient for most applications.PROJECT DOCUMENTSFor your convenience and use the following documents are provided for all buildings whenapplicable. These documents should be kept in a safe location along with other items relatedto the building, such as architectural drawings and information on building equipment. Werecommend making additional copies of pertinent documents and storing them separately incase one set is lost or damaged.Experience has shown that sooner or later these documents will be needed. They are invaluablein making repairs and modifications, and should you ever decide to sell the building, thedocumentation can be an important selling tool.1. Letter of Engineering Design CertificationThe letter of certification will include information concerning the building code used in theengineering design of the structure, the design loads, the building size and any specialload conditions2. Erection DrawingsThese drawings show the structural, enclosure and trim components of the building. Thearchitectural drawing does NOT always contain all of these details. The job number appearsin the lower right corner of all pages.3. Parts and Packing ListThis is several pages long and contains the bill of materials for every piece and part shippedto you with your building order. It describes each part in detail, including its color, finish, lengthand quantity shipped.4. Warranties (if applicable)When applicable a written warranty is provided.5. Product CertificationsUnderwriters Laboratories ListingsCertifications from insurers, test labs or independent certification agencies16
<strong>MAINTENANCE</strong> RECORDDateMaintenance ActivityMaintenancePerformed ByNotes17