Foam Marker - Silvan Australia
Foam Marker - Silvan Australia
Foam Marker - Silvan Australia
- No tags were found...

Create successful ePaper yourself
Turn your PDF publications into a flip-book with our unique Google optimized e-Paper software.
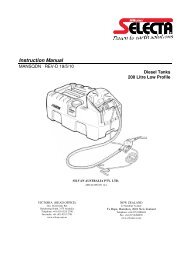
Operator’s ManualMANFOAM-1 REV B 26/07/05<strong>Foam</strong> <strong>Marker</strong>sBubbler Standard30Litre + 100Litre
Introduction<strong>Silvan</strong> is an <strong>Australia</strong>n owned company specialising in the supply of crop protection equipment toprimary producers. A leader in the design of agricultural sprayers, the company was established in 1962and has grown to become the largest manufacturer and supplier of crop protection equipment in<strong>Australia</strong>.Our reputation for quality products backed by quality service is something of which we are extremelyproud. Your investment in a <strong>Silvan</strong> foam marker is an investment in a quality product.<strong>Silvan</strong> foam markers are designed and manufactured to provide a high standard of performance andsafety and incorporate innovative features. To ensure continued efficient performance and safeoperation, you need to read this manual thoroughly and fully familiarise yourself with all aspects of yourfoam marker’s operation, maintenance and safety procedures.Now that you’re a proud <strong>Silvan</strong> owner, all our services and dealer support are available to you shouldyou need them. We assure you of our best attention at all times.YOUR FOAM MARKER DETAILSRecord the details of your foam marker here for future reference when discussing servicewith your <strong>Silvan</strong> dealer, ordering parts or making a warranty claim.FOAM MARKER TYPESERIAL NUMBERDATE OF DELIVERY_______________________________________________________________________________________SELLING DEALERADDRESSTELEPHONEINSTALLED BY_____________________________________________________________________________________________________________________________________________________________________________Page 1
ContentsWarrantyPageAbout Your Warranty 2New Product Warranty 3Safety Information 4Specifications 4InstallationBubbler Standard 5OperationGeneral Considerations 6Concentrate, water quality, weather, storageBubbler Standard 7Maintenance 8About Your WarrantyGeneral<strong>Silvan</strong> <strong>Australia</strong> Pty. Ltd. welcomes any warrantyrepair and apologises to you for anyinconvenience caused. See the following pagefor the warranty policy.The following information will assist yourunderstanding of warranty procedures.Any authorised <strong>Silvan</strong> dealer service outlet canperform warranty repairs, however, werecommend that such repairs be carried out bythe Dealer from whom you bought the machine.Most warranty repairs are handled routinely, butsometimes requests for repairs cannot beaccepted under warranty. For example, if amachine fails prematurely and that failure can beattributed to abuse or neglect, then warrantydoes not apply.Whilst <strong>Silvan</strong> will abide by its warranty policyunder all genuine circumstances, we mustemphasise that such can only apply when ourequipment has been used in applications forwhich it was designed and manufactured andthat a reasonable degree of common sense hasbeen exercised by the operator.Warranty Repair SiteThe warranty provides for repairs to be carriedout at the servicing dealer’s normal place ofbusiness. An owner may elect to have repairscarried out at his own residence but, whilst<strong>Silvan</strong> will accept the actual repair cost of thefailed component(s), the travelling costs etc.will not be covered under warranty (seefollowing).Items Not Covered By WarrantyThe warranty does not allow for the cost of thefollowing items. These are the responsibilityof the owner.1. Labour to travel to and from a broken-downmachine or for any distance charges.2. Labour premiums that might apply for anyrepairs that are made outside the dealer’snormal business hours.3. Transportation costs of the machine to andfrom the service outlet.4. Freight costs to get parts to and from theservice outlet.5. Telephone and fax calls made by theowner in connection with the warrantyrepair.Page 2
New Product WarrantyWARRANTY POLICY<strong>Silvan</strong> <strong>Australia</strong> Pty. Ltd. warrants to the owner, that it will repair or replace, without chargefor labour or parts, any defective or malfunctioning parts in accordance with the warrantylimitations and adjustments schedule below.PRODUCT - ALLPRIVATE DOMESTIC USE - 12 MONTHSPRIVATE and COMMERCIAL AGRICULTURAL USE - 12 MONTHSAGRICULTURAL CONTRACTORS - 6 MONTHSGOVERNMENT and MUNICIPAL DEPARTMENTS - 6 MONTHSALL OTHER NON-AGRICULTURAL APPLICATIONS - 3 MONTHSThe warranty period will begin on the date the product is delivered to the first retailpurchaser.THIS WARRANTY COVERS:Only conditions resulting from defects in workmanship or material under normal use andservice.THIS WARRANTY DOES NOT COVER:Conditions resulting from misuse, negligence, alteration, accidental damage or failure toperform normal maintenance services;Any product which has been repaired by other than an authorised <strong>Silvan</strong> <strong>Australia</strong> Pty. Ltd.service outlet so as, in any way in the sole and absolute judgement of <strong>Silvan</strong> <strong>Australia</strong> Pty.Ltd., to affect adversely its performance and reliability;The replacement of lubricating oil, filters and belts installed in connection with normalmaintenance services;Loss of time, inconvenience, loss of use of the product or any other consequentialdamages.The repair of defective products qualifying under this warranty will be performed by anauthorised <strong>Silvan</strong> <strong>Australia</strong> Pty. Ltd. service outlet within a reasonable time following thedelivery of the product, at the cost of the owner, to the service outlet’s place of business.The product will be repaired or replaced, using new parts sold by <strong>Silvan</strong> <strong>Australia</strong> Pty. Ltd.The owner is responsible for the performance of regular maintenance services as specifiedin the Operator’s Manual applicable to the product.THIS WARRANTY IS THE ONLY WARRANTY APPLICABLE TO SILVAN AUSTRALIAPTY. LTD. NEW PRODUCTS AND, TO THE MAXIMUM EXTENT PERMITTED BY LAW,IS EXPRESSLY IN LIEU OF ANY OTHER WARRANTIES EXPRESSED OR IMPLIED,INCLUDING ANY IMPLIED WARRANTY OF MERCHANTABILITY OR FITNESS FOR APARTICULAR PURPOSE.SILVAN AUSTRALIA PTY. LTD. DOES NOT AUTHORISE ANY PERSON TO CREATEFOR IT ANY OTHER OBLIGATION OR LIABILITY IN CONNECTION WITH THESEPRODUCTS.SILVAN AUSTRALIA PTY. LTD. SHALL NOT BE LIABLE FOR INCIDENTAL ORCONSEQUENTIAL DAMAGES RESULTING FROM A PRODUCT PERFORMING INBREACH OF THIS WRITTEN WARRANTY.Page 3
Safety InformationBefore operating the foam marker read the following safety instructions.Failure to comply with these warnings may result in serious injury or death.Whilst <strong>Silvan</strong> foam markers incorporate all the necessary safety features, it is essential that any personoperating them is aware of the safety precautions that should be exercised.• <strong>Silvan</strong> foam markers are designed andmanufactured solely for the purpose ofdropping foam to define the area sprayedwhen agricultural chemicals are beingapplied to crops. Under no circumstancesshould they be used for any other purpose.• Before using the foam marker, carefully readand ensure you understand the contents ofthis manual and any other manual relevant tothe safe operation of any associated tractorand spraying machinery.• Before operating the foam marker read thesafety warnings carried on the unit and anyassociated equipment• Never allow an inadequately trained personto operate the foam marker.• Before use of any chemicals includingfoam concentrate refer to the chemicalmanufacturer’s label and safety instructionsfor safe handling procedures and the correctmethod of use. Always use therecommended personal protective clothingand equipment.• Ensure that all operators and associatedpersonnel are familiar with the legalregulations and codes of practice that applySpecificationsConcentrate TankPolytuff impact resistant polyethylene tank on galvanised steel mounting frame.Capacity 30 litres or 100 litresAir SupplyHeavy duty 12 volt DC diaphragm compressor.In line air bleed valve.Cab mounted on/off switch for compressor.<strong>Foam</strong> Delivery19 mm diameter reinforced PVC hose.(20 metres supplied in kit version)Manual change to right or left end of spray boom.Flexible RH and LH foam droppers.Page 4
InstallationThe following installation instructions apply to foam markers which are purchased in kit form.If your foam marker is part of the factory fitted equipment on a <strong>Silvan</strong> sprayer then refer only to the sectiondescribing the installation of the cabin controls.Bubbler Standard1. Bolt or weld the mounting frame(s) for the foam tank and air compressor to a convenient location onthe sprayer. If welding galvanised steel take care to grind away the galvanised surface to be weldedand to weld in a well ventilated area. The 30 litre unit has a common frame for the compressor andtank. The 100 litre unit is supplied with a mounting for the foam tank but requires the compressor to bemounted separately and preferably in a high location to reduce dust entry.2. This step is applicable to the 100 litre unit only as the air hose is already fully installed on the 30 litremodel.Attach the free end of the air hose to the bottom of the foam tank using a hose clamp to secure. Locatethe air bleed valve against the compressor mounting frame with the adjusting screw convenientlypositioned and secure the air hose to the mounting with plastic ties above and below the valve.3. Connect the electrical leads from the air compressor to the tractor’s 12 volt system. Cut the leads at aconvenient location and fit the quick release connector to enable easy coupling and uncoupling of thethe sprayer and tractor. Connect the red lead of the tractor section to the positive terminal of thetractor battery and the black lead to the negative terminal. Position the compressor on/off switch in aconvenient location for the operator, cut the red lead and connect it to both terminals of the switch.Pass both leads through a suitable opening in the tractor cab, ensuring they do not rub on any sharpedges, or drill a hole and install a rubber grommet for this purpose. Ensure that the leads are keptclear of the PTO shaft and tractor wheels.4. Cut a length of 19 mm hose to reach from the foam tank to the back of the sprayer at the centre of theboom. Fit one end of the hose to the elbow on top of the foam tank and secure with a hose clamp.Route the hose along the sprayer frame, attaching at convenient points with plastic ties. Ensure thatthe hose is not positioned where it can be accidentally squashed or kinked. Install the threaded maleconnector to the rear end and secure with a hose clamp.5. From the centre of the boom, run equal lengths of 19 mm hose along each arm to the end of theboom, attaching at several places with plastic ties. Pay particular attention to the points where theboom will fold to ensure the hoses are not damaged during folding.6. Install a threaded female connector to the end of each hose at the centre of the boom and secure witha hose clamp. During operation either one of these boom hoses can be screwed to the threadedconnection of the hose leading from the concentrate tank, depending upon whether foam is to bedropped to the left or right.7. Fit a foam dropper to the outer end of each boom hose and secure with a hose clamp.8. Attach the rigid tubing section of each foam dropper to the outer end of the boom with two saddleclamps. Ensure the droppers are located so that they do not interfere with the spray pattern of the endnozzles.Page 5
OperationGeneral Considerations<strong>Foam</strong> ConcentratesAlways use <strong>Silvan</strong> <strong>Foam</strong> <strong>Marker</strong> Concentrate which is supplied in 1, 5 or 15 litre plastic containers andis specially formulated for this application. It has been evaluated over a wide range of operatingconditions and has been found to consistently demonstrate superior performance.Under normal operating conditions it is used in diluted form at a rate of 1 part of concentrate per 100parts of water ie. 300 ml of concentrate to 30 litres of water for the smaller Bubbler tank, or 1 litre ofconcentrate to 100 litres of water for the larger tank.Avoid foam concentrate contact with skin and eyes and avoid inhaling vapour. Wear overalls, PVC glovesand face shield or goggles. If product is on skin immediately wash area with soap and water. If poisoningoccurs, do not induce vomiting. Give plenty of water or milk to drink and seek medical assistance. If in eyes,hold eyes open and flood with water for at least 15 minutes and see a doctor.Water Quality<strong>Foam</strong> quality and durability will deteriorate if the concentrate is diluted with “hard” water.“Soft” water will give the best foaming result and it is recommended that rain water or “soft” town wateris used in preference to bore or dam water.A reduction in foam volume and durability becomes noticeable when the calcium carbonate (CaCO 3 )content of the water exceeds 300 parts per million (ppm) and quality can be reduced by up to 40% whenCaCO 3 reaches 1500 ppm.Water Temperature<strong>Foam</strong> volume decreases with colder water temperature. Up to 40% of foam volume can be lost at 5 0 Ccompared to 25 0 C.The solution temperature can be kept above 10 0 C by using hot water if necessary.Weather ConditionsRadiant energy from the sun has a far greater impact on foam life than air temperature. In the absenceof clouds the surface temperature of bare ground rises rapidly under direct sunlight, particularly on darksoils where soil temperature can approach 55 0 C on a sunny day of 25 0 C air temperature. <strong>Foam</strong> blobsfalling on bare ground under these conditions may last less than 20 minutes. Under cloudy conditionsthe soil temperature will be similar to that of the air and foam blobs will generally last 30 minutes orlonger, depending on the actual temperature. <strong>Foam</strong> falling on green vegetation will also last appreciablylonger. Under high temperatures the life of foam blobs can be extended by increasing the amount ofconcentrate added to the tank by approximately 50%.If the air temperature rapidly falls towards 5 0 C, as can happen at winter sunset, the volume and qualityof foam may deteriorate noticeably. Under such conditions it is recommended that the temperature inthe foam tank is raised by adding concentrate which has been diluted with warm water.Dry, windy conditions may require an increased strength of concentrate to keep the foam on the ground.The amount of concentrate added can be increased up to double the normal rate if necessary.When using increased strength solutions, if the discharge of foam is slower than required because it istoo thick then dilute the mix by adding water.Page 6
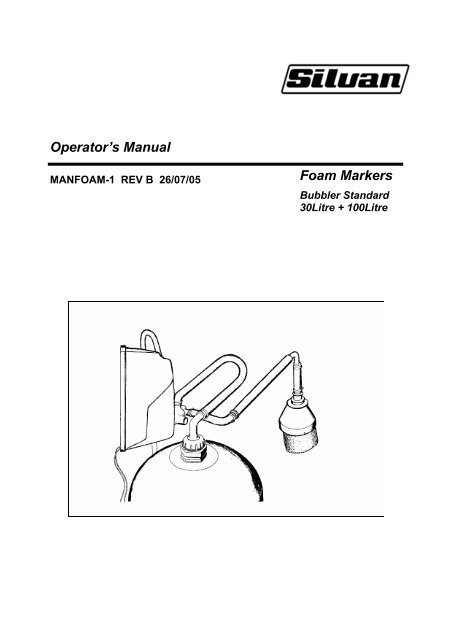
OperationStorage of Diluted Solution and ConcentrateDiluted foam solutions tend to deteriorate considerably if stored in the marker tank for more than two days,resulting in reduced foam volume and quality. If the solution has been in the tank for more than 24 hours itis recommended that it be drained and replaced with a fresh mix.Store concentrate in its original container with the lid securely closed in a well ventilated, cool area.Concentrate can tend to age when stored for longer than 6 months and it is advisable to thoroughly stirand agitate older concentrate before use.Bubbler StandardAir is pumped from the electric diaphragm compressor through a hose fitted with a non-return valve to thebottom of the foam tank, which is either 30 or 100 litre capacity.As the air bubbles through the mixture of water and foam concentrate it produces foam. The pressureproduced by the entering air forces the foam out the top of the tank and along the hose to the foamdropper at the end of the spray boom where it accumulates into large drops before falling to the ground.OperationUnscrew the foam hose from the top of the tank. Take care that any built up pressure in the tank isreleased slowly first. Fill to approximately 3/4 capacity with clean water then add foam concentrate at therecommended rate..Completely fill the tank with water and refit the foam hose. To thoroughly mix the solution and avoidcreating excess foam in the tank whilst adding water, insert the filling hose below the water surface anduse a gentle flow.Refer to the General Considerations section for advice on water quality and foam concentrate dilutionrates.Screw the boom foam line on the side which is to be marked, to the foam hose connection at the back ofthe sprayer near the boom centre.To start foam generation turn the compressor on from the cabin switch and allow sufficient time for foam toreach the boom dropper before commencing spraying. Once the system has been primed, foamgeneration can be stopped and started by operating the cabin switch.Adjust the bleed screw in the air line between the compressor and tank to regulate the distance betweenfoam drops. Screwing the valve out allows more air to “bleed” from the system and sends less to the tankwhich reduces the rate of foam generation and increases the distance between drops. Screwing the valvein increases foam generation and reduces the drop interval.AIR BLEED SCREWPage 7
OperationSometimes a foam marker may “blow out” due to excess air escaping through the foam and creating an airgap in the hose which causes marking to stop for some distance until foam again reaches the dropper. Tocorrect this problem make small adjustments to the bleed screw to allow more air to bleed off, until thefoam supply is continuous.To change foam marking to the other side of the boom, unscrew the foam line at the back of the sprayerand reconnect to the opposite boom hose. Take care when unscrewing the foam line of residual pressureleft in the line. Allow sufficient time for foam to fill the hose and accumulate in the end dropper beforemoving off.MaintenanceFlushing the SystemFor efficient performance it is important to remove unused foam and foam solution from the system aftereach day’s use.Bubbler StandardRemove the top and bottom hose connections from the foam tank and drain any unused foam solution, thenflush the tank with waterAir Compressor FilterThe filter on the compressor air inlet of all models of foam marker should be checked and cleaned ifnecessary each day.Detach the cover from the compressor and remove the filter pad from the end plate of the compressor.Brush any surface dust from the filter and wash it in warm water and detergent. Squeeze the filter dry andreinstall it in the compressor end plate. Refit the compressor cover.Page 8
SILVAN AUSTRALIA PTY LTDABN 48 099 851 144VICTORIA (HEAD OFFICE)89 Lewis Rd.Wantirna South 3152Telephone: (03) 9887 2788Facsimile: (03) 9887 1035www.silvanagcess.comQUEENSLAND44 Lysaght St.Acacia Ridge 4110Telephone: (07) 3345 9500Facsimile: (07) 3345 9511WESTERN AUSTRALIA12 Cressall RoadBalcatta 6021Telephone: (08) 62410900Facsimile: (08) 9240 1832