E-Bike ® Service Manual 24V MODELS - V is for Voltage
E-Bike ® Service Manual 24V MODELS - V is for Voltage
E-Bike ® Service Manual 24V MODELS - V is for Voltage

Create successful ePaper yourself
Turn your PDF publications into a flip-book with our unique Google optimized e-Paper software.
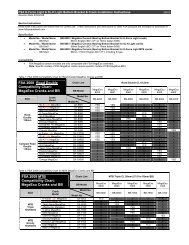
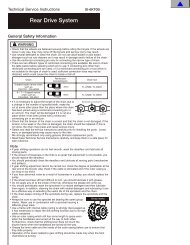
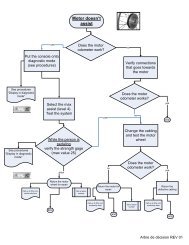
ELECTRICAL 8-7TAILLIGHTTROUBLESHOOTINGReplacementThe LEDs in the taillight cannot bereplaced. If the taillight LEDs burn out, install anew taillight assembly.1. Be sure the power knob <strong>is</strong> OFF, and removethe battery from the compartment.2. D<strong>is</strong>connect the taillight/brake light connectorunder the seat (Figure 13).General instructionsFind the symptom that describes the conditionyou are trying to correct. Follow that troubleshootingprocedure step-by-step until theproblem <strong>is</strong> corrected. Per<strong>for</strong>m the troubleshootingprocedures in the indicated orderunless instructed to proceed to another step.Be<strong>for</strong>e moving on to a next step, reconnect anypart that had been d<strong>is</strong>connected unlessinstructed otherw<strong>is</strong>e.A. The battery does not beep OK when yousecure the battery in the battery compartment.FIG. 133. Remove the two taillight mounting nuts(Figure 14), and remove the taillight assemblyfrom the seat bracket.1. Turn the headlight on. If the light turns on,the battery and the connection are fine.Proceed to step 3.2. If the headlight does not turn on, push thebottom of the battery into the battery compartmentwith your hand. The problem <strong>is</strong> solved ifthe E-<strong>Bike</strong> beeps OK.3. If the headlight does not come on, check thebattery voltage. Recharge the battery if necessary.4. Replace the controller.B. The system beeps GO when the powerknob <strong>is</strong> turned ON, but the motor does notoperate.FIG. 144. Fit a new taillight assembly in place, andsecure it with the two taillight mounting nuts.Torque the nuts to the specification in Table 4.5. Connect the taillight/brake light connector(Figure 13).1. Check the operation of the brake sensors byoperating each brake lever. The brake lightshould turn on when a brake lever <strong>is</strong> pulled.The brake light should also turn off when abrake lever <strong>is</strong> released. If the brake light operatesproperly when each brake lever <strong>is</strong> pulledand released, proceed to step 5.2. Check the brake sensor connectors at thecontroller board (A & B, Figure 1). Be sureeach connector securely engages its mate inthe board.3. Operate each brake lever again. If the brakelight operates properly when each brake lever<strong>is</strong> pulled and released, reset the unit by turningthe power knob ON and then OFF. Turn thepower knob ON, and check the operation ofthe motor. If the motor does not operate, proceedto step 5.