LX-LD-102P118-12 High Power Sensor LED Floodlight Instruction
LX-LD-102P118-12 High Power Sensor LED Floodlight Instruction
LX-LD-102P118-12 High Power Sensor LED Floodlight Instruction
- No tags were found...

You also want an ePaper? Increase the reach of your titles
YUMPU automatically turns print PDFs into web optimized ePapers that Google loves.
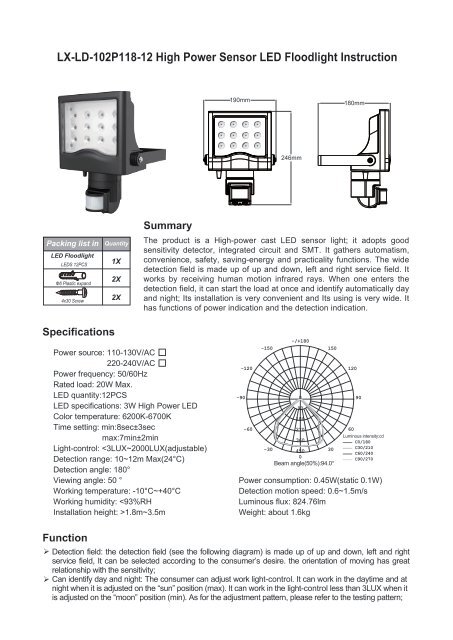
<strong>LX</strong>-<strong>LD</strong>-<strong>102P118</strong>-<strong>12</strong> <strong>High</strong> <strong>Power</strong> <strong>Sensor</strong> <strong>LED</strong> <strong>Floodlight</strong> <strong>Instruction</strong>190mm180mm246mmPacking list in<strong>LED</strong> <strong>Floodlight</strong><strong>LED</strong>S <strong>12</strong>PCSΦ6 Plastic expand4x30 ScrewQuantity1X2X2XSummaryThe product is a <strong>High</strong>-power cast <strong>LED</strong> sensor light; it adopts goodsensitivity detector, integrated circuit and SMT. It gathers automatism,convenience, safety, saving-energy and practicality functions. The widedetection field is made up of up and down, left and right service field. Itworks by receiving human motion infrared rays. When one enters thedetection field, it can start the load at once and identify automatically dayand night; Its installation is very convenient and Its using is very wide. Ithas functions of power indication and the detection indication.Specifications<strong>Power</strong> source: 110-130V/AC220-240V/AC<strong>Power</strong> frequency: 50/60HzRated load: 20W Max.<strong>LED</strong> quantity:<strong>12</strong>PCS<strong>LED</strong> specifications: 3W <strong>High</strong> <strong>Power</strong> <strong>LED</strong>Color t emperature: 6200K-6700KTime setting: min:8sec±3secmax:7min±2minLight-control:
‣‣‣‣‣Switch off the power;Screw off the nail on the bottom. Open the wire hole. The power wire and the loadwire are bored in thebottom;Fix the bottom on the selected position with the inflated screw;Connect the power and the load with the connection-wire column according to thesketch diagram;Fix the sensor on the bottom, please screw the nail and switch on the power.Mounting holes92mmThe name of each partTop <strong>LED</strong><strong>12</strong>PCSWarning!Please confirm when shut off the power cord access.(Lamp shell for aluminum material)According to the demand of the lampadjust good use of sensors andilluminate angle of view, make the bestuse of products in view.If you need toput your logoin hereFixed frame+175°-175°Fluctuation angleadjustment350°<strong>Power</strong>indicatorBrightnessadjust45°Control knobDelayadjustPIR <strong>Sensor</strong>+60°-60°Test‣ Turn the light-control knob clockwise on the maximum(sun), turn the time knob clockwise on the minimum;‣ When you switch on the power, the load doesn’t work and the indicator lamp flashes one time every 4sec.After 5~10sec, the load work and the indicator lamp flash two times every 1sec. Under the conditions of noinduction signal the load should stop working within 5~30sec, the indicator lamp should flash still one timeevery 4sec;‣ After the first is out, make it sense again after 5~10sec.The load should work and the indication flash speedis two times every 1sec. The load should stop working within 5~15sec;‣ Turn light-control knob anti-clockwise on the minimum.If it is adjusted in the less than 3LUX, the inductor loadshould not work after load stop working. If you cover the detection window with the opaque objects (toweletc), the load work .under no induction signal condition, the load should stop working within 5~15sec.
Note‣ Electrician or experienced human can install it;‣ The unrest objects can’t be regarded the installation basis-face;‣ In front of the detection window there shouldn’t be hinder or unrest objects effecting detection;‣ Avoid installing it near air temperature alteration zones for example: air condition, central heating, etc;‣ For your safety, please don’t open the case if you find hitch after installation;‣ In order to avoid the unexpected damage of product, please add a safe device of 6A when installing Infraredsensor,for example,fuse,safe tube etc.Some problem and solved way‣ The load don’t work:a. Check the power and the load;b. If the load is good;c. If the indicator lamp speed quicken after sensing;d. Please check if the working light correspond to the light-control.‣ The sensitivity is poor:aPlease check if in front of the detection window there are hinderthat effect to receive the signals;b. Please check the ambient temperature;c. Please check if the signals source is in the detection fields;d. Please check the installation height;e. If the moving orientation is right.‣ The sensor can’t shut automatically the load:a. If there are continual signals in the detection fields;b. If the time setting is set to the longest;c. If the power correspond to the instruction;d. If the air temperature change near the sensor, for example air condition or central heating etc.Warning!1.The <strong>LED</strong>S in serial can function when all the seals installed in place.2.Please don’t remove or connect with other lamp when powered on.3.When the <strong>LED</strong>S in serial are damaged ,you need experienced technician to repair usingthe same rating <strong>LED</strong>SFor type Y attachments: If the external flexible cable or cord of this luminaire is damaged,itshall be exclusively,replaced by the manufacturer or his service agent or a similar qualifiedperson in order to avoid a hazard.Please confirm with profession installation.Please cut off power supply before installation and removal operations.Make sure that you have cut off the power for safety purposes.Improper operation caused losses, the manufacturer does not undertake any responsibility.