NOVA Toolbox Project Toy Tractor - Teknatool
NOVA Toolbox Project Toy Tractor - Teknatool
NOVA Toolbox Project Toy Tractor - Teknatool
- No tags were found...

Create successful ePaper yourself
Turn your PDF publications into a flip-book with our unique Google optimized e-Paper software.
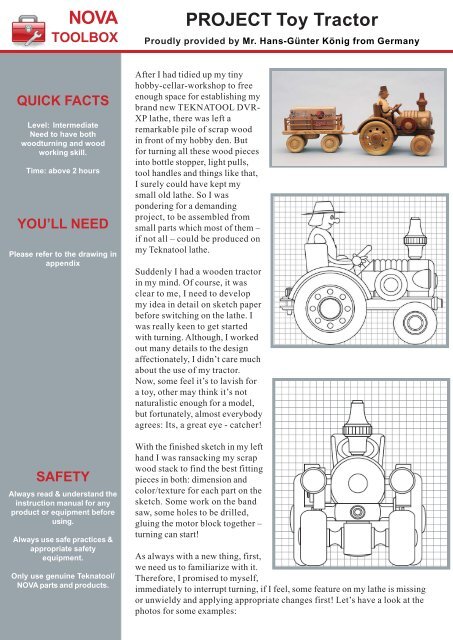
<strong>NOVA</strong>TOOLBOXPROJECT <strong>Toy</strong> <strong>Tractor</strong>Proudly provided by Mr. Hans-Günter König from GermanyQUICK FACTSLevel: IntermediateNeed to have bothwoodturning and woodworking skill.Time: above 2 hoursYOU’LL NEEDPlease refer to the drawing inappendixSAFETYAlways read & understand theinstruction manual for anyproduct or equipment beforeusing.Always use safe practices &appropriate safetyequipment.Only use genuine <strong>Teknatool</strong>/<strong>NOVA</strong> parts and products.After I had tidied up my tinyhobby-cellar-workshop to freeenough space for establishing mybrand new TEKNATOOL DVR-XP lathe, there was left aremarkable pile of scrap woodin front of my hobby den. Butfor turning all these wood piecesinto bottle stopper, light pulls,tool handles and things like that,I surely could have kept mysmall old lathe. So I waspondering for a demandingproject, to be assembled fromsmall parts which most of them –if not all – could be produced onmy <strong>Teknatool</strong> lathe.Suddenly I had a wooden tractorin my mind. Of course, it wasclear to me, I need to developmy idea in detail on sketch paperbefore switching on the lathe. Iwas really keen to get startedwith turning. Although, I workedout many details to the designaffectionately, I didn’t care muchabout the use of my tractor.Now, some feel it’s to lavish fora toy, other may think it’s notnaturalistic enough for a model,but fortunately, almost everybodyagrees: Its, a great eye - catcher!With the finished sketch in my lefthand I was ransacking my scrapwood stack to find the best fittingpieces in both: dimension andcolor/texture for each part on thesketch. Some work on the bandsaw, some holes to be drilled,gluing the motor block together –turning can start!YOURSAFETYAs always with a new thing, first,we need us to familiarize with it.Therefore, I promised to myself,immediately to interrupt turning, if I feel, some feature on my lathe is missingor unwieldy and applying appropriate changes first! Let’s have a look at thephotos for some examples:
<strong>NOVA</strong> PROJECTMAKING A TOY TRACTORFirst of all I ordered some additional Jawsfor the <strong>NOVA</strong> Chuck, which I got as abonus, when I bought my lathe. Fig. 1shows the base of the tractor, held by twosegment of the long nose jaw.Fig. 2: With this strong grip, decorating thiswobbling board is not as dangerous as itseems to be.Fig. 3: This shop made sanding disk (onlythe Velcro pad and the flange where boughtparts) is a great helper for some finishingtasks,like trimming the ready turned motorblock.Fig. 4: I turned a centering-recess on thesmall faceplate, which came with my DVRXP lathe. And I attached it to a small chuckfrom a metalworker’s lathe, which makeschucking small parts much easier for me.Fig. 5: I became inspired for experimentingwith an old cross slide from a scrap yard,when I saw <strong>Teknatool</strong>’s web pages aboutthe Ornamental turner. Unfortunately is thisversatile device not on the European market.
<strong>NOVA</strong> PROJECTMAKING A TOY TRACTORFig. 6 u. 7: Of course, my breadboard construction can’t provide all the features of theOrnamental-turner, but decent and appropriate decoration could surely enhance someparts of my tractor in a funny way.Fig. 8: The swivel-headstock was brought to aconvenient position, before hollowing the shapefor the driver’s seat. – A great advantageespecially in such a small workshop as mine.Fig. 9: There are a lot of small wood parts had tobe polished. Therefore I mounted all three mobsof my wood polishing system on a threaded steelrod, to make this procedure faster.After assemble all parts together, the toytractor is finally completed!WHAT’S NEXT?Want to know more about our products?Ready to try more projects?Go to our website or contact us for more informationTEKNATOOL INTERNATIONALwww.teknatool.comsales@teknatool.comUSAPh 1-866-748-3025Fax 1-866-748-4193Rest of WorldPh +64 9 837 6900Fax +64 9 837 6901
PROJECT <strong>Toy</strong> <strong>Tractor</strong>Courtesy of the GermanWoodworking MagazineHolzWerkenwww.holzwerken.netAutor: Hans-Günter König©Vincentz NetworkPage 1 of 9
SpecificationPart. Name Quantity1 Base 12 Engine 13 Mudguard 24 Steering Bar 15 Exhaust Valve 16 Brake (Rear) 27 Brake (Fron)t 28 Axis (Rear) 29 Axis (Front) 210 Flywheel 111 Washer for Flywheel 112 Bolt for Flywheel 113 Gearbox 114 Driver‘s Seat 115 Steering wheel 116 Spacer for Steering wheel117 Bolt for Steering wheel118 Floodlight 219 Floodlight Holder220 Bolt for Hitch 121 Front Wheel 222 Rear Wheel 223 Dowel 10mm 324 Wood screw ca. 3x25mm 4On a Scale of: 1 : 1,5(1 square means 1cm x 1 cm)Page 2 of 9
Page 3 of 9
1517161112110cut off an glue on with offsetPage 4 of 92
5181946cut off20713Page 6 of 93
22892114cut offPage 5 of 9
1413425Specification for the DriverPart Name Quantity1215 11610731 Body 12 Head 13 Nose 14 Hat 15 Brim 16 Sleeve 27 Thigh 28 Shank 29 Shoe 210 Button 311 Palm 212 Finger 10813 Glass Eye 214 Fur, resampling Hair 115 Cord for Arms 2Page 7 of 991On a Scale of: 1 : 1,5(1square means 1cm x 1 cm)
Specification for the CartPart Name Quantity1 Cargo area 12 Wheel 53 Axis 44 Bolt 55 Undercarriage (Rear) 16 Undercarriage (Front) 17 Washer for Undercarriage (Front) 18 Pivot for Undercarriage (Front) 19 Pole 210 Ball Bearing 211 Noose 112 Corner Post 413 Middle Post 214 Rod (Front/Rear) 415 Side Rod 816 Dowel 10mm 2On a Scale of: 1 : 1,5(1square means 1cm x 1 cm)Page 8 of 9
211112134914 151086Page 9 of 9573