- Page 2:
ContentsChannel Menu• Using the I
- Page 8 and 9:
NNOnly memorised channels can be re
- Page 10 and 11:
◀■■Channel ListYou can view a
- Page 12 and 13:
❑❑Using the Channel■■Channe
- Page 14 and 15:
●●Lock / Unlock: Lock a channel
- Page 16 and 17:
❑❑Using Favourite Channels■
- Page 18 and 19:
◀How to assign a channel to favou
- Page 20 and 21:
■■Auto TuningScans for a channe
- Page 22 and 23:
◀●●Analogue Channel Tuning: S
- Page 24 and 25:
❑❑Other FeaturesOOMENUm → Cha
- Page 26 and 27:
Basic Features❑❑Changing the Pr
- Page 28 and 29:
❑❑Changing the Picture SizeOOME
- Page 30:
NNNOTE●●Depending on the input
- Page 33 and 34:
●●Black Tone (Off / Dark / Dark
- Page 35 and 36:
●●10p White Balance (Off / On):
- Page 37:
■■Picture OptionsOOMENUm → Pi
- Page 40 and 41:
Blur Reduction: Adjusts the blur re
- Page 42 and 43:
■■PC Screen AdjustmentOOMENUm
- Page 44 and 45:
❑❑Changing the Preset Sound Mod
- Page 46 and 47:
●●SRS TruDialog (Off / On)(stan
- Page 48:
■■3D Audio (Off / Low / Medium
- Page 51 and 52:
◀■■Additional Settings(digita
- Page 53 and 54:
●●Dolby Digital Comp (Line / RF
- Page 55 and 56:
●●Auto Volume (Off / Normal / N
- Page 57 and 58:
Preference Features❑❑Setting th
- Page 59 and 60:
●●Depending on how your network
- Page 61 and 62:
■■Network SettingOOMENUm → Ne
- Page 63 and 64:
NNIf it fails to set automatically,
- Page 65 and 66:
How to set up manuallyTo set up you
- Page 67 and 68:
Samsung’s Wireless LAN adapter is
- Page 69:
●●●●●●If your router, m
- Page 72 and 73:
●●If Pure High-throughput (Gree
- Page 74 and 75:
■■Network Setup (Auto)◀Most w
- Page 76 and 77:
◀6. If the wireless router has se
- Page 78 and 79:
How to set up manuallyTo set up you
- Page 80 and 81:
■■Network Setting (One Foot Con
- Page 82 and 83:
◀NNIf One Foot Connection does no
- Page 84 and 85:
◀How to set up using Plug & Acces
- Page 87 and 88:
◀If Your TV Fails to Connect to t
- Page 89 and 90: ◀--Clock Set: Set the Date and Ti
- Page 91 and 92: ◀Time: Set the hour and minute.Vo
- Page 93 and 94: ● Off Timer 1 / Off Timer 2 / Off
- Page 95 and 96: ●●●●Programme Rating Lock:
- Page 97 and 98: ●●No-Signal Power Off (Off / 15
- Page 99 and 100: ●●Subtitle Language: Sets the s
- Page 101 and 102: ●●BD Wise (Off / On): Provides
- Page 103 and 104: ❑❑Picture In Picture (PIP)■
- Page 105 and 106: ●●PIP settingsMain pictureCompo
- Page 107 and 108: ●●Sound Test (Yes / No): Use th
- Page 109 and 110: Installing the Latest Version◀●
- Page 111 and 112: ●●Alternative Software (backup)
- Page 113 and 114: ❑❑Viewing TV using the 3D funct
- Page 115 and 116: ●●3D Mode: Select the 3D input
- Page 117 and 118: NNSupport resolution (16:9 only)Res
- Page 119 and 120: 3. Use the u or d button to select
- Page 121 and 122: Supported formats and operating spe
- Page 123 and 124: NNNOTE●●3D Mode is set to Off a
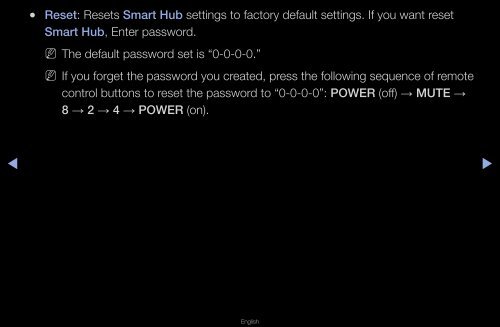
- Page 125 and 126: ❑❑Getting Started with Smart Hu
- Page 127 and 128: Screen DisplayYou can search for va
- Page 129 and 130: ●●●●●●If you experience
- Page 131 and 132: ◀1. Press the Red button in the S
- Page 133 and 134: ◀Using the KeypadPressing the TTX
- Page 135 and 136: 4-4. Press the TTX/MIX button on th
- Page 137 and 138: 7. Select Service of the Service Si
- Page 139: ◀●●Service ManagerTicker Auto
- Page 143 and 144: NNUsing the colour buttons with the
- Page 145 and 146: Using the Samsung Apps by categoryT
- Page 147 and 148: ◀[Legal Statement]Due to the vari
- Page 149 and 150: ◀■■Web Browser For LED 6600 s
- Page 151 and 152: ◀14. When writing emails or posti
- Page 153 and 154: ❑❑Troubleshooting for SMART HUB
- Page 155 and 156: ◀UNDER NO CIRCUMSTANCES, INCLUDIN
- Page 157 and 158: ◀NNIf your Samsung TV connects to
- Page 159 and 160: ■■MediaShows a list of mobile p
- Page 161 and 162: ●●To turn off the media content
- Page 163 and 164: For the method of connecting extern
- Page 165 and 166: Anynet+ MenuThe Anynet+ menu change
- Page 167 and 168: ◀❑❑Switching between Anynet+
- Page 169 and 170: ❑❑Troubleshooting for Anynet+
- Page 171 and 172: The connected device is notdisplaye
- Page 173 and 174: ◀❑❑Connecting a USB Device1.
- Page 175 and 176: NNFunctions that are not supported
- Page 177 and 178: Before using media contents functio
- Page 179 and 180: ●●MP3 files with DRM that have
- Page 181 and 182: Screen DisplayMove to the file you
- Page 183 and 184: ■■Timer Recording (in Schedule
- Page 185 and 186: ◀To record a current broadcasting
- Page 187 and 188: Before using the Timeshift and a re
- Page 189 and 190: ●●●●●●If the USB device
- Page 191 and 192:
Playing Recorded TV Programme1. Pre
- Page 193 and 194:
●●NNIn this mode, you can enjoy
- Page 195 and 196:
File Extension Container Video Code
- Page 197 and 198:
Video Decoder••Supports up to H
- Page 199 and 200:
■■Music◀Playing Music1. Press
- Page 201 and 202:
4. Press the ENTERE button. The mes
- Page 203 and 204:
■■PhotosViewing a Photo (or Sli
- Page 205 and 206:
CategoryOperationsRecordedTVVideos
- Page 207 and 208:
CategoryOperationsRecordedTVVideos
- Page 209 and 210:
◀CategorySlide ShowEffectBackgrou
- Page 211 and 212:
IssuesSolutions and Explanations◀
- Page 213 and 214:
IssuesSound QualitySolutions and Ex
- Page 215 and 216:
IssuesSolutions and ExplanationsThe
- Page 217 and 218:
IssuesSolutions and ExplanationsThe
- Page 219 and 220:
IssuesSolutions and ExplanationsOth
- Page 221 and 222:
IssuesSolutions and ExplanationsYou
- Page 223 and 224:
◀❑❑Teletext Feature(depending
- Page 225 and 226:
Colour buttons (red,green, yellow,
- Page 227 and 228:
Typical Teletext pagePartContentsAS
- Page 229:
◀DivX Certified® to play DivX®