

SXV-M8C handbook.pdf - Starlight Xpress
SXV-M8C handbook.pdf - Starlight Xpress
SXV-M8C handbook.pdf - Starlight Xpress
- No tags were found...

You also want an ePaper? Increase the reach of your titles
YUMPU automatically turns print PDFs into web optimized ePapers that Google loves.
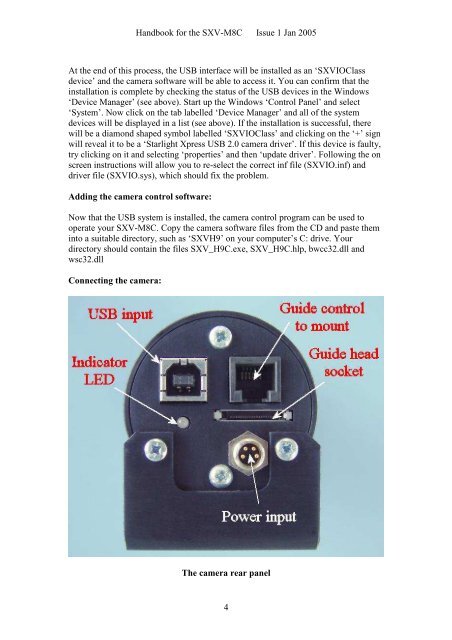
Handbook for the <strong>SXV</strong>-<strong>M8C</strong> Issue 1 Jan 2005At the end of this process, the USB interface will be installed as an ‘<strong>SXV</strong>IOClassdevice’ and the camera software will be able to access it. You can confirm that theinstallation is complete by checking the status of the USB devices in the Windows‘Device Manager’ (see above). Start up the Windows ‘Control Panel’ and select‘System’. Now click on the tab labelled ‘Device Manager’ and all of the systemdevices will be displayed in a list (see above). If the installation is successful, therewill be a diamond shaped symbol labelled ‘<strong>SXV</strong>IOClass’ and clicking on the ‘+’ signwill reveal it to be a ‘<strong>Starlight</strong> <strong>Xpress</strong> USB 2.0 camera driver’. If this device is faulty,try clicking on it and selecting ‘properties’ and then ‘update driver’. Following the onscreen instructions will allow you to re-select the correct inf file (<strong>SXV</strong>IO.inf) anddriver file (<strong>SXV</strong>IO.sys), which should fix the problem.Adding the camera control software:Now that the USB system is installed, the camera control program can be used tooperate your <strong>SXV</strong>-<strong>M8C</strong>. Copy the camera software files from the CD and paste theminto a suitable directory, such as ‘<strong>SXV</strong>H9’ on your computer’s C: drive. Yourdirectory should contain the files <strong>SXV</strong>_H9C.exe, <strong>SXV</strong>_H9C.hlp, bwcc32.dll andwsc32.dllConnecting the camera:The camera rear panel4


