
You also want an ePaper? Increase the reach of your titles
YUMPU automatically turns print PDFs into web optimized ePapers that Google loves.
The red indicator light will turn on to signal<br />
power. Allow the waffle iron to preheat.<br />
When the waffle iron has reached desired<br />
temperature, the green indicator light will turn<br />
on and the audible tone will sound. You are<br />
now ready to begin baking.<br />
Note: The first time you use your waffle iron it<br />
may have a slight odor and may smoke<br />
a bit. This is normal, and <strong>com</strong>mon to<br />
appliances with a nonstick surface.<br />
4. Lift lid of waffle iron by grasping the handle,<br />
pushing in the button and lifting up in one fluid<br />
motion. Lid will stay open at 110° position until<br />
you lower it.<br />
5. Pour batter across the lower waffle grid.<br />
Use a heat-proof spatula to spread batter<br />
evenly over the grids. Close the lid. The<br />
waffle iron will automatically latch shut when<br />
you lower the lid. The green light will turn off<br />
but the red light will stay illuminated.<br />
6. Baking time is determined by the browning<br />
level that you chose in Step 3. It may take<br />
up to 4 minutes to bake your waffle on<br />
setting #6.<br />
7. When the waffle sticks are ready to eat, the<br />
green light will turn on and the audible tone<br />
will sound. Remove waffle sticks by gently<br />
loosening the edges with a heat-proof plastic<br />
spatula or wooden spatula. Never use<br />
metal utensils, as they will damage the<br />
nonstick coating.<br />
4<br />
8. When you are finished baking, turn the<br />
control dial counterclockwise to the OFF<br />
setting. The red indicator light will turn off.<br />
Unplug the power cord from the wall outlet.<br />
Allow the waffle iron to cool down <strong>com</strong>pletely<br />
before handling.<br />
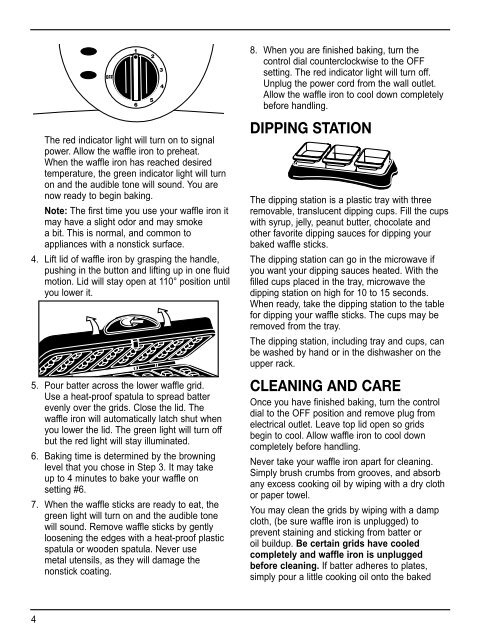
<strong>DIP</strong>PING STATION<br />
The dipping station is a plastic tray with three<br />
removable, translucent dipping cups. Fill the cups<br />
with syrup, jelly, peanut butter, chocolate and<br />
other favorite dipping sauces for dipping your<br />
baked waffle sticks.<br />
The dipping station can go in the microwave if<br />
you want your dipping sauces heated. With the<br />
filled cups placed in the tray, microwave the<br />
dipping station on high for 10 to 15 seconds.<br />
When ready, take the dipping station to the table<br />
for dipping your waffle sticks. The cups may be<br />
removed from the tray.<br />
The dipping station, including tray and cups, can<br />
be washed by hand or in the dishwasher on the<br />
upper rack.<br />
CLEANING AND CARE<br />
Once you have finished baking, turn the control<br />
dial to the OFF position and remove plug from<br />
electrical outlet. Leave top lid open so grids<br />
begin to cool. Allow waffle iron to cool down<br />
<strong>com</strong>pletely before handling.<br />
Never take your waffle iron apart for cleaning.<br />
Simply brush crumbs from grooves, and absorb<br />
any excess cooking oil by wiping with a dry cloth<br />
or paper towel.<br />
You may clean the grids by wiping with a damp<br />
cloth, (be sure waffle iron is unplugged) to<br />
prevent staining and sticking from batter or<br />
oil buildup. Be certain grids have cooled<br />
<strong>com</strong>pletely and waffle iron is unplugged<br />
before cleaning. If batter adheres to plates,<br />
simply pour a little cooking oil onto the baked