- Page 1 and 2: ttttttttttttttttttttttttttttttttttt
- Page 4 and 5: Contents iiiUsing the OverlayThe di
- Page 6 and 7: can now be part of a corporate tele
- Page 8 and 9: Customer useCallers in the public n
- Page 10 and 11: Bits and Pieces 5Loop start trunksL
- Page 12 and 13: Bits and Pieces 7When a call comes
- Page 14 and 15: When a call comes in on a DID trunk
- Page 16 and 17: Benefits 11Dialing within the syste
- Page 18 and 19: Benefits 13DID trunks cannot be con
- Page 20 and 21: Call handling with target linesBene
- Page 22 and 23: Customer UseCustomer Use 17This sec
- Page 24 and 25: CallCustomer Use 19and select tie l
- Page 26 and 27: Heading Parameter SettingIncoming t
- Page 28 and 29: Customer Use 23Key systemHardware:
- Page 30 and 31: In thesystemCustomer Use 25Select t
- Page 32 and 33: ASystem FeatureLine Redirection fea
- Page 34 and 35: Check the location where the system
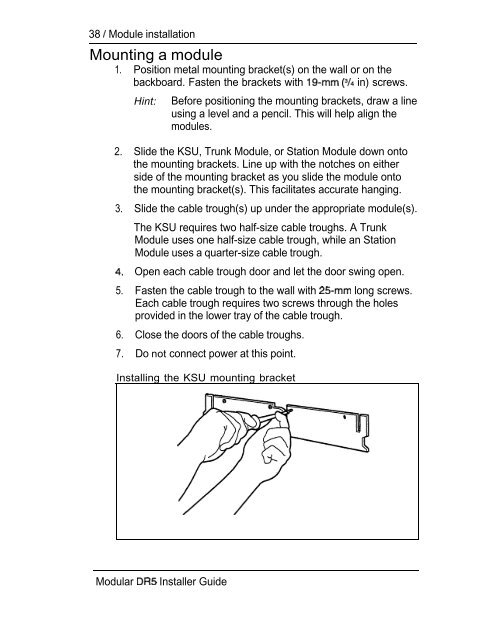
- Page 36 and 37: Module installationModule installat
- Page 38 and 39: Station Module (SM)Module installat
- Page 40 and 41: RememberModule installation 35Leave
- Page 44 and 45: Module installation 39Installing th
- Page 46 and 47: Module installation 41Installing th
- Page 48 and 49: Module installation 43The procedure
- Page 50 and 51: IModule installation 45The procedur
- Page 52 and 53: Module installation 47Continue with
- Page 54 and 55: Connecting internal wiringWiring 49
- Page 56 and 57: 5. Connect external lines to a stan
- Page 58 and 59: Emergency telephones 53Emergency te
- Page 60 and 61: telephonestelephones 55WARNINGtelep
- Page 62 and 63: telephones 57Removing thewail-mount
- Page 64 and 65: default button assignmentstelephone
- Page 66 and 67: telephones 61TelephoneThe default b
- Page 68 and 69: OptionalOptional equipment 63Auxili
- Page 70 and 71: Installing an external paging syste
- Page 72 and 73: Power up thePower up the system 67s
- Page 74 and 75: Telephone replacementTelephone relo
- Page 76 and 77: Radio FrequencyThis equipmentuses,
- Page 78 and 79: Regulations 73Telephone Company Reg
- Page 80 and 81: Service tone cadencesToneCadence (s
- Page 82 and 83: Mechanical requirementsVibration op
- Page 84 and 85: Port numberingPort numbering 79Port
- Page 86 and 87: and B2 Directory Numbers (DN)Port n
- Page 88 and 89: KSU external lines and auxiliary eq
- Page 90 and 91: Station Module wiring chart 85Stati
- Page 92 and 93:
E&M orwiring chartor Trunk Cartridg
- Page 94 and 95:
E&M or Trunk Cartridge wiring chart
- Page 96 and 97:
DID Trunk Cartridge wiring chart 91
- Page 98 and 99:
DID Trunk Cartridge wiring chart 93
- Page 100 and 101:
After the hardware has been install
- Page 102 and 103:
Startup defaultsStartup defaults 97
- Page 104 and 105:
Line AccessParameterLine assignment
- Page 106 and 107:
MiscellaneousStartup defaults 101Pa
- Page 108 and 109:
CapabilitiesDialing filtersStartup
- Page 110 and 111:
Startup defaults 105Line abilities
- Page 112 and 113:
Call ServicesParameterAuto Call inf
- Page 114 and 115:
Configuration overview 109Vogrammin
- Page 116 and 117:
,Entering Configuration1. Release a
- Page 118 and 119:
Configuration overview 113Moving th
- Page 120 and 121:
Thedisplay buttonsConfiguration ove
- Page 122 and 123:
DataData 1173. Call HandlingTrunk l
- Page 124 and 125:
Data 119Incoming calls on auto-answ
- Page 126 and 127:
Data 121Note:The digits provided by
- Page 128 and 129:
Data 123Auto-answer withoutWhen a c
- Page 130 and 131:
Data 125Trunk Data settings apply t
- Page 132 and 133:
Data 127modeTrunk mode lets you spe
- Page 134 and 135:
Data 129Use the display button to s
- Page 136 and 137:
Data 131Line dataLine data programm
- Page 138 and 139:
Data 133Prime TelephoneThis feature
- Page 140 and 141:
Line Access 135Programming hintsThe
- Page 142 and 143:
Line Access 137Line Pool accessThis
- Page 144 and 145:
Call Handling 139Call HandlingCall
- Page 146 and 147:
Call Handling 141Programming hintsT
- Page 148 and 149:
MiscellaneousMiscellaneous 143Misce
- Page 150 and 151:
_ 0:beremote user is on thechange t
- Page 152 and 153:
Miscellaneous 147Link TimeLink Time
- Page 154 and 155:
Miscellaneous 149Programming hintsT
- Page 156 and 157:
System DataSystem Data 151System Da
- Page 158 and 159:
System Data 153Programming hintsA n
- Page 160 and 161:
Set copySet Copy 155Set copy allows
- Page 162 and 163:
Applying Set copy1.2.3.4.5.6.7.8.Ac
- Page 164 and 165:
A Maintenance session is a software
- Page 166 and 167:
System VersionSystem Version 161Sys
- Page 168 and 169:
StatusStatus 163lStatus allows you
- Page 170 and 171:
Status 165device identification dis
- Page 172 and 173:
Status 167How the device state is s
- Page 174 and 175:
Enabling the deviceWhen the display
- Page 176 and 177:
ExaminingStatusLooking at the modul
- Page 178 and 179:
Module Status 173How the module or
- Page 180 and 181:
Enablingmodule or its cartridgesMod
- Page 182 and 183:
Diagnostics 177Running DiagnosticsS
- Page 184 and 185:
Connectivity test resultsResultcode
- Page 186 and 187:
System Test Log 181Checking the cur
- Page 188 and 189:
System Administration Log 183System
- Page 190 and 191:
Alarm codesAlarm codes 185The KSU g
- Page 192 and 193:
Alarm codes 187Causes of alarm code
- Page 194 and 195:
Alarm codes 1891. Check that the pr
- Page 196 and 197:
Event messages 191Event message The
- Page 198 and 199:
Event messages 193Complete list of
- Page 200 and 201:
Maintenance recordsMaintenance reco
- Page 202 and 203:
Maintenance records 197System Test
- Page 204 and 205:
These troubleshooting procedures al
- Page 206 and 207:
General troubleshooting procedure1.
- Page 208 and 209:
Installation check 203Test the opti
- Page 210 and 211:
IExpansion Cartridgeinstallation ch
- Page 212 and 213:
Problems with equipmentProblems wit
- Page 214 and 215:
Problems with equipment 209Trunk Ca
- Page 216 and 217:
Problems with equipment 211Symptoms
- Page 218 and 219:
Problems with linesProblems with li
- Page 220 and 221:
Problems with lines 215Hung lines a
- Page 222 and 223:
selectedshowsProblems with lines 21
- Page 224 and 225:
Problems with featuresProblems with
- Page 226 and 227:
Problems with features 221Music on
- Page 228 and 229:
Network telephone trouble for remot
- Page 230 and 231:
Network telephone trouble for remot
- Page 232 and 233:
Network telephone trouble for remot
- Page 234 and 235:
UsingNetwork telephone trouble for
- Page 236 and 237:
Network telephone trouble for remot
- Page 238 and 239:
Network telephone trouble for remot
- Page 240 and 241:
Problems with optional equipment 23
- Page 242 and 243:
Problems with optional equipment 23
- Page 244 and 245:
AAccess code: A sequence ofcharacte
- Page 246 and 247:
Glossary 241BBackground Music: A fe
- Page 248 and 249:
Glossary 243Cam -On:A feature which
- Page 250 and 251:
Glossary 245This feature allows you
- Page 252 and 253:
GlossaryExternal call: A call to ad
- Page 254 and 255:
Glossary 249Host System Signaling:
- Page 256 and 257:
Glossary 251Lon Tones:A feature tha
- Page 258 and 259:
Glossary 253Park timeout: The time
- Page 260 and 261:
Glossary 255Receiver The handset of
- Page 262 and 263:
Glossary 257Set Copy: A programming
- Page 264 and 265:
Glossary 259Trunk Answer:A feature
- Page 266 and 267:
AAccess codeLine pool 149Startup 95
- Page 268 and 269:
Index 263Park timeout 141Transfer C
- Page 270 and 271:
programming music 142Host delay 148
- Page 272 and 273:
Index 267Public 18Security 2, 10uni
- Page 274 and 275:
Index 269getting wrong tone 226misd
- Page 276 and 277:
Index 271Paging 237163Station Modul
- Page 278 and 279:
Welcome to 1System Coordinators rol
- Page 280 and 281:
Contents iiiCall Log 93Related feat
- Page 282 and 283:
In addition to basic telephone serv
- Page 284 and 285:
Call Display servicesCall Display s
- Page 286 and 287:
Call Display services 5Call Display
- Page 288 and 289:
Call Display services 7We strongly
- Page 290 and 291:
Call Display services 9Recommended
- Page 292 and 293:
Call Display services 11Set program
- Page 294 and 295:
The system comes programmed with de
- Page 296 and 297:
Programming toolsAProgramming 15tel
- Page 298 and 299:
Administration programming has nine
- Page 300 and 301:
Administration overview 19Moving th
- Page 302 and 303:
Thedisplay buttonsAdministration ov
- Page 304 and 305:
Administration overview 23Entering
- Page 306 and 307:
System Speed Dial 25System Speed Di
- Page 308 and 309:
System Speed Dial 27System Speed Di
- Page 310 and 311:
Telephone NamesNames 29Personalize
- Page 312 and 313:
Time and dateTime and date 31Time a
- Page 314 and 315:
Setting the dateBegin with the disp
- Page 316 and 317:
CapabilitiesCapabilities 35Capabili
- Page 318 and 319:
Programming hintscan have up to 100
- Page 320 and 321:
Capabilities 39Remote access packag
- Page 322 and 323:
Capabilities 41Use the button, the
- Page 324 and 325:
Capabilities 43Automatic HandsfreeA
- Page 326 and 327:
Capabilities 45Programming hintsCal
- Page 328 and 329:
Capabilities 47Priority CallThis fe
- Page 330 and 331:
Capabilities 49The ability to chang
- Page 332 and 333:
Service ModesService Modes 51Using
- Page 334 and 335:
Service Modes 53Manual allows you t
- Page 336 and 337:
PasswordPassword 55The Administrati
- Page 338 and 339:
Log Defaults 57There are 600 Call L
- Page 340 and 341:
Call Services 59Telephone (Set) Ser
- Page 342 and 343:
Copying settingsCopying settings 61
- Page 344 and 345:
Set Profile and Line Profile 63Prog
- Page 346 and 347:
Using Set ProfileBegin with 221: 22
- Page 348 and 349:
Programming remindersProgramming re
- Page 350 and 351:
PrimePrime Telephone operatorintern
- Page 352 and 353:
Call Pickup GroupsPickup Group Name
- Page 354 and 355:
Answer a callAnswering the telephon
- Page 356 and 357:
Using features 75All displays liste
- Page 358 and 359:
Answering the telephoneAnswering th
- Page 360 and 361:
What line indicators meanon and off
- Page 362 and 363:
Answering the telephone 81waitingca
- Page 364 and 365:
L itransferIcall backtoAnswering th
- Page 366 and 367:
85You can program memory buttons fo
- Page 368 and 369:
87numbers must be programmed onto m
- Page 370 and 371:
Call Forward 89LineNote the differe
- Page 372 and 373:
Call InformationCall Information 91
- Page 374 and 375:
Call LogCall Log 93llCall Log creat
- Page 376 and 377:
Call Log 95To manually log an exter
- Page 378 and 379:
4. Lift the receiver. This is not n
- Page 380 and 381:
NEXTMOREO NCall Log 99The “slash
- Page 382 and 383:
Call Log 1011: Unknown number The c
- Page 384 and 385:
Call Park 103You have tried to park
- Page 386 and 387:
Call Pickup 105Your telephone is no
- Page 388 and 389:
Call QueuingCall Queuing 107When yo
- Page 390 and 391:
Camp On 109221/Line001 hung UPcallR
- Page 392 and 393:
Conference 111Independently hold tw
- Page 394 and 395:
Conference 113/Make call firstYou h
- Page 396 and 397:
COS PasswordCOS Password 115Change
- Page 398 and 399:
Dialing ModesYou can set the dialin
- Page 400 and 401:
Customizing your telephone 119You c
- Page 402 and 403:
Customizing your telephone 121This
- Page 404 and 405:
DialingDialing 123One of the most i
- Page 406 and 407:
Dialing’/ 125DisplaysYou will see
- Page 408 and 409:
Dialing 127in serviceRestricted cal
- Page 410 and 411:
FeatureProgramming.Feature Programm
- Page 412 and 413:
Feature Programming 131and HOLDPres
- Page 414 and 415:
Handsfree/Mute 133Make calls withou
- Page 416 and 417:
Hold 135Hold 1Put a call on holdYou
- Page 418 and 419:
Host System SignalingHost System Si
- Page 420 and 421:
Host System Signaling 139DisplaysYo
- Page 422 and 423:
Line Pools 141NotesYou do not usual
- Page 424 and 425:
Line Redirection 143deniedinIn use:
- Page 426 and 427:
Line Redirection 145Displays while
- Page 428 and 429:
Long TonesLong Tones 147Use long to
- Page 430 and 431:
2. Press SHOW to display your first
- Page 432 and 433:
Messages 151Dial the internal numbe
- Page 434 and 435:
Messages 153You can receive up to f
- Page 436 and 437:
Telephones 155More than one secreta
- Page 438 and 439:
You may see this prompt when you tr
- Page 440 and 441:
Page 159zone:Enter the desired zone
- Page 442 and 443:
NotesPriority Call 161You can make
- Page 444 and 445:
Service Modes 163NotesA service mod
- Page 446 and 447:
Special Telephones 165The CAP modul
- Page 448 and 449:
Special Telephones 167To bypass a H
- Page 450 and 451:
Speed Dial 169DisplaysYou will see
- Page 452 and 453:
Speed Dial 171Normally, Speed Dial
- Page 454 and 455:
Cancel Background MusicYou can canc
- Page 456 and 457:
System features 175You can clear a
- Page 458 and 459:
Time featuresTime features 177The T
- Page 460 and 461:
Transfer 179Transfer using HoldTran
- Page 462 and 463:
Transfer 181Your transfer cannot be
- Page 464 and 465:
Using remotely 183Over a private ne
- Page 466 and 467:
Controlling access to yourUsing rem
- Page 468 and 469:
Voice CallVoice Call 187Make a voic
- Page 470 and 471:
Modular DR5 Telephone Feature Card
- Page 472 and 473:
Modular DR5 Telephone Feature Card
- Page 474 and 475:
Modular DR5 Telephone Feature Card
- Page 476 and 477:
Modular Telephone Feature Card 195C
- Page 478 and 479:
Prime Telephone User Card 197When d
- Page 480 and 481:
Prime Telephone User Card 199YourTr
- Page 482 and 483:
Prime Telephone User Card 201inform
- Page 484 and 485:
User Card 203Release buttoncancels
- Page 486 and 487:
User Card 205About thememory button
- Page 488 and 489:
M7208 User Card 207About line butto
- Page 490 and 491:
Shift button.for using the top func
- Page 492 and 493:
User Card 211About memorybuttonsThe
- Page 494 and 495:
M7324 User Card 213About line butto
- Page 496 and 497:
AAccess code: A sequence ofcharacte
- Page 498 and 499:
Glossary 217BBackground Music: A fe
- Page 500 and 501:
Glossary 219Capabilities: A section
- Page 502 and 503:
Glossary 221Direct-dial: A feature
- Page 504 and 505:
GlossaryFFeature button: A button t
- Page 506 and 507:
Glossary 225KKey Service Unit (KSU)
- Page 508 and 509:
GlossaryNNames: A feature that allo
- Page 510 and 511:
Glossary 229Programming: A series o
- Page 512 and 513:
Glossary 231Set Copy: A heading isC
- Page 514 and 515:
Glossary 233Transfer Callback: A fe
- Page 516 and 517:
AAccess CodeExternal line 123denied
- Page 518 and 519:
Index 237Feature description 110on
- Page 520 and 521:
Index 239Line AbilitiesLine Filter
- Page 522 and 523:
Priority deniedPriority call 160Pri
- Page 524 and 525:
index 243Tonesat Remote Access 184d
- Page 526 and 527:
ModularProgrammingRecordNote: This
- Page 529 and 530:
Line #Enter the number of the line
- Page 531 and 532:
Set #ModelEnter the of the set to b
- Page 533 and 534:
Held reminderIChoose if the Held Li
- Page 535 and 536:
. .To begin General Administration:
- Page 537 and 538:
Trunk answerNight-O set (default is
- Page 539:
The is a review of each of the main


