Malibu Power Wedge Diagnostic Manual - 2011 (PDF) - Bakes Online
Malibu Power Wedge Diagnostic Manual - 2011 (PDF) - Bakes Online
Malibu Power Wedge Diagnostic Manual - 2011 (PDF) - Bakes Online
- No tags were found...

Create successful ePaper yourself
Turn your PDF publications into a flip-book with our unique Google optimized e-Paper software.
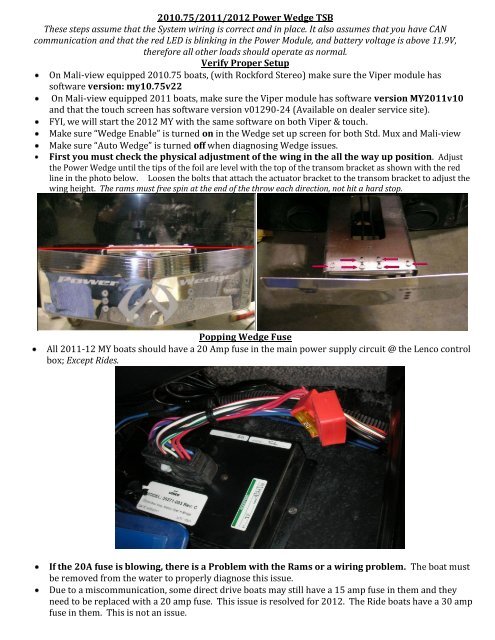
Red Blinking LEDPrimary power module-fuses in normal position.By-Passing the Touch Command SwitchesThe power modules have by-pass positions for all loads. These by-pass positions can be very helpful indiagnosing switch function issues. If the Lenco box is powered and working correctly, you can move the<strong>Wedge</strong> up & Down by moving the appropriate fuse to the by-pass position.Fuse in <strong>Wedge</strong>down By-PassPrimary <strong>Power</strong> Module-<strong>Wedge</strong> Down fuse in By-pass position.
Fuse in <strong>Wedge</strong> UpBy-pass positionPrimary <strong>Power</strong> Module-<strong>Wedge</strong> Up Fuse in By-pass position.Rams can Fail, Break & fill with WaterIf you have a system that’s popping fuses continually, you may have a ram that has taken on water. If you find aram squirting water out as you cycle the <strong>Wedge</strong> up & down, you have found the problem. Replace the waterlogged ram.Normal Operational ParametersPresets will not deploy the <strong>Wedge</strong> unless the engine is running.The <strong>Wedge</strong> can move to the down position with just the power on, yet the system must see between 1-9.9 MPHto allow the <strong>Wedge</strong> to move up.The <strong>Wedge</strong> will not come up past the normal operational zone unless the boat speed is below 10 MPH.The system will allow adjustment of the wake size shape in the normal operational zone between 1 & 22 MPH.An alarm will sound if the wedge is not in the all the way up position when above 25 MPH.Auto-<strong>Wedge</strong> OperationThe Auto <strong>Wedge</strong> is a great feature that will save gas and improve the low end performance when pulling up anadvanced rider who likes to ride with the <strong>Wedge</strong> in the Max up or advanced positions. The Auto <strong>Wedge</strong> can alsobe a bit intimidating if the operator is not clear on what to expect from the Auto <strong>Wedge</strong> feature.The Auto <strong>Wedge</strong> feature will operate in both the <strong>Manual</strong> operation of the <strong>Wedge</strong> and with the Pre-sets. The wayit operates is; once the system knows where you want to wedge positioned “at the target speed”, the system willdrop the <strong>Wedge</strong> all the way down for less resistance or drag once you’re below 75% of the target speed. Thisallows for better steering performance in a turn and places the <strong>Wedge</strong> in the least resistive position for the nextpull up.Example: If you set the cruise for a target speed 20 mph with the Auto <strong>Wedge</strong> feature On, then you drop the<strong>Wedge</strong> and position it at the Max wake position, the <strong>Wedge</strong> will stay in this position until the boat speedincreases above 2 MPH, at this point the Auto <strong>Wedge</strong> will put the <strong>Wedge</strong> all the way down “for less resistanceduring take off” and then as you hit 15 mph, the Auto <strong>Wedge</strong> will move the wedge back to your original Maxwake position. As you reduce speed below 15 mph, the <strong>Wedge</strong> will drop again.
<strong>Power</strong> <strong>Wedge</strong> Over-Current AlarmsOn the <strong>2011</strong>/2012 MY systems, we are using a control box from Lenco that is constantly monitoringthe Amperage draw from each Ram as well as insuring each ram is properly connected andoperational.There are 5 different alarm banners that can pop up to alert the operator of a problem between theLenco control box and the rams.1. 0.5V - Port Actuator – Max Current Draw Failure2. 1.0V - Stbd Actuator - Max Current Draw Failure3. 1.5V - Port Actuator - Average Current Failure (Tends to catch binding actuators or reverse polarity failure)4. 2.0V - Stbd Actuator – Average Current Failure – (Tends to catch binding actuator or reverse polarity failure)5. 2.5V - Unbalanced Current Failure (Tends to catch open or poor connections)These alarms can be triggered for several different reasons.1. Foil out of Adjustment.2. One ram longer then the other.3. One or both rams filled with water.4. One ram is faster than the other.5. Foil hinge bolts to tight.6. Ram attachment bolts to tight7. One ram pulling 4 times the amperage of the other.The system is designed to watch for problems with regards to the Amperage load being pulled by eachram. If one ram is pulling 4 times the current of the other, an Average current draw failure alarmbanner will be displayed. The system is trying to prevent a good ram from pulling itself apart due to aproblem with the other.The 0.5V-2.5V values next to the Actuator Alarms are the voltages sent to the Viper from the Lencocontrol box on the pink/white alarm circuit to signal the Viper to display a particular Alarm.New 5 Lobe Rams for 2012The motors in the rams have changed for the 2012 MY. The lobes on the motor use for tracking thelocation of the ram have changed from a 3 lobe motor to a 5 lobe motor. This was a change at themanufacture level; we had no choice but to make the switch.Due to the “tracking” lobe change on the ram motor, the Lenco control box had to change as well touse the new 5 lobe data.It’s very important that you use the correct 5 lobe control box with 5 lobe rams and that youuse the correct 3 lobe control box with the older 3 lobe rams.All 2012 Product will use 5 lobe Rams and 5 lobe control boxes.How to tell the difference between 3 lobe and 5 lobe components3-lobe rams-part# 20791-001 and 20791-0013. These rams have a number etched into the body of theram. The first number on a 3 lobe ram will be a 1, 2, 3 or 4.5-lobe rams-part# 20791-0015. The first number on a 5 lobe ram will be a 5, 6, 7, or 8.The 5 lobe control box will say “5 lobe” on the tag. Part numbers #30271-0015, -0025 and -0035.3 lobe control boxes are still available for warranty and non-warranty replacements. The 3 lobe partnumbers are #30271-001, -002 and -003.If 3 lobe and 5 lobe components are used on the same system, the gauge will never work right.